
Most of the work below is the result of using my lathe and my small 3-axis NC (Numerically controlled) routing machine. The NC code was solely developed with our own software tools. I use the IRIT solid modeling environment to create the G-code (the NC tool path) and NCSim to simulate and verify the code before I actually cut. You can also watch a You Tube movie showing the CNC process of many of the models below.
An Oval Table
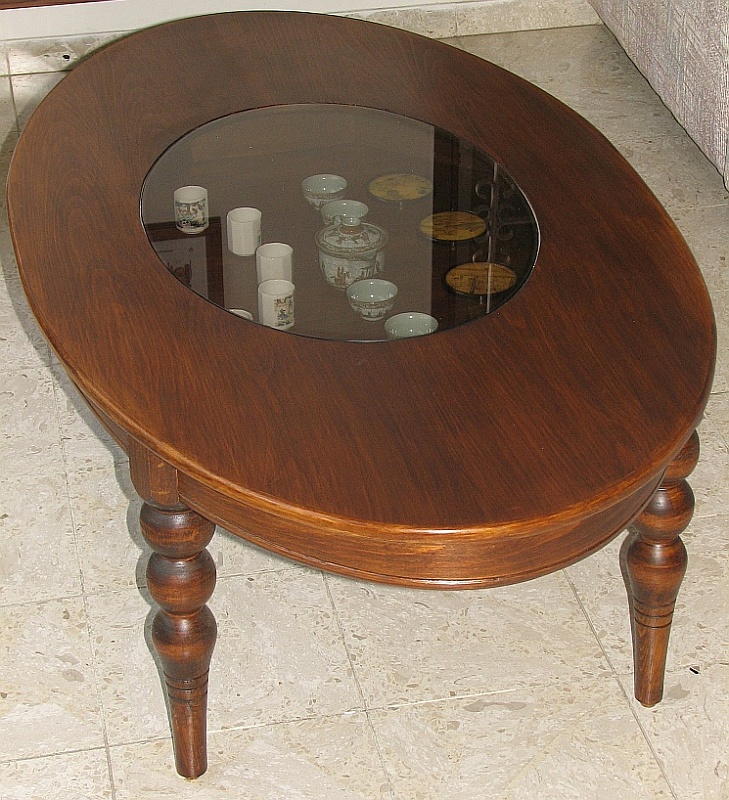
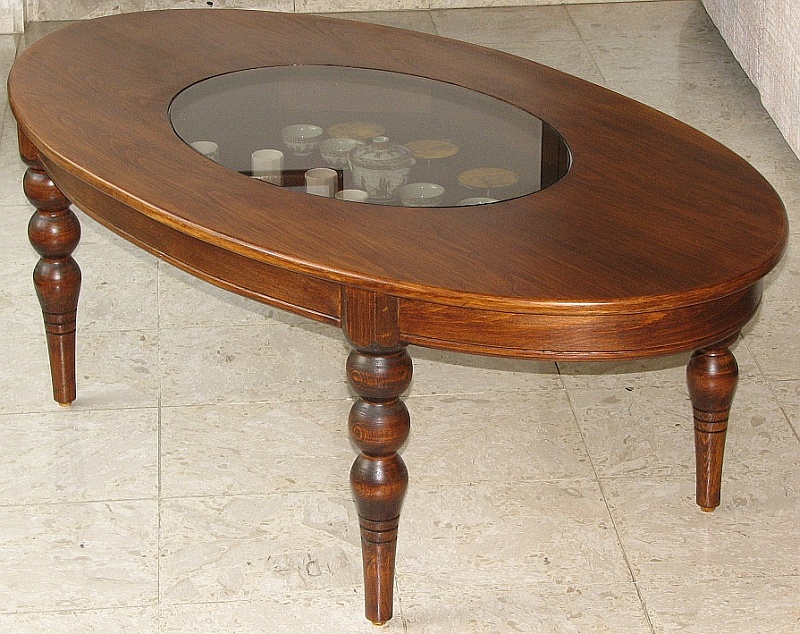 One can only guess how these legs were made.
A Wall Clock
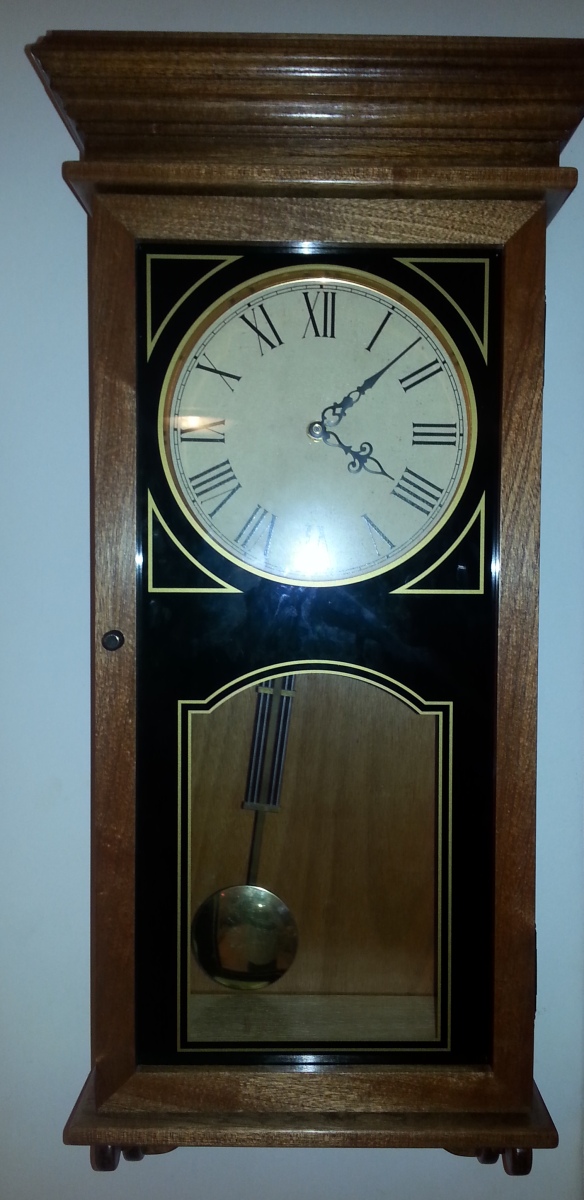

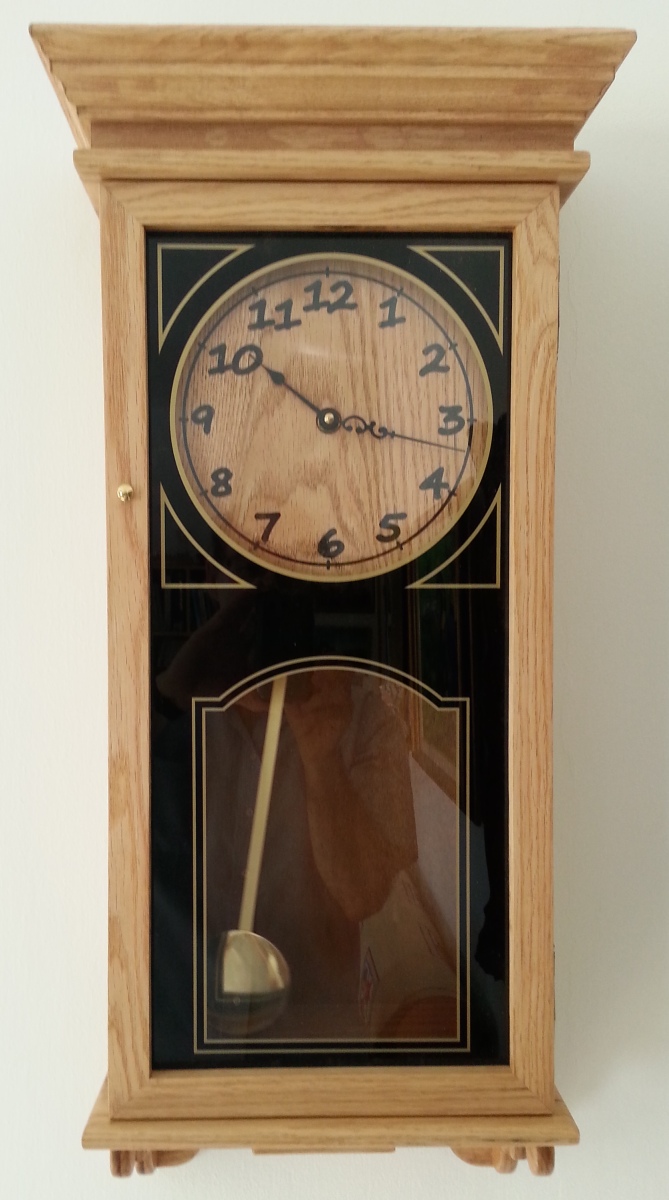 A wall clock, from Mahogany (left) and Oak (right).
A Wooden Wheels Clock
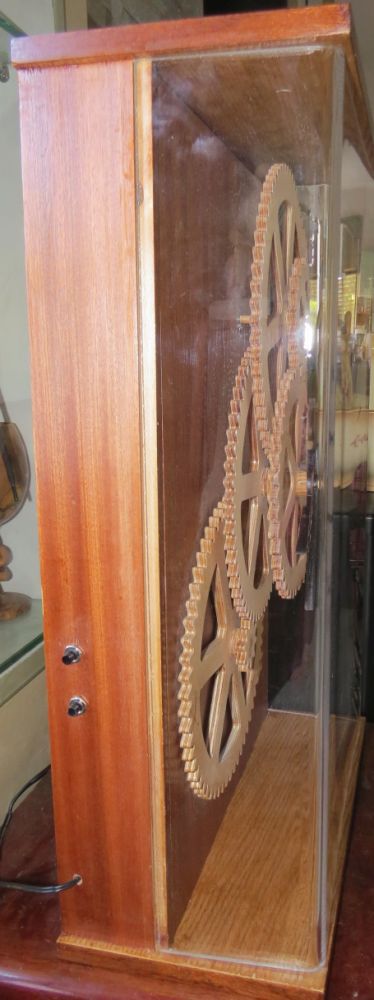
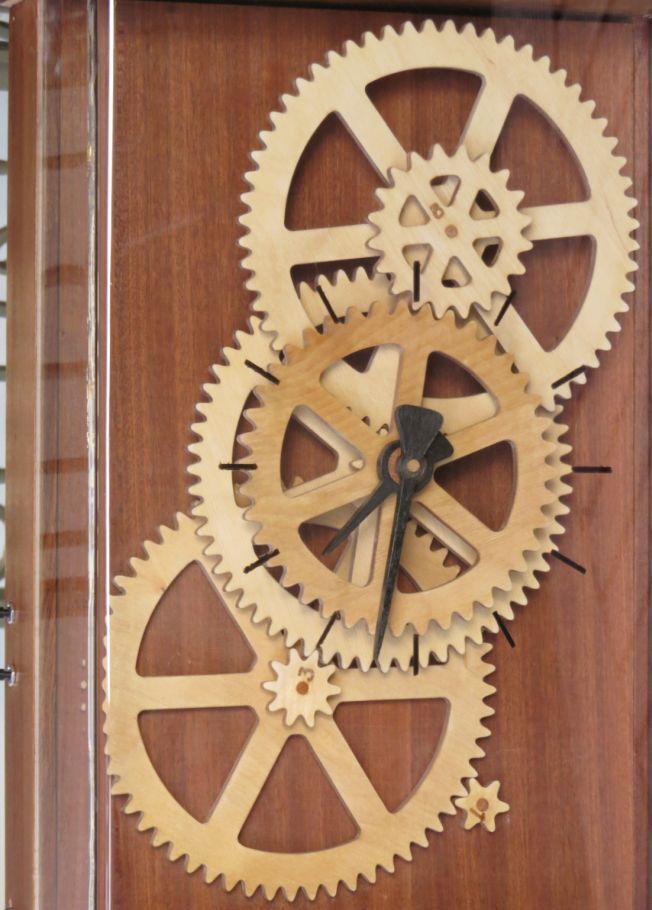
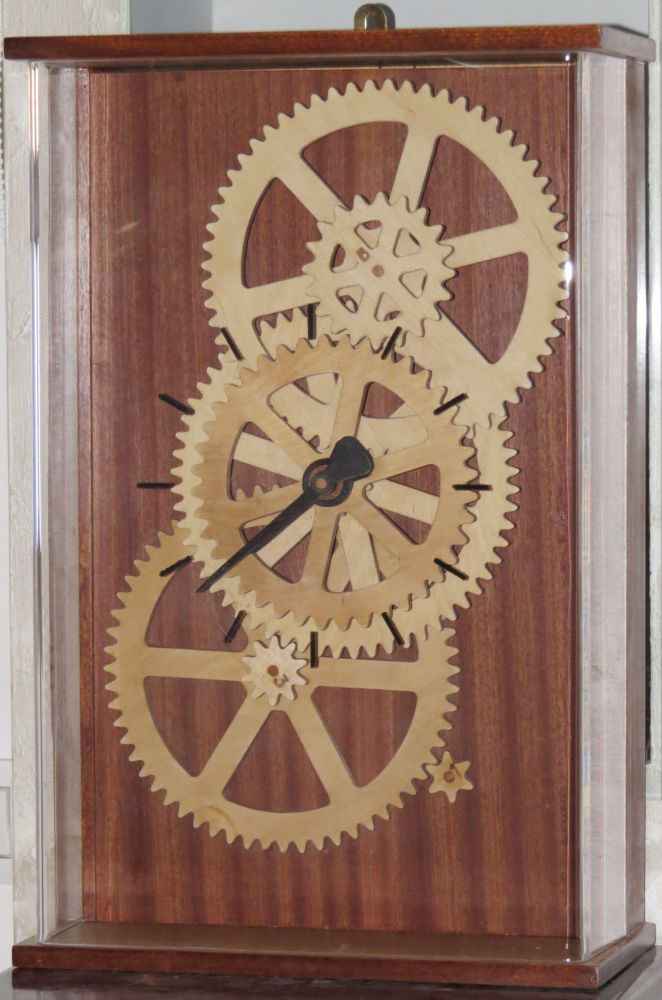
 A clock made from wooden wheels (using CNC). The clock is
operated via wheel number 1 (small wheel on the bottom right)
via a step motor controlled by the Arduino controller. The
code to operate the controller is available here while the
CNC code to cut the wheels (from ~6 mm thick birch plywood, in
mm, using 1.5mm diameter tool) is available
here.
A clock made from wooden wheels (using CNC). The clock is
operated via wheel number 1 (small wheel on the bottom right)
via a step motor controlled by the Arduino controller. The
code to operate the controller is available here while the
CNC code to cut the wheels (from ~6 mm thick birch plywood, in
mm, using 1.5mm diameter tool) is available
here.
A Rocking Horse

 The original plans for this Rocking Horse are from YouTube.
This is my version (I made two of them as can be seen here- can you
find the difference?). Full size plans on multiple
A4 pages are available here in this
pdf file .
The original plans for this Rocking Horse are from YouTube.
This is my version (I made two of them as can be seen here- can you
find the difference?). Full size plans on multiple
A4 pages are available here in this
pdf file .
A Desk Clock
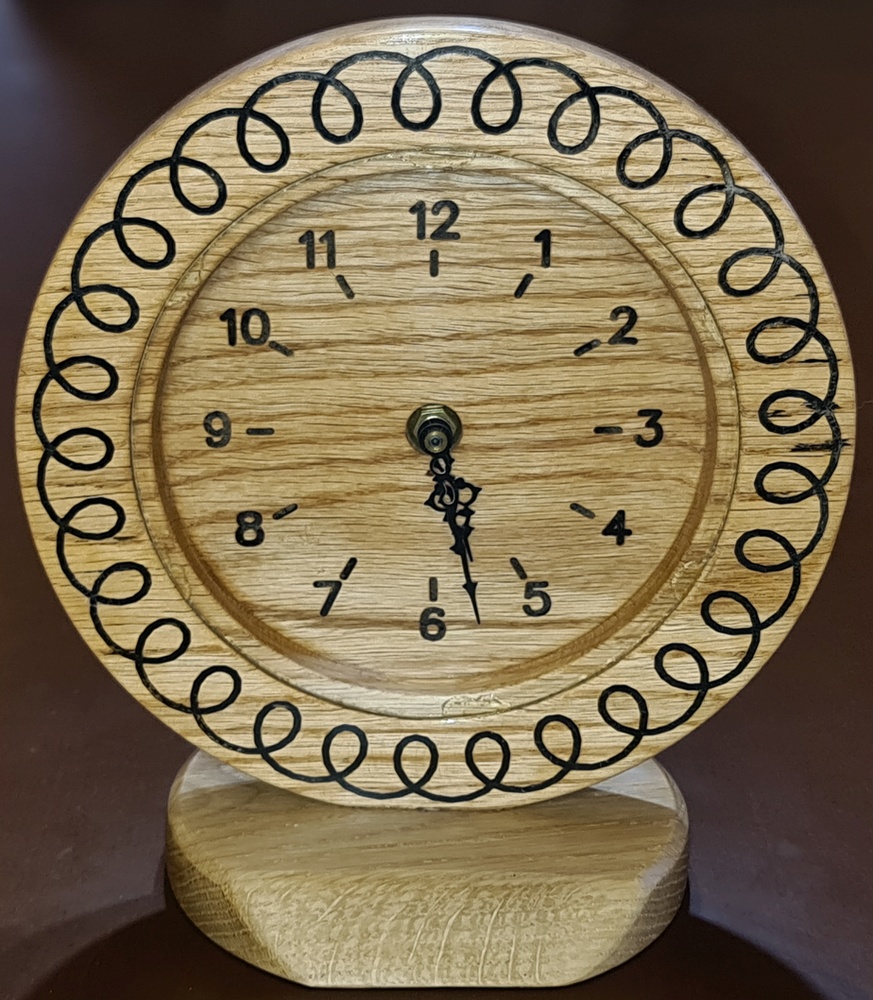
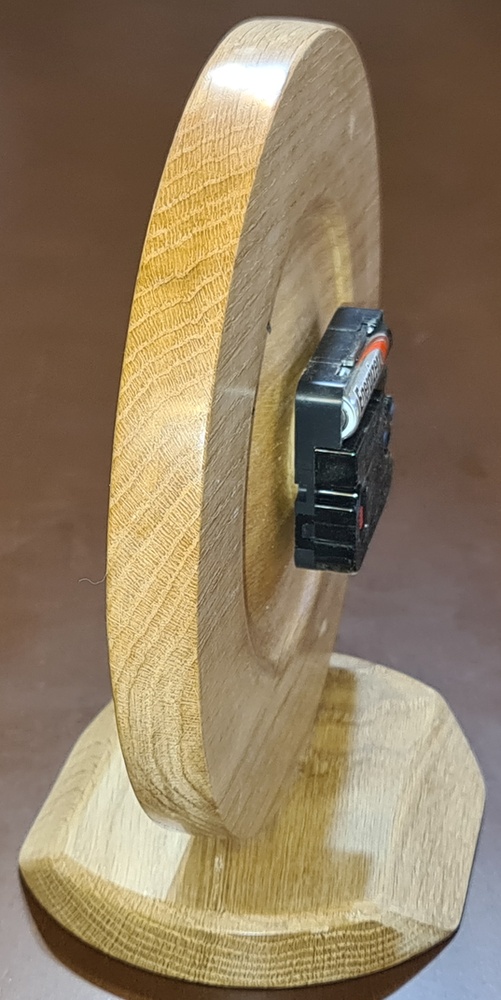
 A desk clock, from Oak. The black digits and the modulated sine wave
around it were carved using CNC and filled with black Ebody sawdust.
On the back side, the electronic mechanism of the clock is seen.
A desk clock, from Oak. The black digits and the modulated sine wave
around it were carved using CNC and filled with black Ebody sawdust.
On the back side, the electronic mechanism of the clock is seen.
Round Epoxy Table

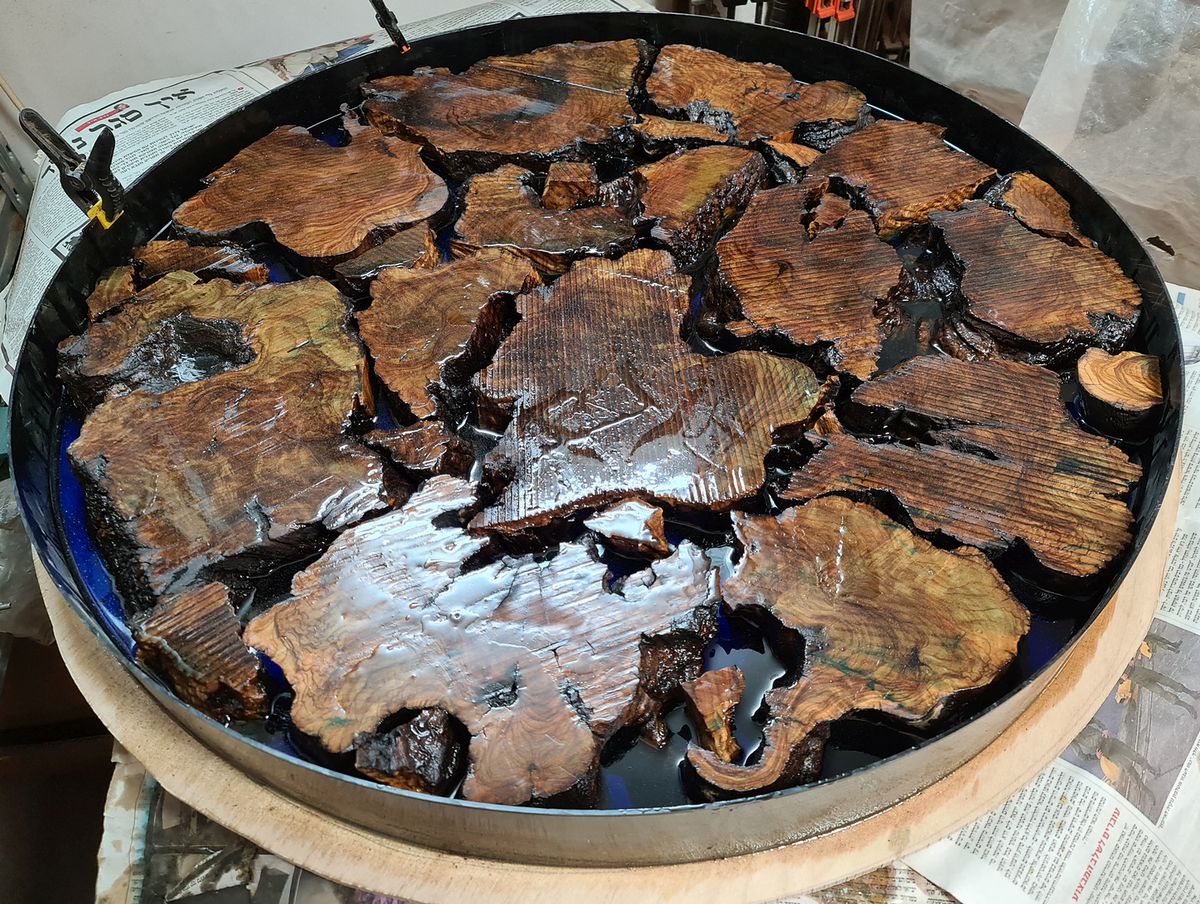
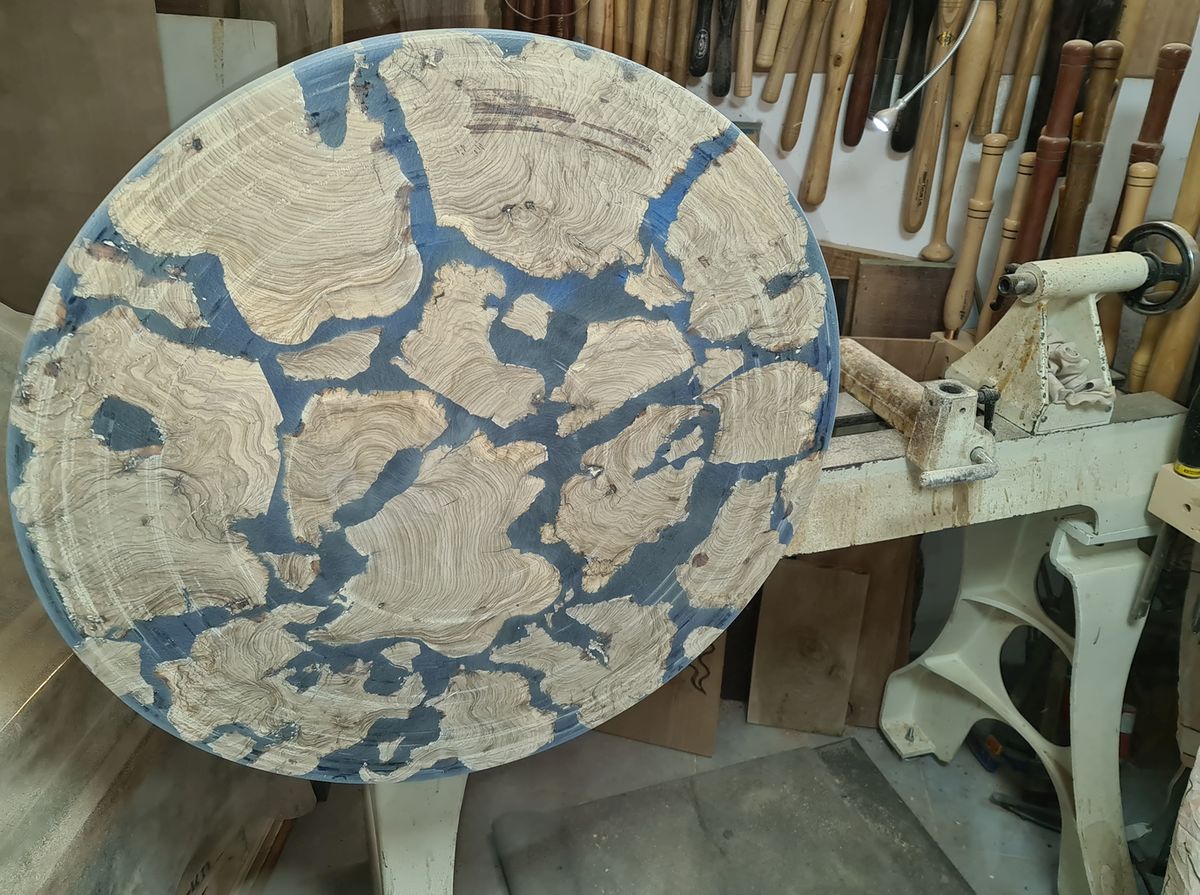 The steps of making this round epoxy table of over 70 cm in diameter.
Left show the layout of the pieces of the Olive tree (thanks to Koby
Golan for the wood), middle after pouring some epoxy, and on the
right, the finishing steps on my lather. Turned with the help of
Uri Benchetrit, on his larger lathe (not shown here).
The steps of making this round epoxy table of over 70 cm in diameter.
Left show the layout of the pieces of the Olive tree (thanks to Koby
Golan for the wood), middle after pouring some epoxy, and on the
right, the finishing steps on my lather. Turned with the help of
Uri Benchetrit, on his larger lathe (not shown here).
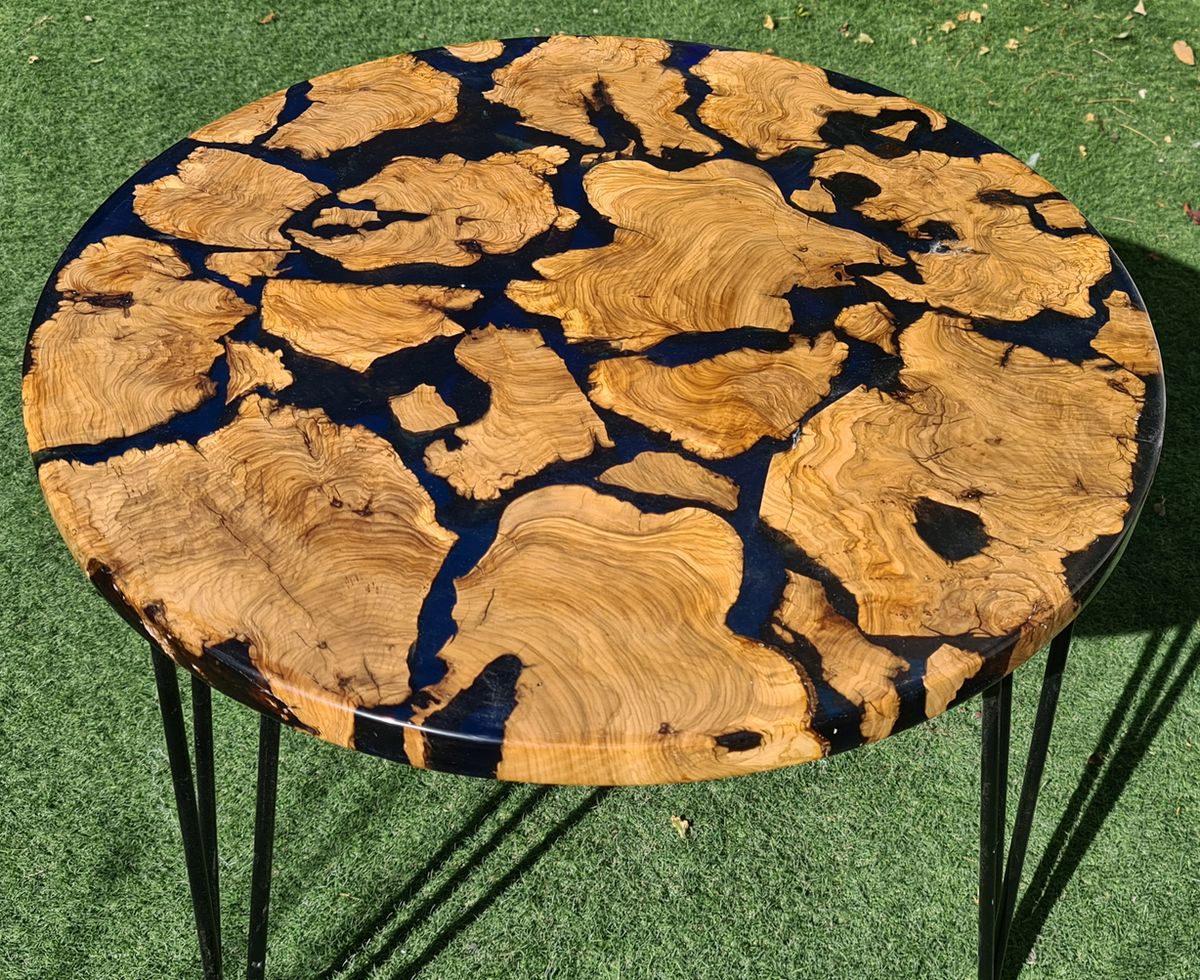
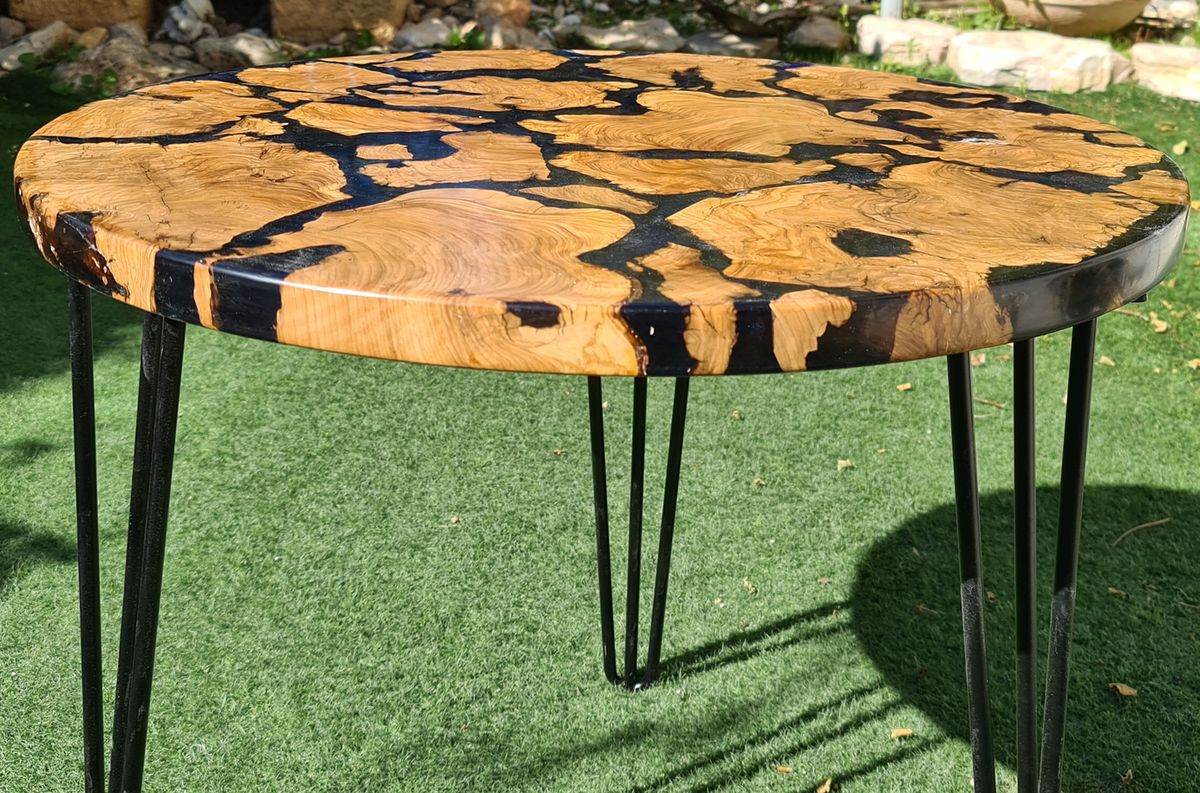
 Three Images of the final table. Made with partially translucent blue
epoxy.
Three Images of the final table. Made with partially translucent blue
epoxy.
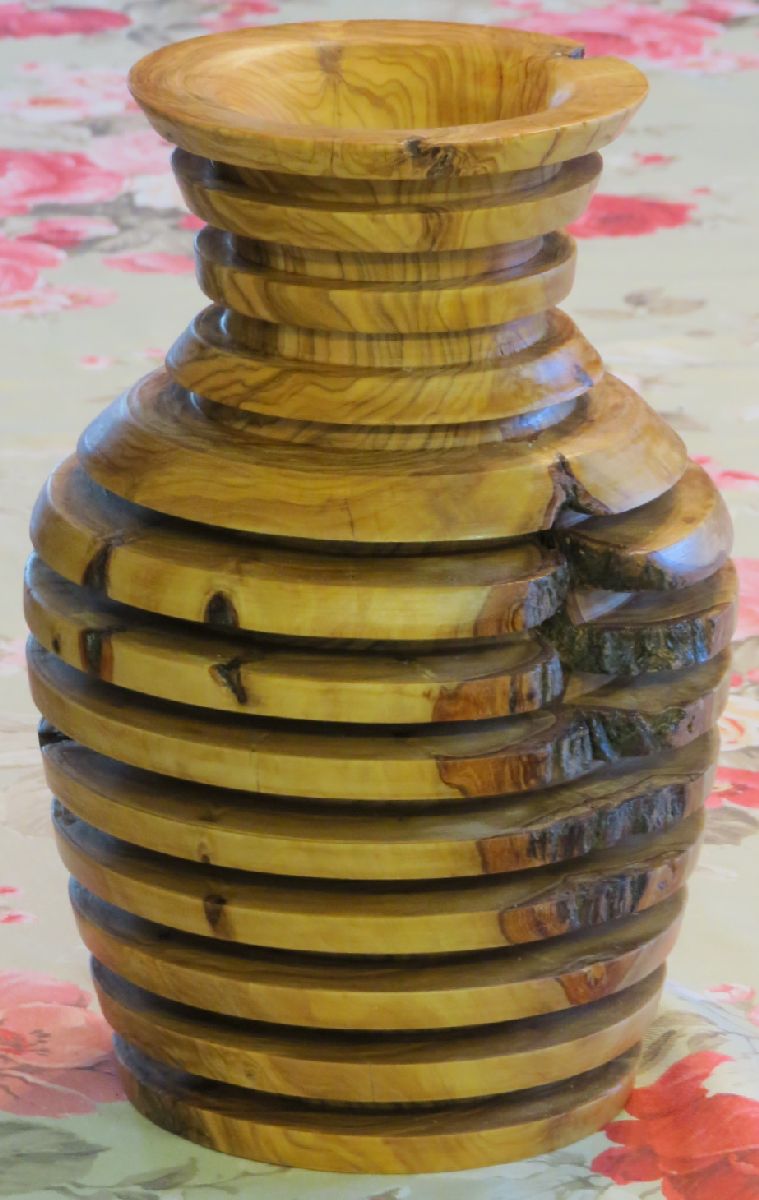
Spiral Shelves
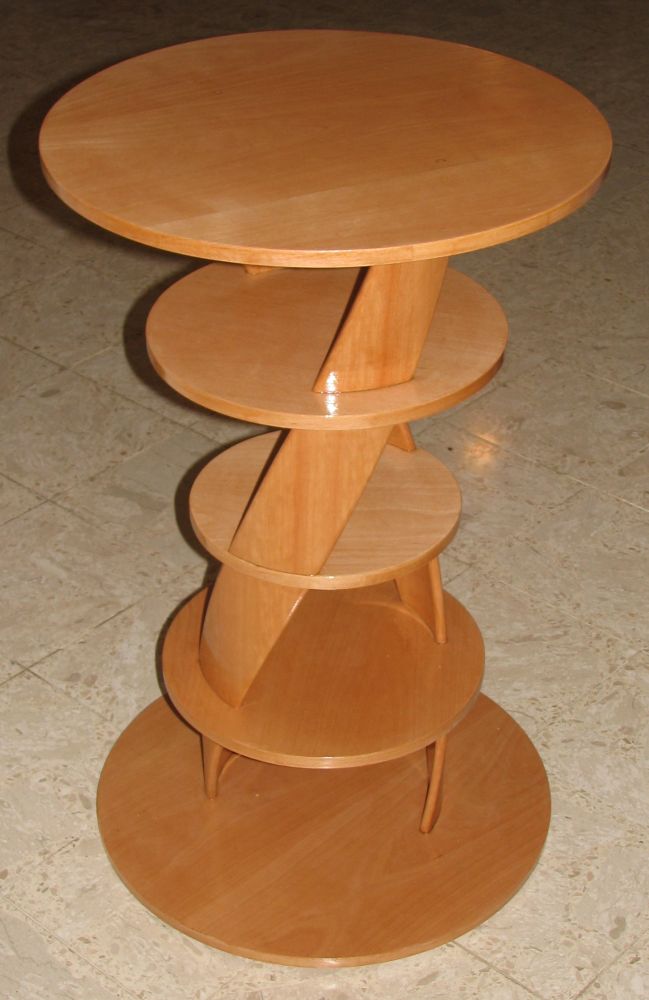
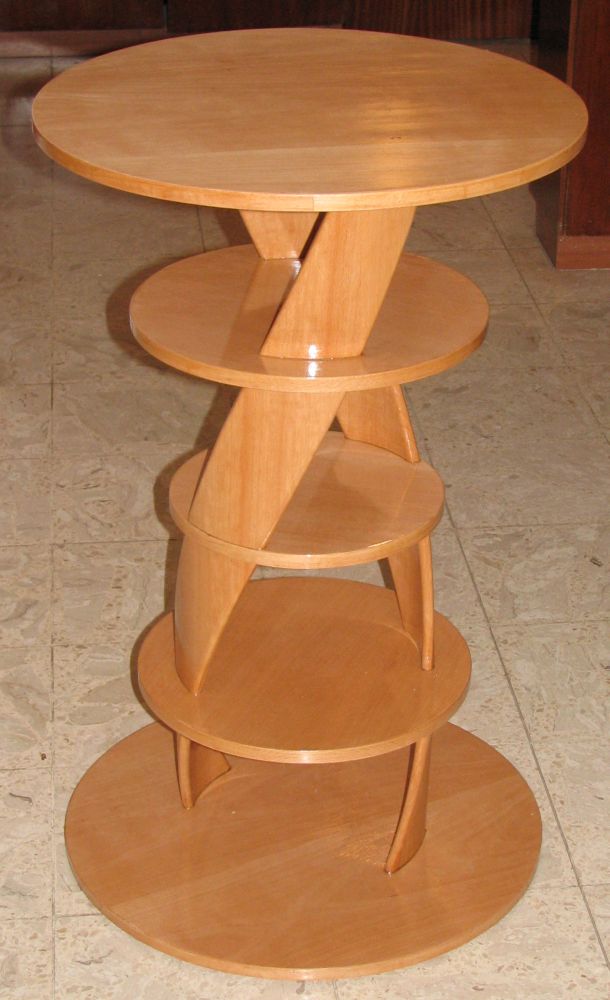
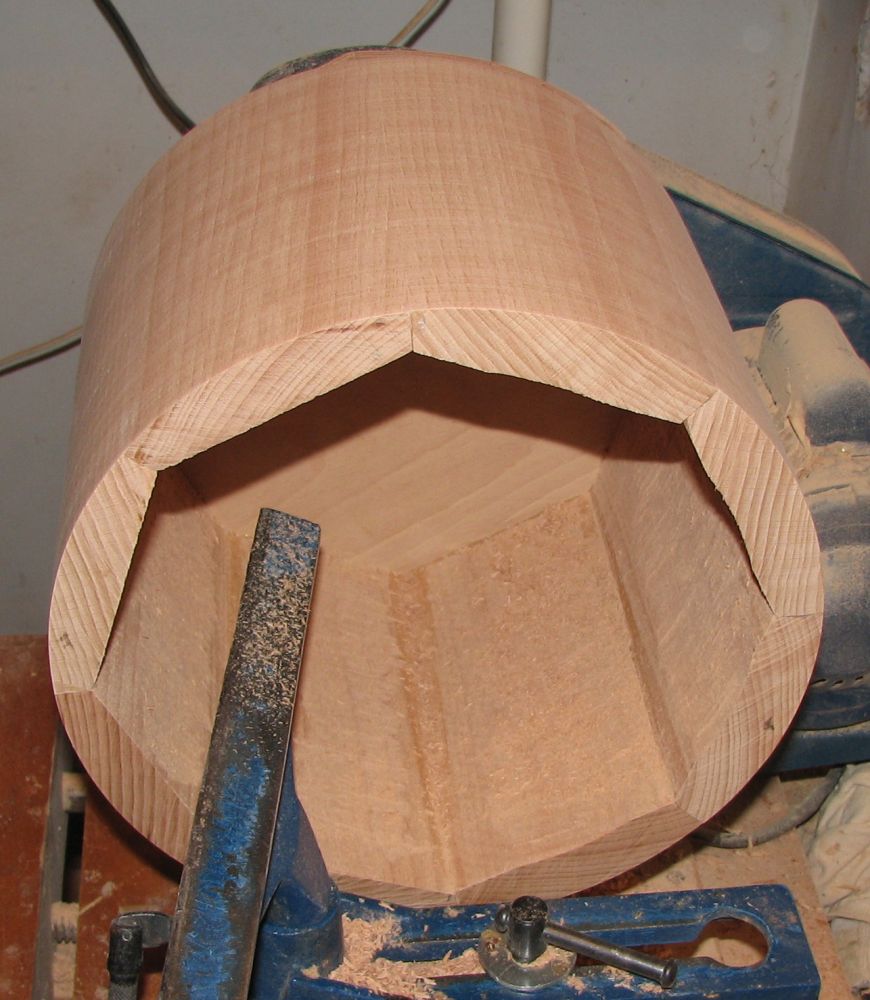
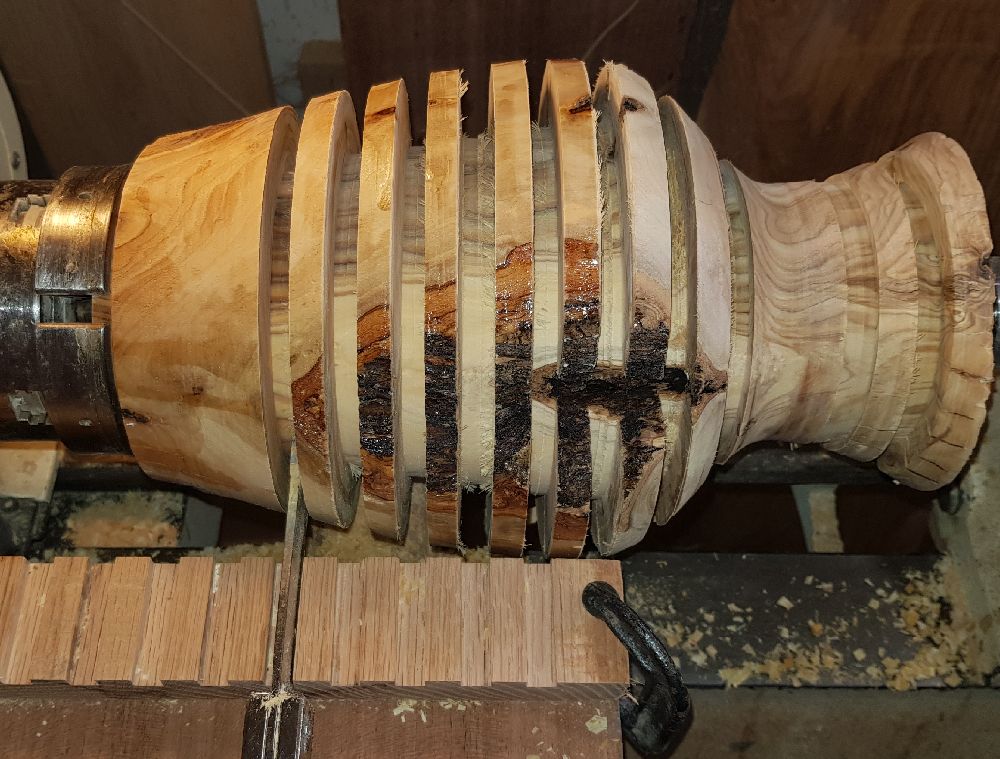
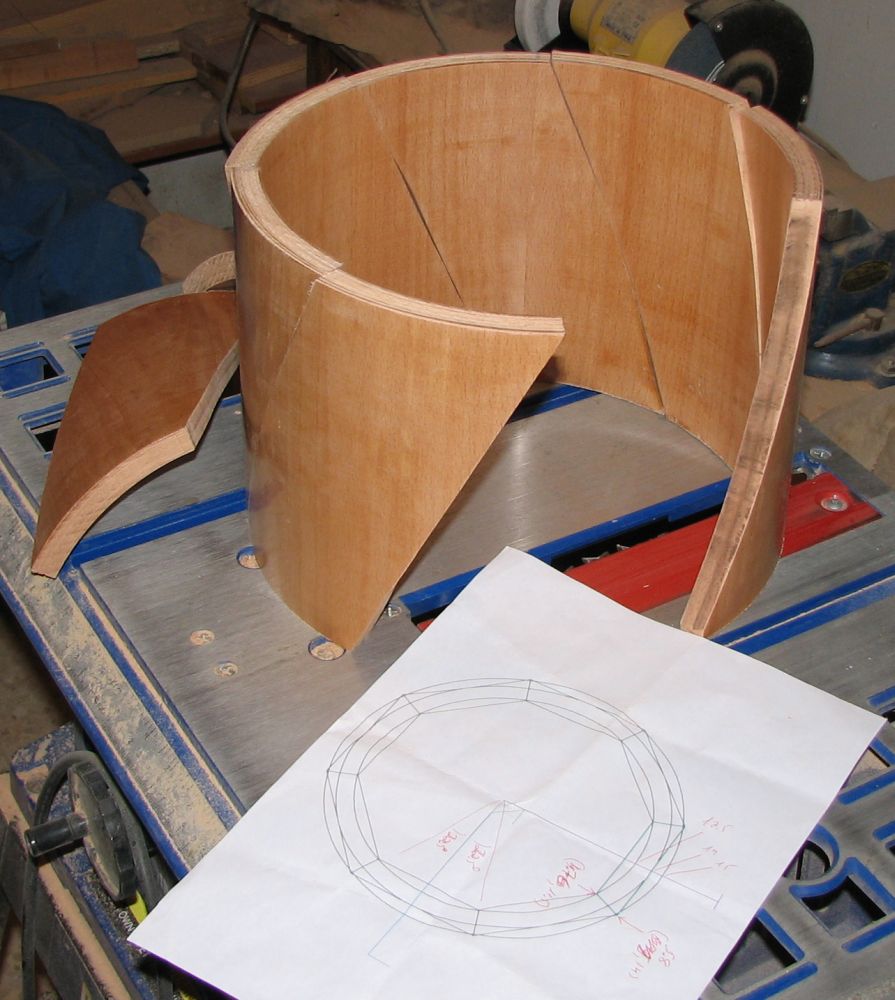 The spirals are mostly turning (of a cylinder) on a lathe. If you need
hints how the spirals were made on the lathe, consult the two pictures on
the right. This table is made from a Beech wood.
The spirals are mostly turning (of a cylinder) on a lathe. If you need
hints how the spirals were made on the lathe, consult the two pictures on
the right. This table is made from a Beech wood.
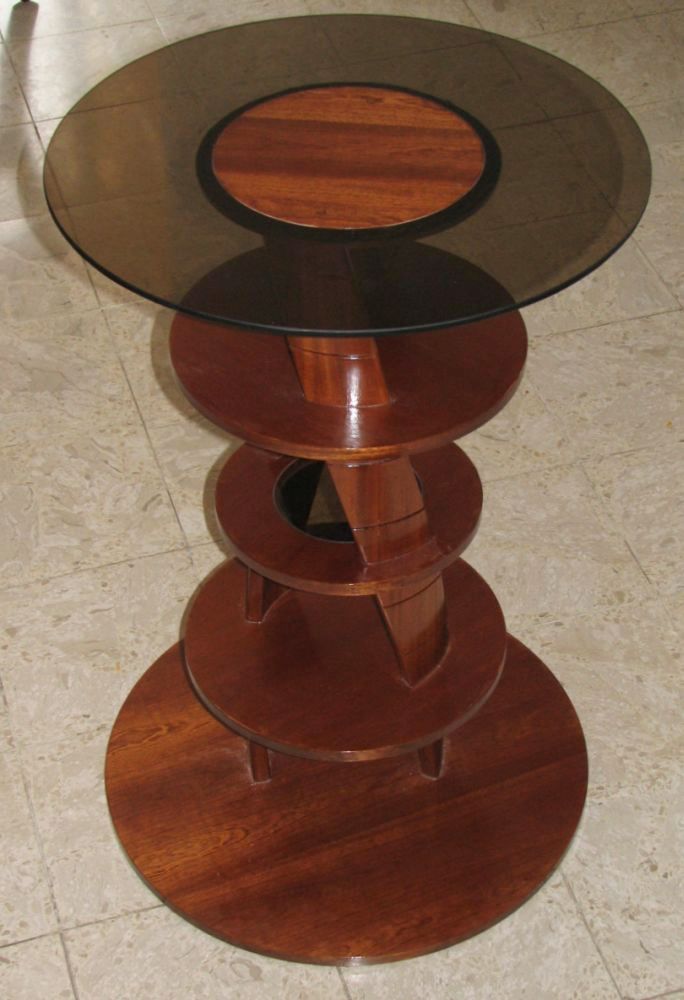
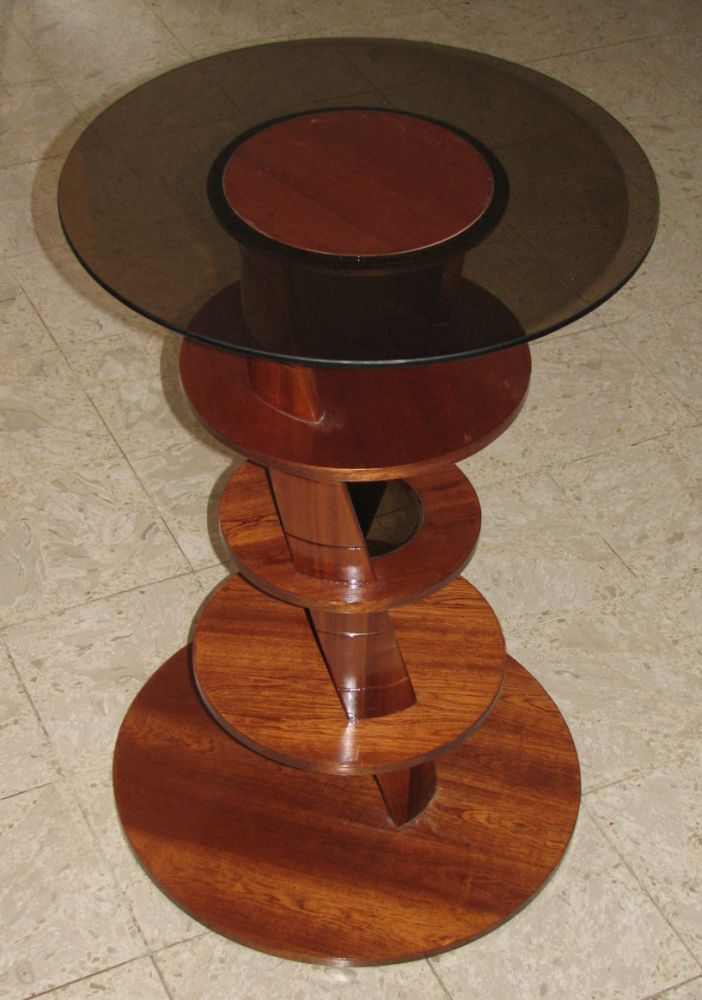 This second table was made from Mahogany and glass.
Floating Table
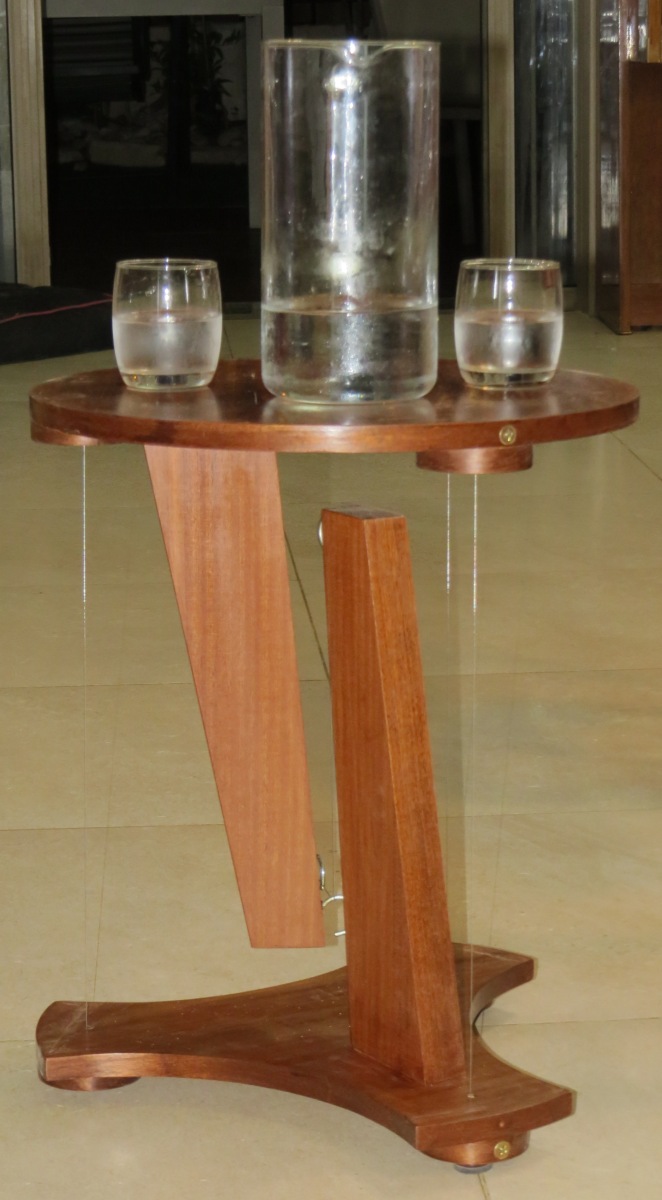
 This floating table was inspired by a similar table model created in
https://youtu.be/80uQSWkdevQ.
This floating table was inspired by a similar table model created in
https://youtu.be/80uQSWkdevQ.
Glass Flower

 Believing in combining other materials (glass and wood
here). I made this glass flower in some novice glass class
and, turned a wooden base for it (olive tree).
Believing in combining other materials (glass and wood
here). I made this glass flower in some novice glass class
and, turned a wooden base for it (olive tree).
3 Disks Stool


 This stool was created by turning the pieces and
glueing all together. The left shows how the diagonal joints
were turned in the legs. Be careful and turn the legs in low
speed.
This stool was created by turning the pieces and
glueing all together. The left shows how the diagonal joints
were turned in the legs. Be careful and turn the legs in low
speed.
Borromean Rings

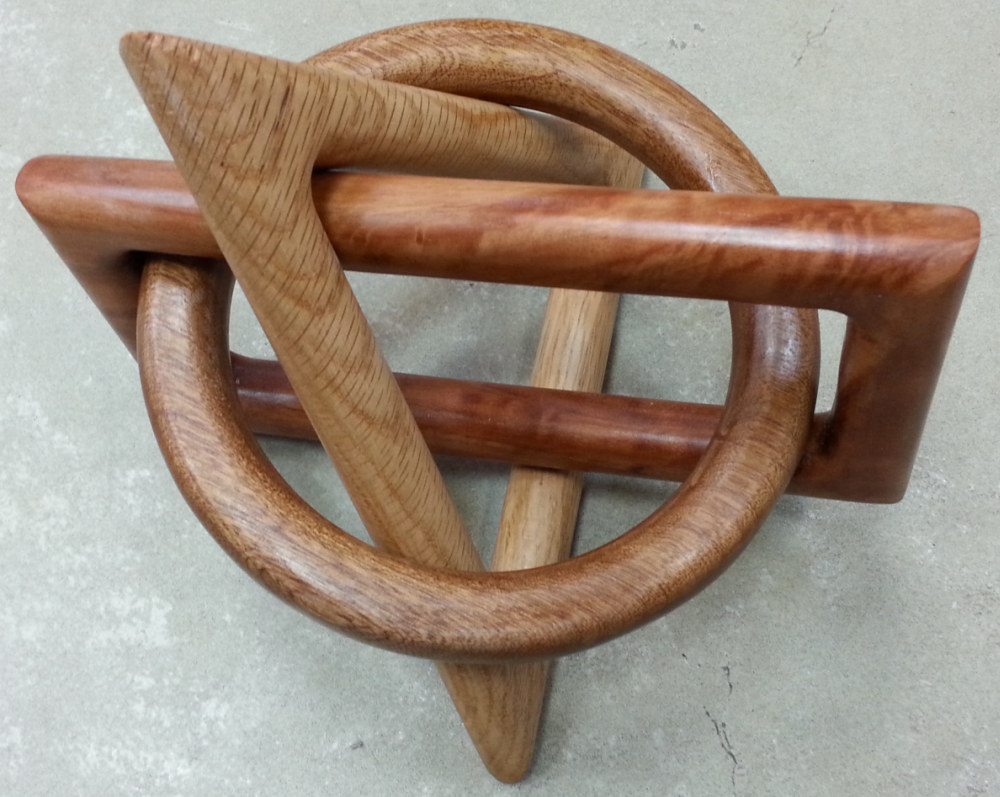
 Three interlocking Borromean Rings. Three different wood types
(Oak, Mahogany, and Eucalyptus). Can you envision how this
object was made? The image on the right gives a hint ("when
you have eliminated all which is impossible, then whatever
remains, however improbable, must be the truth", Sherlock
Holmes).
Three interlocking Borromean Rings. Three different wood types
(Oak, Mahogany, and Eucalyptus). Can you envision how this
object was made? The image on the right gives a hint ("when
you have eliminated all which is impossible, then whatever
remains, however improbable, must be the truth", Sherlock
Holmes).
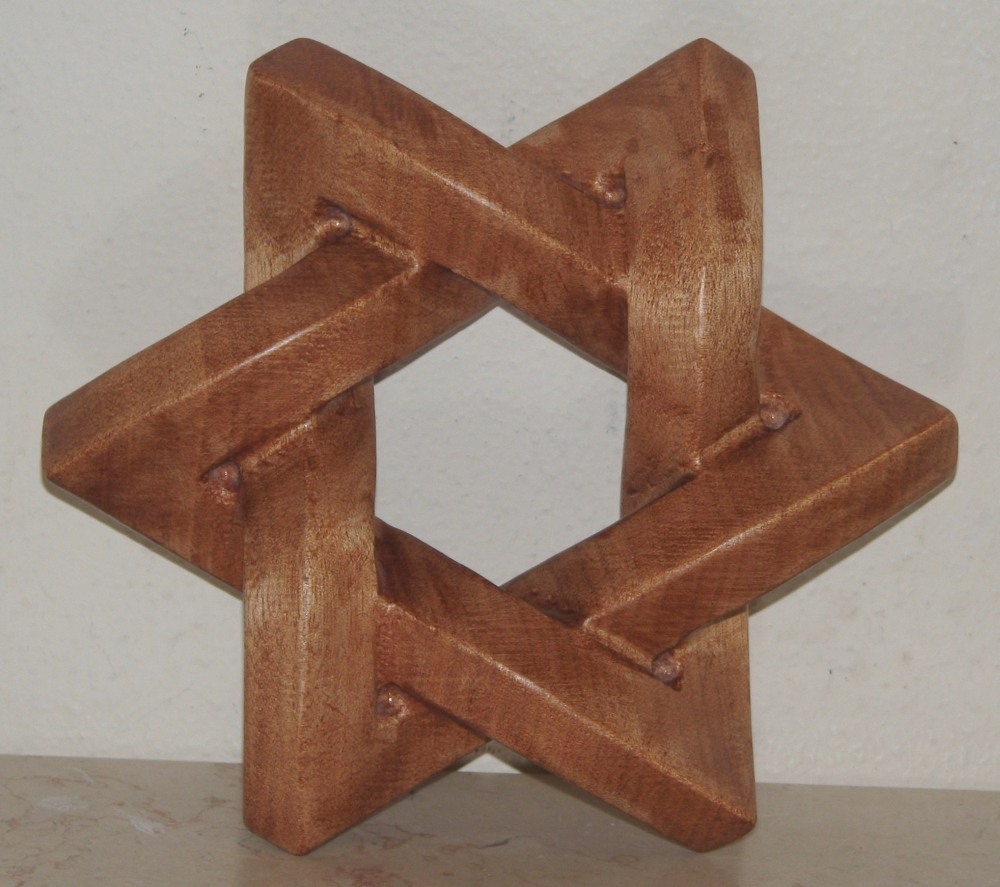
Penrose Triangle
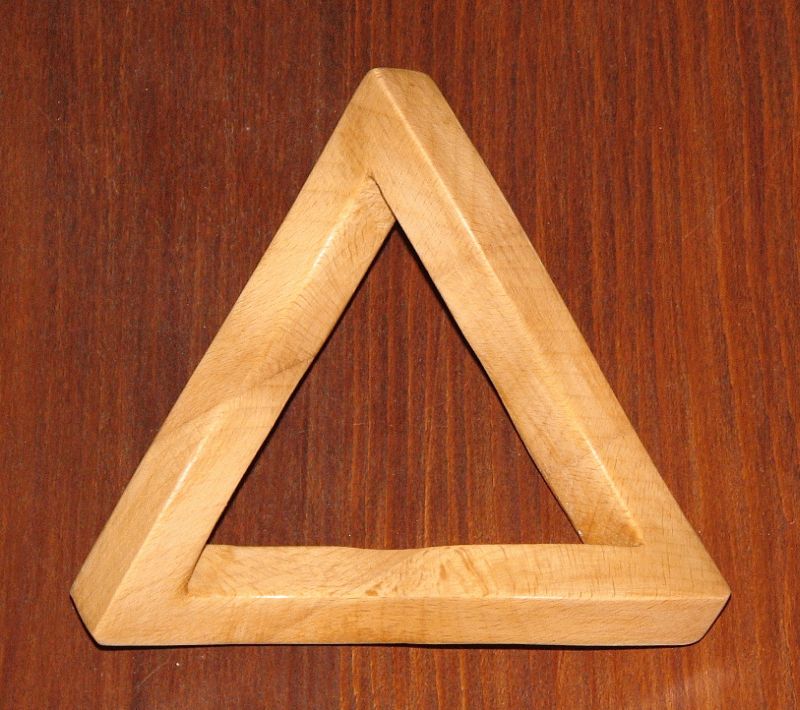
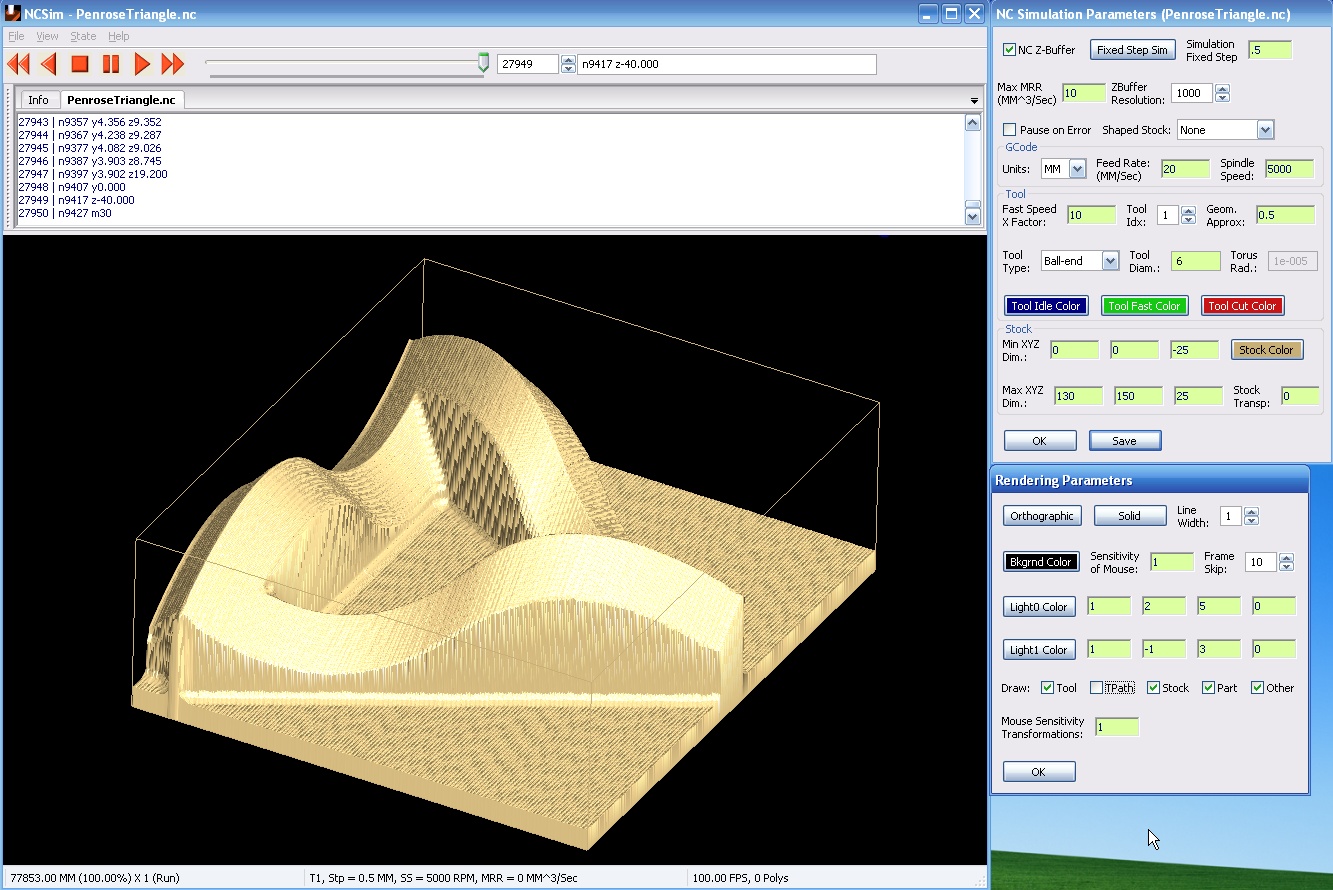 Penrose triangle is a very well-known so called 'impossible' shape.
Try google it. This specific variation of the Penrose triangle is part
of my "Escher for Real"
and
""Beyond Escher for Real"
work.
The right image shows the NC simulation on
NCSim. Beech wood.
Penrose triangle is a very well-known so called 'impossible' shape.
Try google it. This specific variation of the Penrose triangle is part
of my "Escher for Real"
and
""Beyond Escher for Real"
work.
The right image shows the NC simulation on
NCSim. Beech wood.
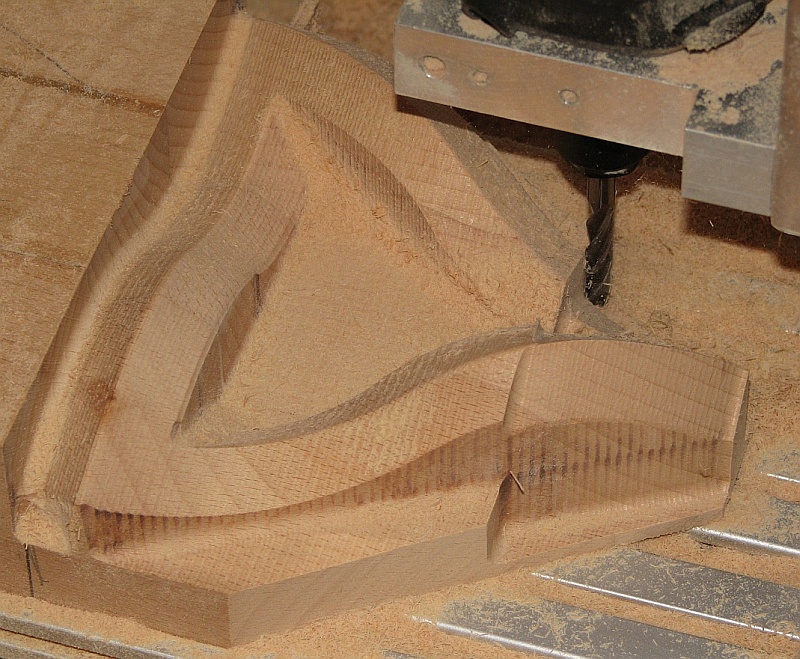
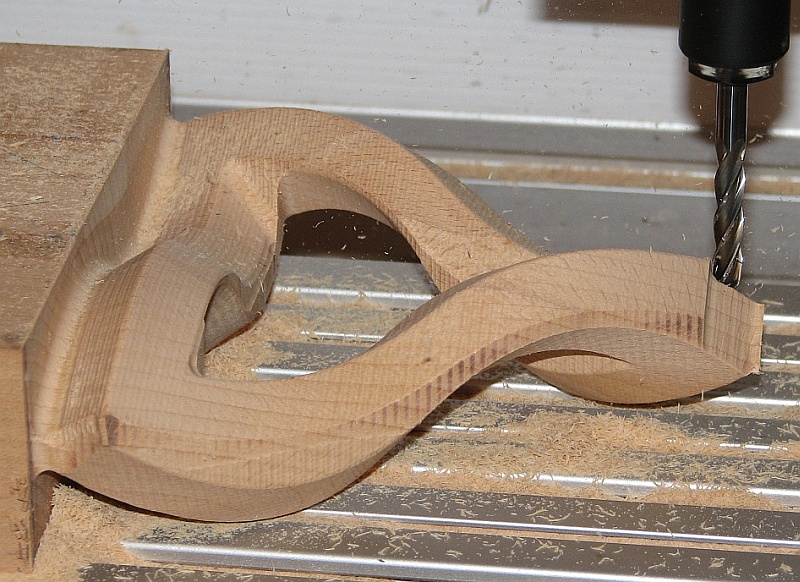 These bottom two images show snapshots of the NC process.
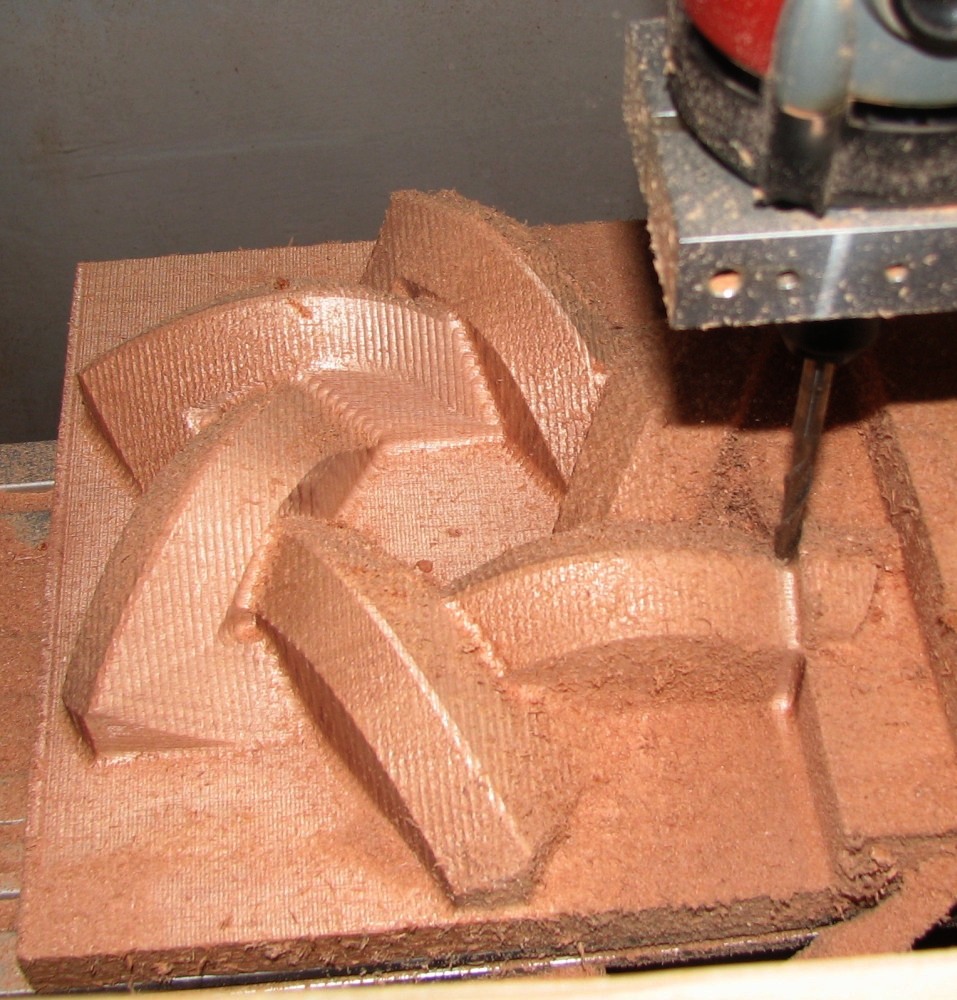
David Star from Two Penrose Triangles
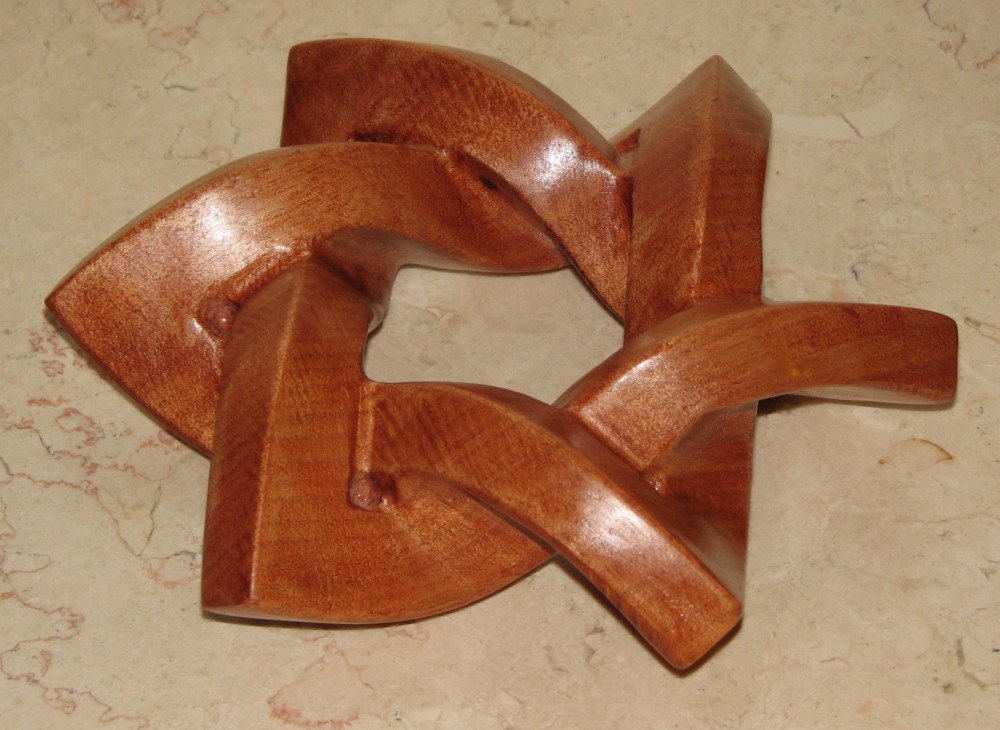
 Here is a variation of the David star using two intertwined Penrose triangles.
The CNC in action is shown on the right. See also ""Beyond Escher for Real". Gaboon wood.
Here is a variation of the David star using two intertwined Penrose triangles.
The CNC in action is shown on the right. See also ""Beyond Escher for Real". Gaboon wood.
David's Head Relief
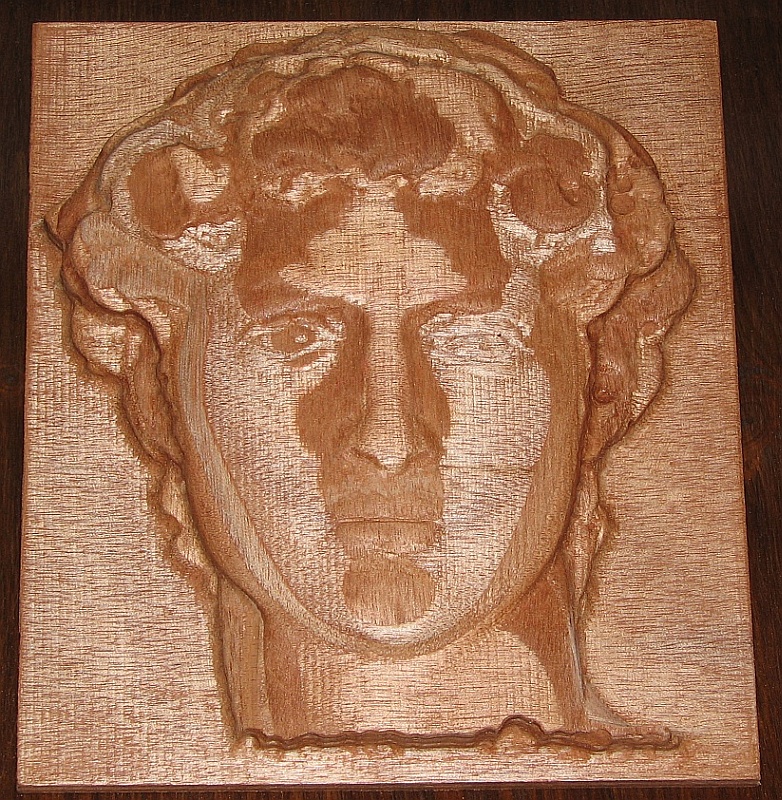
 NC machining of the head of the David's statue. A relief.
See NCSim
for the NC simulation image.
NC machining of the head of the David's statue. A relief.
See NCSim
for the NC simulation image.
Thin wall's lamp shades


 Thin wall's lamp shades. Left is made of Olive wood, right from Cypress.
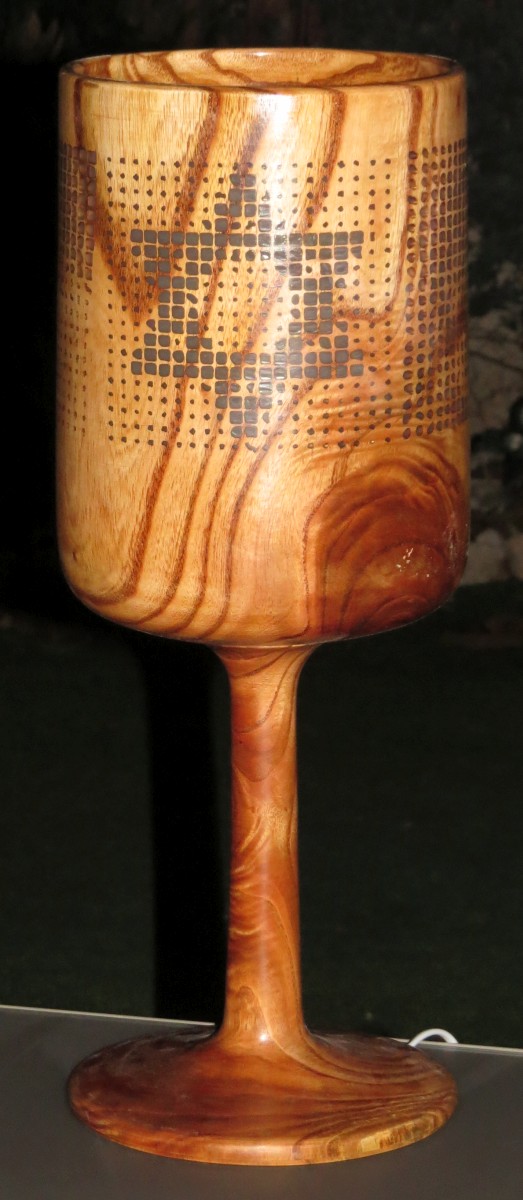
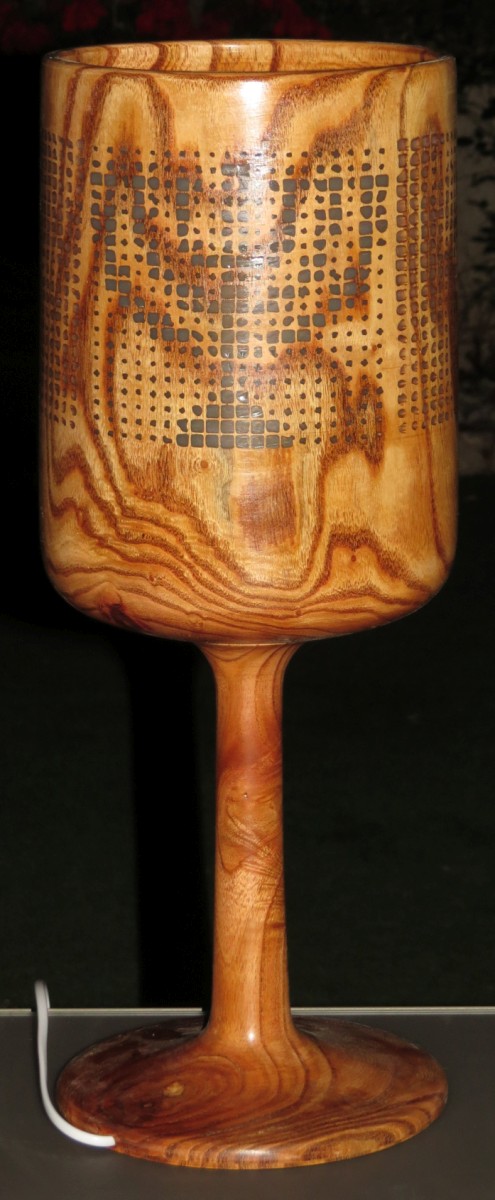
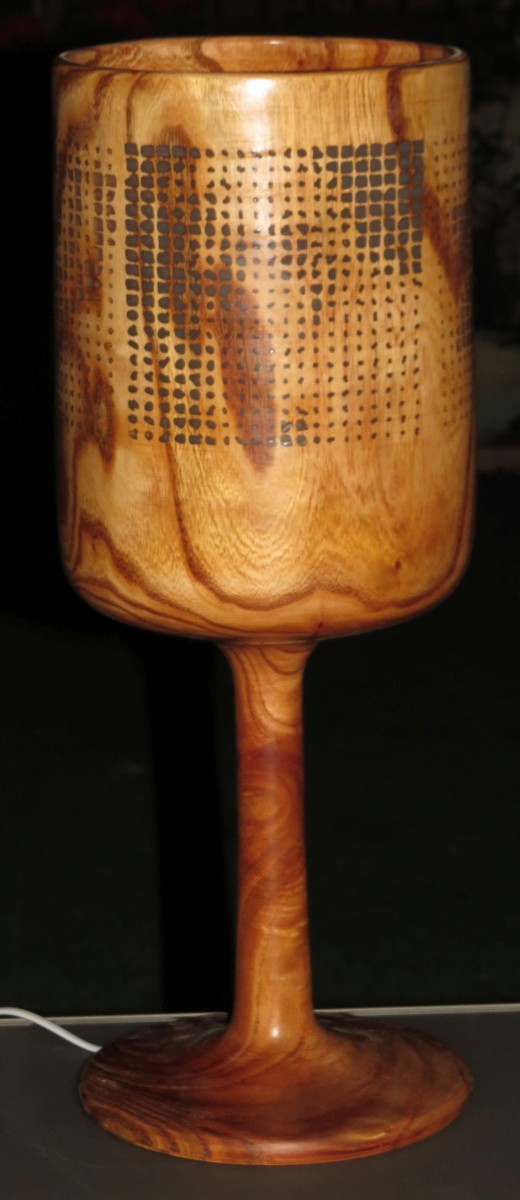
Dithered lamp shade
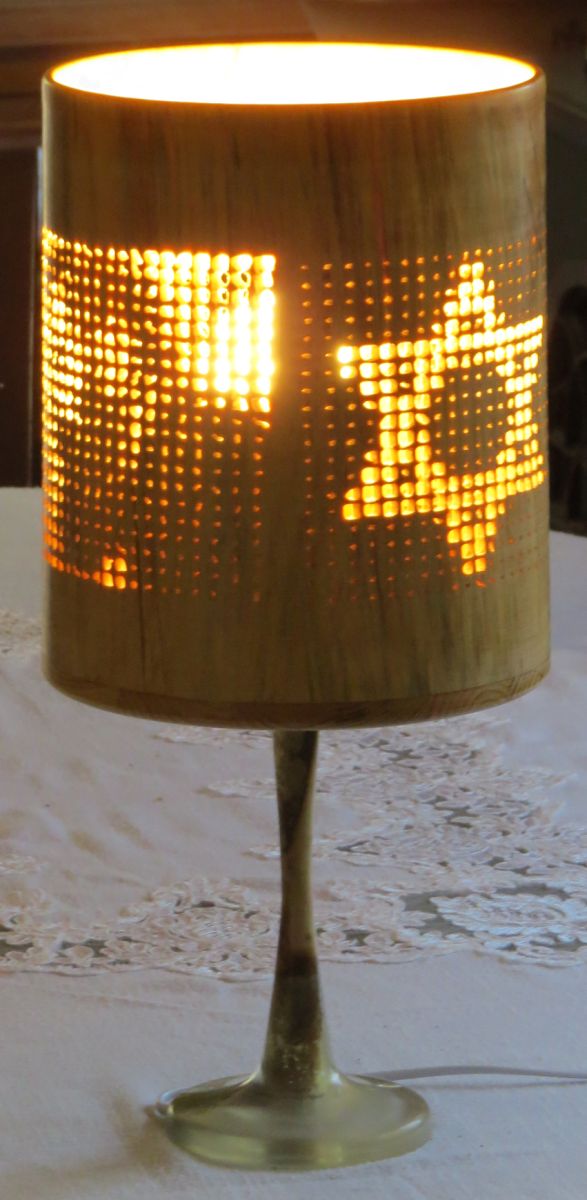
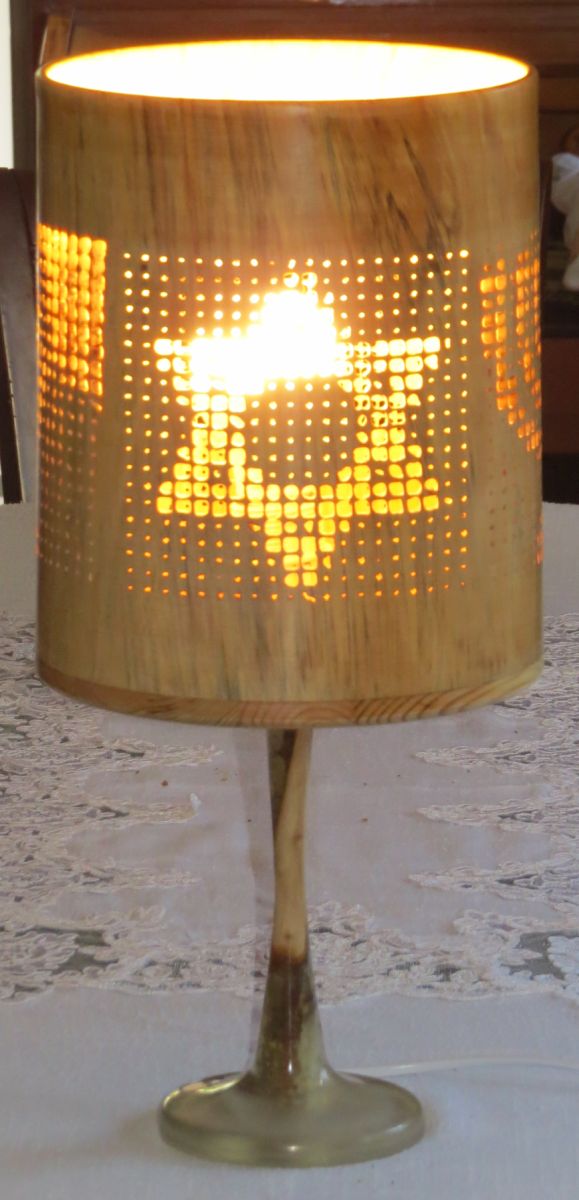

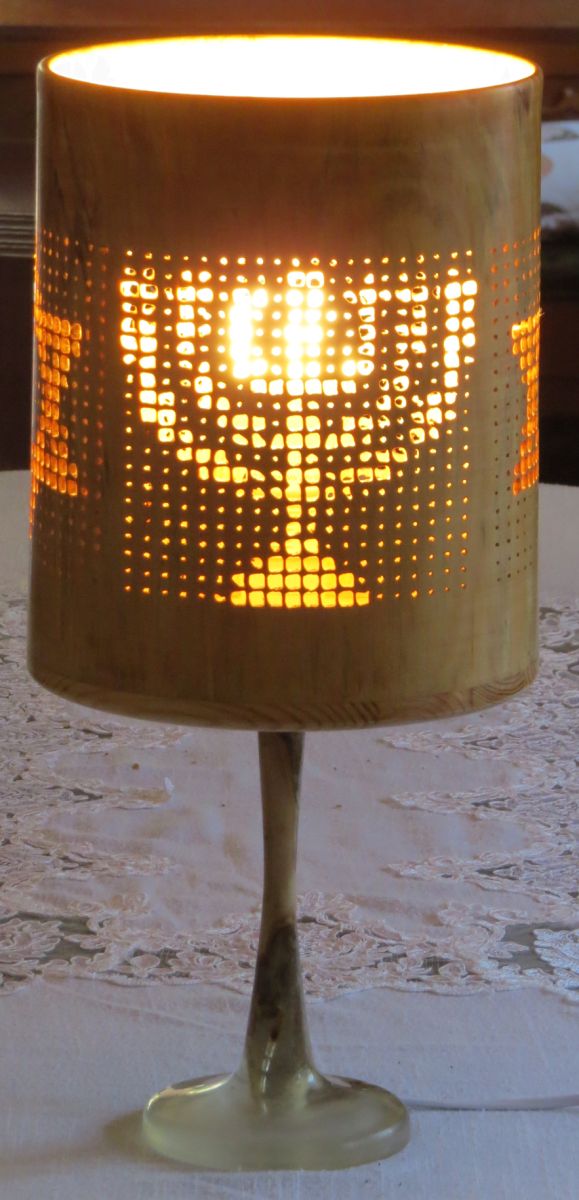
 Dithered lamp shade. Dithered images of the David Star, the Menora,
and Herzl were carved on the side of the thin shade walls, via CNC.
See also Dithering by Curves
Made from Cypress wood. The leg (on the right) is a combination of
wood with Epoxy.
Dithered lamp shade. Dithered images of the David Star, the Menora,
and Herzl were carved on the side of the thin shade walls, via CNC.
See also Dithering by Curves
Made from Cypress wood. The leg (on the right) is a combination of
wood with Epoxy.
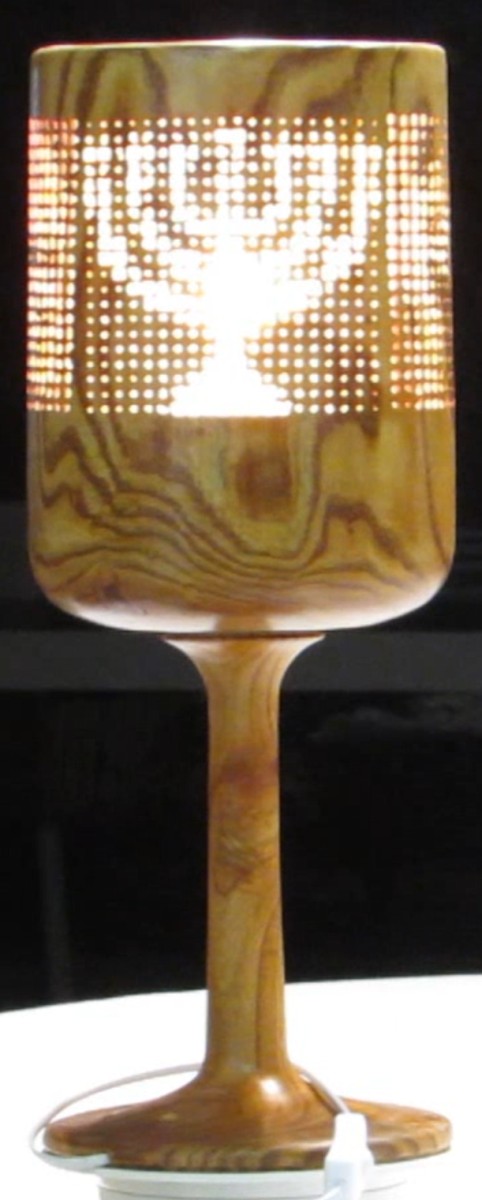
Another variation of a dithered lamp shade is shown below. Dithered images of the David Star, the Menora, and Herzl are shown with the interior lamp being both off and on. In this variation, the dithering holes were filled and sealed with translucent Epoxy. Chinaberry (Melia azedarach) wood.


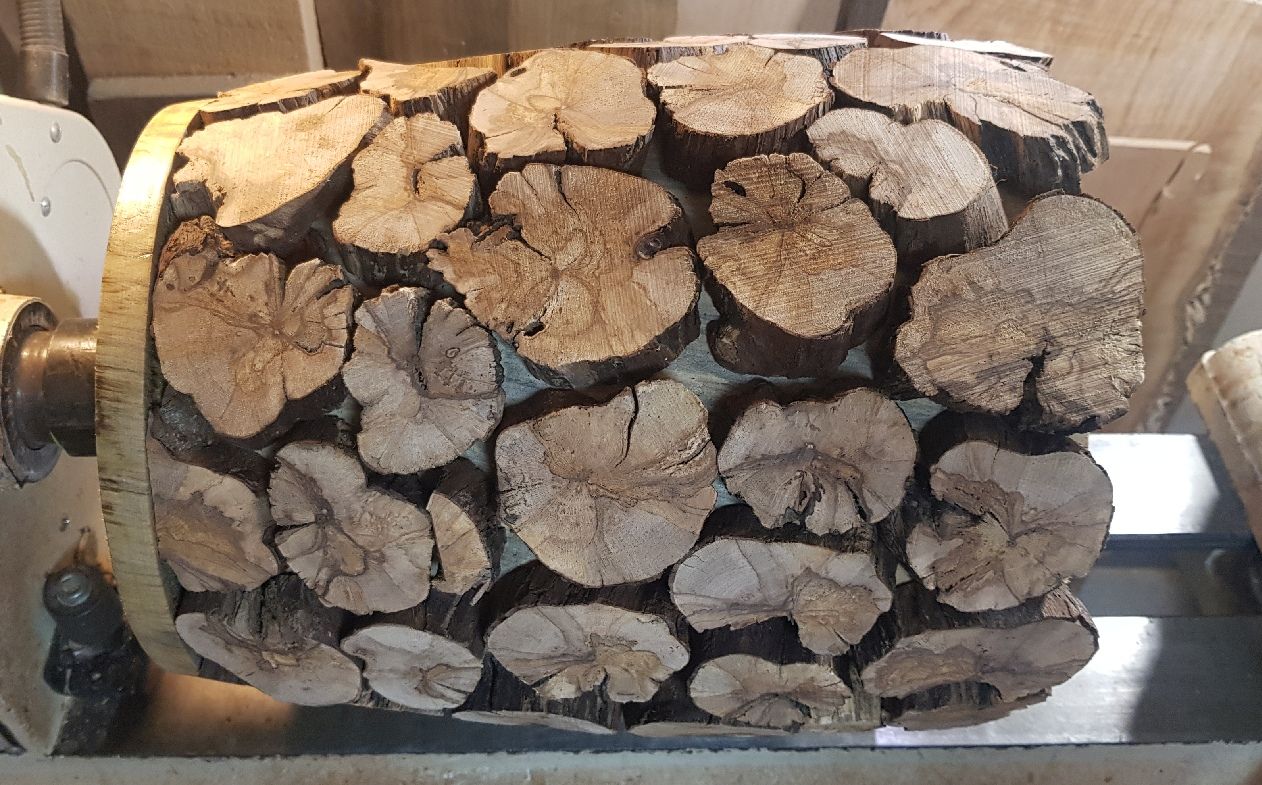
Epoxy stripes champagne glass lamp

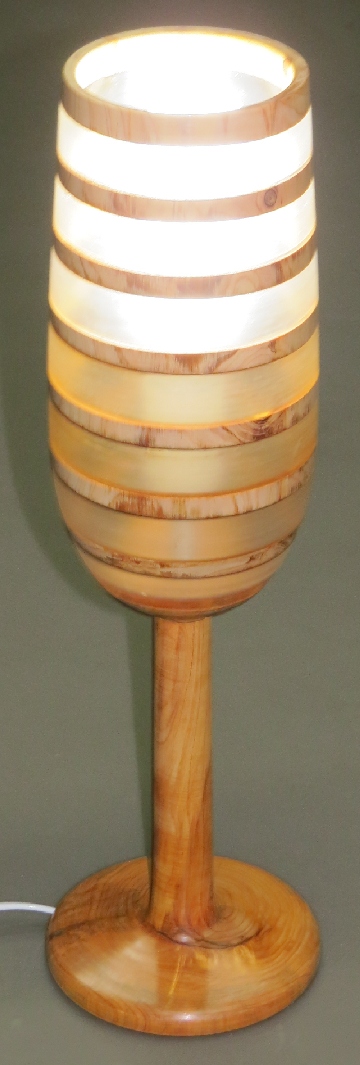
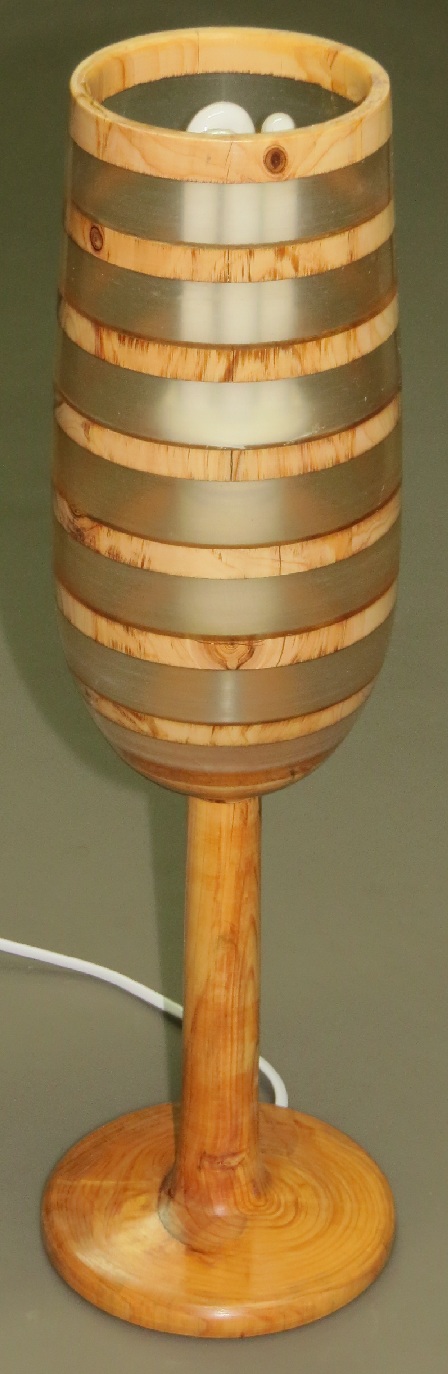
 An epoxy stripes Champagne lamp. The left image shows the top
part ready for pouring the epoxy with the passages prepared
for the epoxy to traverse from one level to the next. Similar
passages were made on the back side for the trapped air to
exit. The entire outer shape was then sealed, and epoxy poured
in. Cypress tree.
An epoxy stripes Champagne lamp. The left image shows the top
part ready for pouring the epoxy with the passages prepared
for the epoxy to traverse from one level to the next. Similar
passages were made on the back side for the trapped air to
exit. The entire outer shape was then sealed, and epoxy poured
in. Cypress tree.
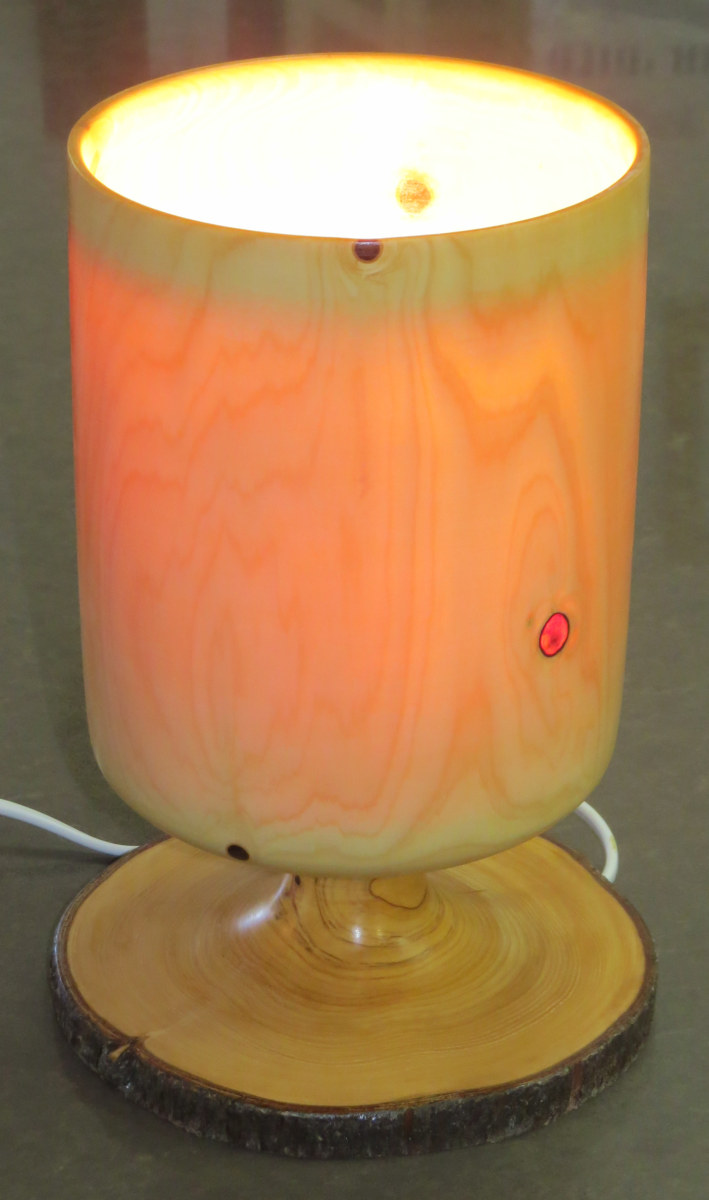
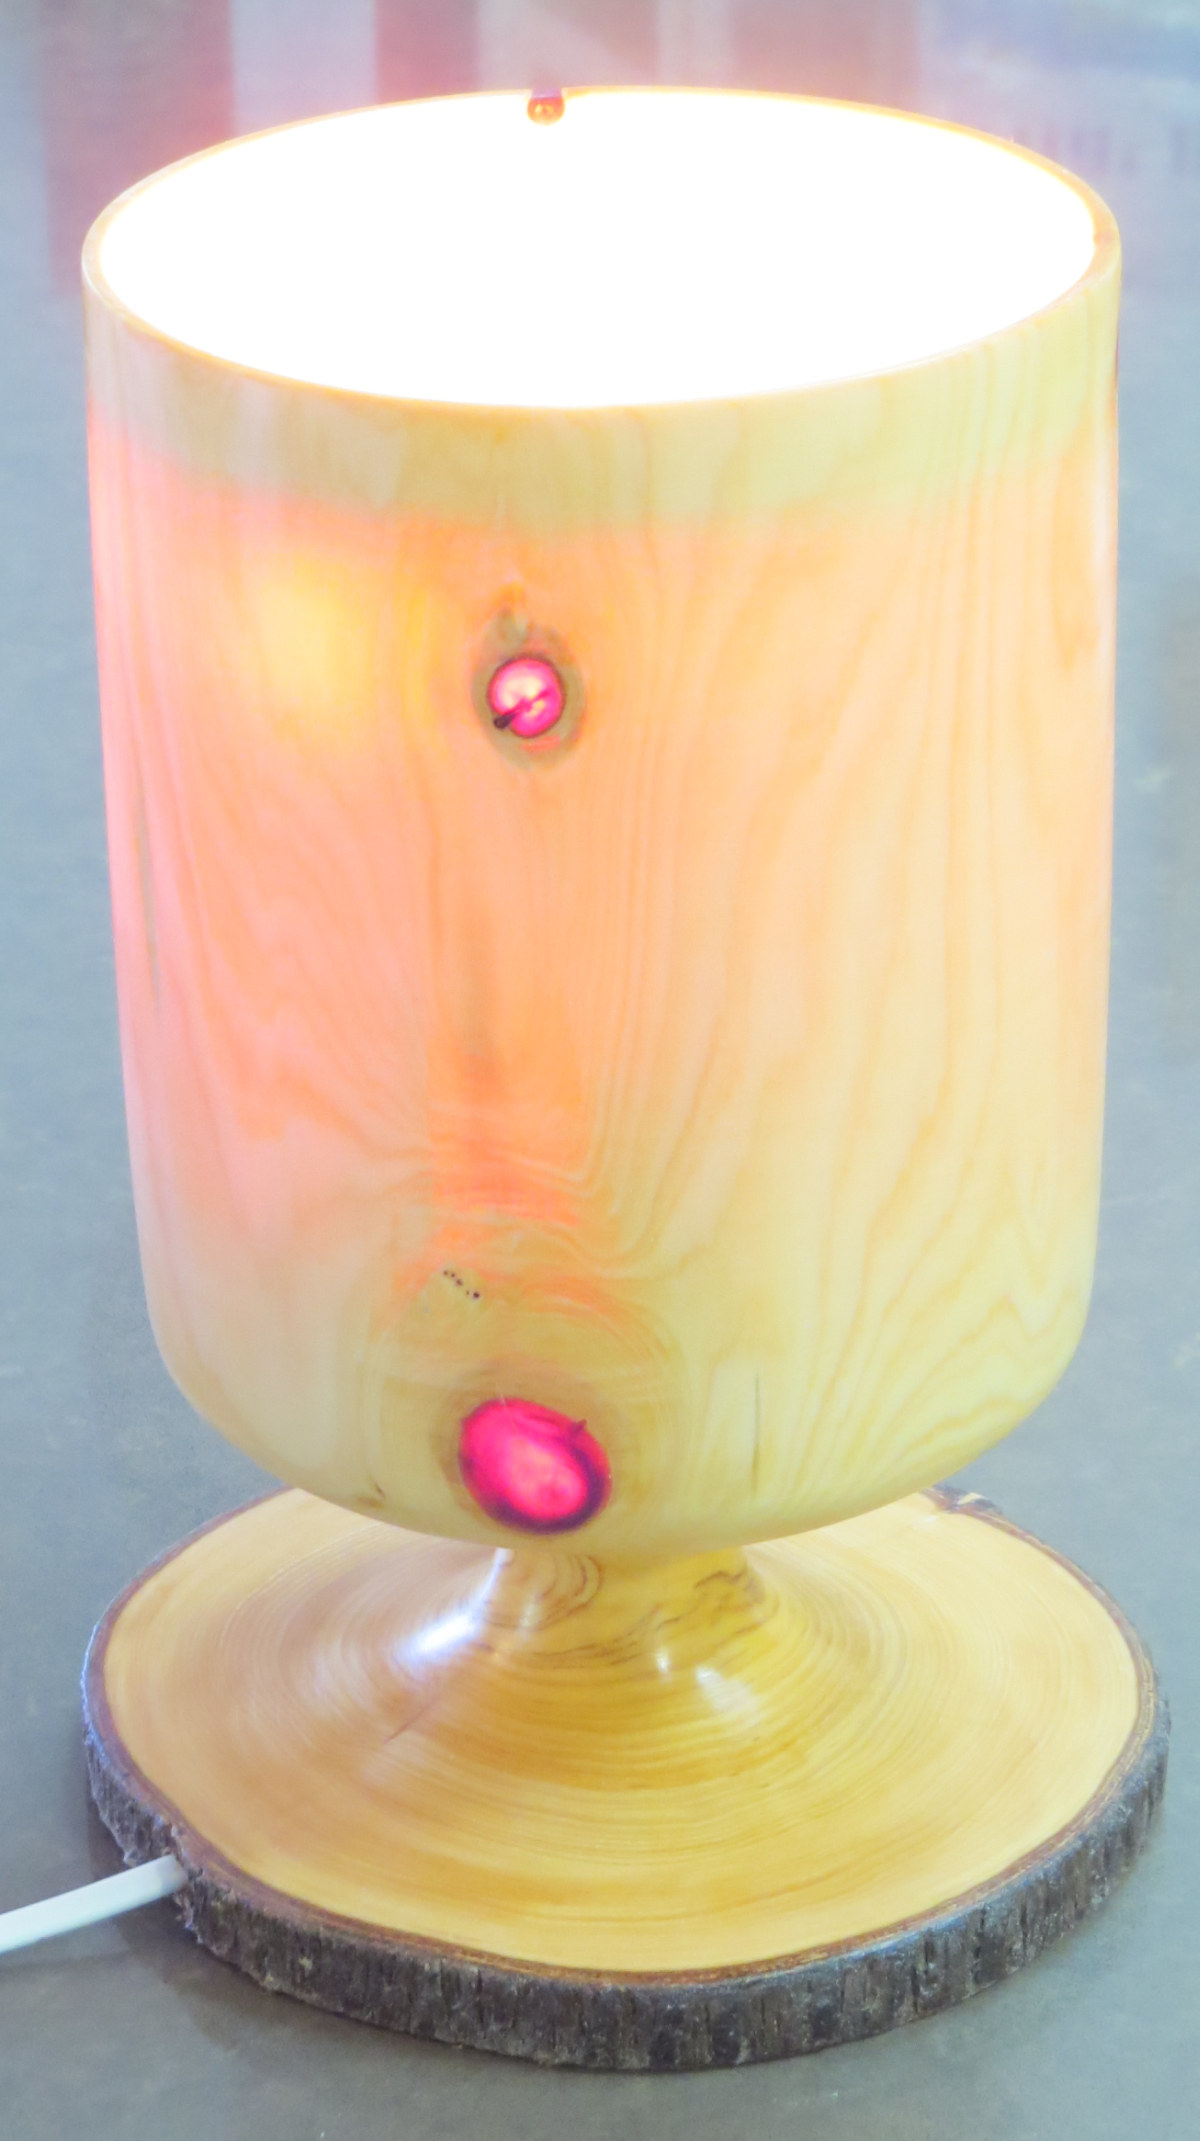
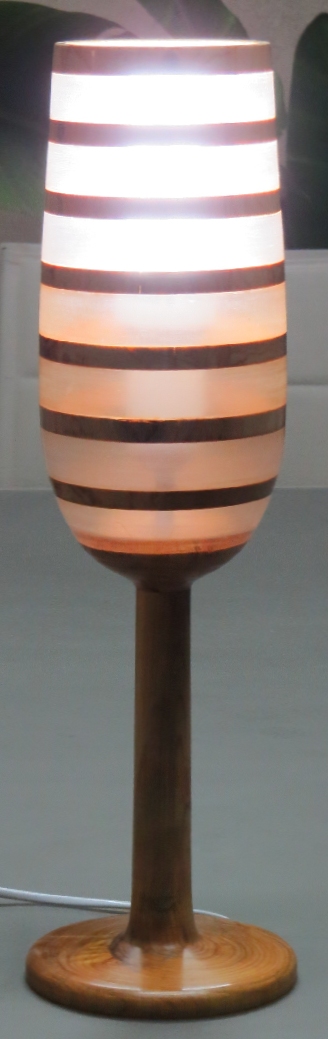
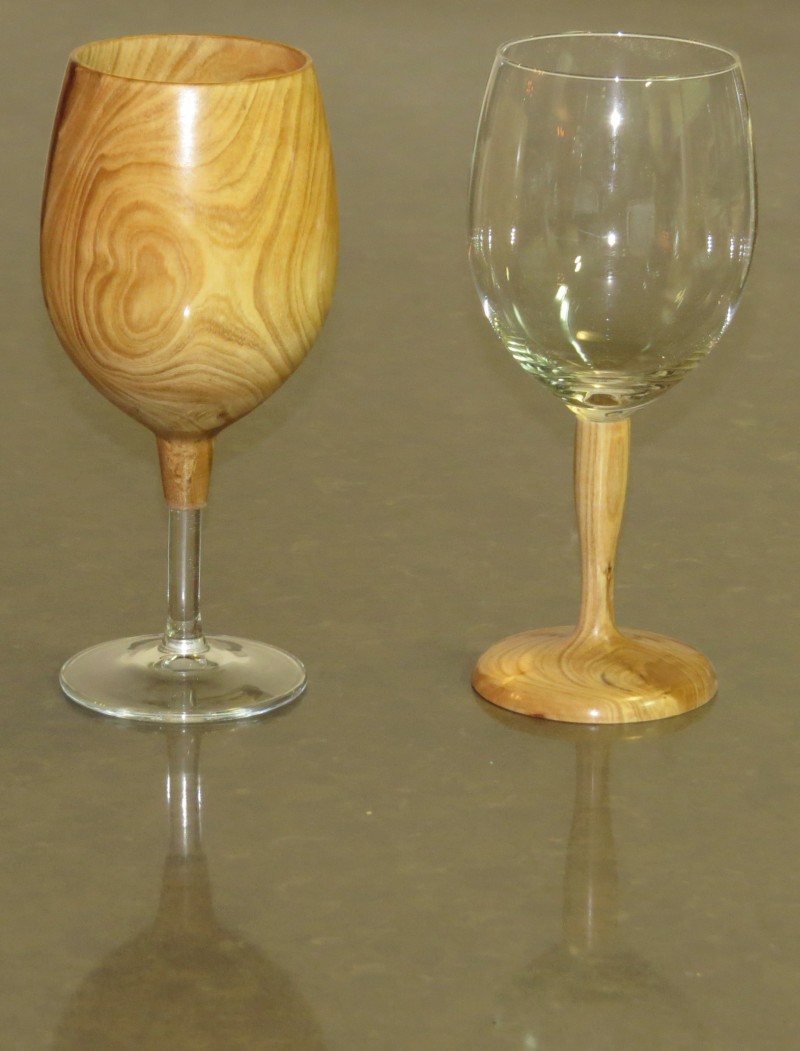
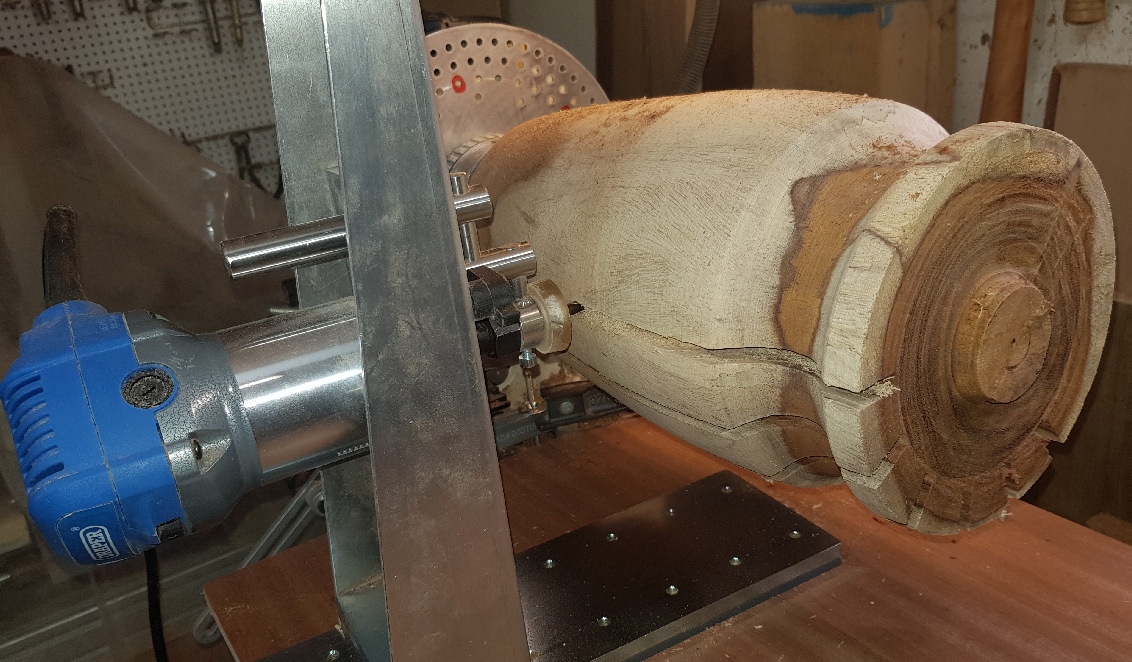
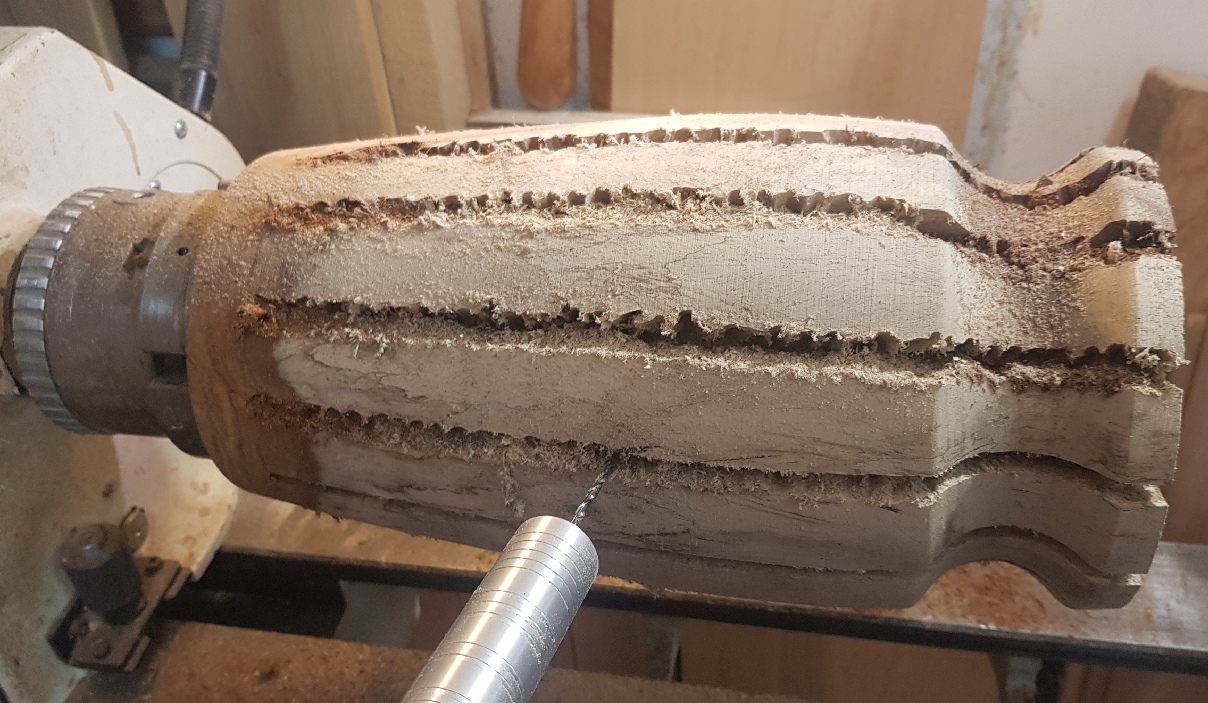
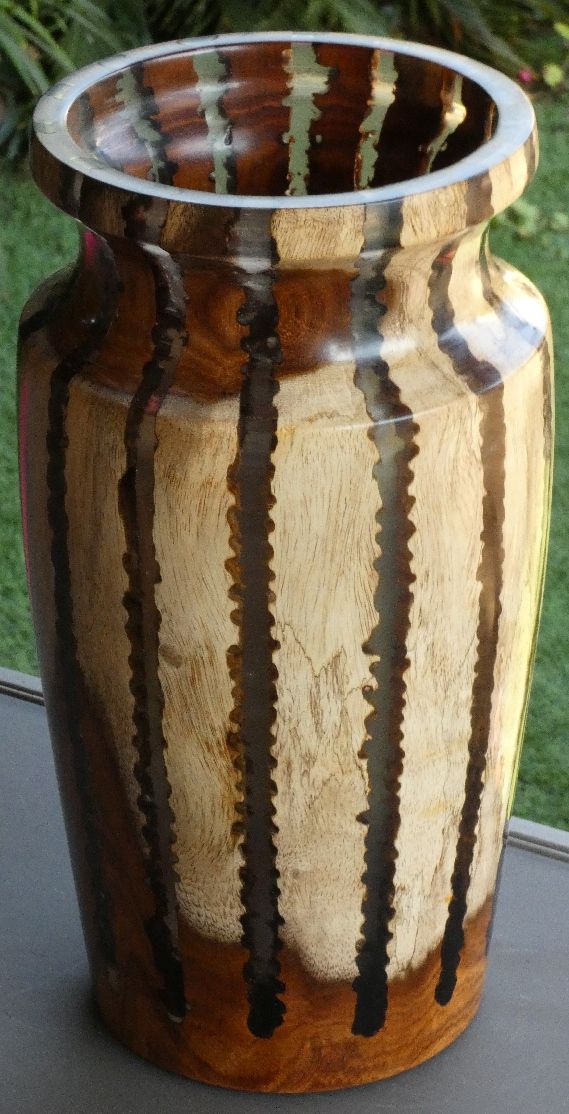
Epoxy stripes red wine glass lamp
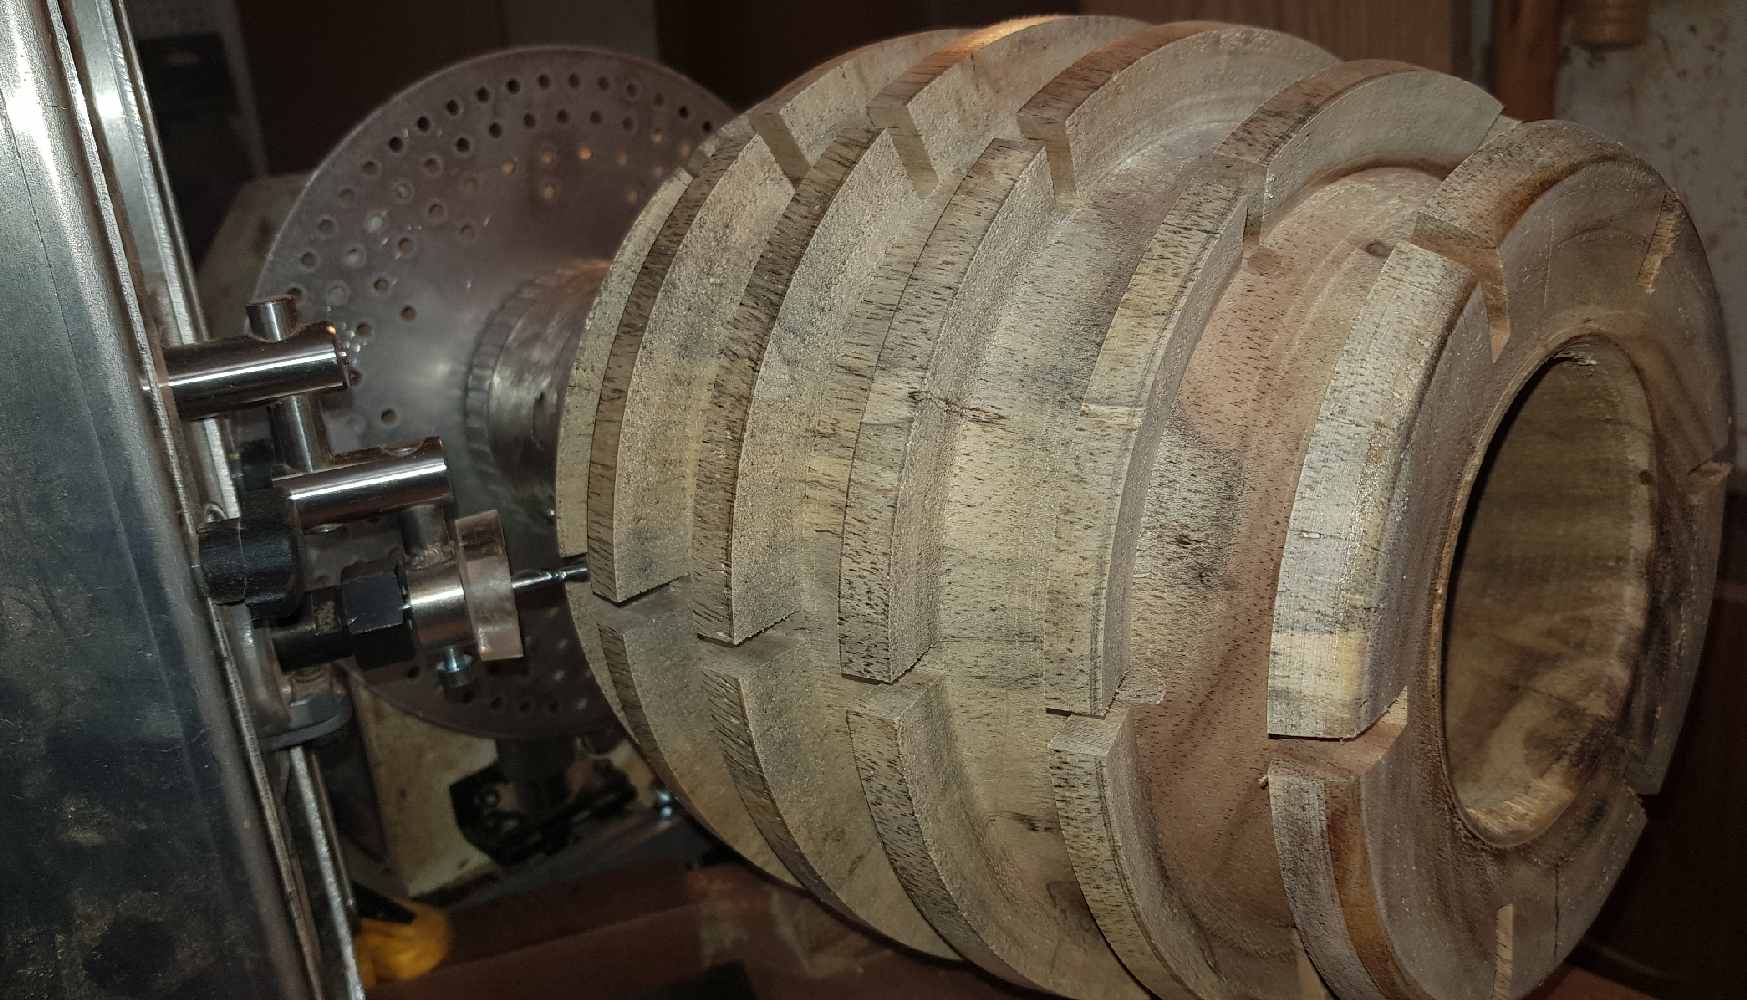

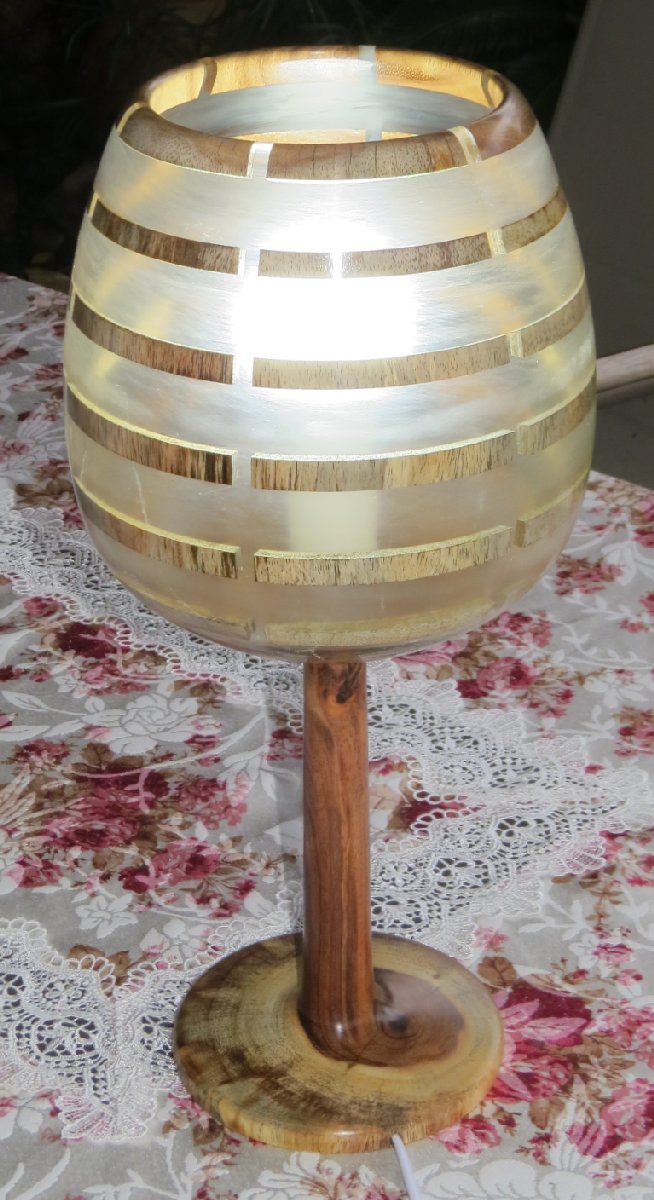 An epoxy stripes red wine glass lamp. The left image shows
the cutting of the longitudes using a router (6mm bit), after
the latitudes were carved on the lathe. Depth of cut was
~20mm before sealing and pouring the epoxy in (Final wall
thickness is around 7 mm). The two rightmost images show the
final lamp turned off and on, respectively. Unknown tree (Melia
azedarach!?).
An epoxy stripes red wine glass lamp. The left image shows
the cutting of the longitudes using a router (6mm bit), after
the latitudes were carved on the lathe. Depth of cut was
~20mm before sealing and pouring the epoxy in (Final wall
thickness is around 7 mm). The two rightmost images show the
final lamp turned off and on, respectively. Unknown tree (Melia
azedarach!?).
Lamp with eccentric circles
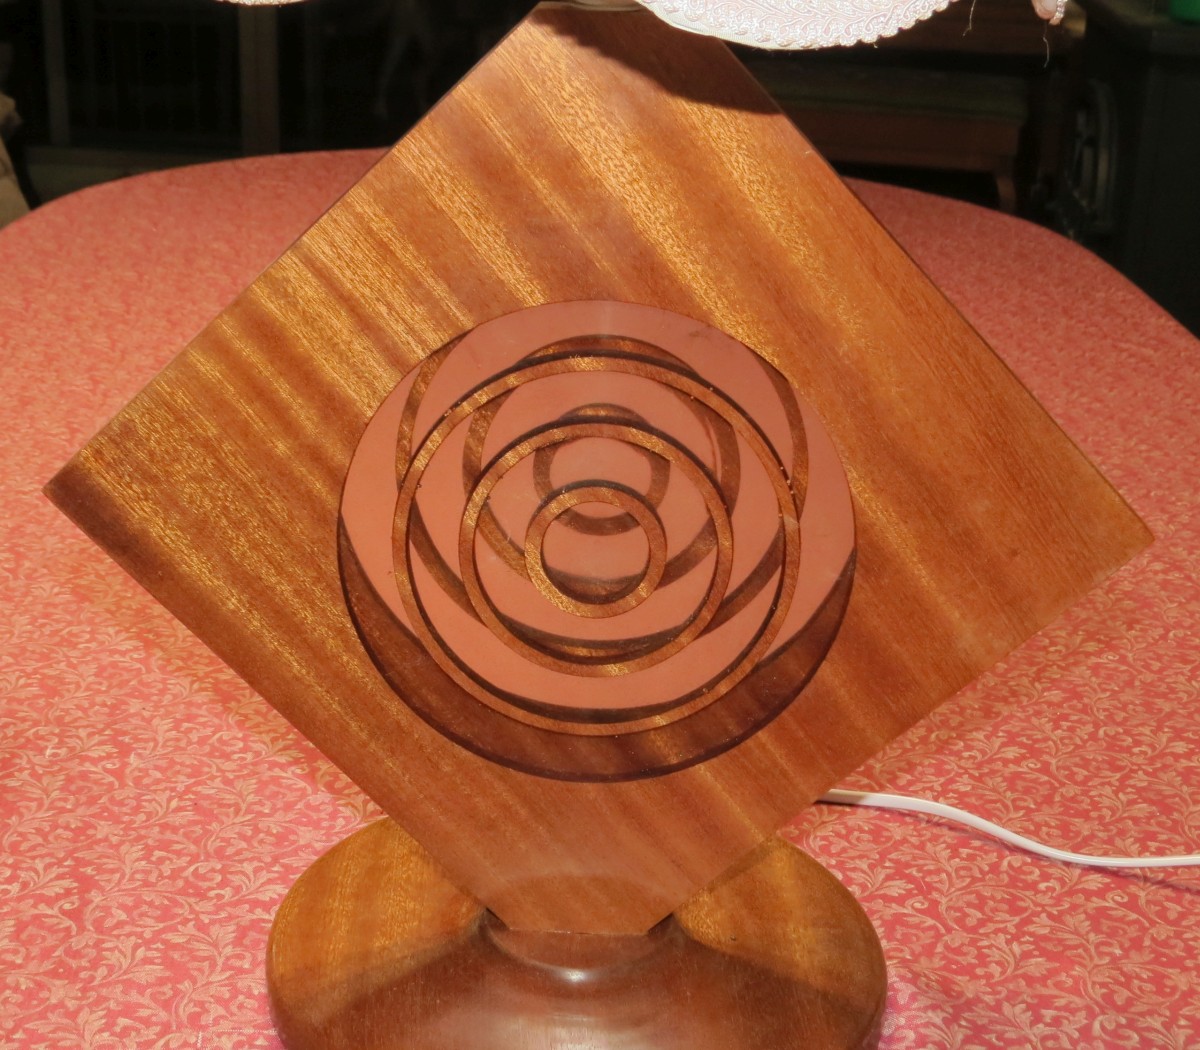
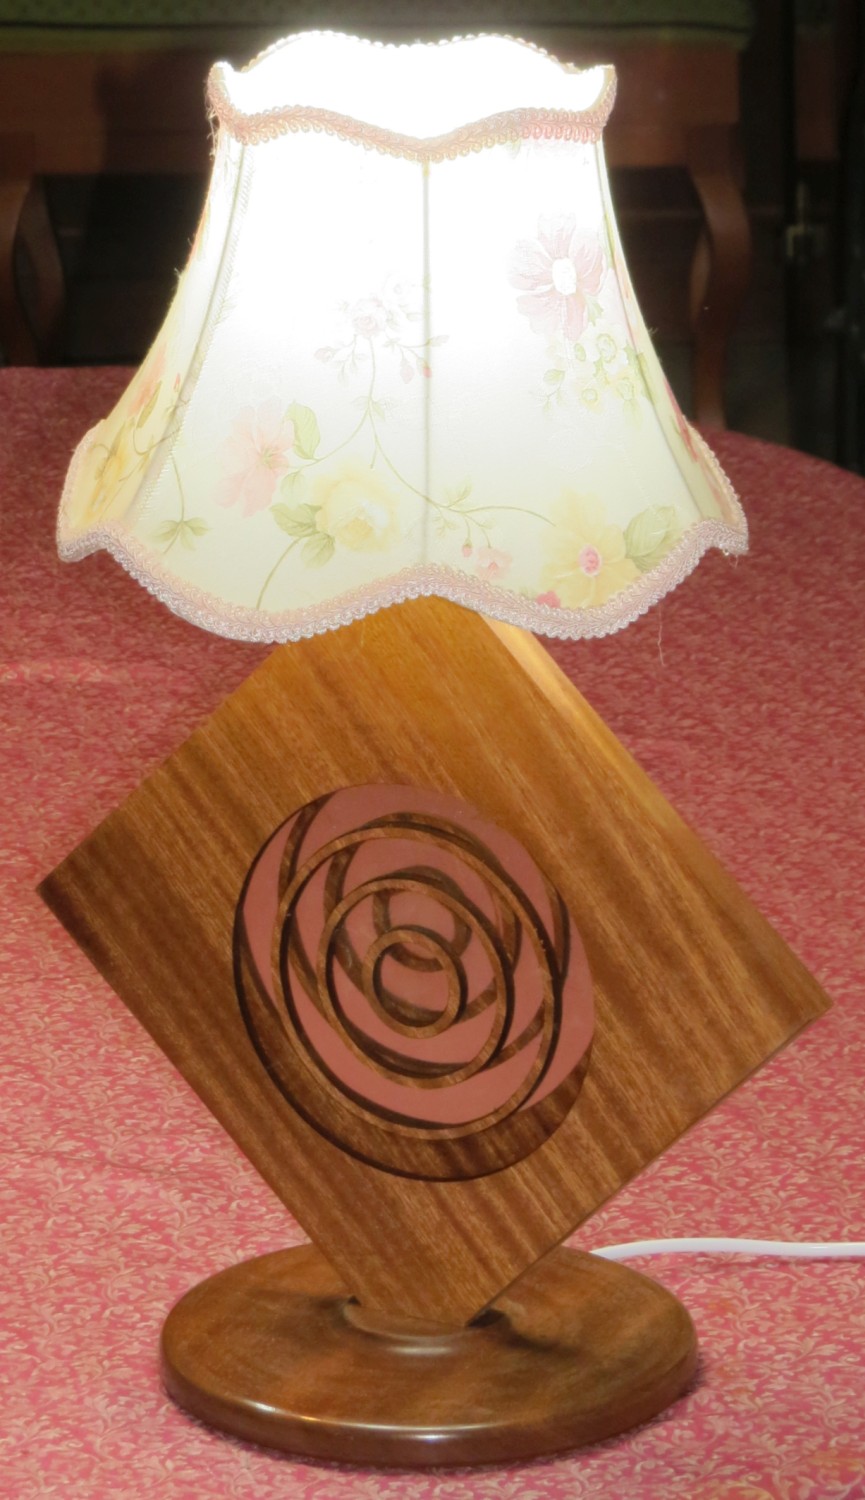
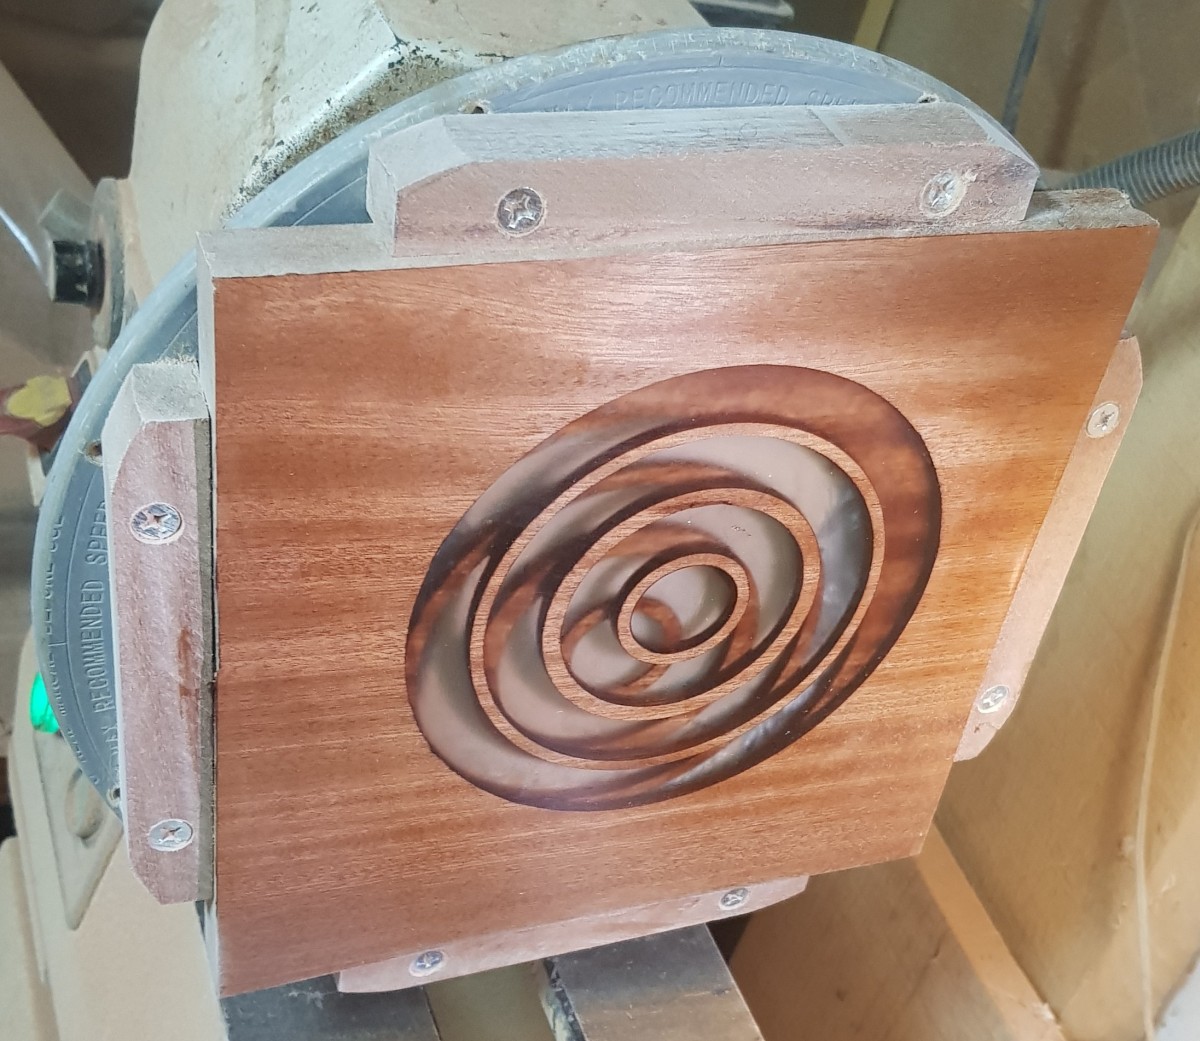
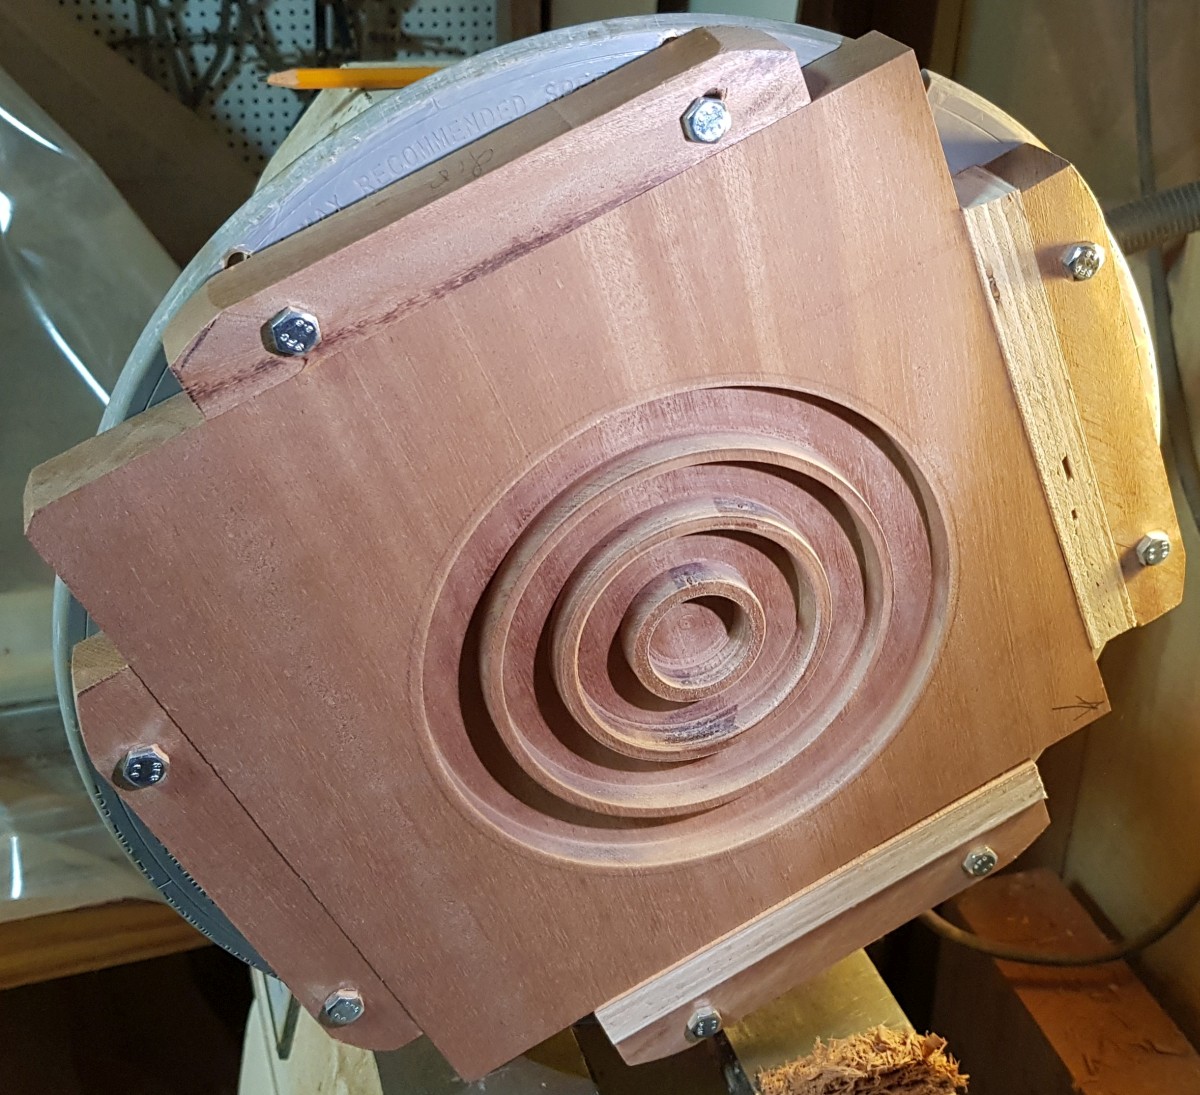 A lamp with eccentric circles. The vertical diamond shape was turned
eccentrically on chucks with square jaws (see two images on the right).
It was turned twice, once from each side, with different eccentricity.
The eccentricity has been achieved using the two wooden bars placed
next to the jaws, on two neighboring jaws (see rightmost image).
After each side was turned, it was filled and sealed back with
transparent epoxy, achieving the final effect. Mahogany wood.
Original idea thanks to Jim Duxbury, American Woodturner,
October 2018. Yet another interesting question is where the
electric wire is...
A lamp with eccentric circles. The vertical diamond shape was turned
eccentrically on chucks with square jaws (see two images on the right).
It was turned twice, once from each side, with different eccentricity.
The eccentricity has been achieved using the two wooden bars placed
next to the jaws, on two neighboring jaws (see rightmost image).
After each side was turned, it was filled and sealed back with
transparent epoxy, achieving the final effect. Mahogany wood.
Original idea thanks to Jim Duxbury, American Woodturner,
October 2018. Yet another interesting question is where the
electric wire is...
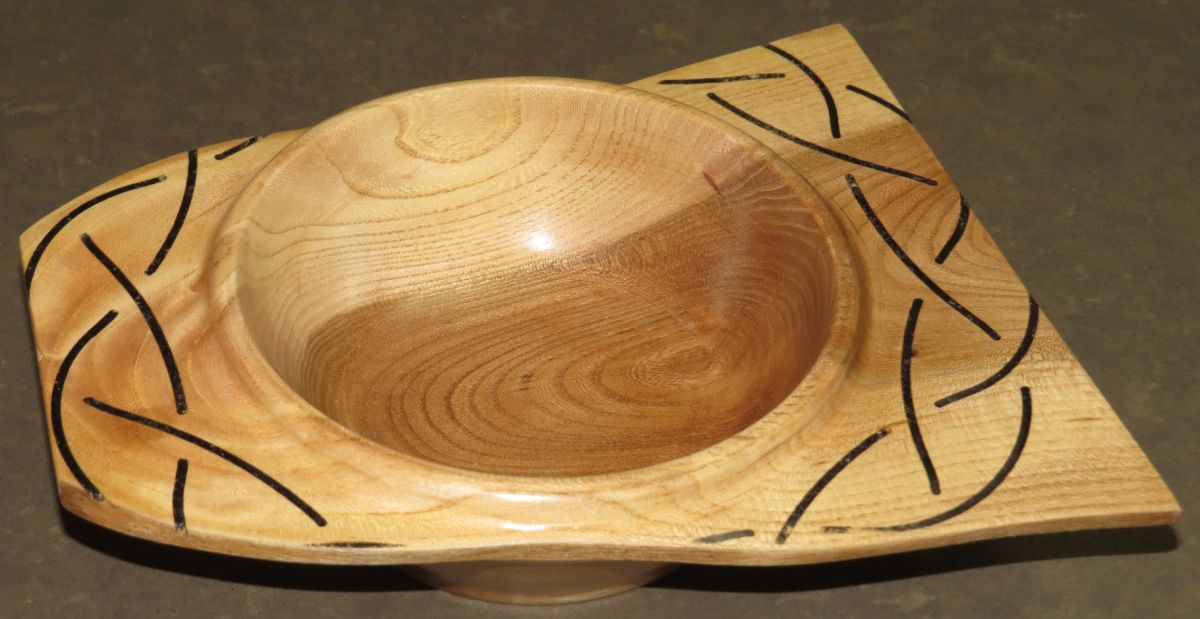
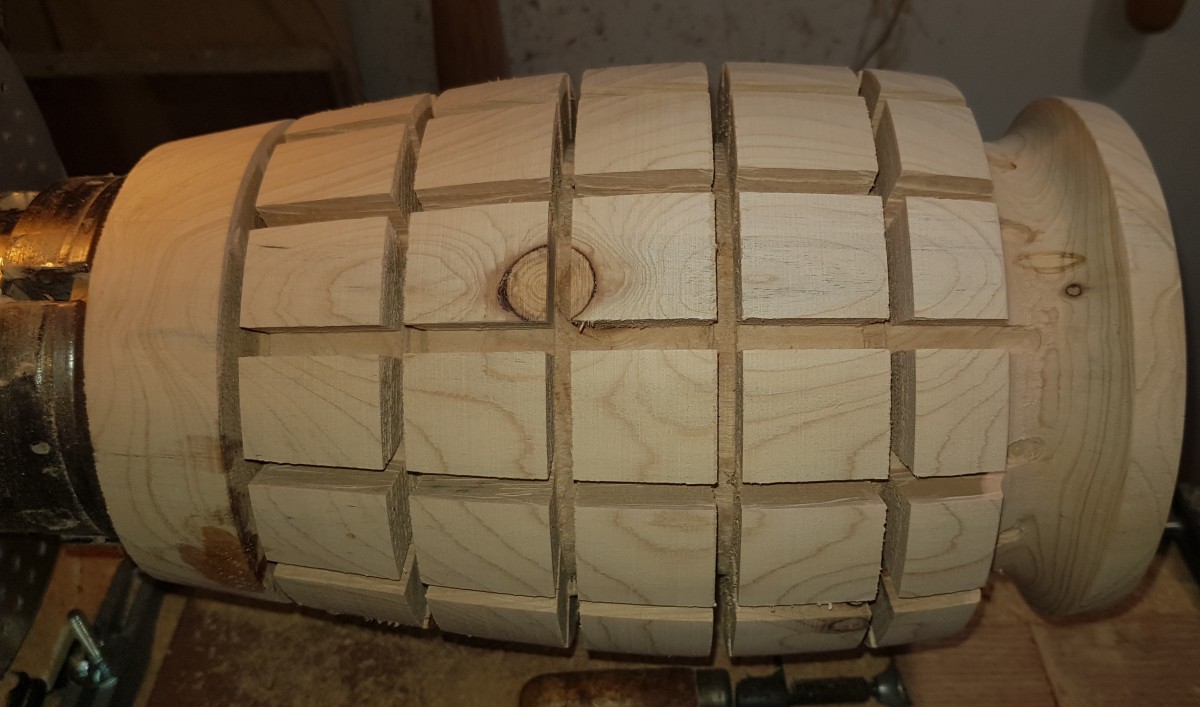
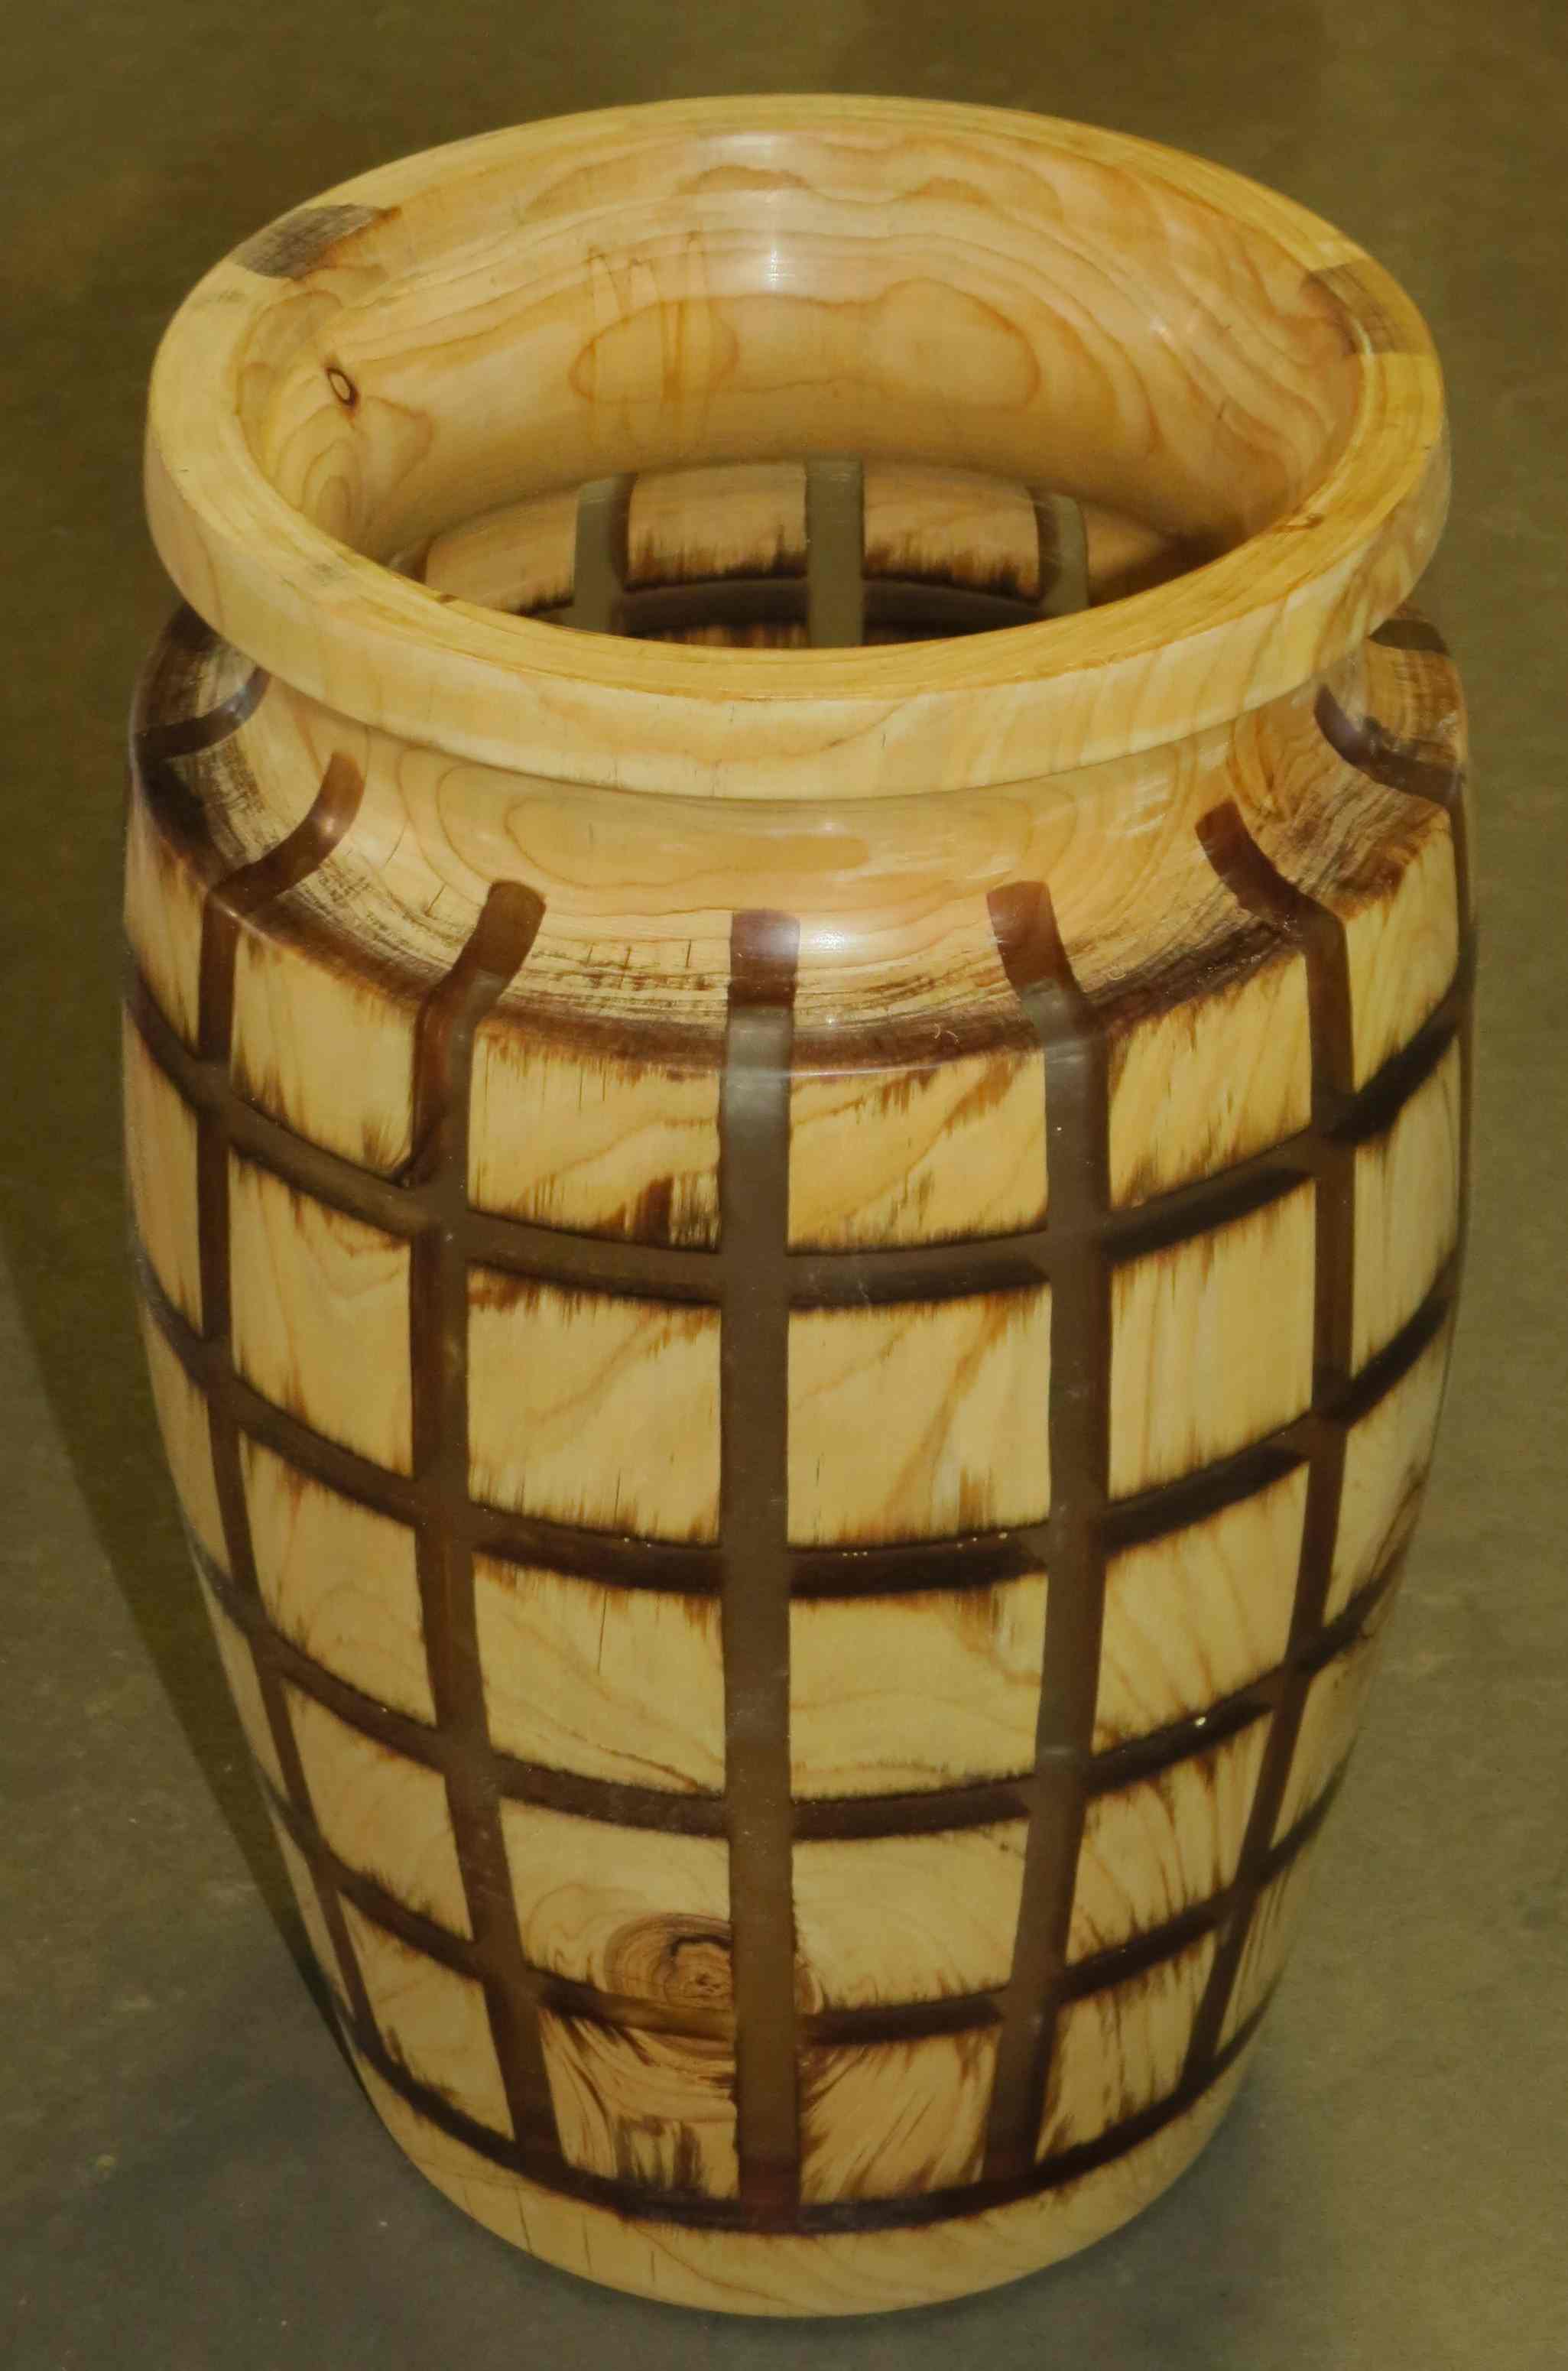
Criss Cross Vessel
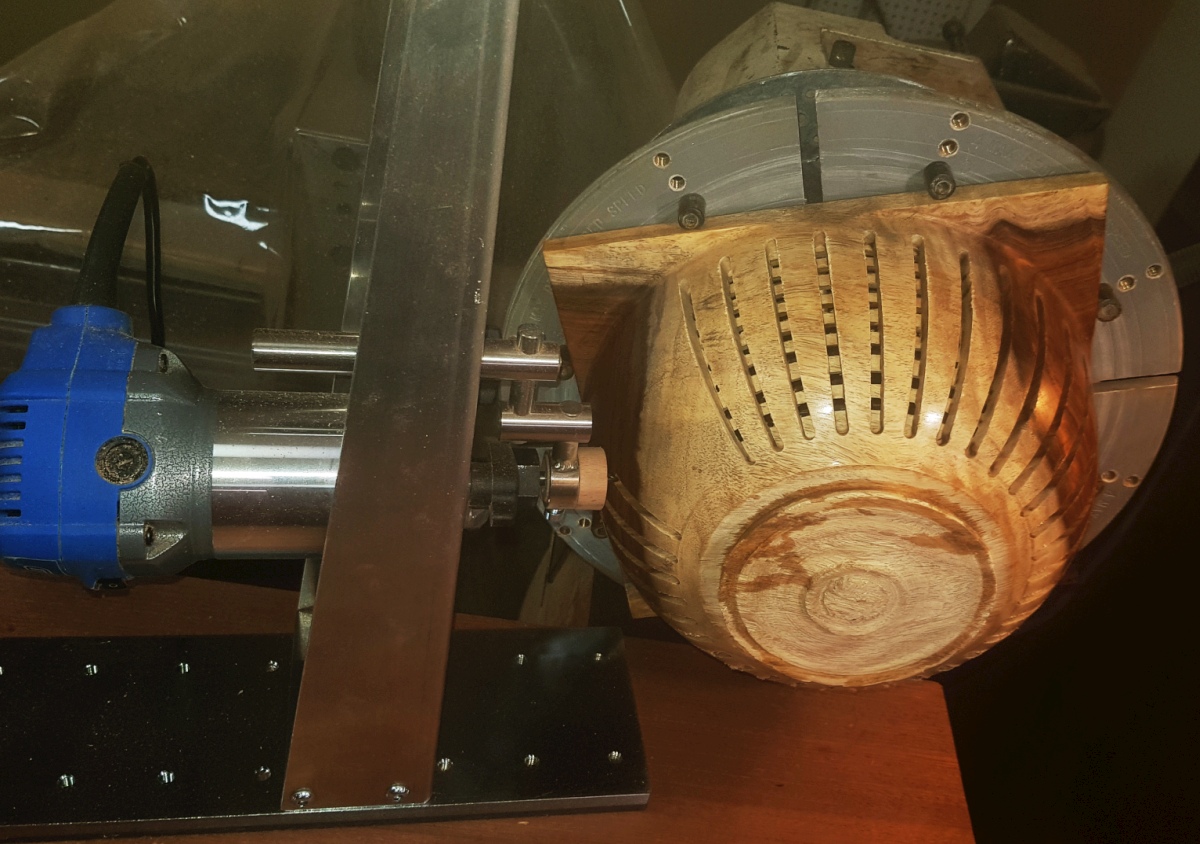
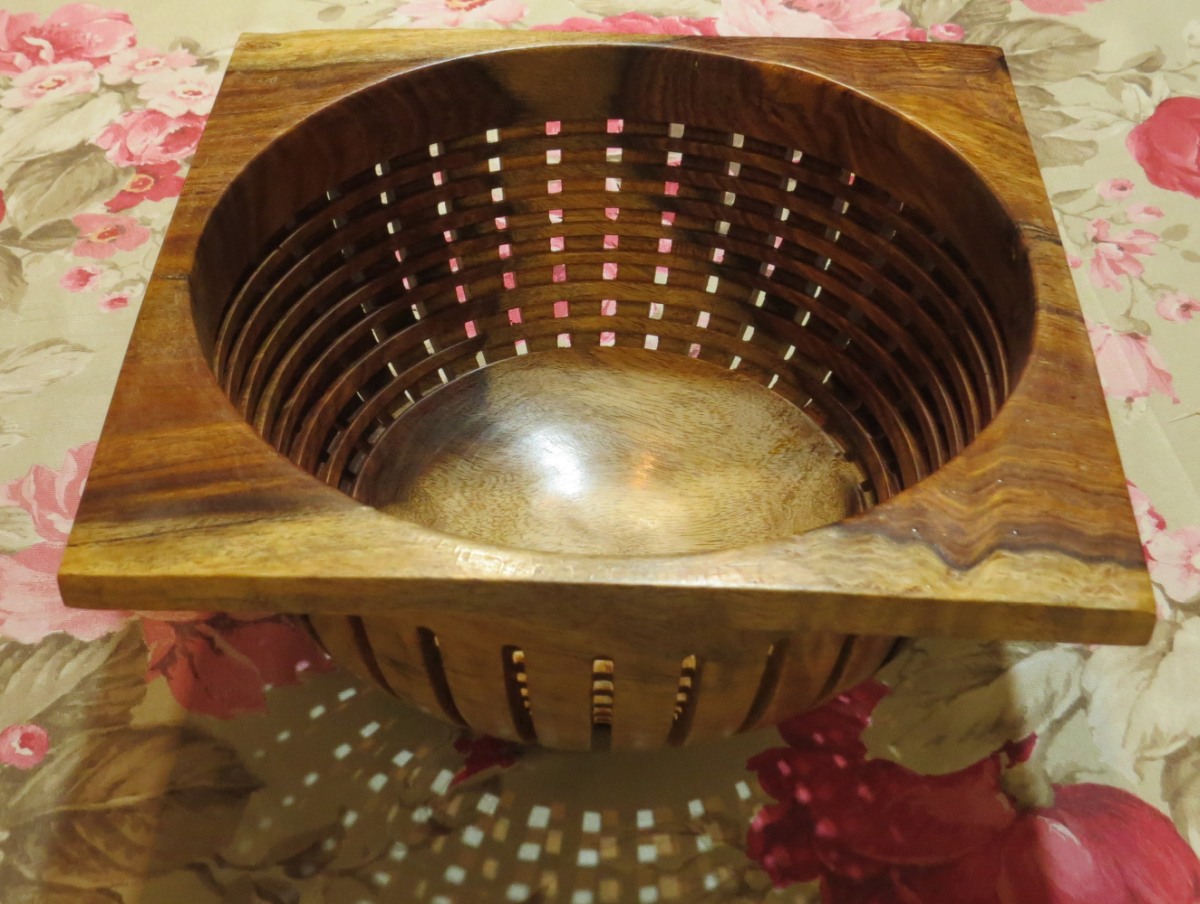
 A vessel with through criss-crosses. The walls are almost
10mm in depth and the longitude and latitude arcs go in about
half that much. The inside latitudes were carved first on the
lathe with a parting tool while the outside longitude arcs
were curved second using the routing device shown on the left
image. Both arcs are about 5mm in width. Indian Rosewood,
over 20cm in diameter.
A vessel with through criss-crosses. The walls are almost
10mm in depth and the longitude and latitude arcs go in about
half that much. The inside latitudes were carved first on the
lathe with a parting tool while the outside longitude arcs
were curved second using the routing device shown on the left
image. Both arcs are about 5mm in width. Indian Rosewood,
over 20cm in diameter.
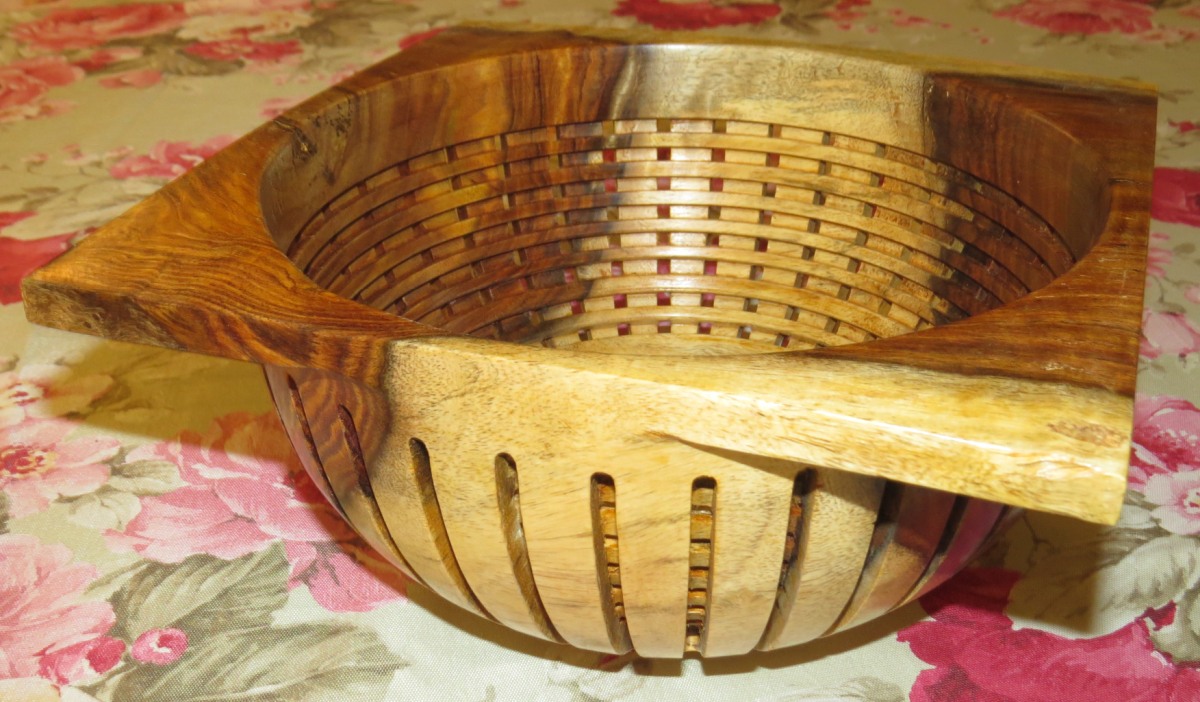
The Utah Teapot
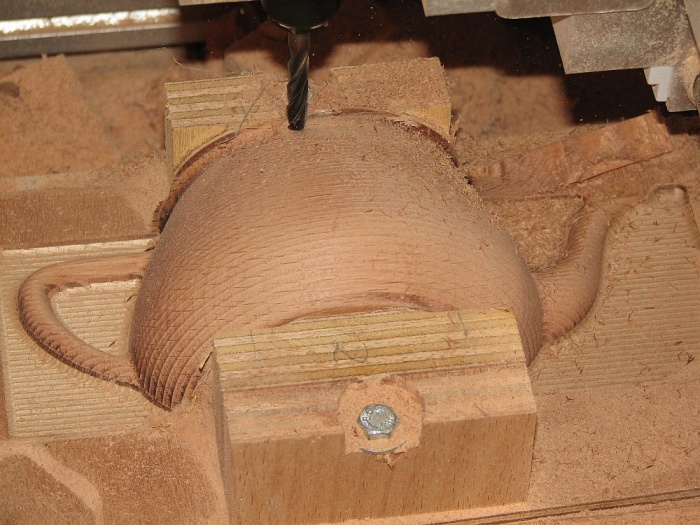
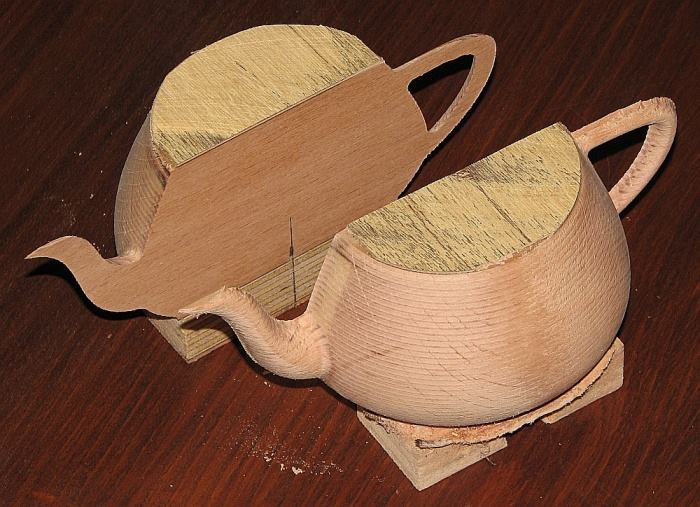

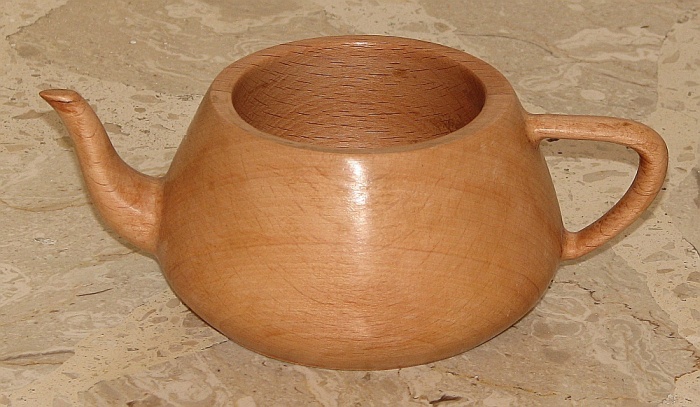
 As one of the most famous models in computer graphics and geometric
modeling, here is a wooden version of the Utah Teapot. Yet another
combination of (mostly) CNC (top left), making two half-teapots, and
turning on a lathe (top right) the inside. Beech wood.
As one of the most famous models in computer graphics and geometric
modeling, here is a wooden version of the Utah Teapot. Yet another
combination of (mostly) CNC (top left), making two half-teapots, and
turning on a lathe (top right) the inside. Beech wood.
3D Vasarely style stripes


 Victor Vasarely (1906-1997), the `father' of OpArt, produced several
pictures in which nearly parallel black stripes on a white background
bend and deform locally to produce striking Gestalt 3D effects.
Inspired by Vasarely's art, in this work we produce a 3D wood version
of two such emblems combined together in 3D, Israel's Menorah and the
David star, that are coming to life independently, from two different
viewing angles. Made off sequoia tree, and combined wood turning and
CNC work (left image). Thanks go to Uriel Bareven that helped
slicing this stock, from Sequoia.
Victor Vasarely (1906-1997), the `father' of OpArt, produced several
pictures in which nearly parallel black stripes on a white background
bend and deform locally to produce striking Gestalt 3D effects.
Inspired by Vasarely's art, in this work we produce a 3D wood version
of two such emblems combined together in 3D, Israel's Menorah and the
David star, that are coming to life independently, from two different
viewing angles. Made off sequoia tree, and combined wood turning and
CNC work (left image). Thanks go to Uriel Bareven that helped
slicing this stock, from Sequoia.
Dithering by curves

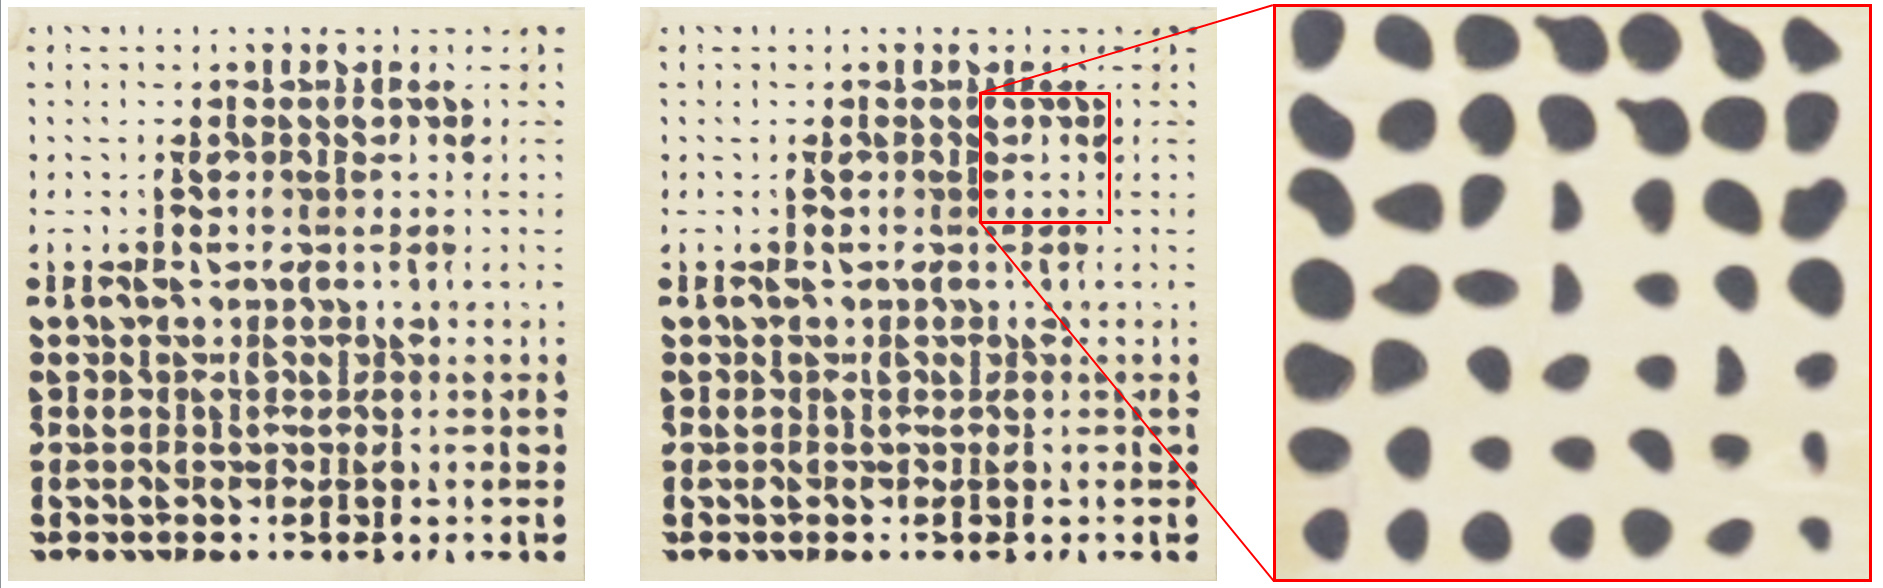 Dithering is a process of creating gradual color changes by
using a (small) finite set of colors. Herein, we recreate a
gray level image of Herzl using random black filled curves over
light (birch plywood wood) background. Each pixel in the original
image on the left (but low resolution sampled to 30 by 30) is
mapped to a black freeform random curve, cut as a hole in a light
wood (next to left image).
The two right images show a zoom-in on a small portion of the
image.
Curves were randomly crafted to cover varying percentages of
the unit (pixel) square and the proper covering curve was selected
based on the gray level of every pixel. These 900 holes were
then cut with the aid of CNC.
See also Dithered lamp shade
Dithering is a process of creating gradual color changes by
using a (small) finite set of colors. Herein, we recreate a
gray level image of Herzl using random black filled curves over
light (birch plywood wood) background. Each pixel in the original
image on the left (but low resolution sampled to 30 by 30) is
mapped to a black freeform random curve, cut as a hole in a light
wood (next to left image).
The two right images show a zoom-in on a small portion of the
image.
Curves were randomly crafted to cover varying percentages of
the unit (pixel) square and the proper covering curve was selected
based on the gray level of every pixel. These 900 holes were
then cut with the aid of CNC.
See also Dithered lamp shade
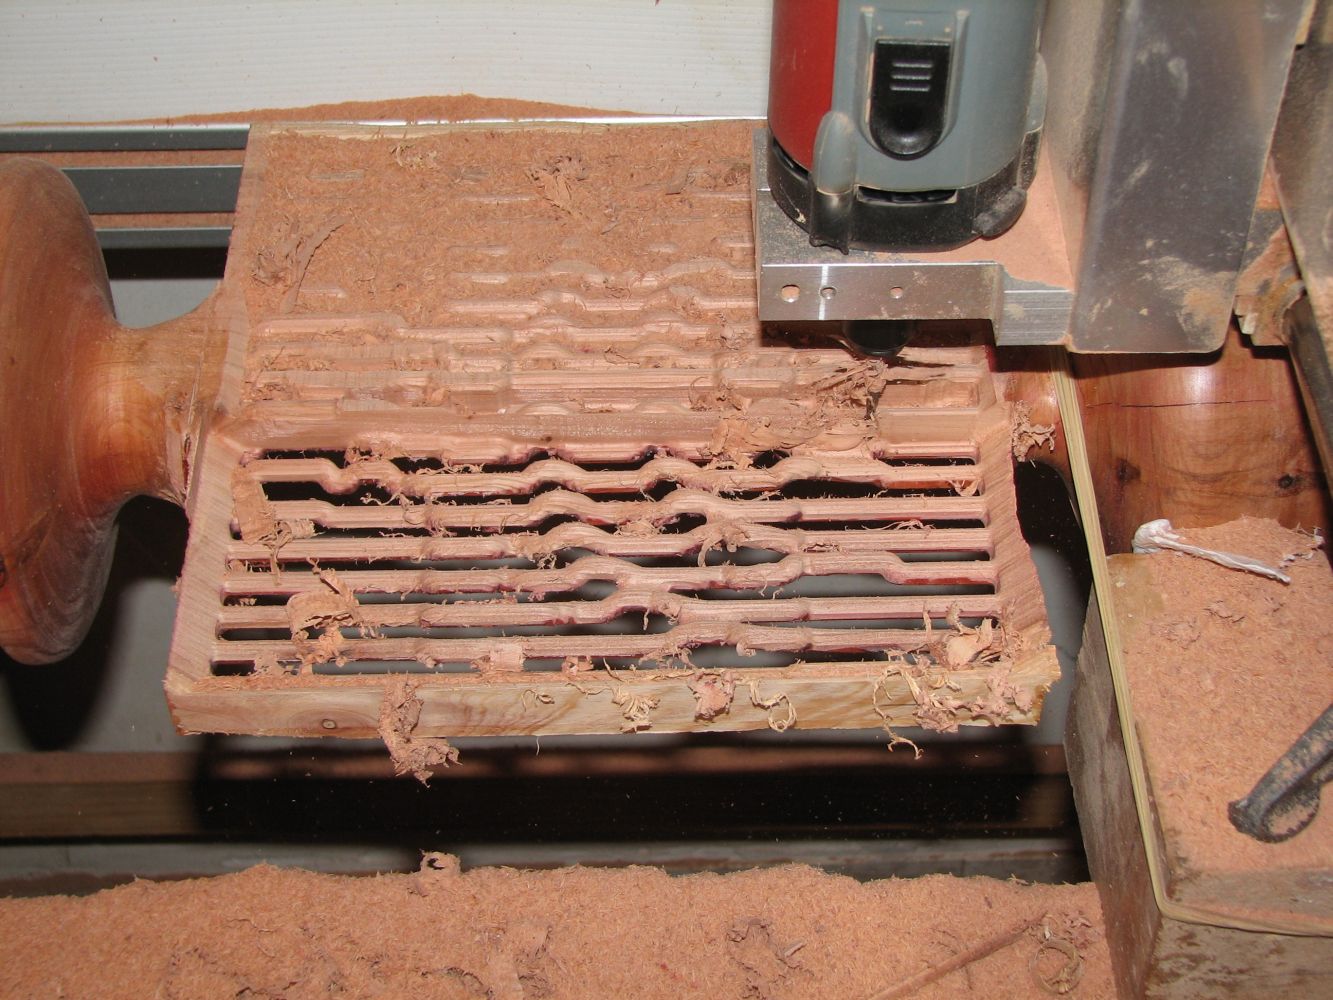
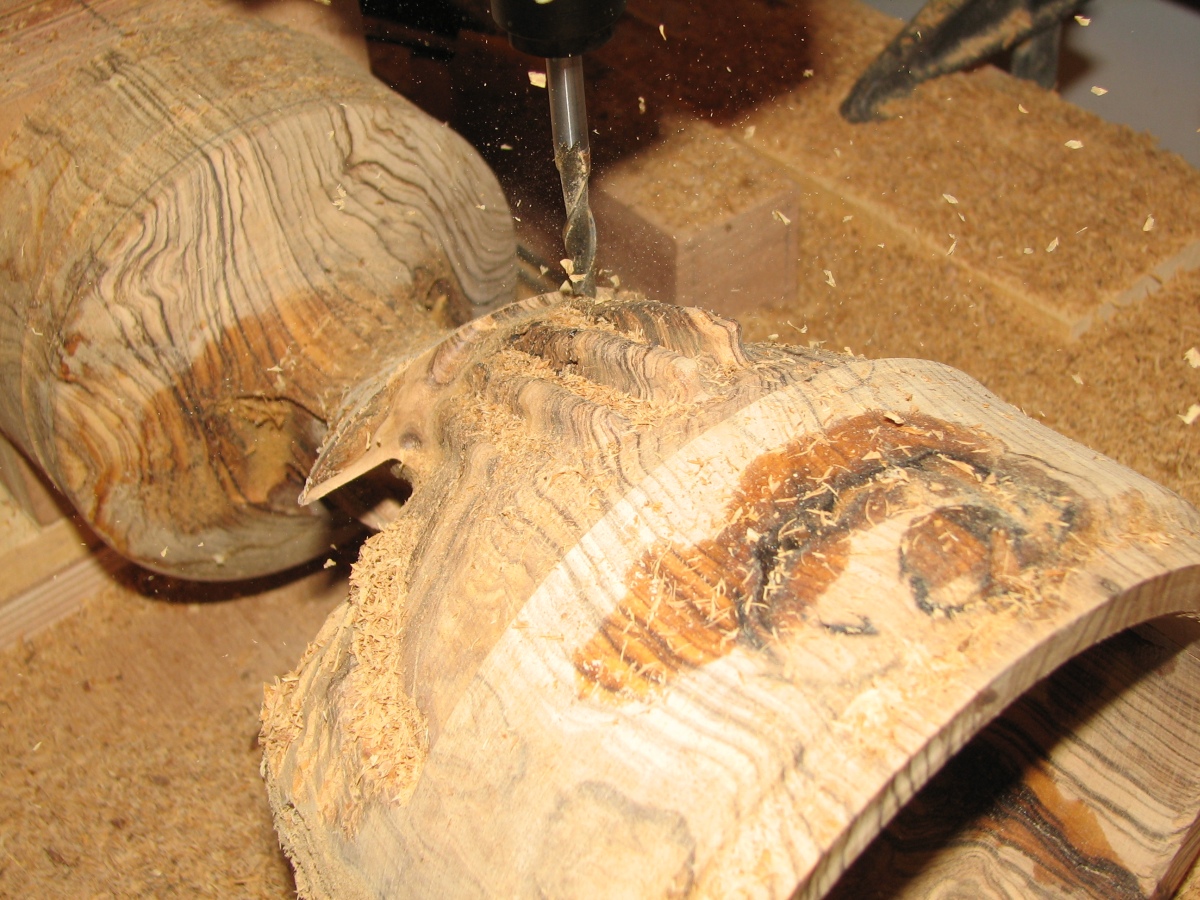
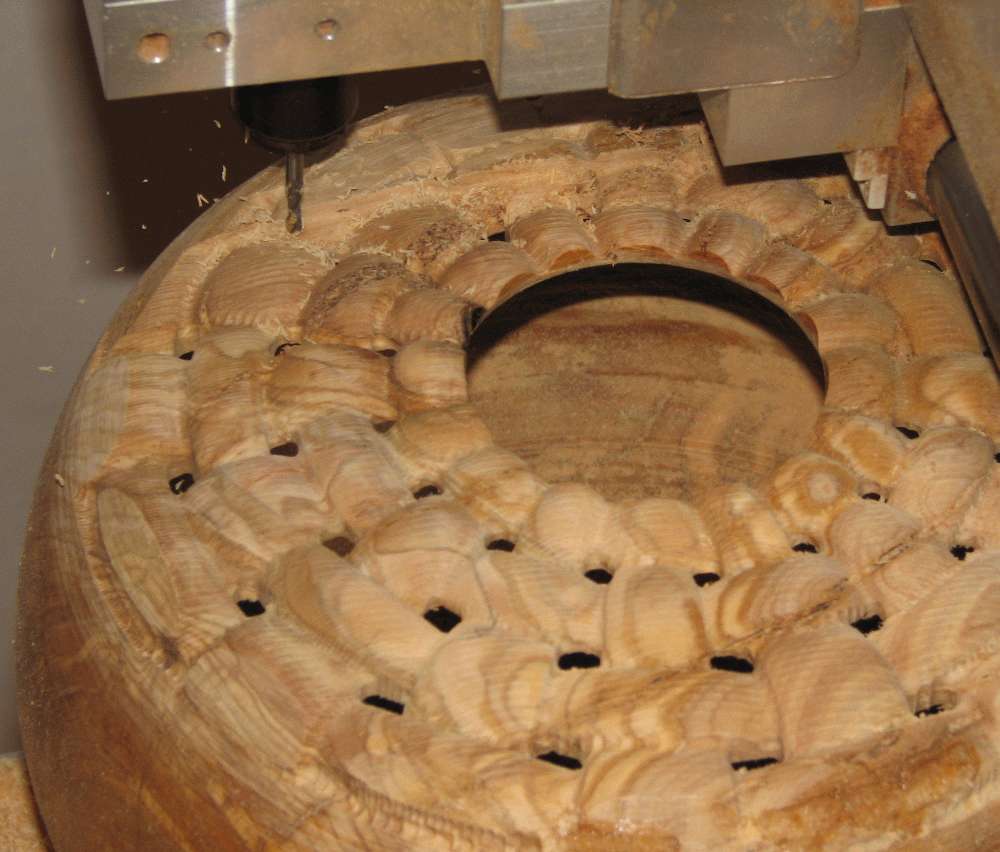
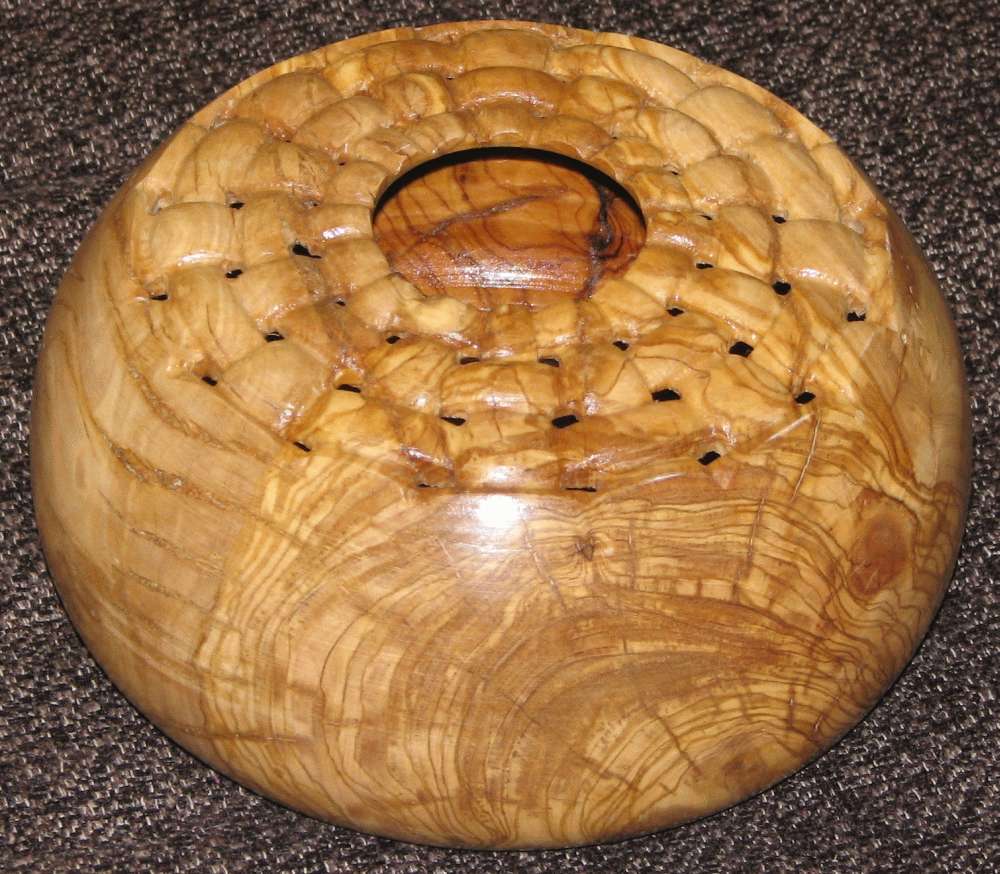
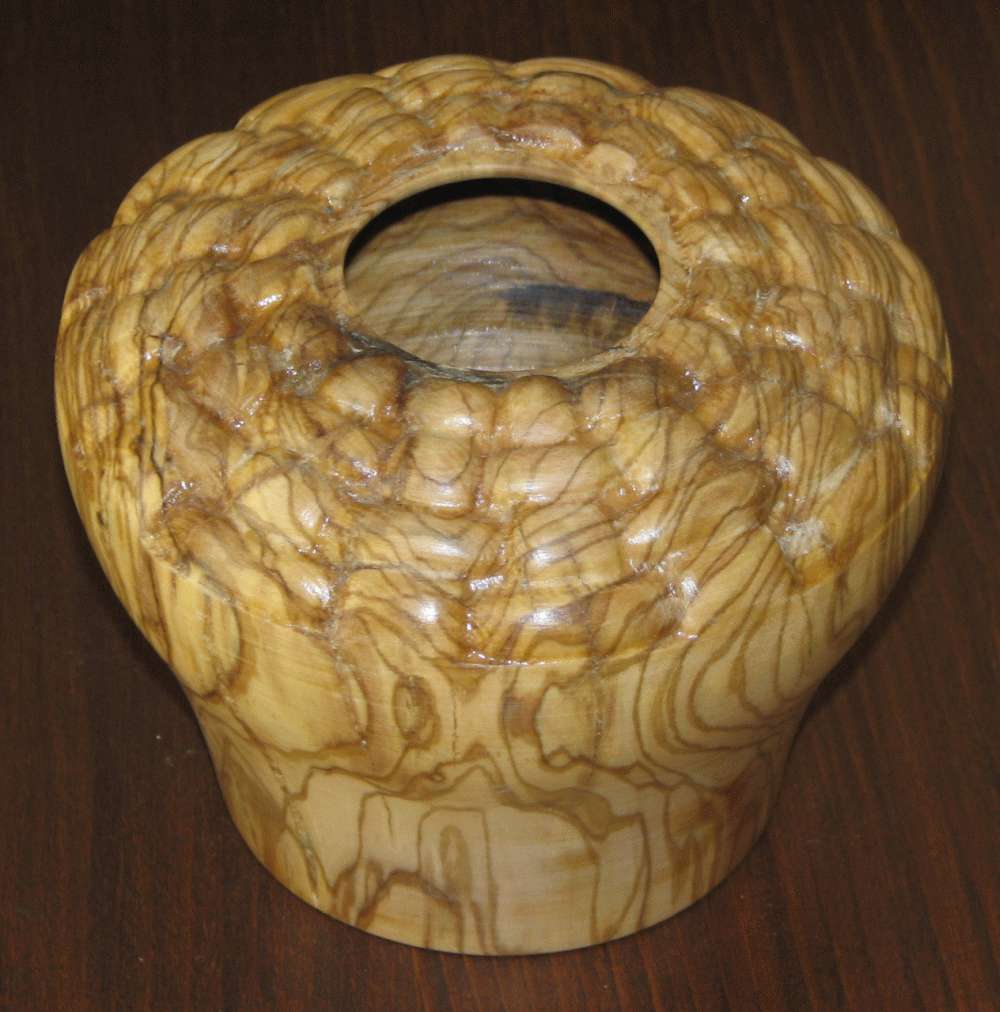
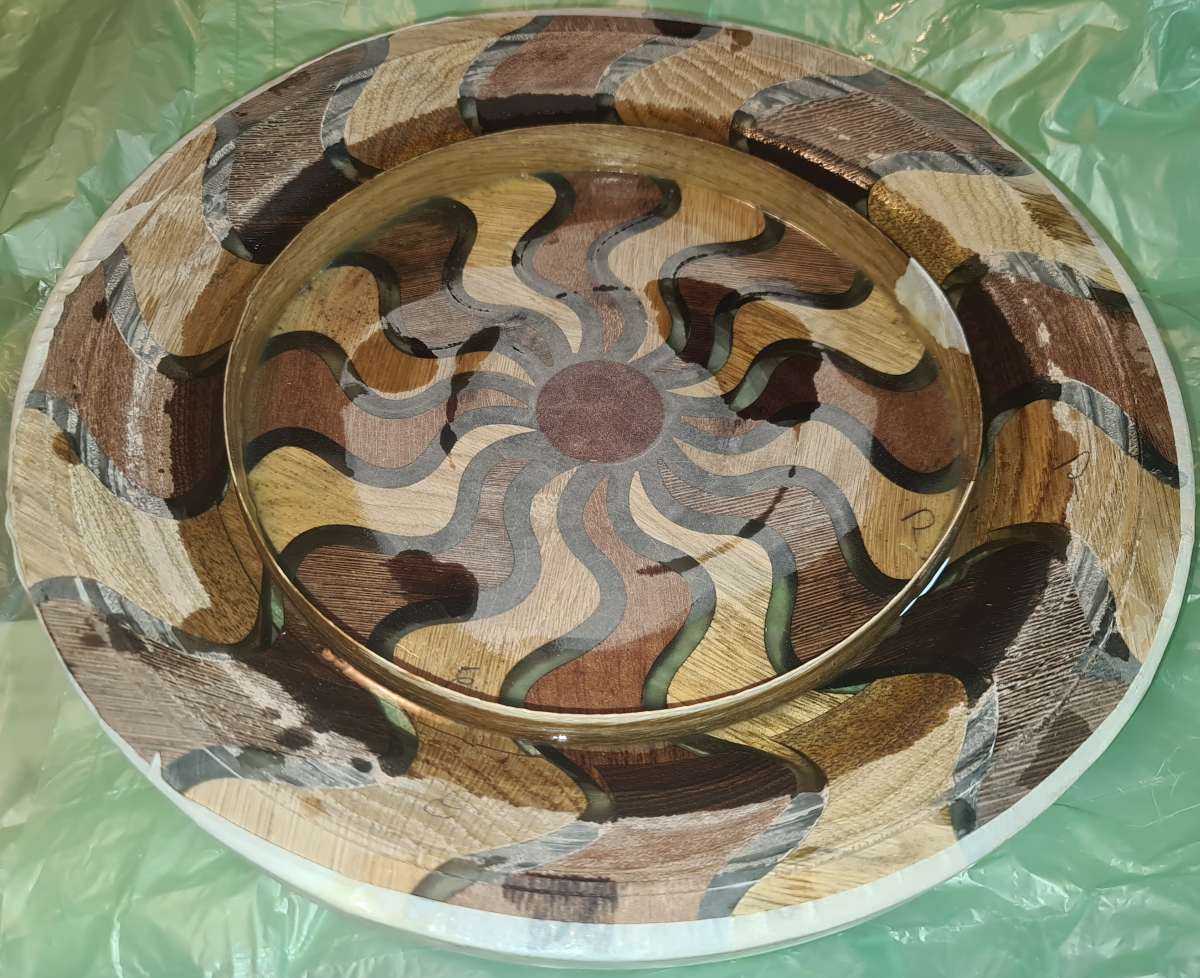
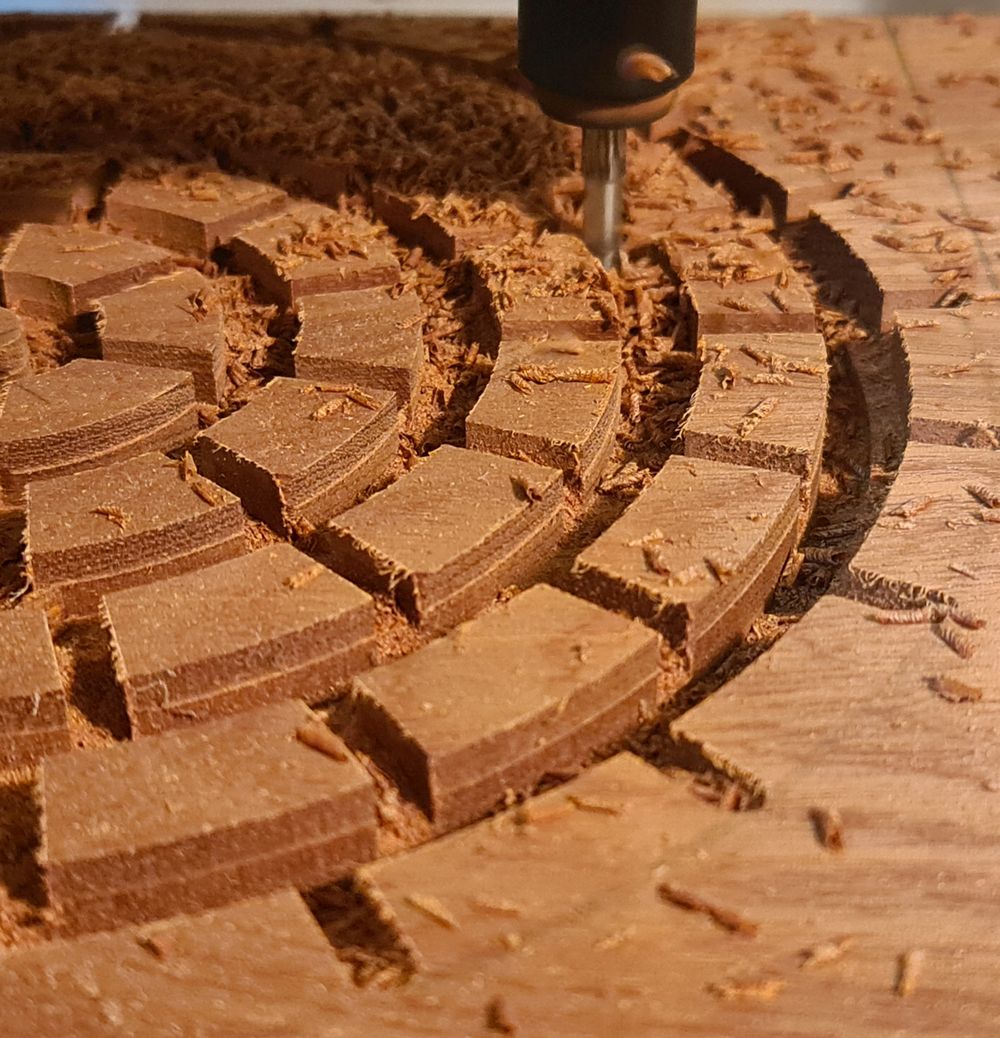
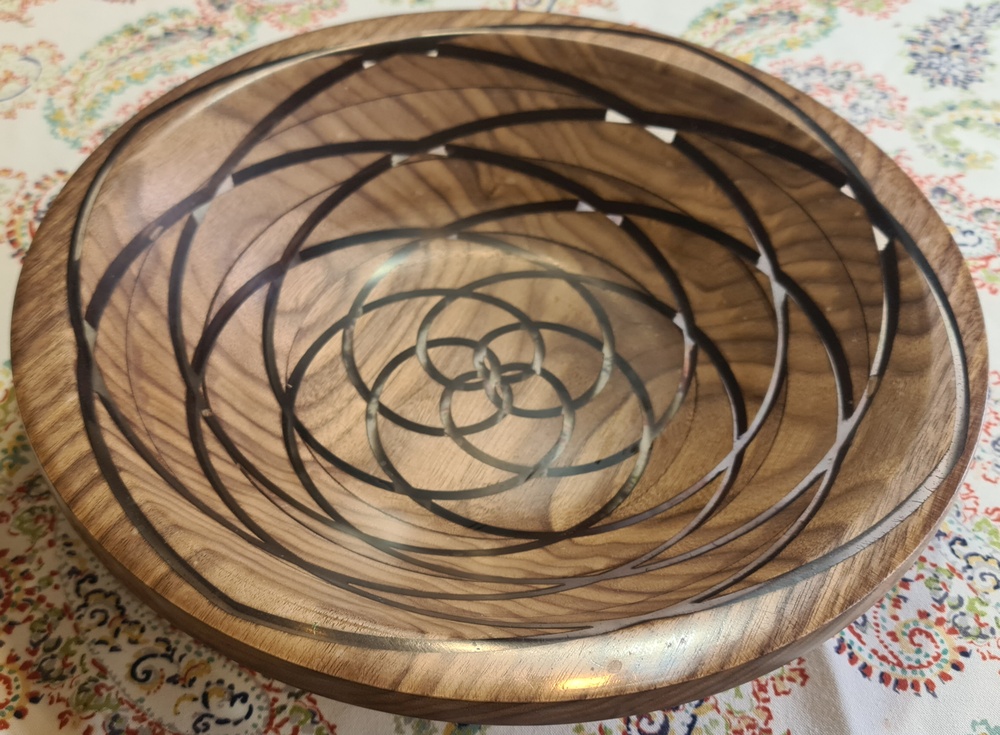
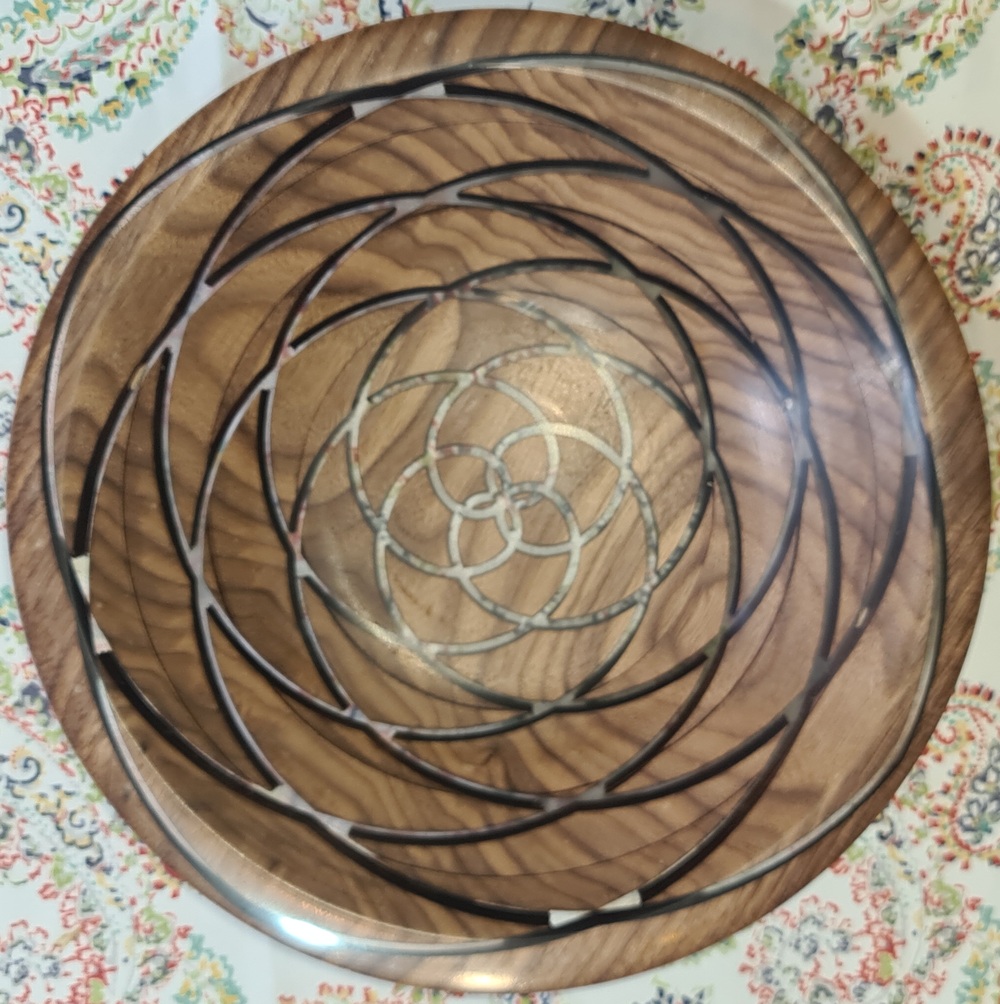
Porous wiggle vessels
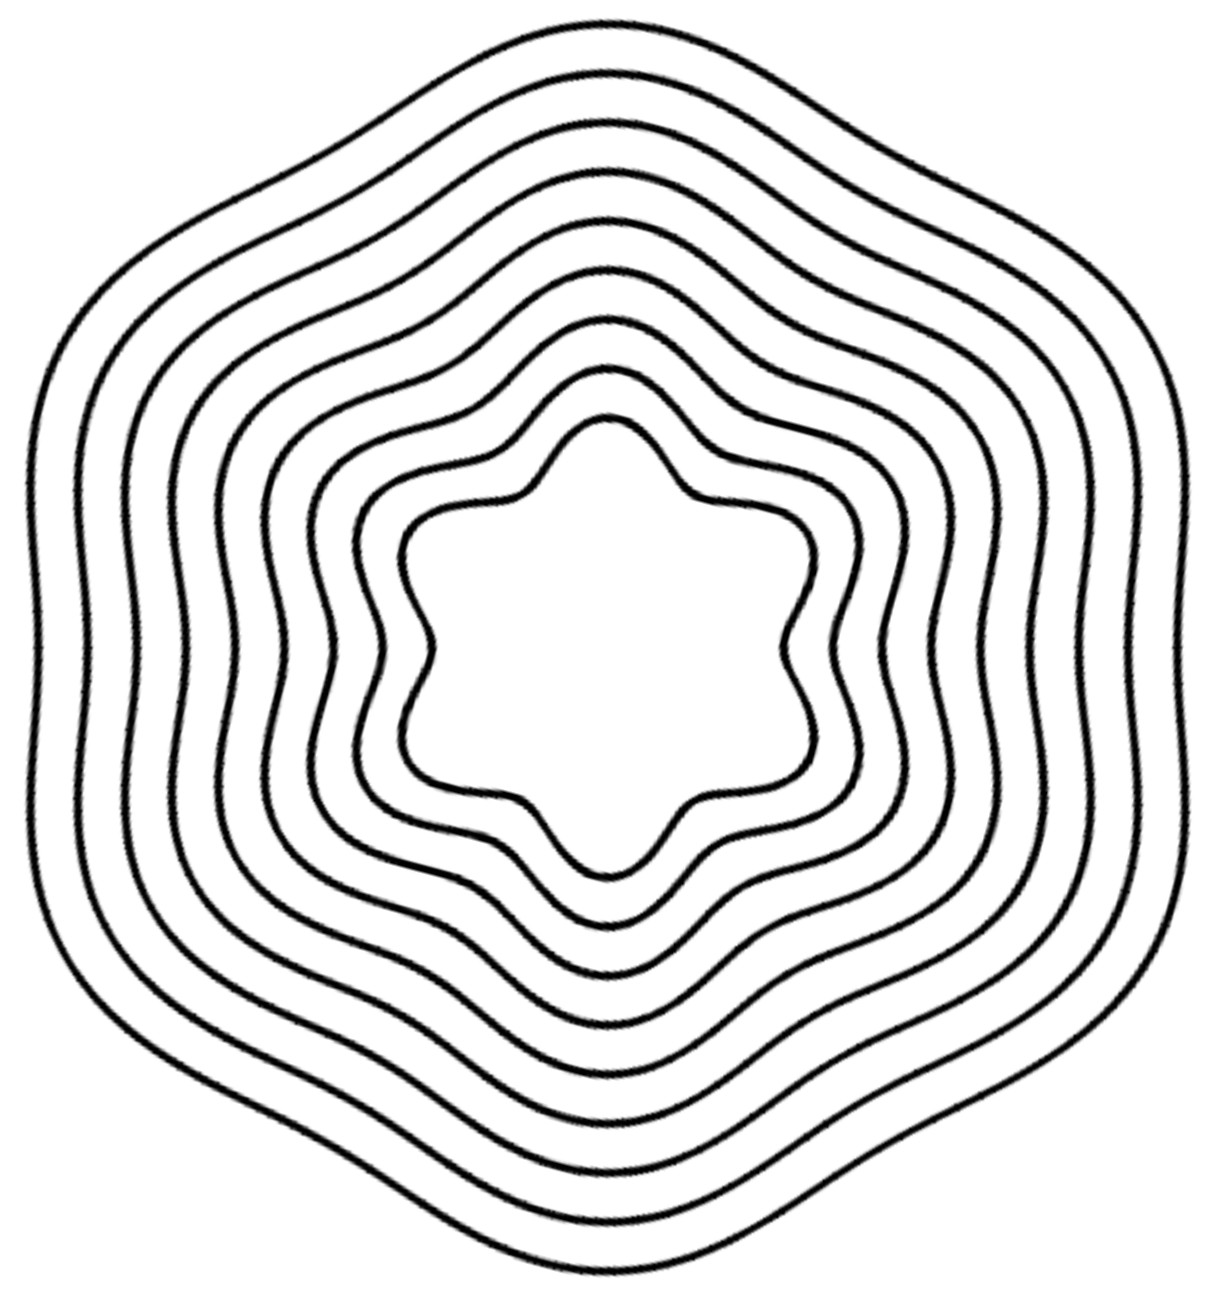
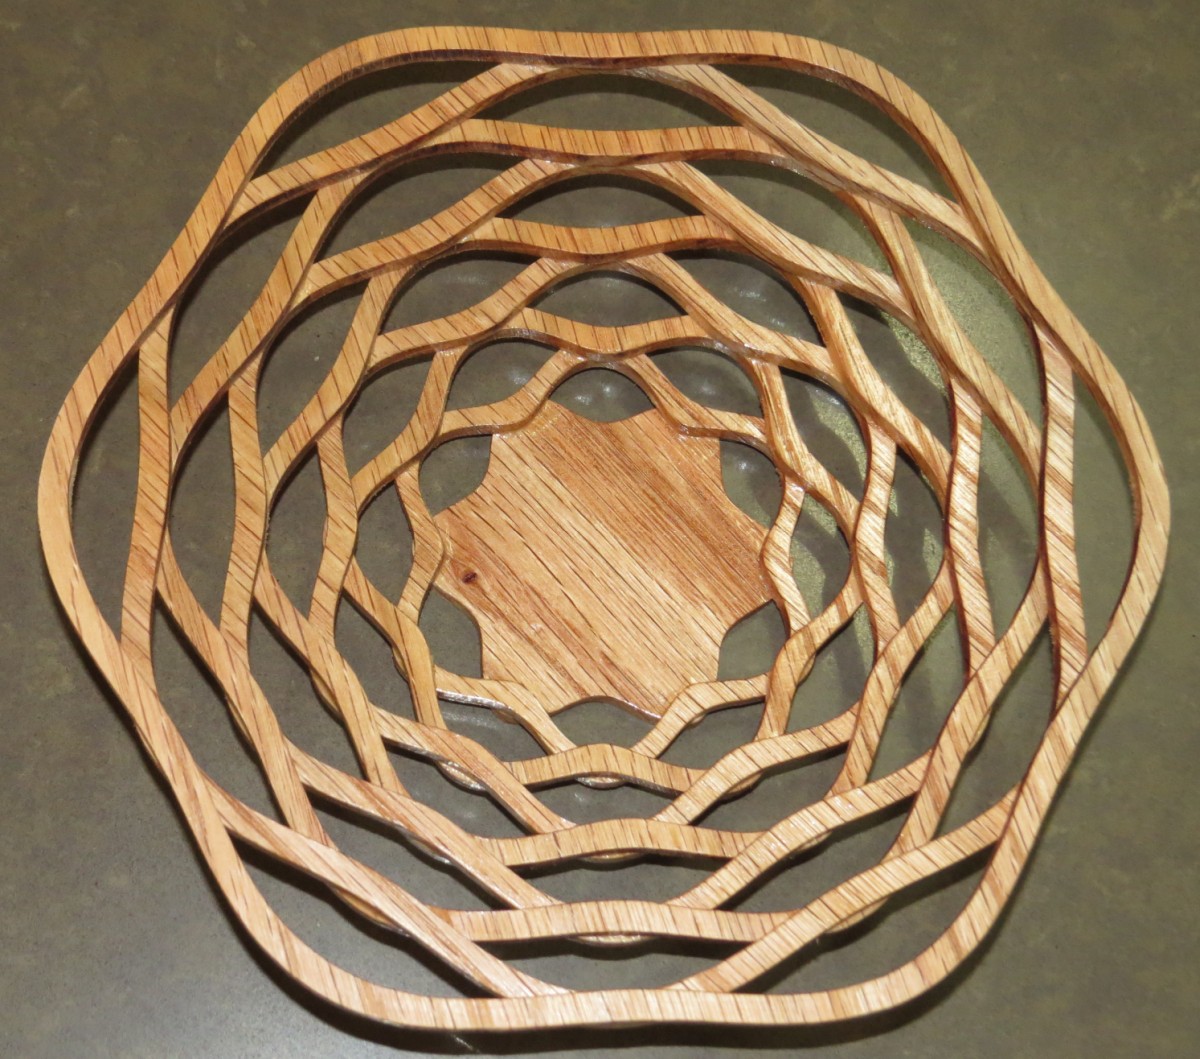
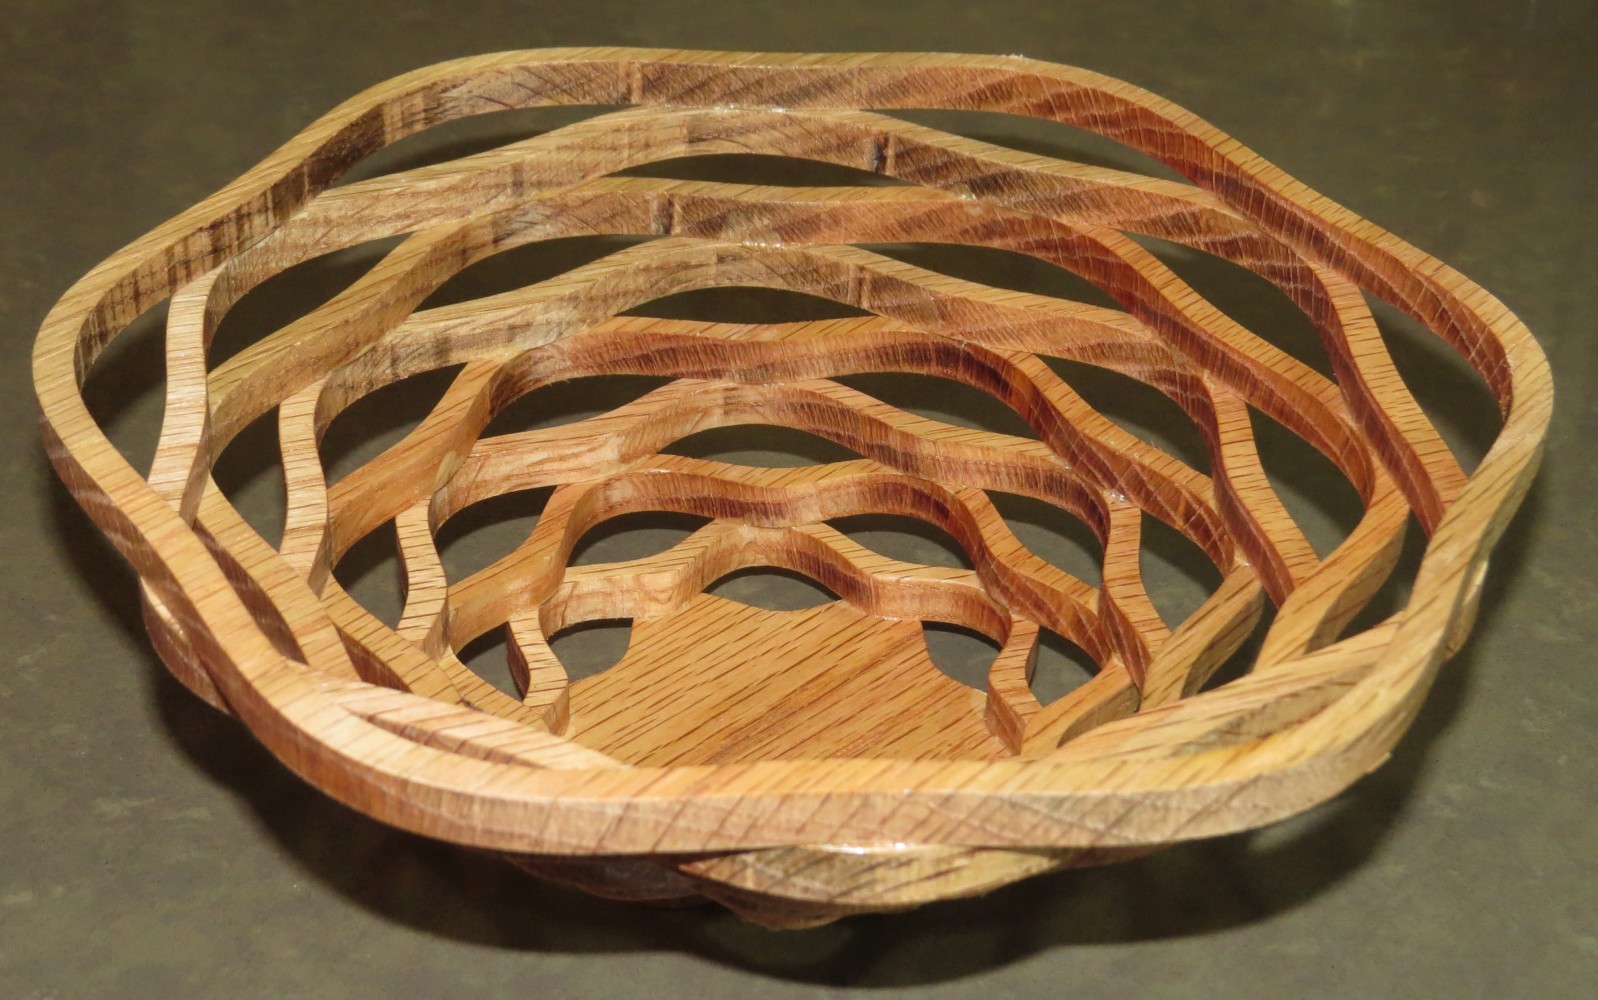
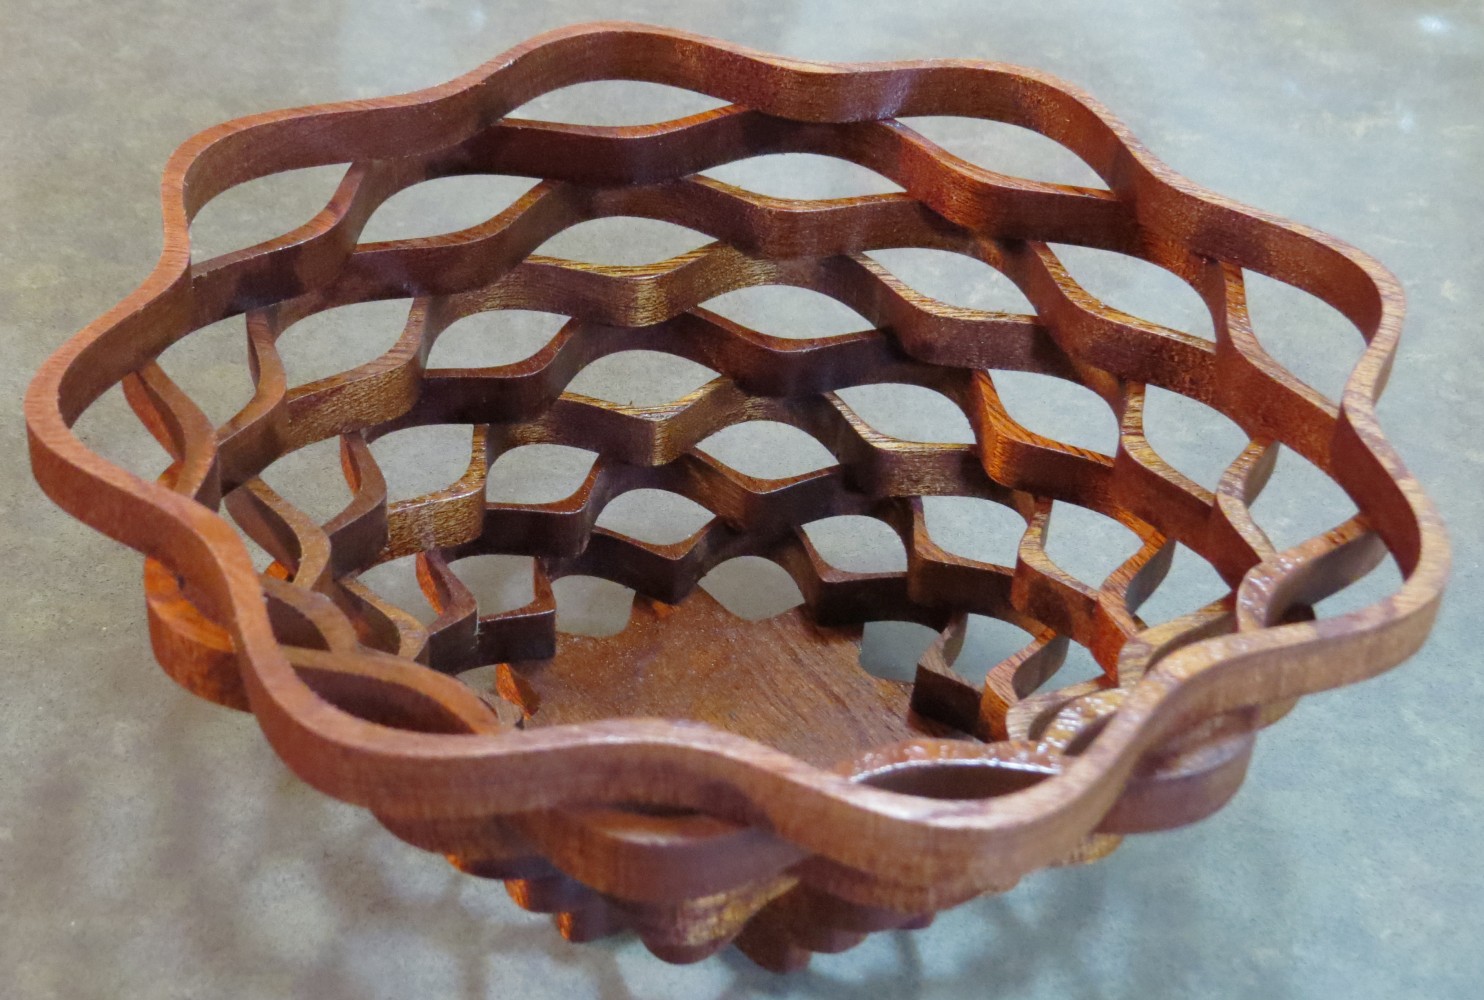
 Given the pattern shown on the top left, these concentric wiggly
rings were cut using CNC, from a few millimeters thick wooden plate.
Then, every second ring was rotated half a cycle of the pattern
and all rings were glued together.
Two such vessels are presented here, from Oak (top) and Mahogany
(bottom).
Given the pattern shown on the top left, these concentric wiggly
rings were cut using CNC, from a few millimeters thick wooden plate.
Then, every second ring was rotated half a cycle of the pattern
and all rings were glued together.
Two such vessels are presented here, from Oak (top) and Mahogany
(bottom).
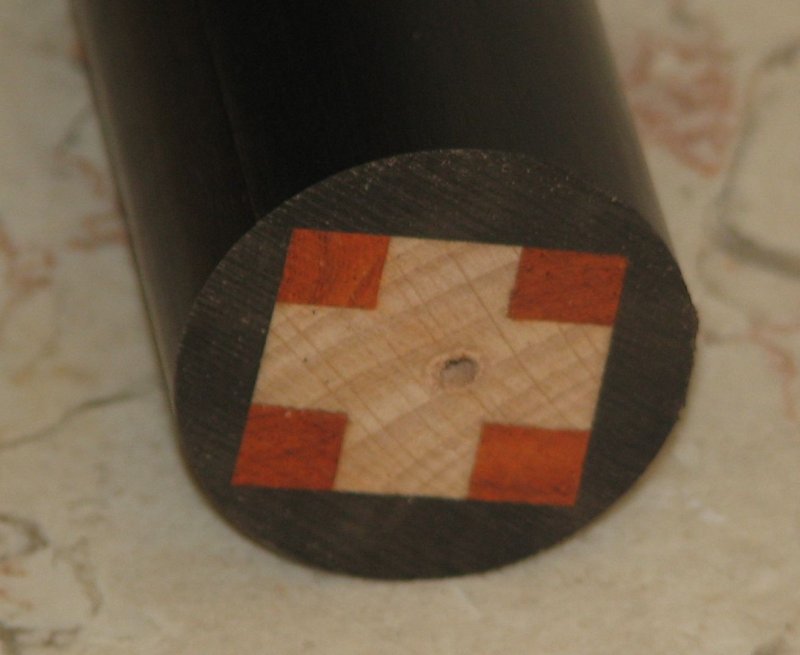
Earrings
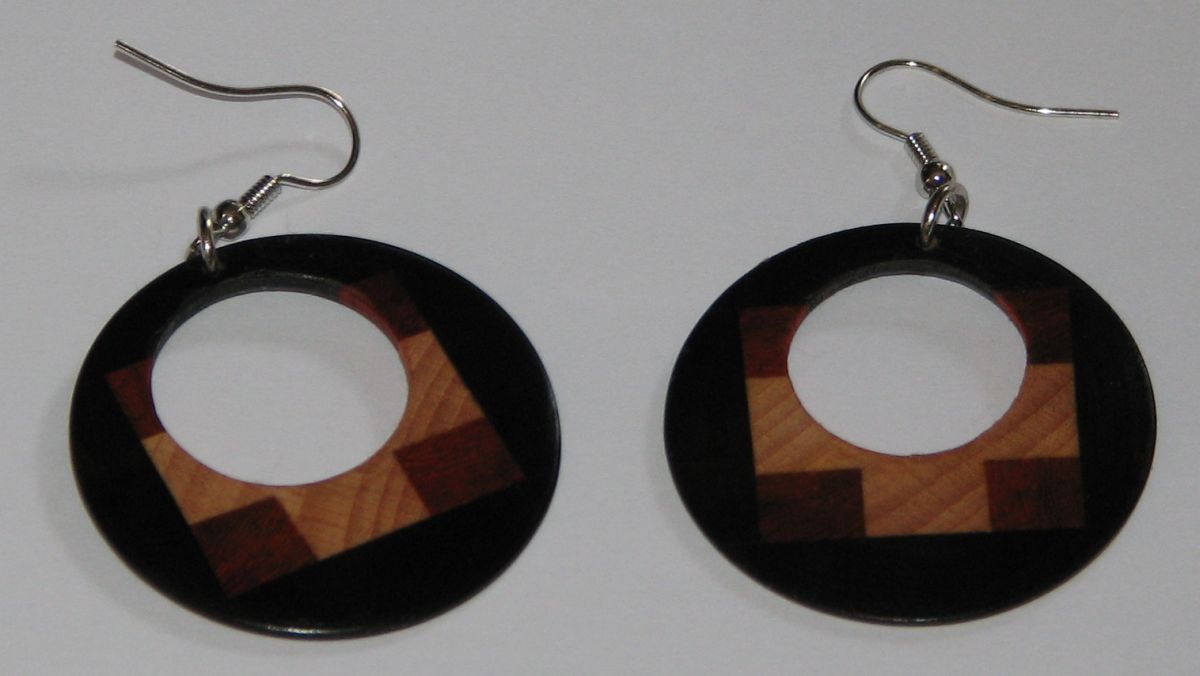
 The stock from which the earrings were (2mm thick) sliced is
shown below. A combination of Ebony, Padauk, and Beech wood.
The Ebony was rounded on a lathe.
The stock from which the earrings were (2mm thick) sliced is
shown below. A combination of Ebony, Padauk, and Beech wood.
The Ebony was rounded on a lathe.
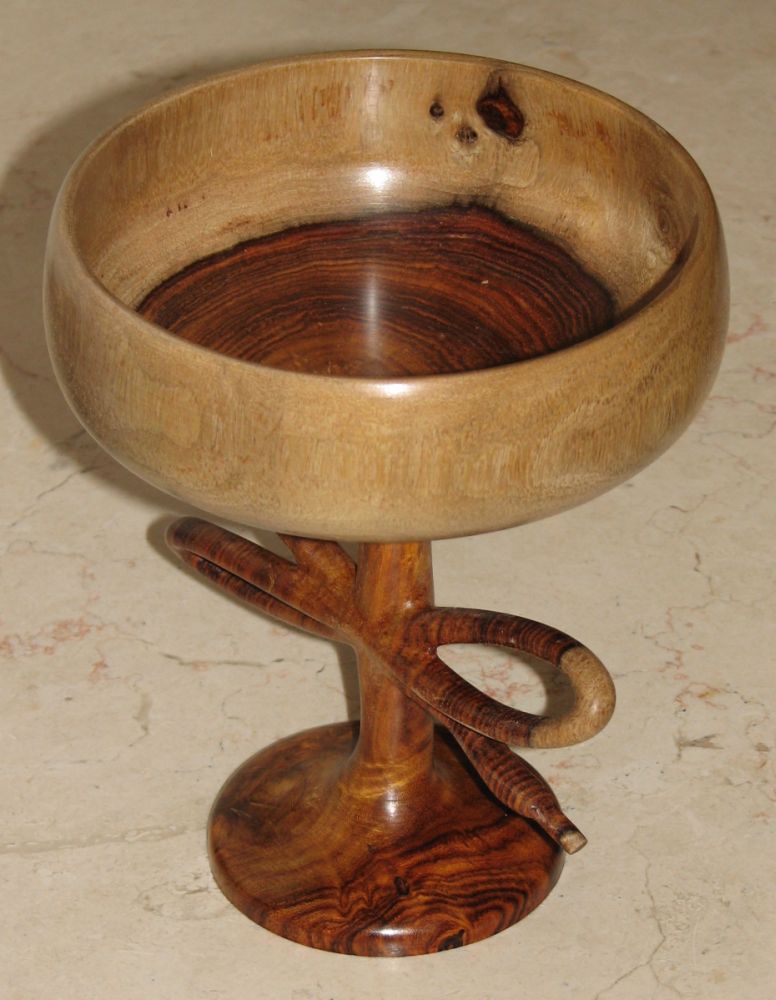
Knot neck's wine glass
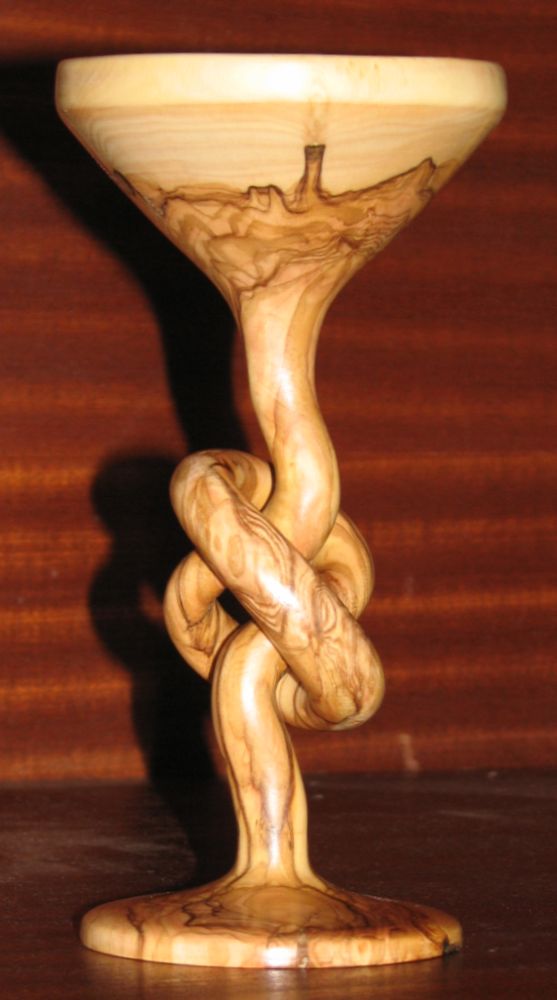
 The neck in the shape of a simple (not a) knot. The NC process is also
depicted below. Olive tree.
The neck in the shape of a simple (not a) knot. The NC process is also
depicted below. Olive tree.
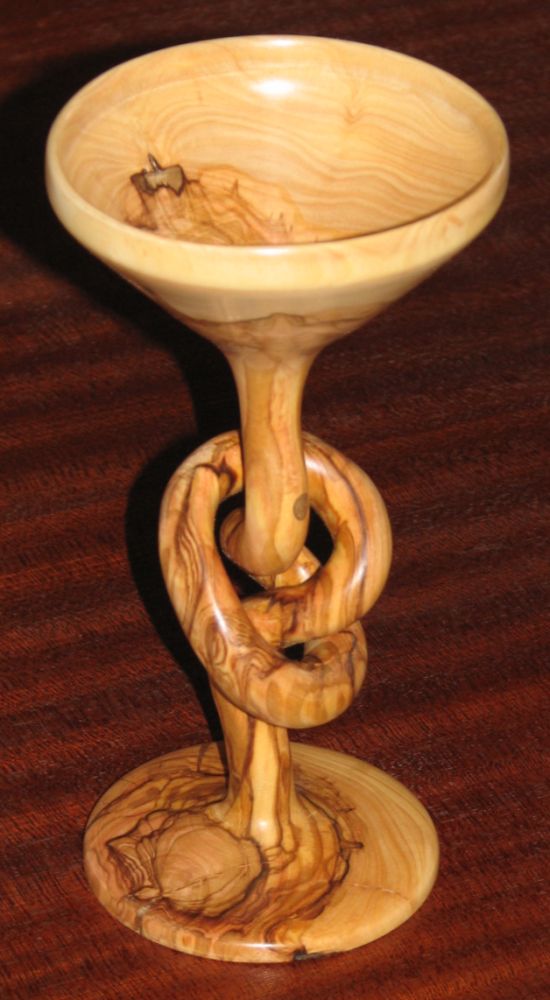
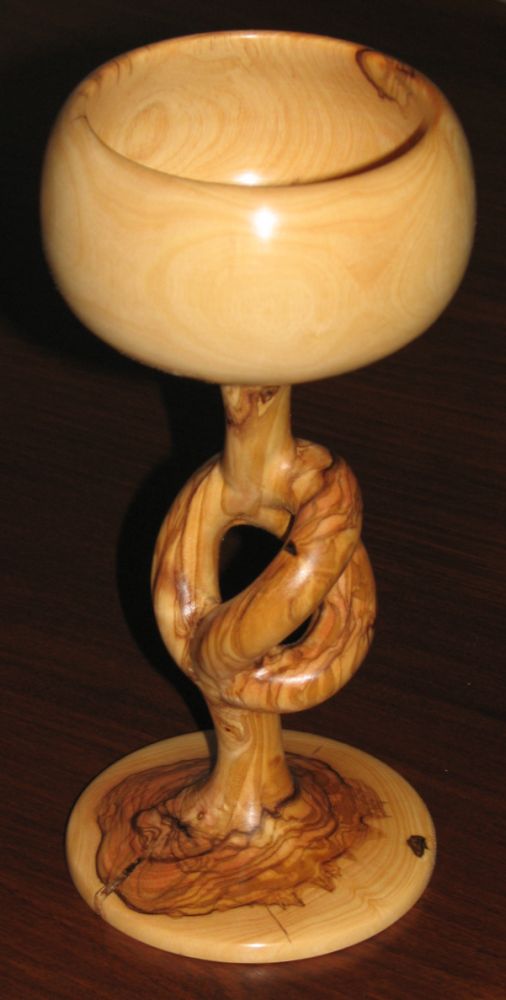
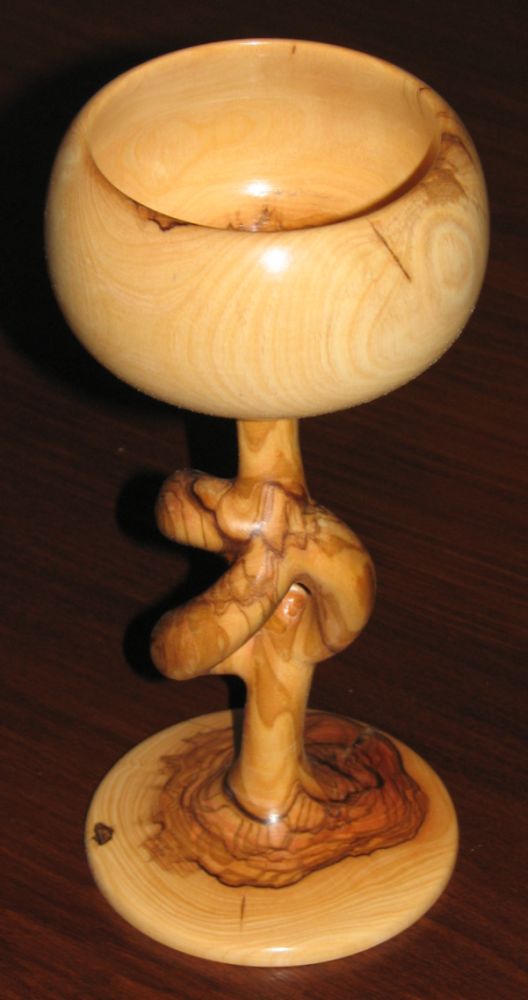
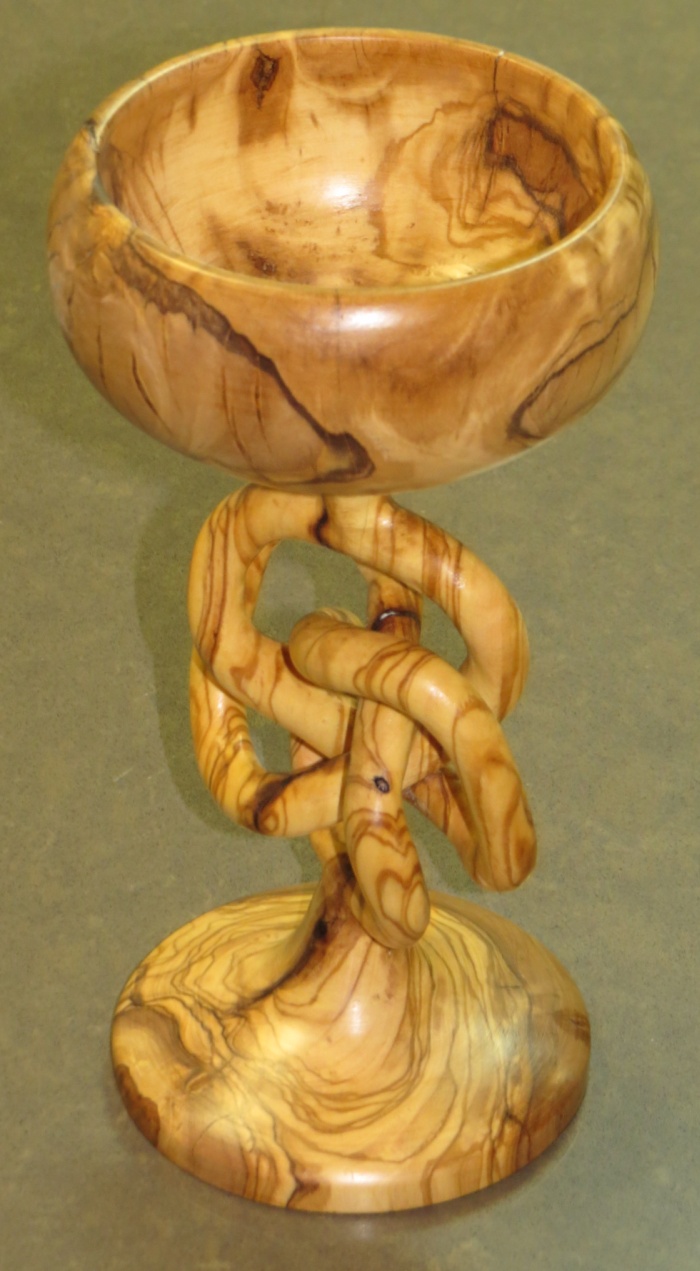
Knotted Wine Glass
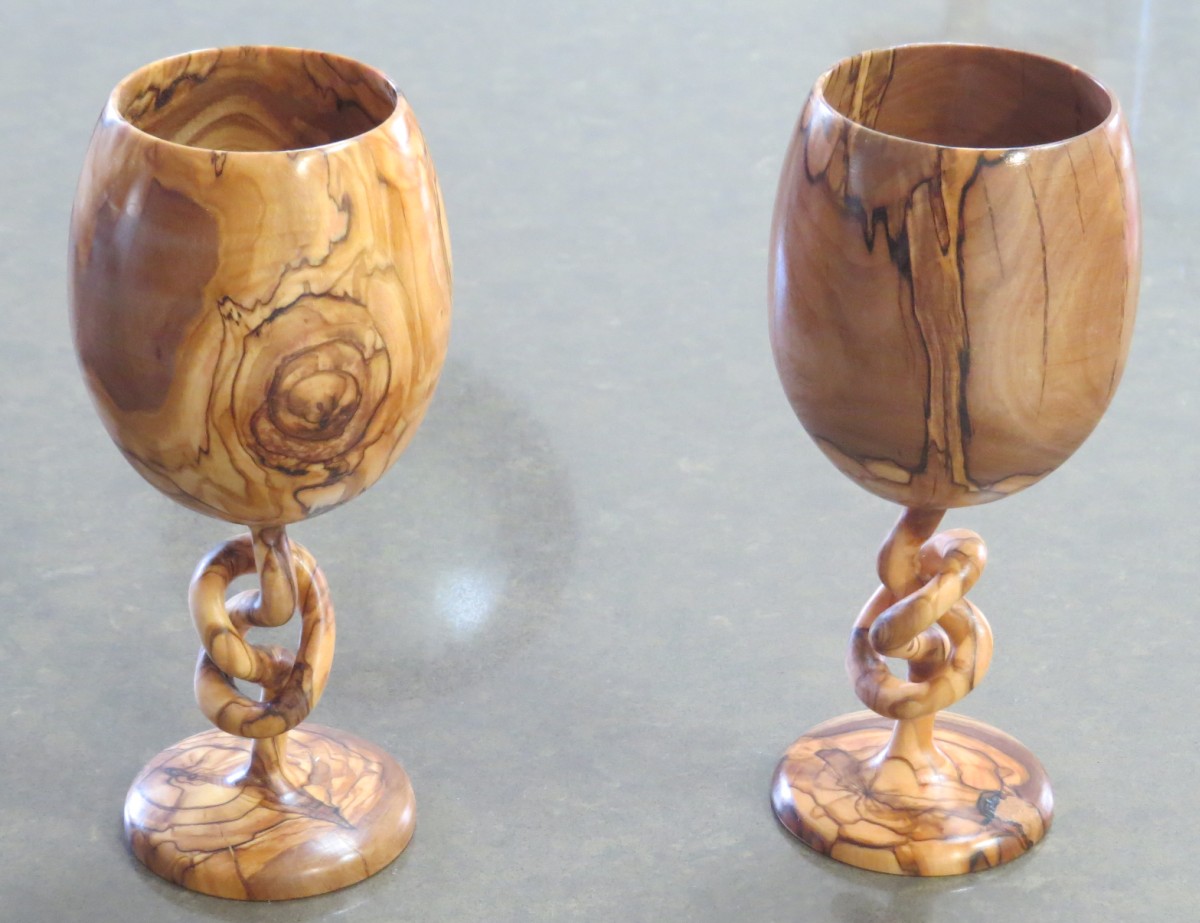
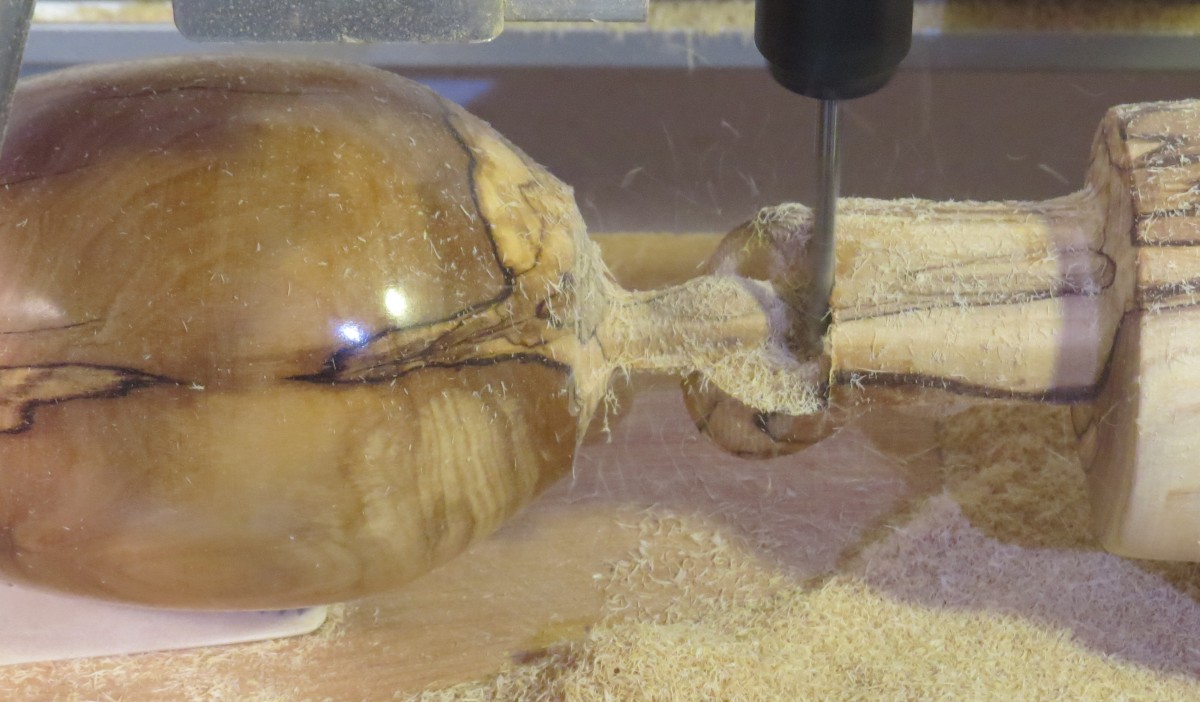 A wine glass with a knotted neck. The image on the right shows the NC step.
Olive tree.
A wine glass with a knotted neck. The image on the right shows the NC step.
Olive tree.
Shoe Knots
 Yet another combination of (very delicate) NC machining and turning.
 This image shows the NC step. Indian Rosewood tree.
A Square Knot


 Yet another variation of a square knot with both NC machining (top
left image) and turning. Both shown samples are from a highly cracked
Olive wood. Final images on the btoom right.
Yet another variation of a square knot with both NC machining (top
left image) and turning. Both shown samples are from a highly cracked
Olive wood. Final images on the btoom right.
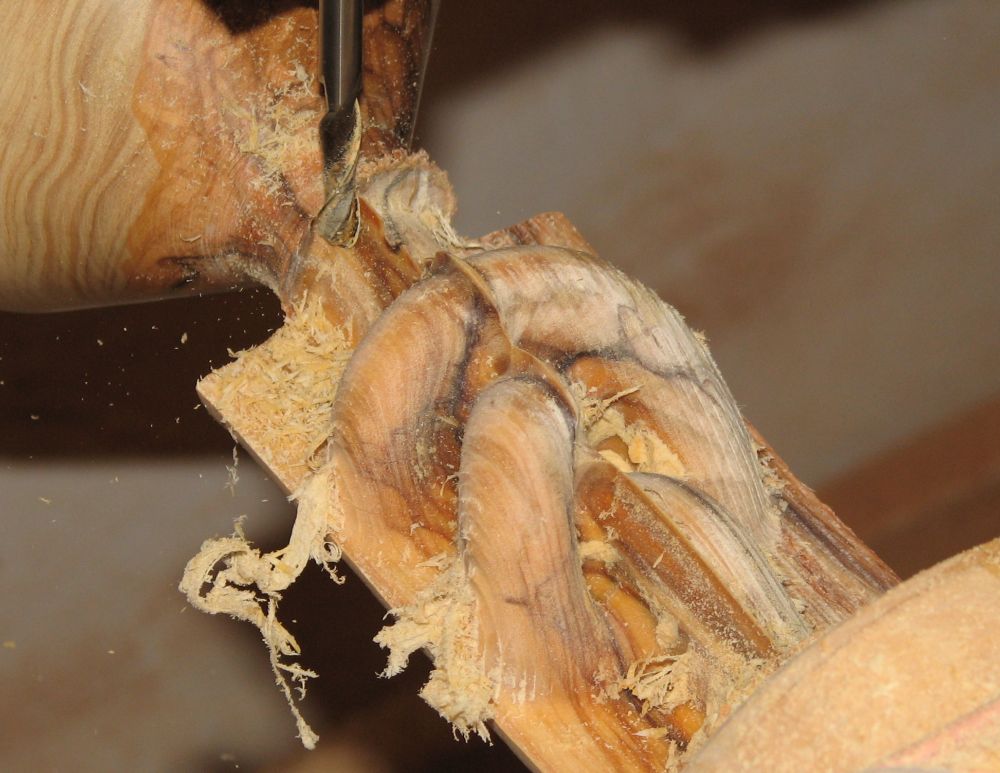
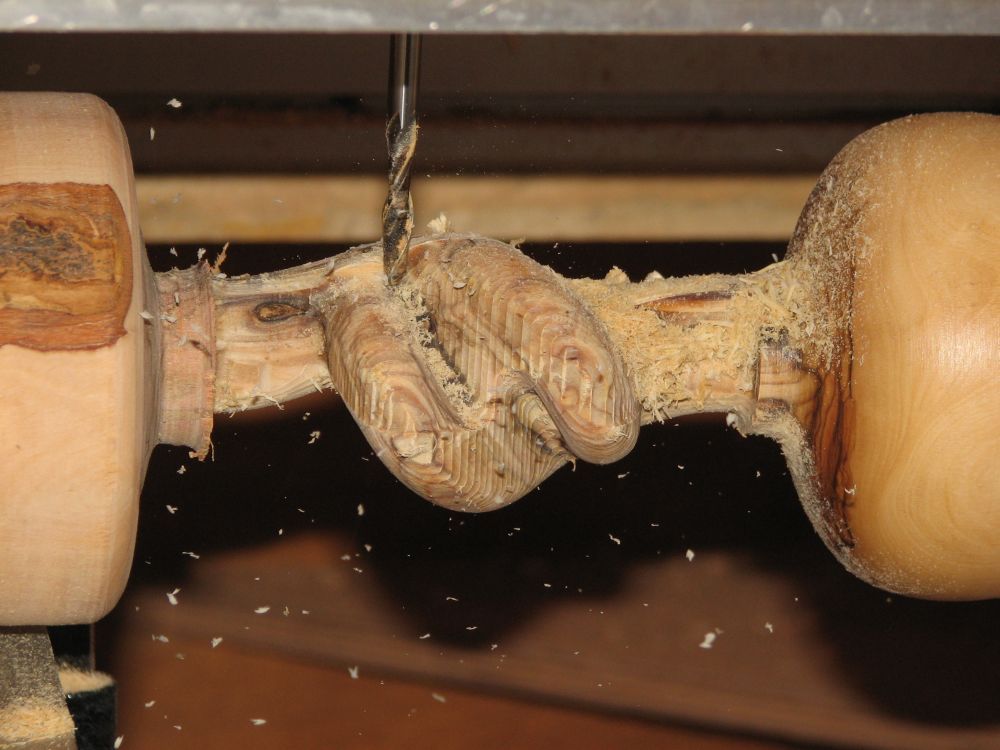
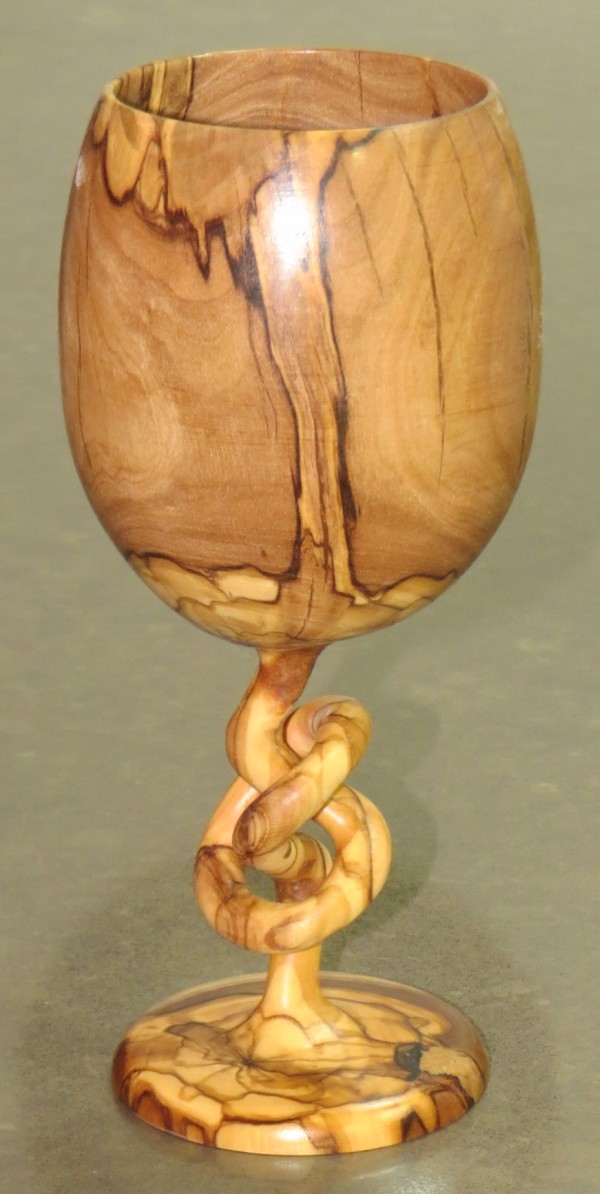
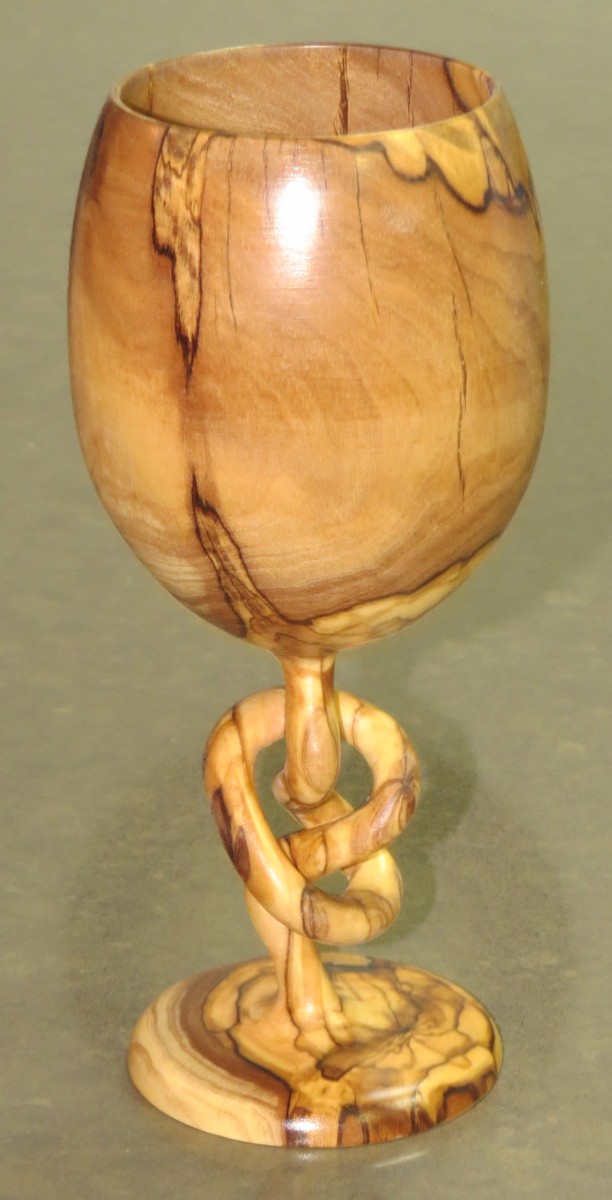
Complex knot neck's vases

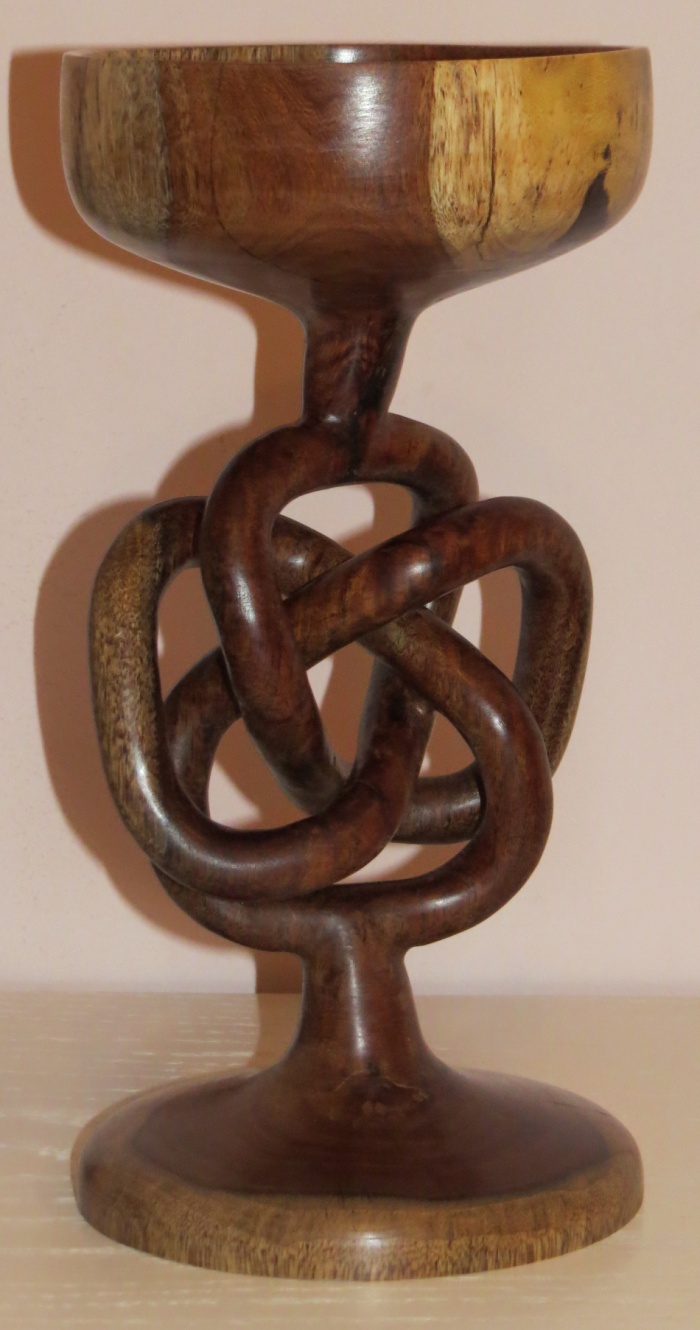
 This time the neck in the shape of a more complex knot (so much so
that I decided not to disconnect two joins if you can see
them). The left is from Olive tree and the right in Indian
Rosewood. The NC process is also depicted below.
This knot is also known as
(8n3) torus knot.
This time the neck in the shape of a more complex knot (so much so
that I decided not to disconnect two joins if you can see
them). The left is from Olive tree and the right in Indian
Rosewood. The NC process is also depicted below.
This knot is also known as
(8n3) torus knot.


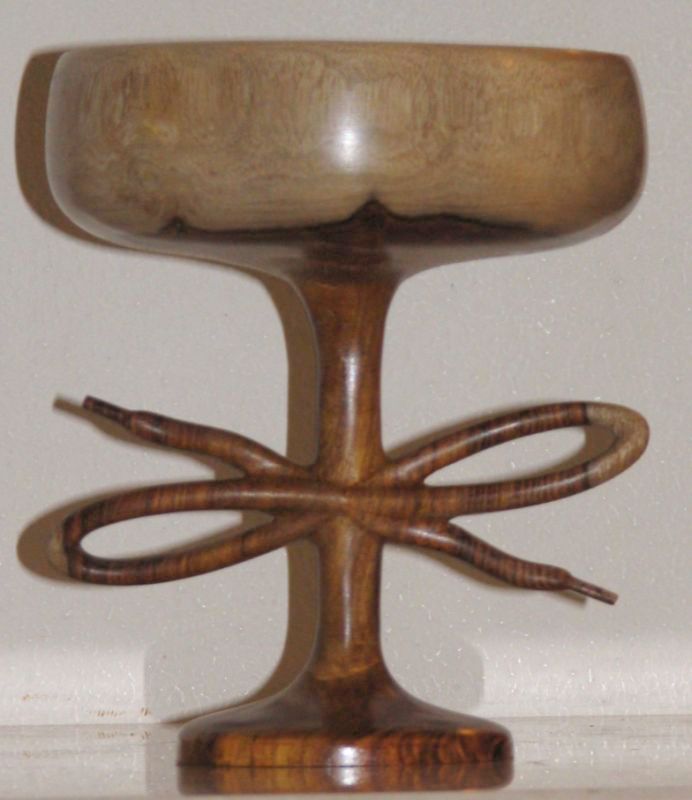
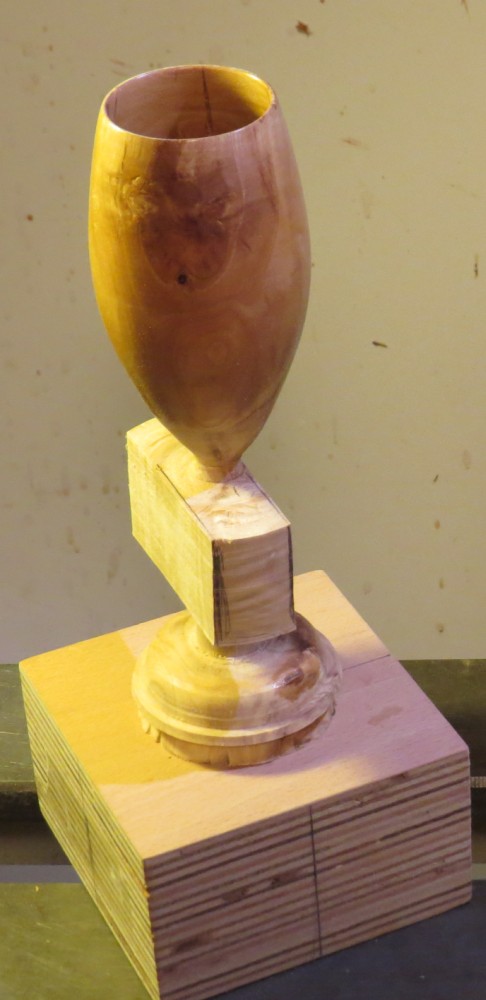
Bow Tie Wine Glass
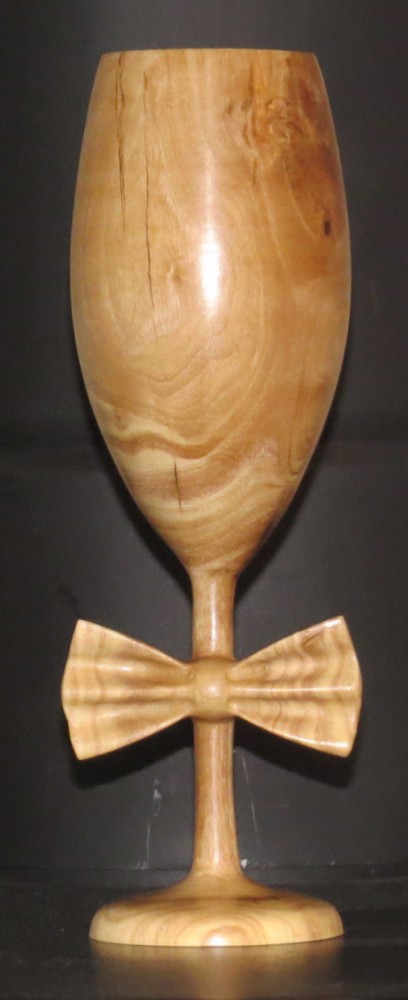
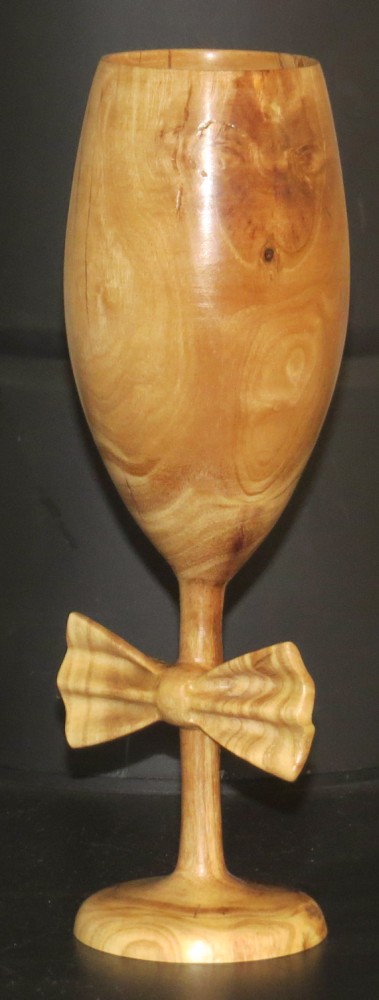
 A gentleman wine glass with a Bow Tie.
The rightmost image shows another variant. Olive tree.
The images below show the steps (left to right): the turning,
preparation for CNC, and the CNC itself.
A gentleman wine glass with a Bow Tie.
The rightmost image shows another variant. Olive tree.
The images below show the steps (left to right): the turning,
preparation for CNC, and the CNC itself.

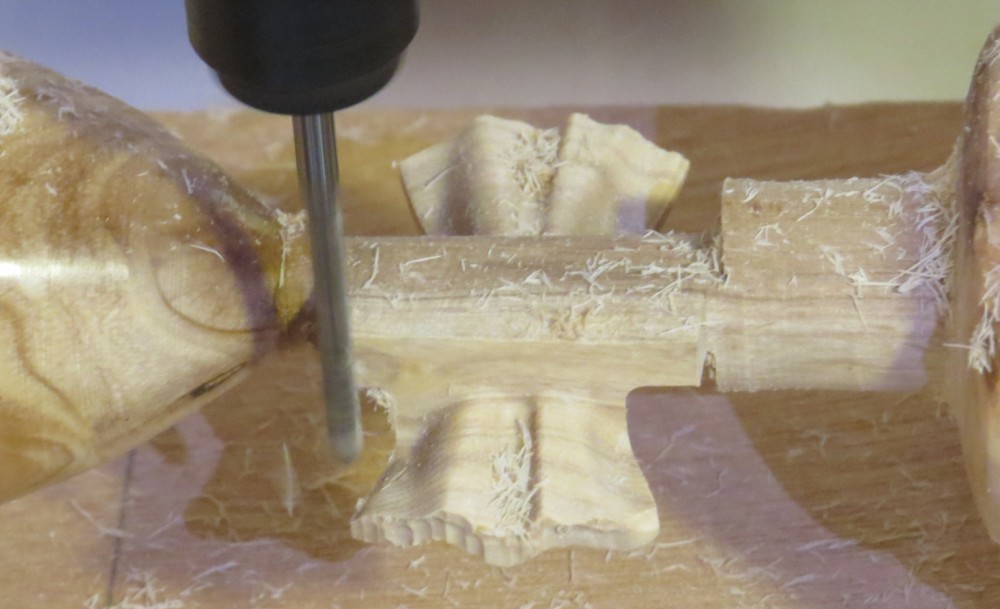
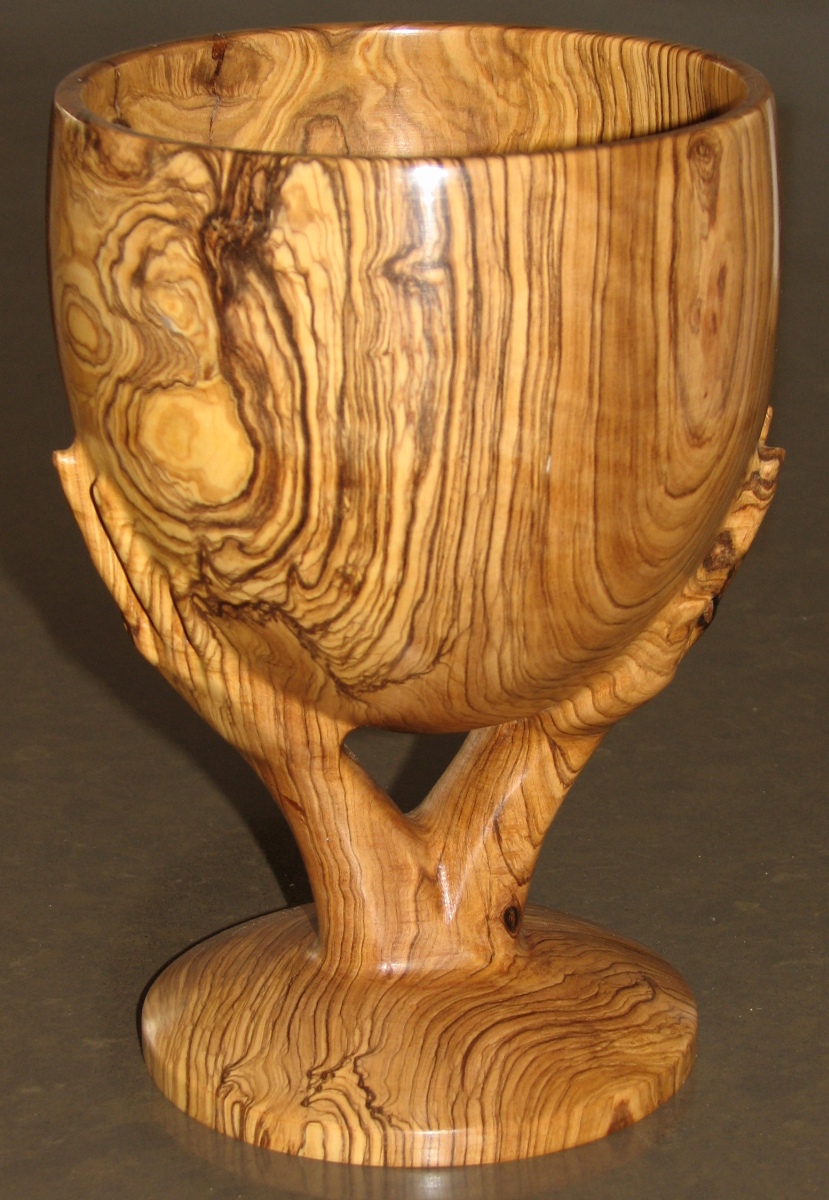
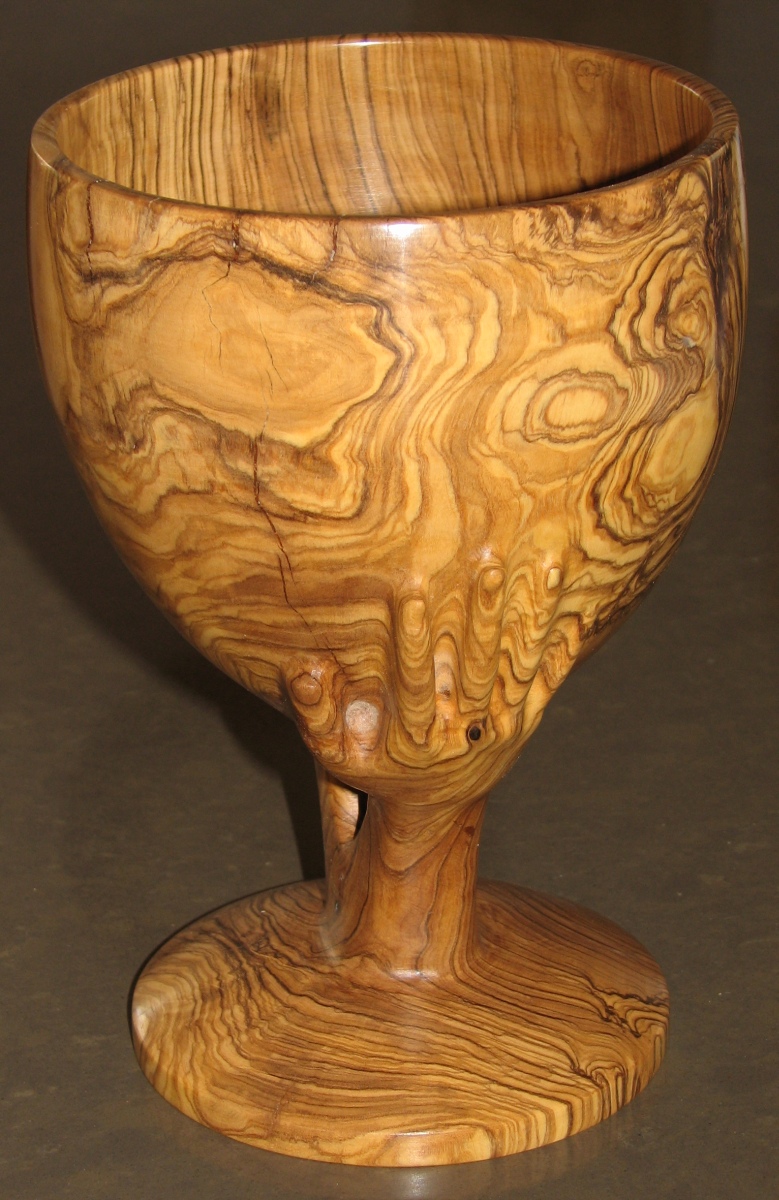
Lettered Necks' Goblet

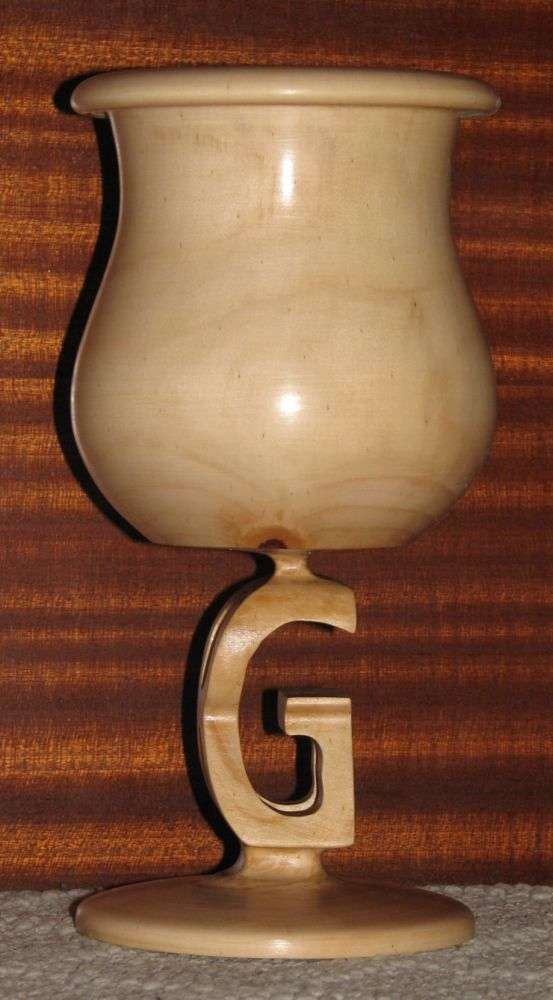
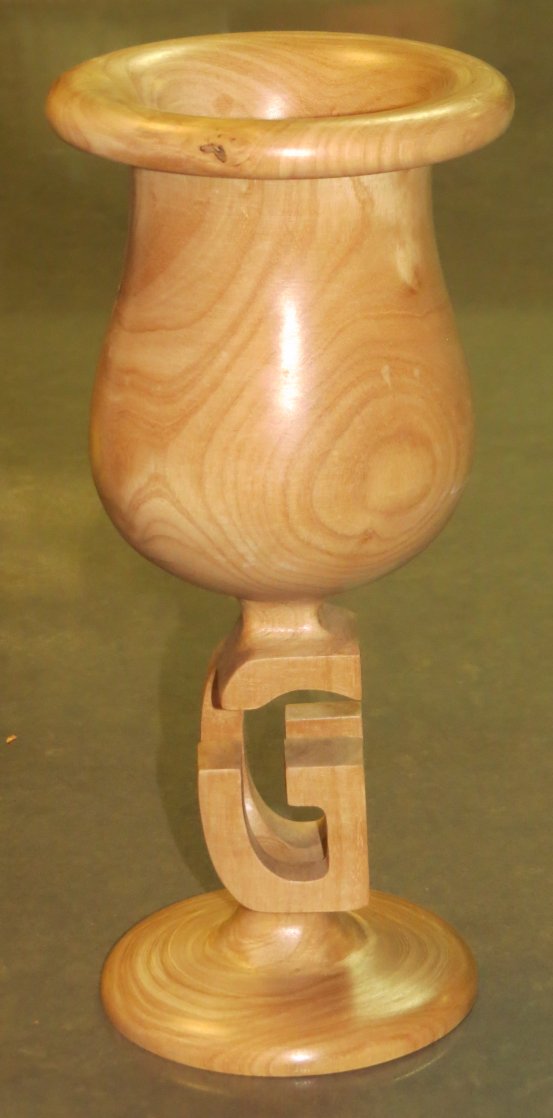
 A neck formed out of a cross of two (same) letters... Olive tree.
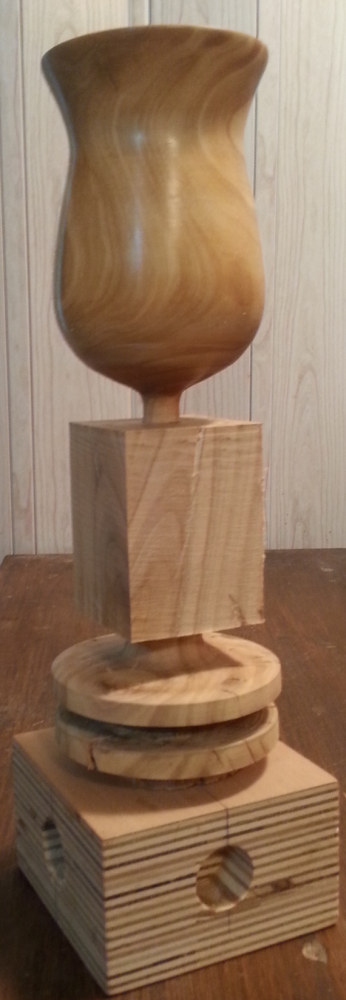
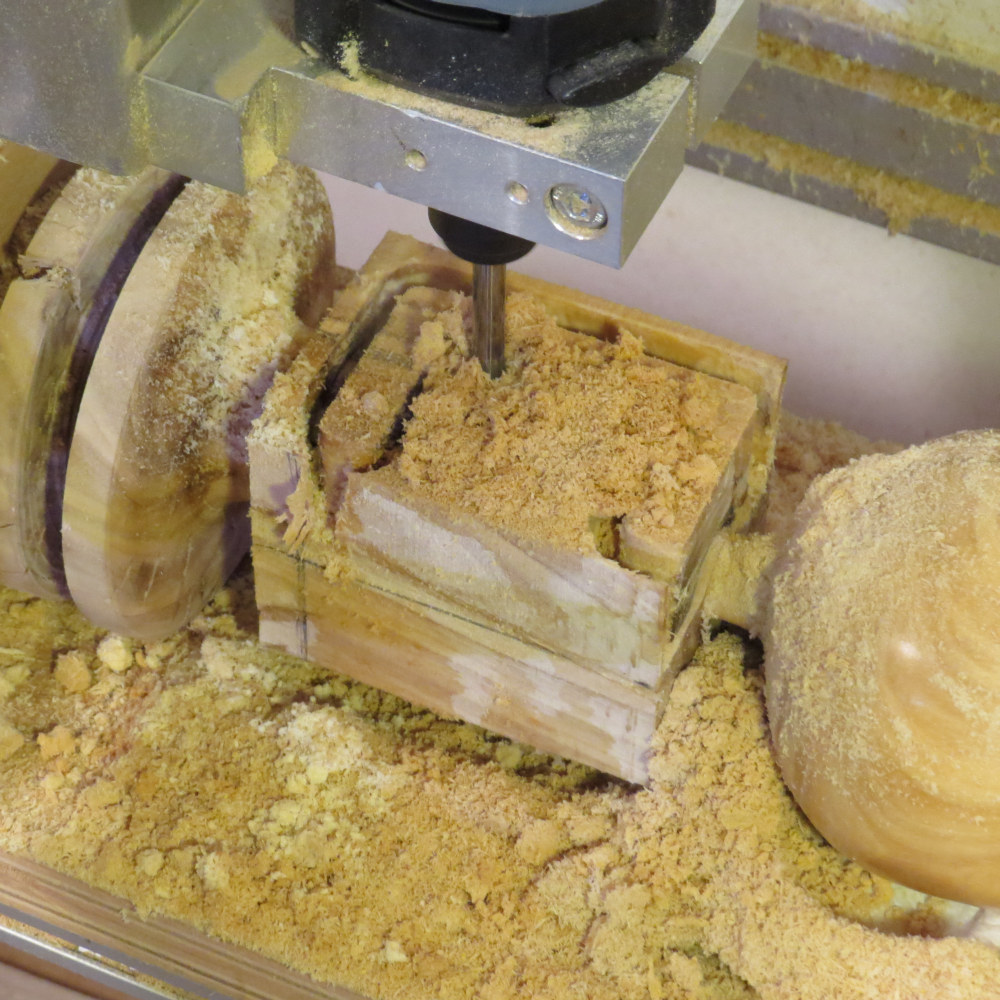
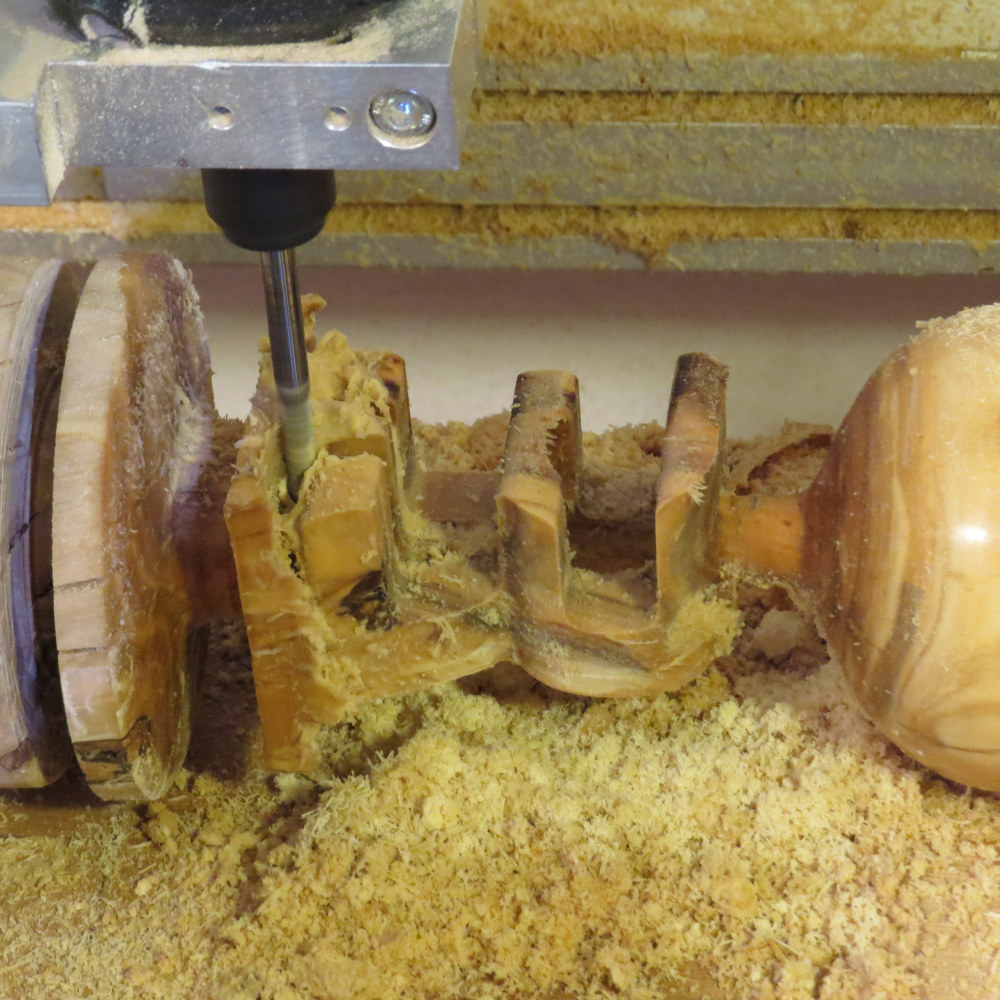
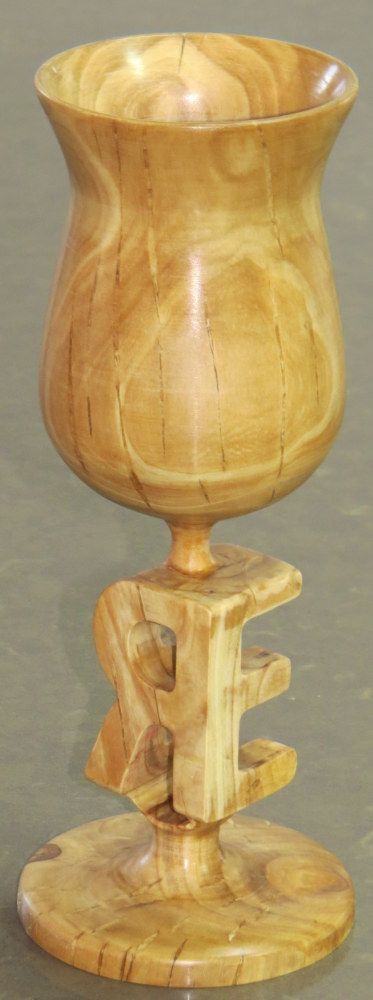
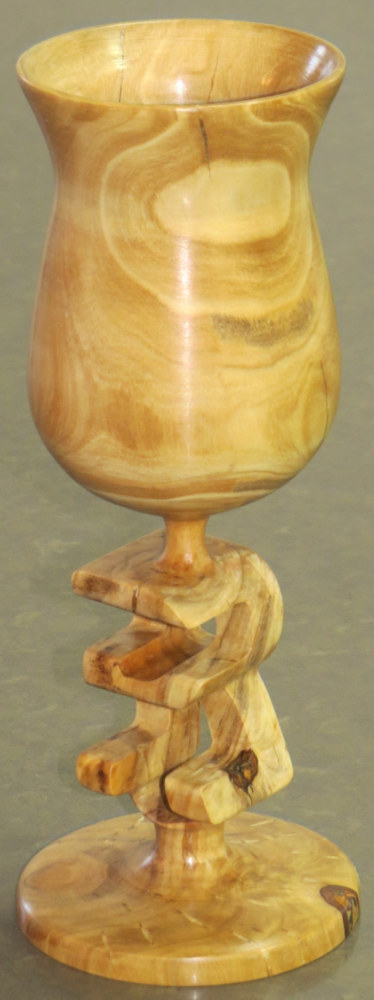 Another neck formed out of a cross of two (different) E & R letters...
First three images on the left show the work in progress. Olive tree.
Another neck formed out of a cross of two (different) E & R letters...
First three images on the left show the work in progress. Olive tree.
Menora(t) David
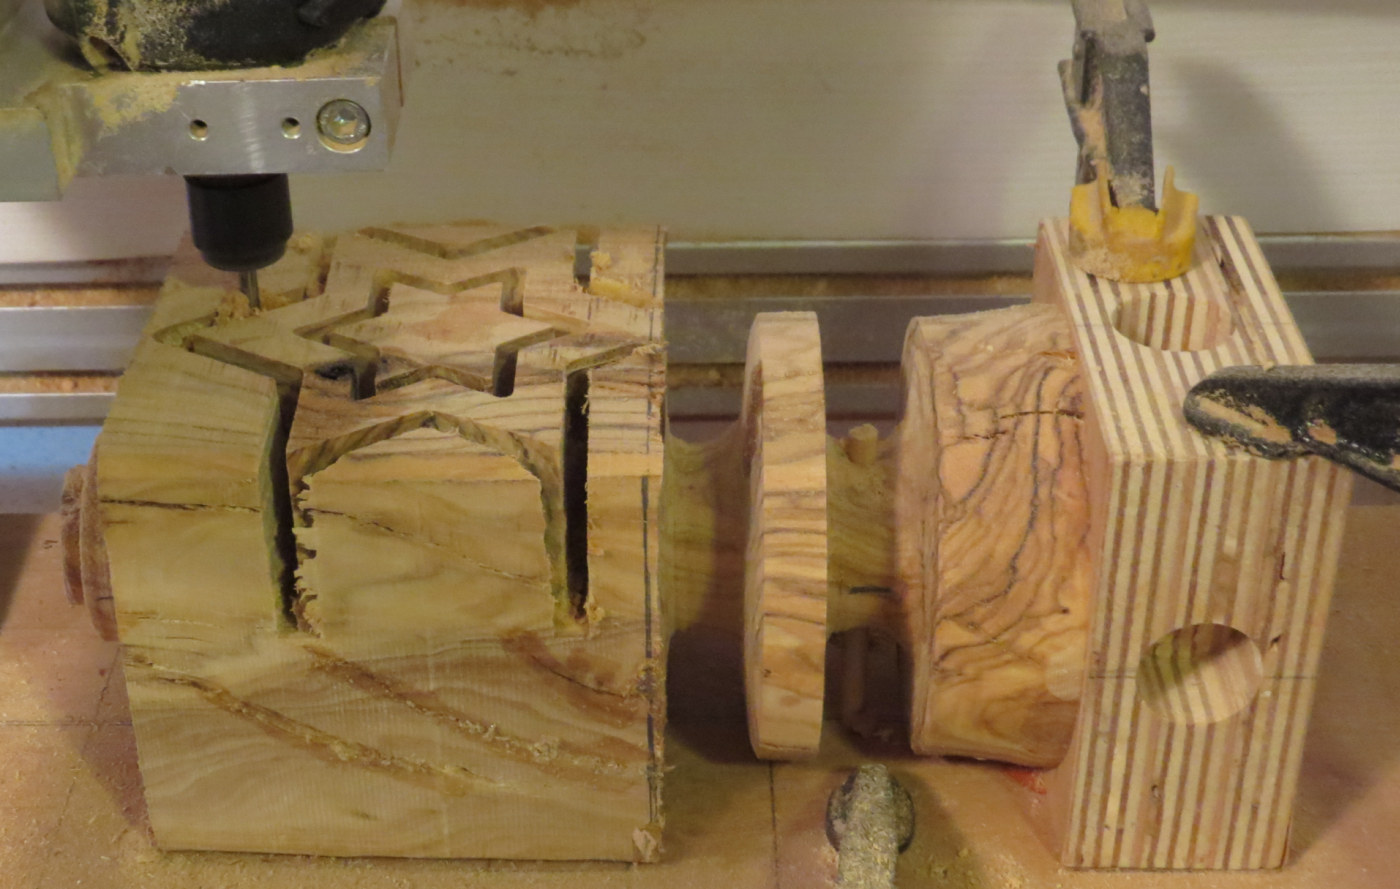
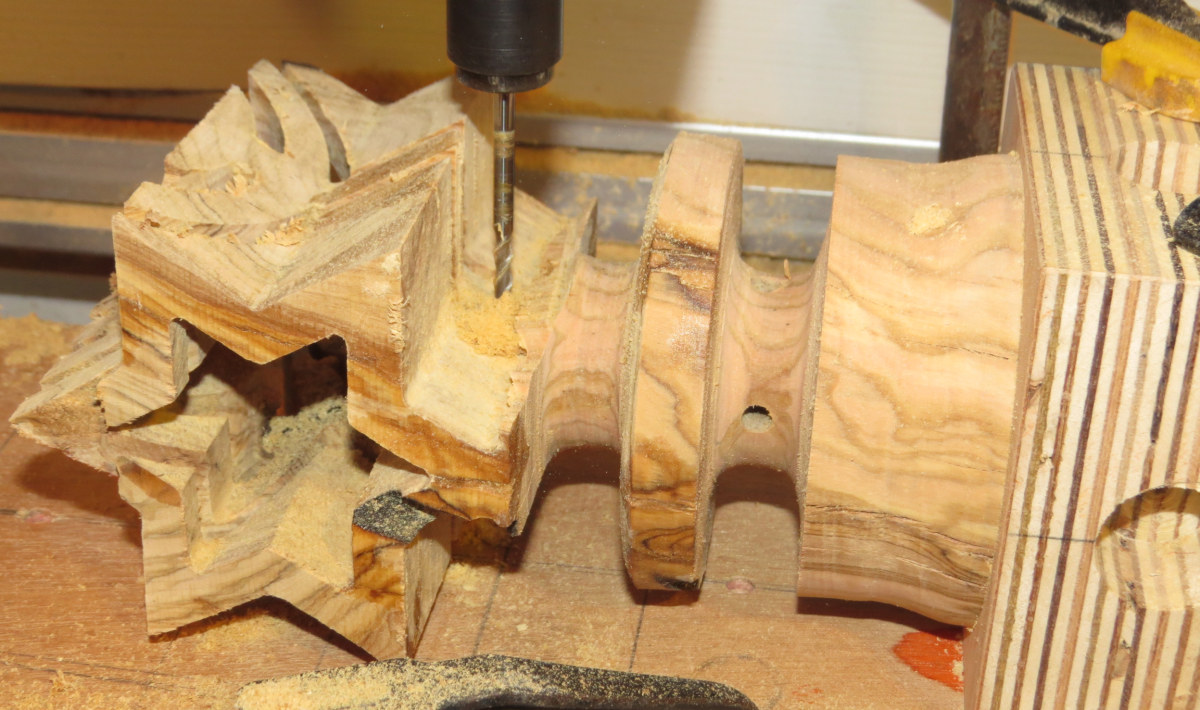
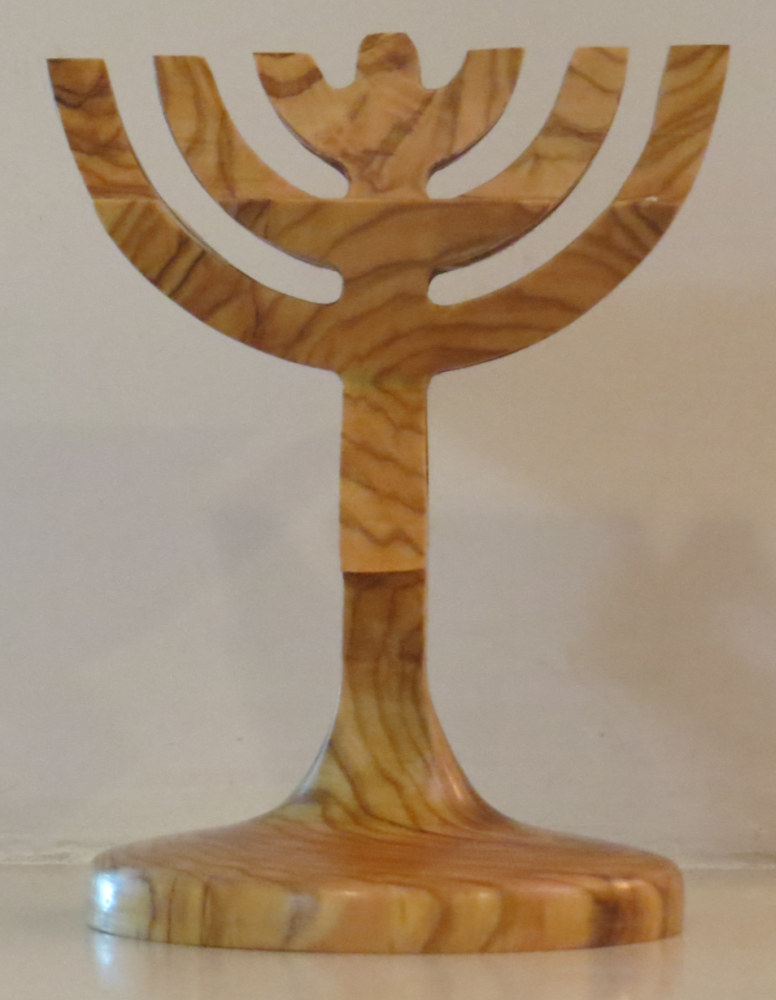

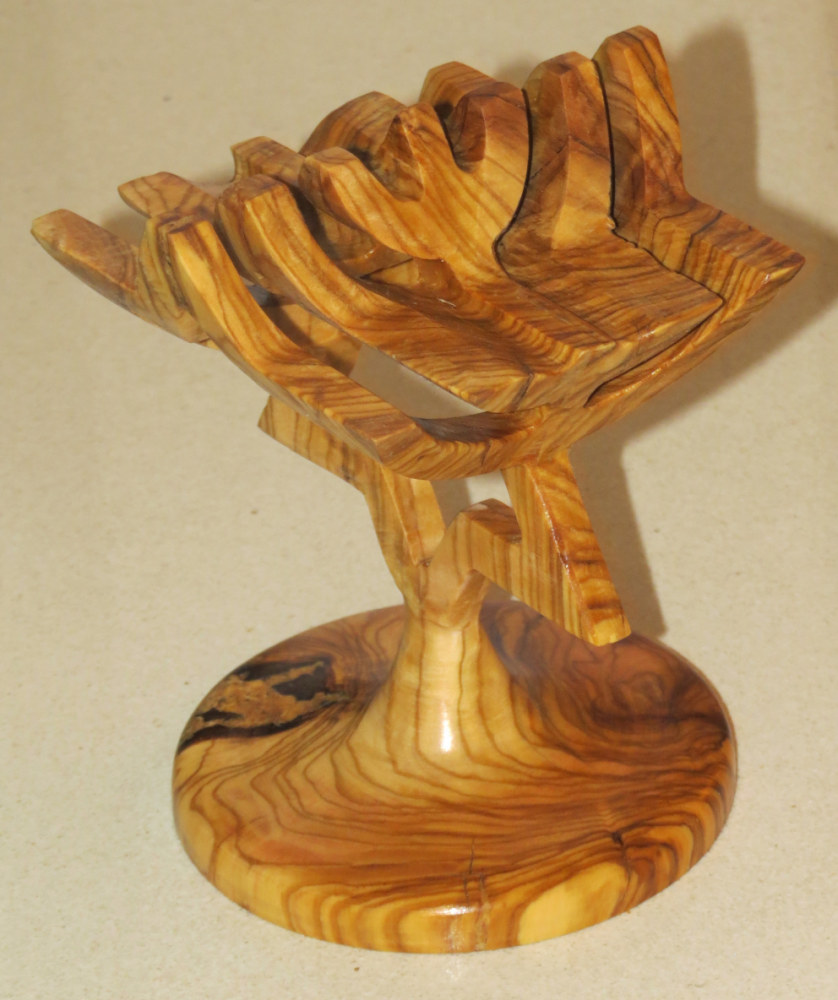
 A statue made to look like the Israeli emblem, the Menorah from
one view (left bottom image) and the star of David from
another direction (middle bottom image), from another... Top
two images show the two setups of the CNC stages. Olive tree.
A statue made to look like the Israeli emblem, the Menorah from
one view (left bottom image) and the star of David from
another direction (middle bottom image), from another... Top
two images show the two setups of the CNC stages. Olive tree.
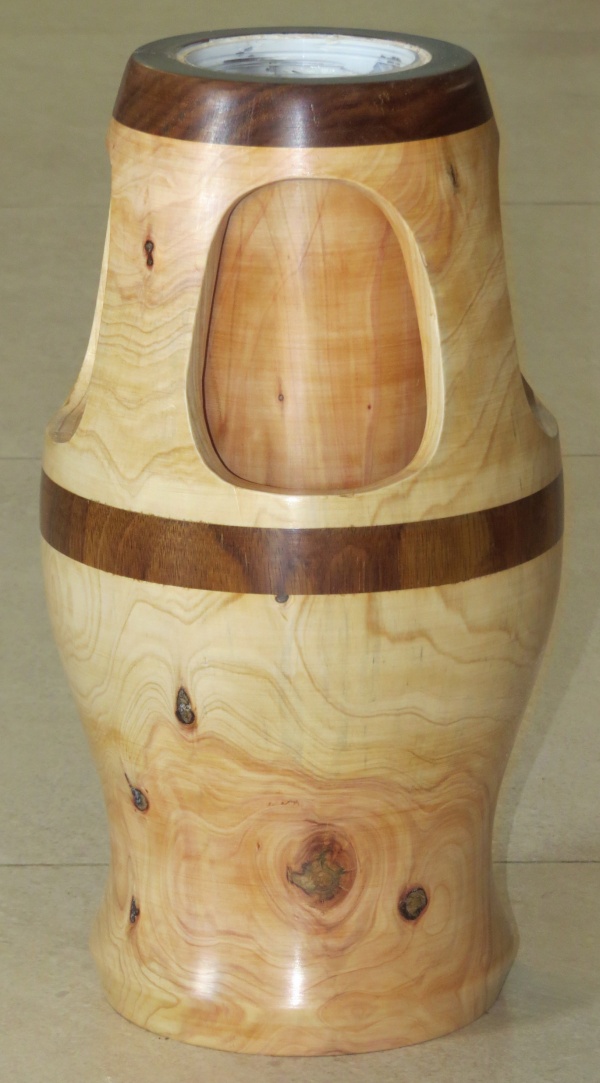
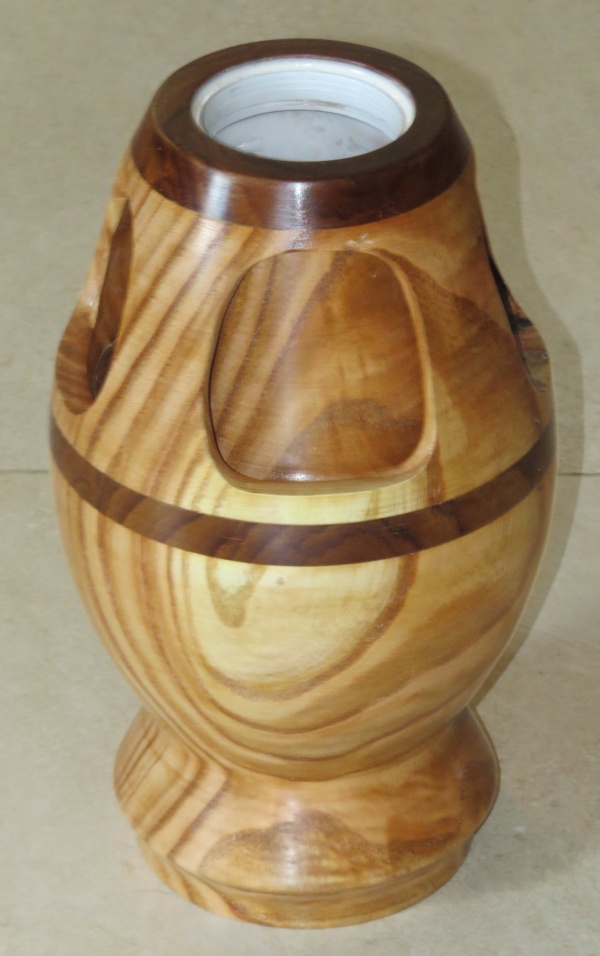
Holding Hand
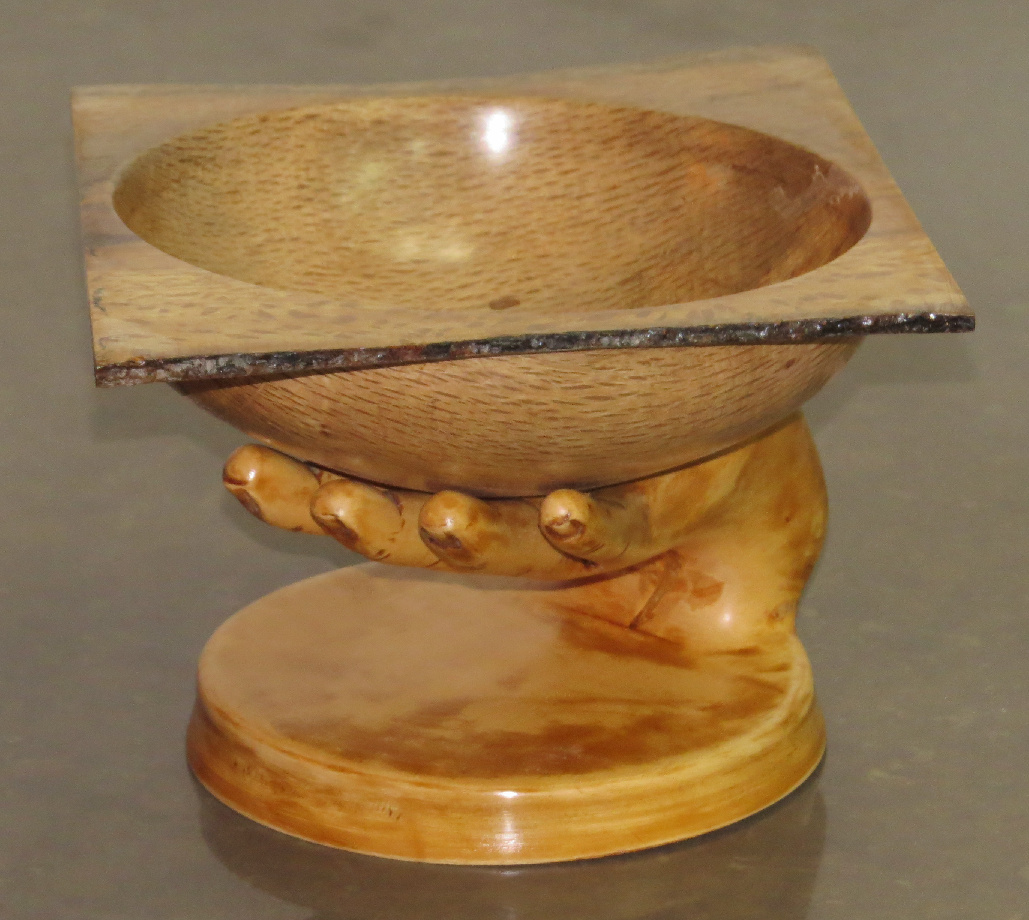

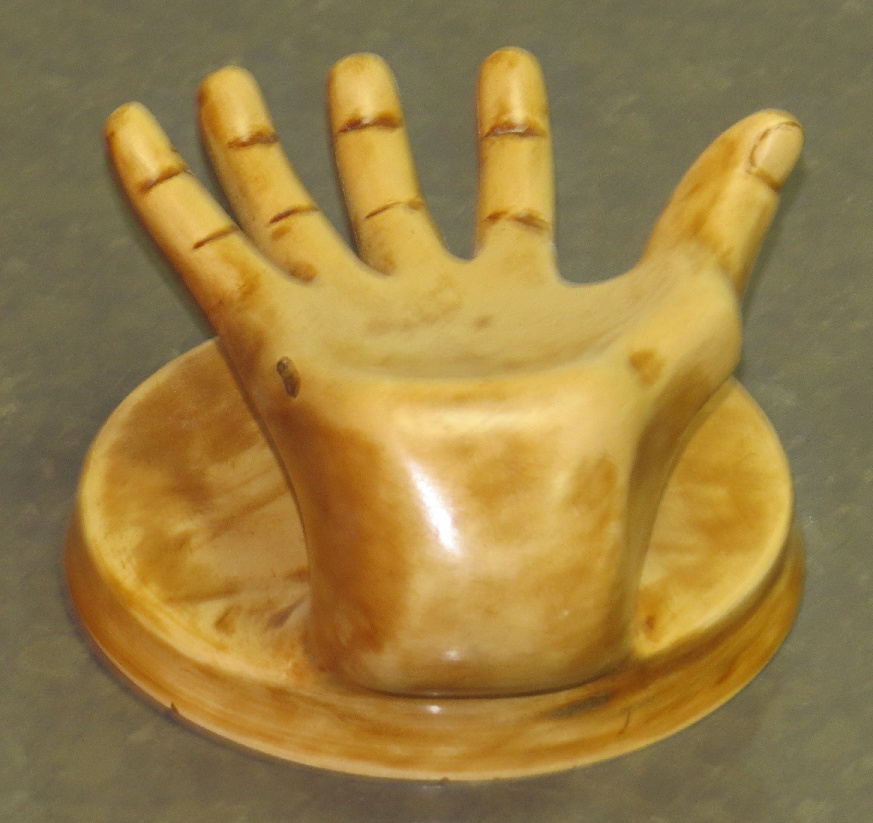
 An attempt to manually carve a hand as a vase holder. Hand is carved
out of a Tilia wood.
An attempt to manually carve a hand as a vase holder. Hand is carved
out of a Tilia wood.
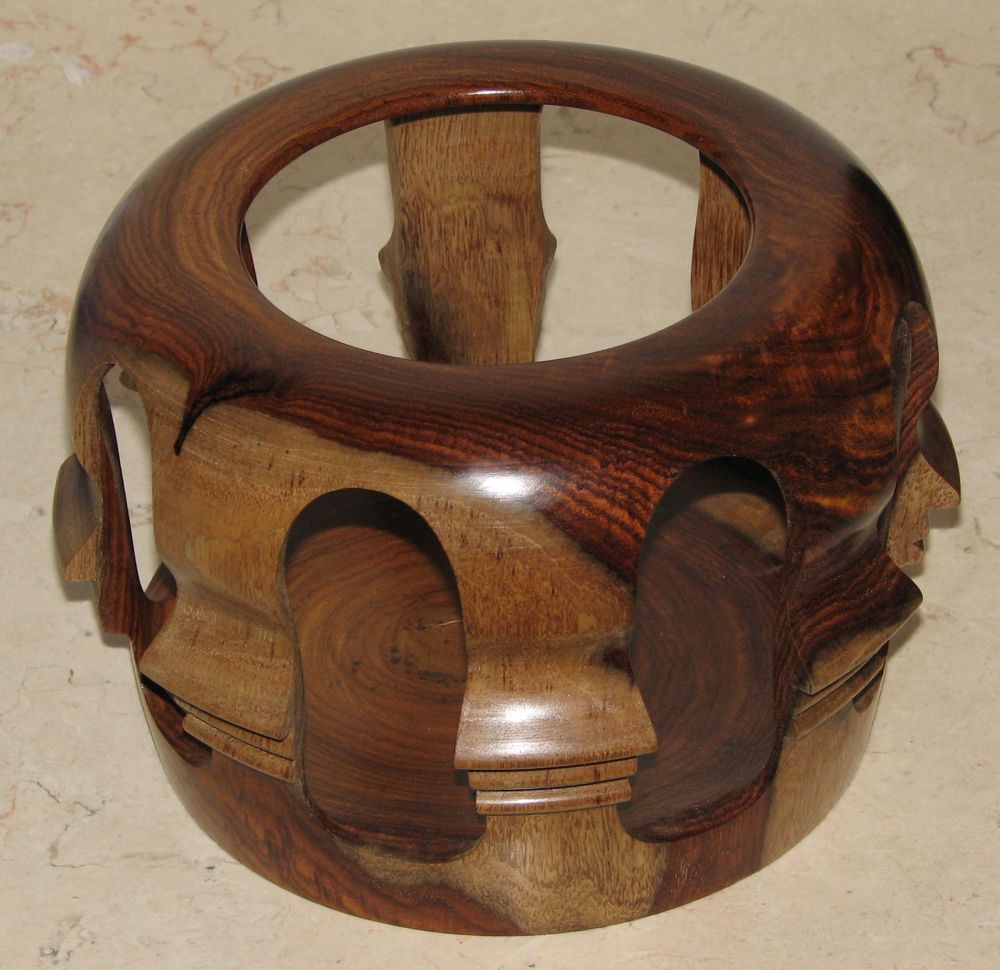
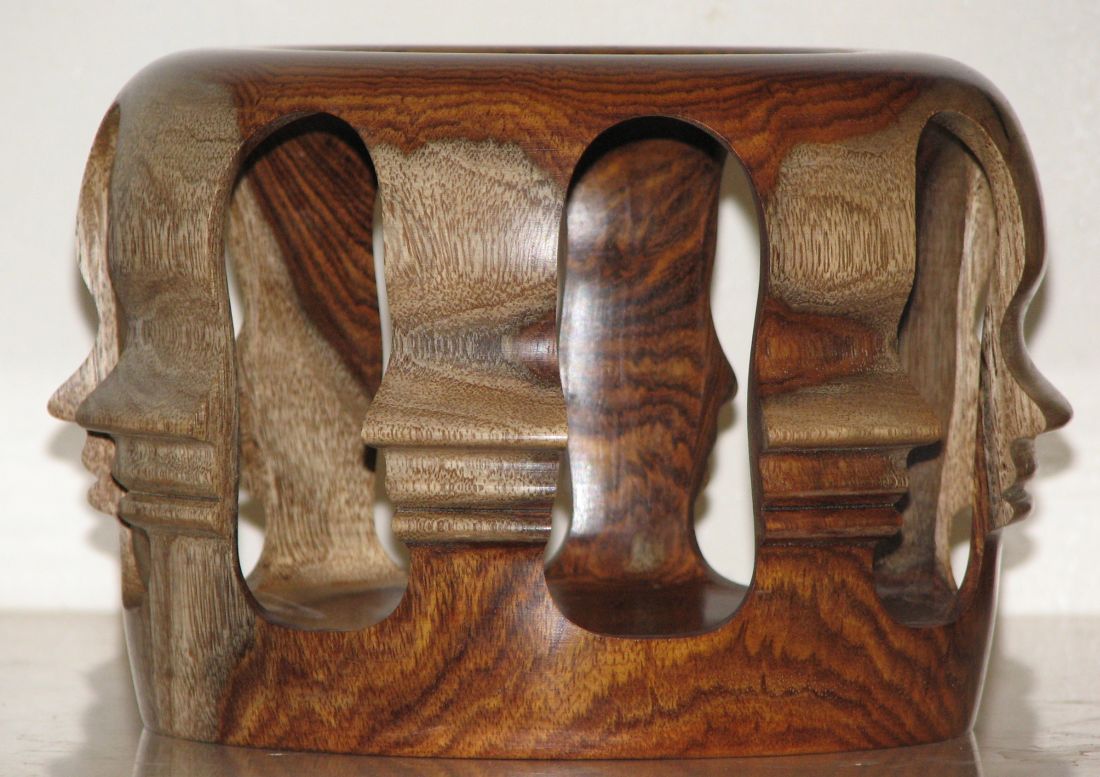
A Facial Statue
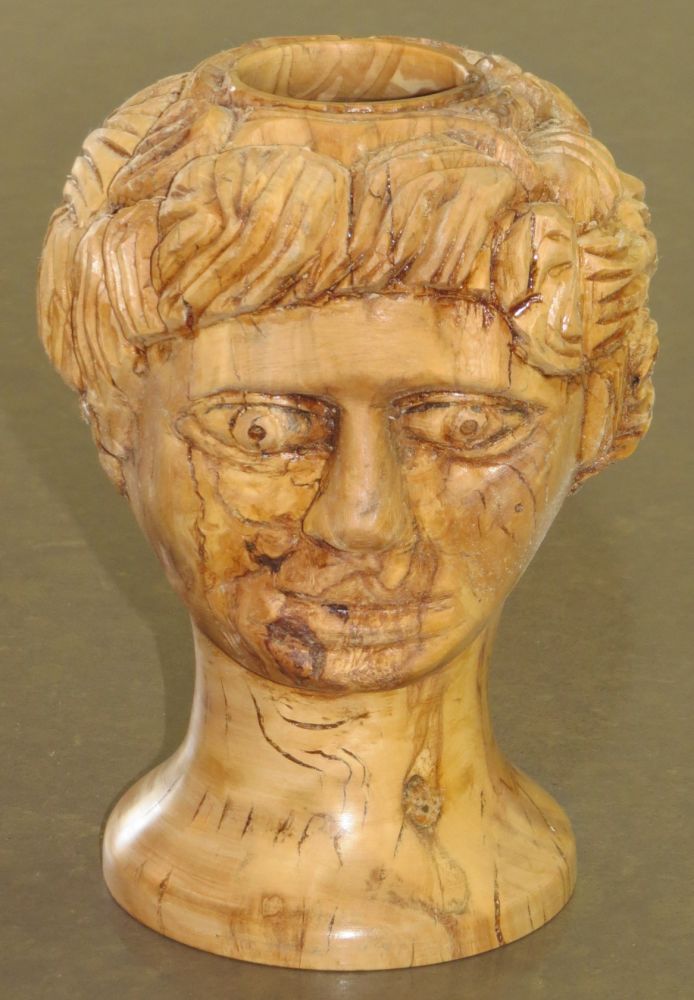

 An attempt to manually carve a facial statue. Carved
out of an Olive tree.
An attempt to manually carve a facial statue. Carved
out of an Olive tree.
A Statue of a Couple
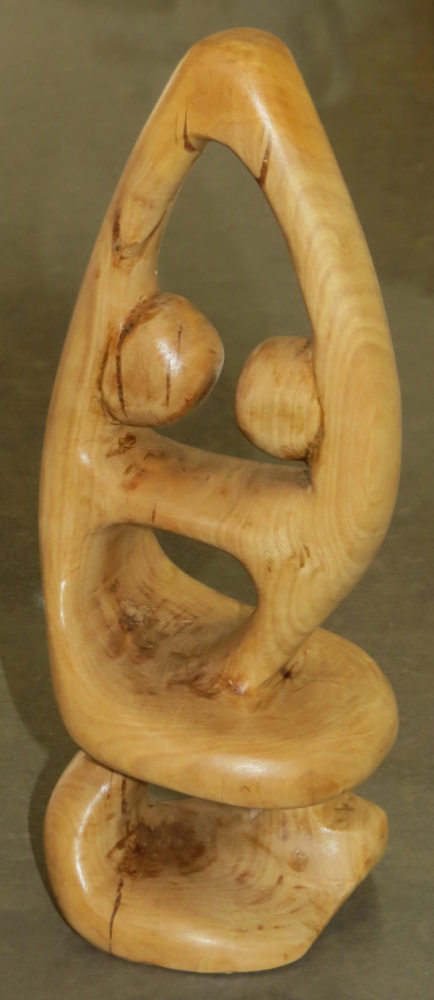
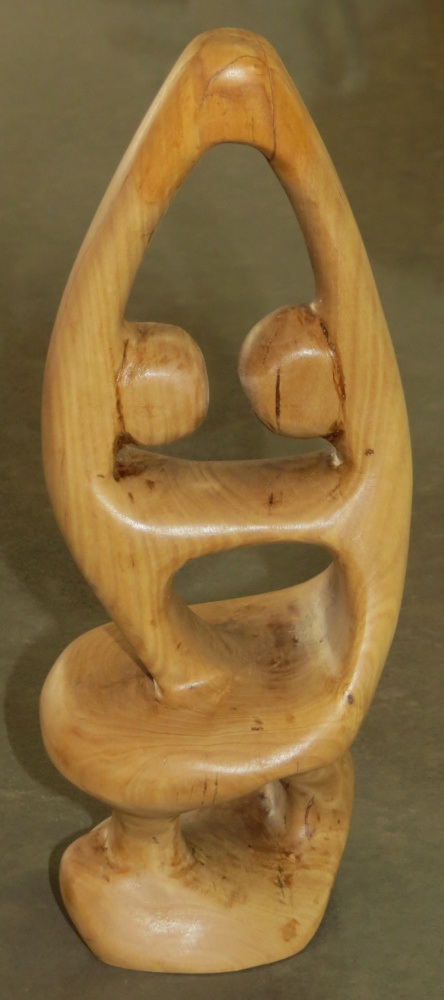
 An attempt to manually carve a statue of a man and a woman. Carved
out of an Olive tree.
An attempt to manually carve a statue of a man and a woman. Carved
out of an Olive tree.
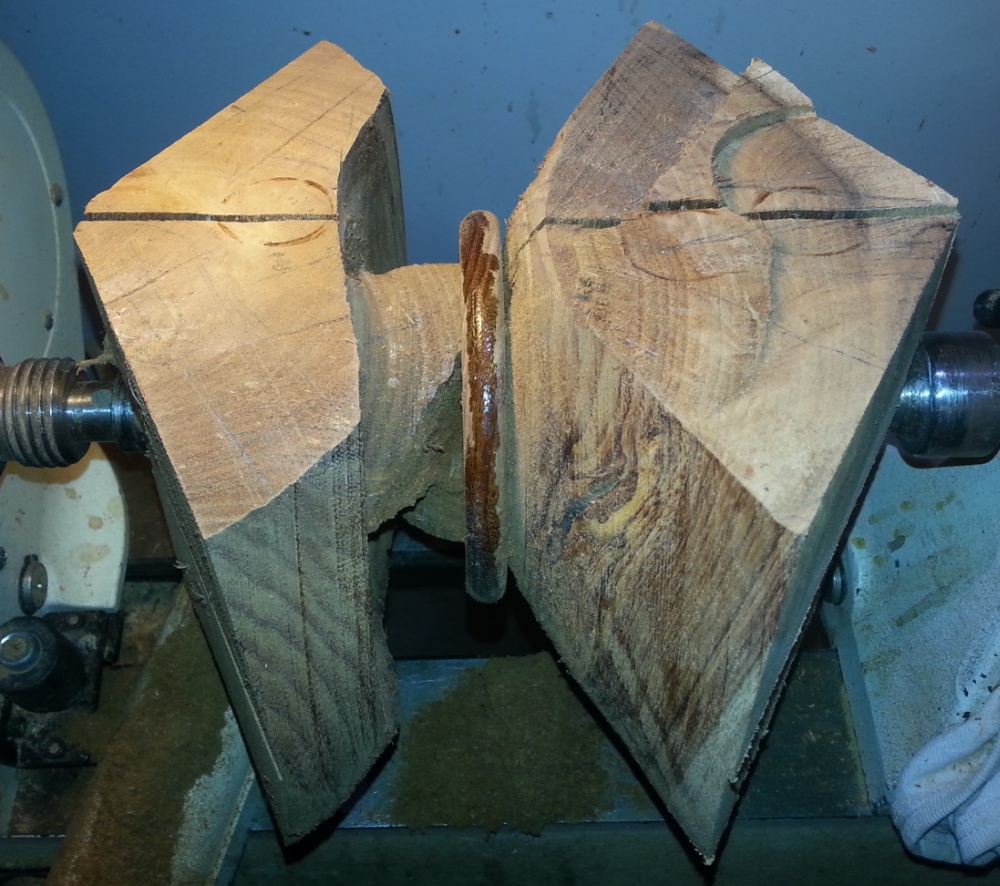
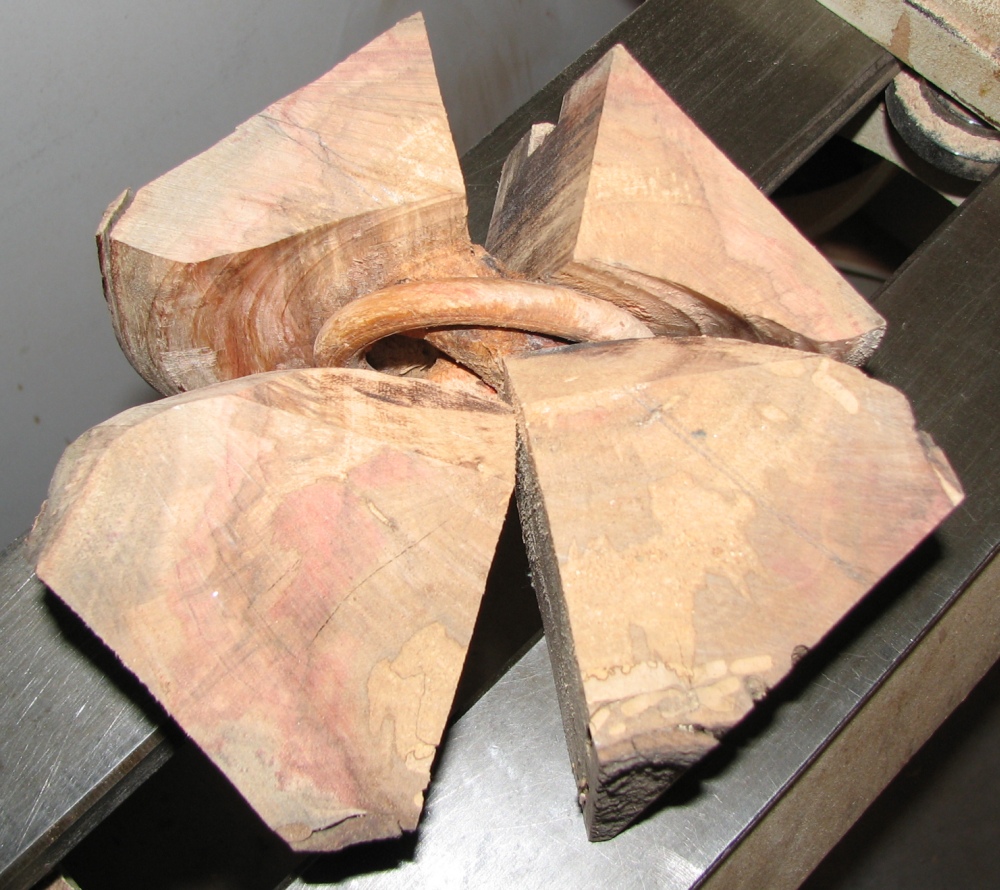
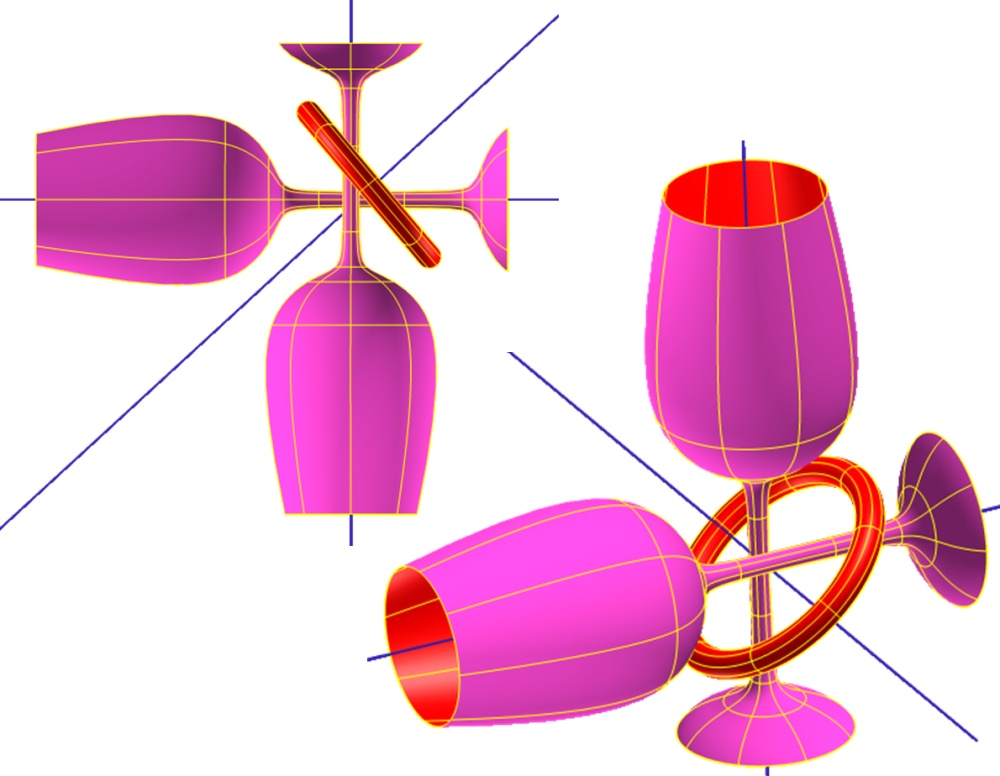
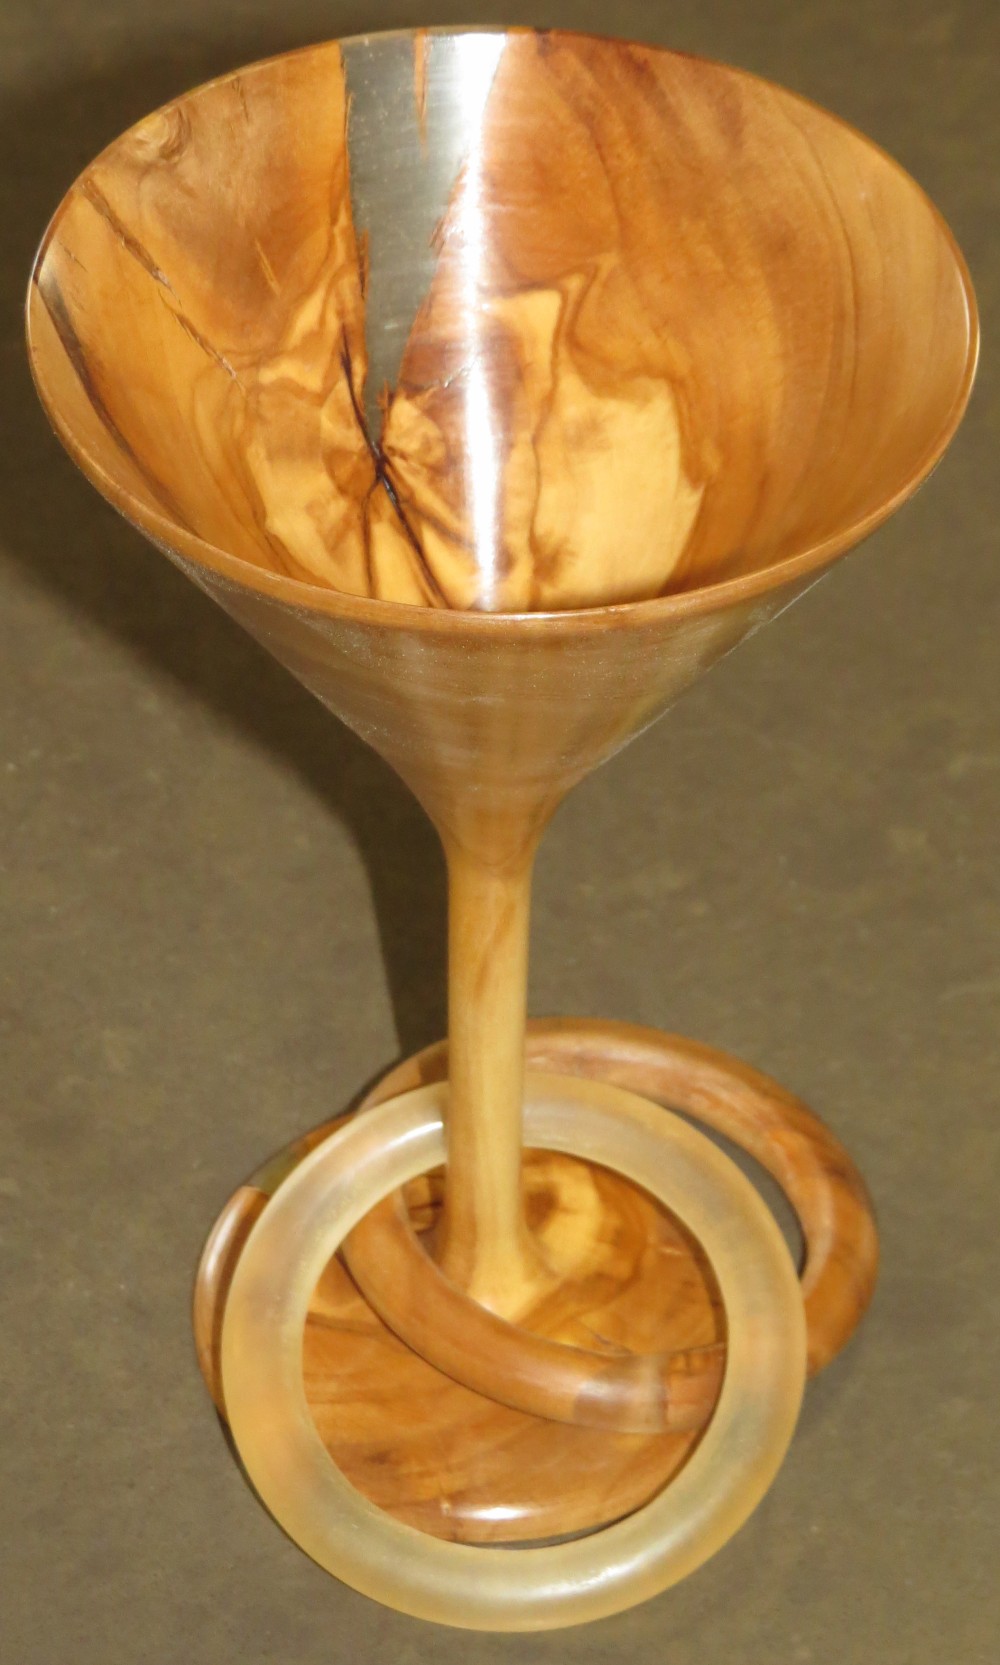
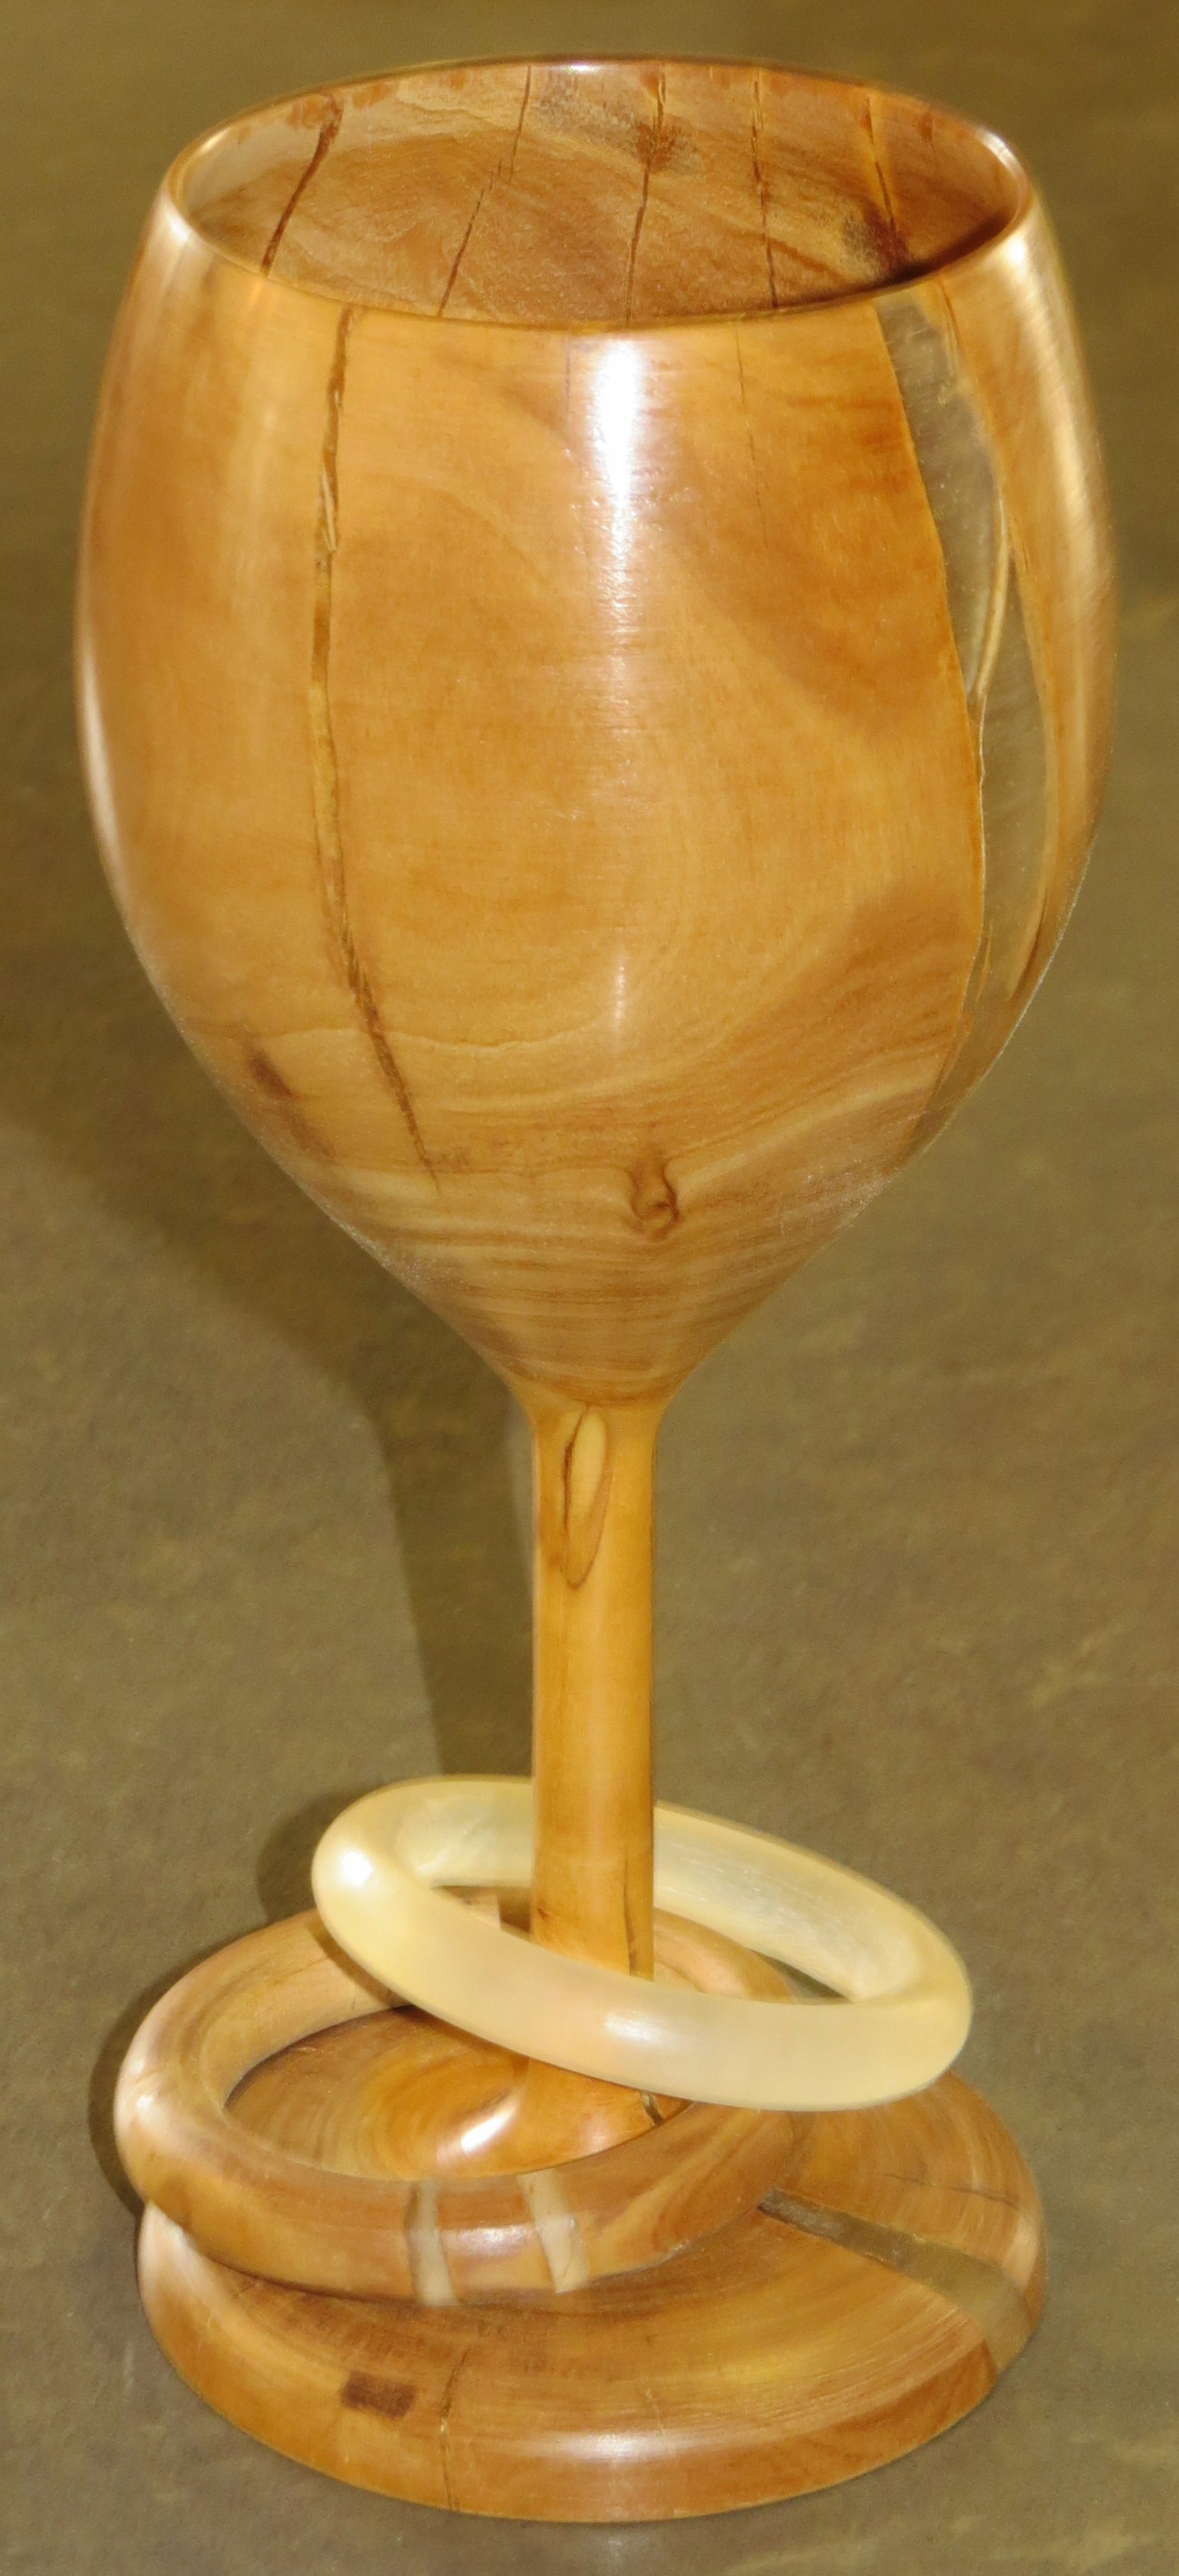
Siamese Twin Wine Glasses
 One can turn one captured ring on a wine glass. One can turn two
captured rings on a wine glass. But can one turn two wine glasses
captured in a single ring? It is doable but the version you see
here is only a partial proof - the ring here broke in the process and
was glued back in... The three images below give you some hints
how it can be done (wood turning only and no CNC).
One can turn one captured ring on a wine glass. One can turn two
captured rings on a wine glass. But can one turn two wine glasses
captured in a single ring? It is doable but the version you see
here is only a partial proof - the ring here broke in the process and
was glued back in... The three images below give you some hints
how it can be done (wood turning only and no CNC).
Anti-twin Wine glasses

 Anti-twins wine glasses. Olive tree.
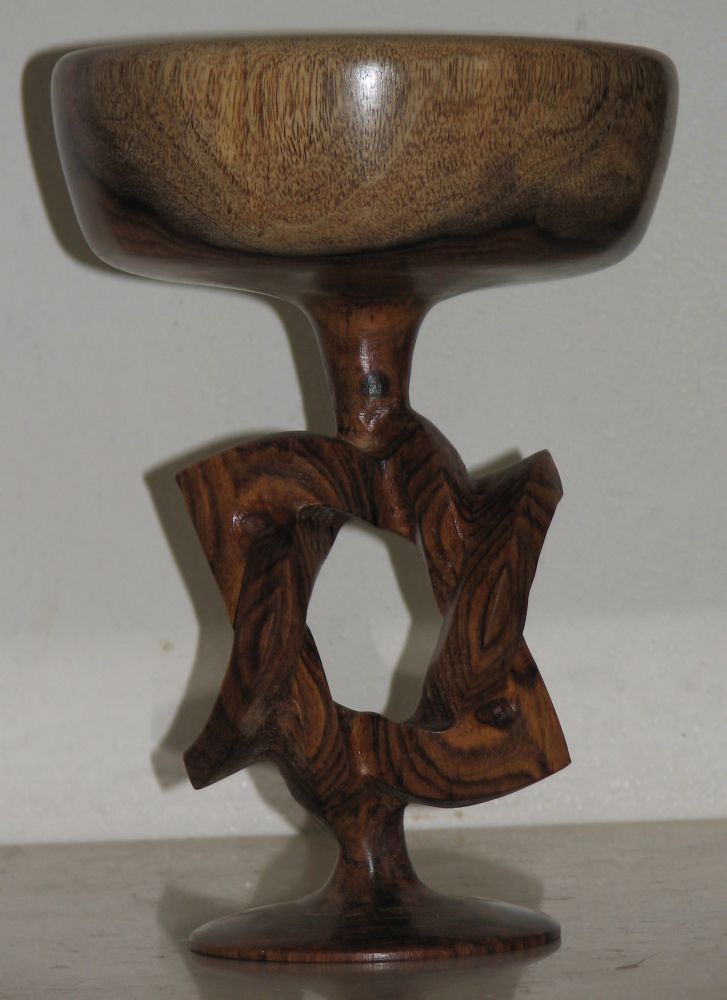
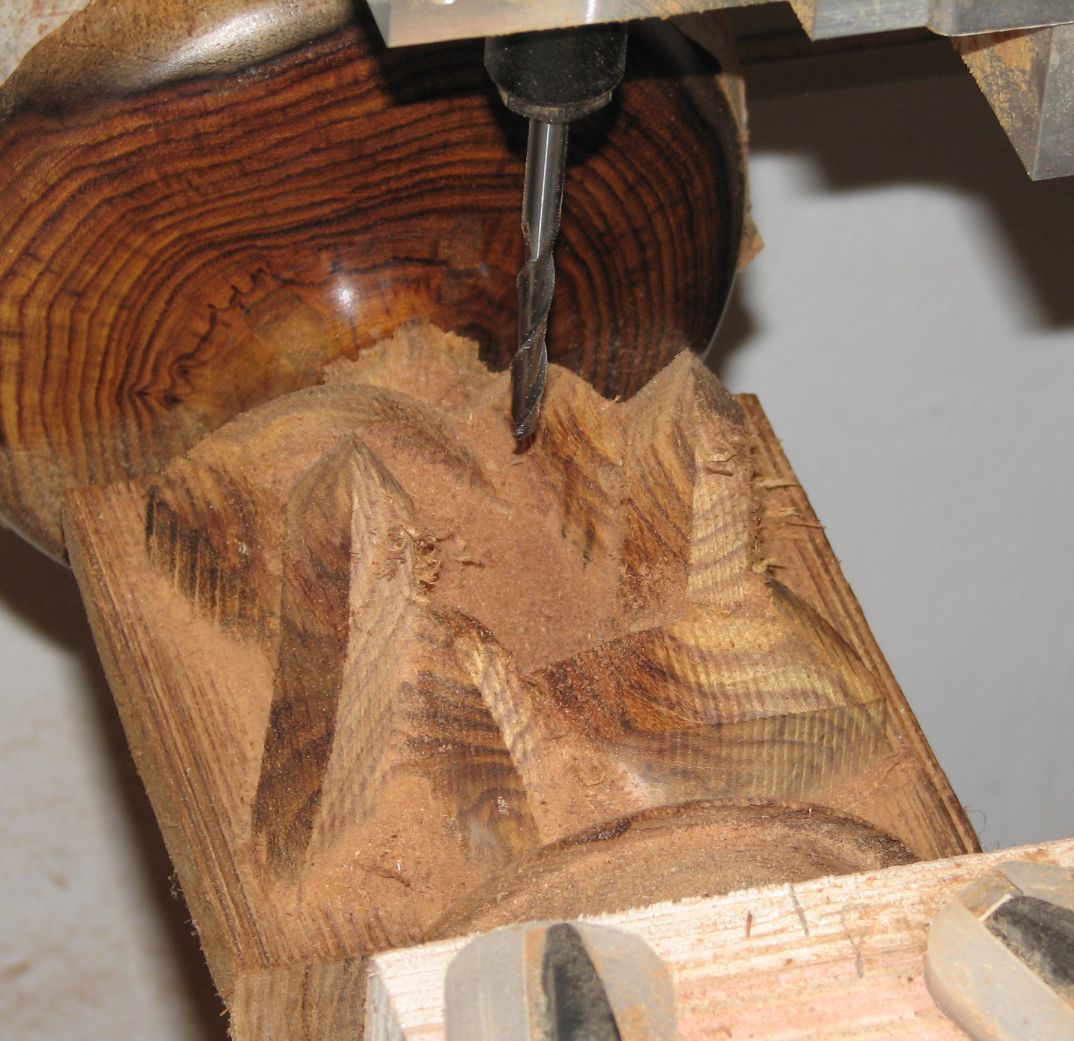
David Star Cup I

 NC machining was used to cut the David Star shape at the neck.
The rest is regular wood turning. The image on the right
shows the NC setup. The David Star is formed out of
two intertwined Penrose triangles. See also "Beyond
Escher for Real". Indian Rosewood.
NC machining was used to cut the David Star shape at the neck.
The rest is regular wood turning. The image on the right
shows the NC setup. The David Star is formed out of
two intertwined Penrose triangles. See also "Beyond
Escher for Real". Indian Rosewood.
David Star Cup II
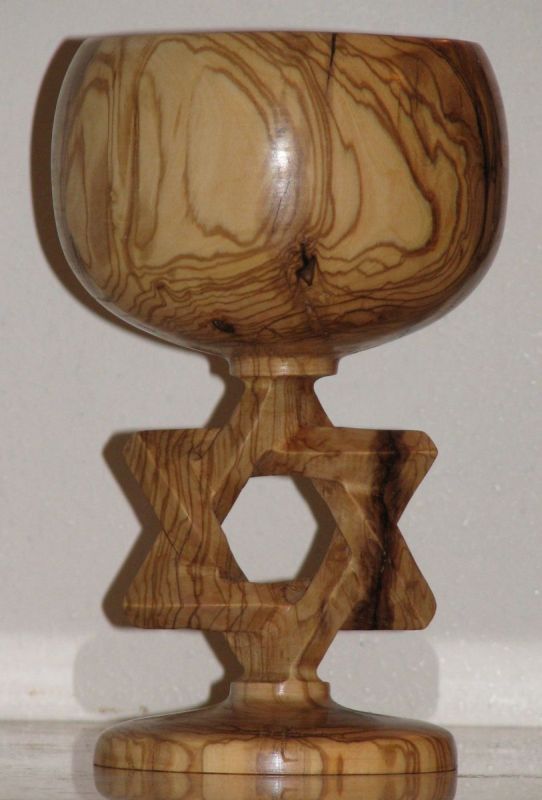

 Here is another variation of this model, this time from an Olive tree.
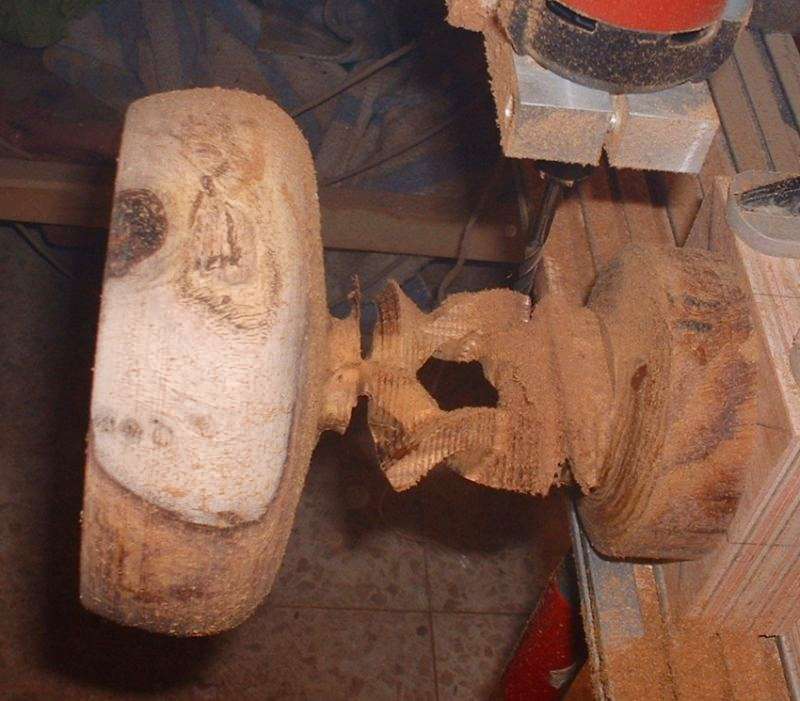
Symbiosis of the Jewish David Star and the Islamic Crescent Moon Symbols
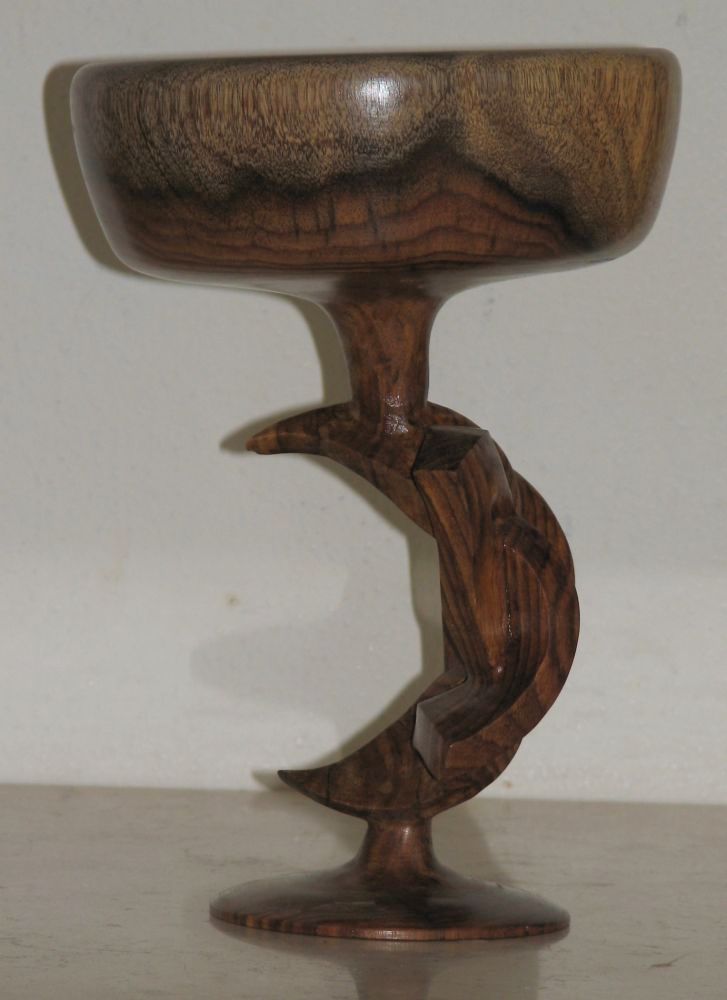
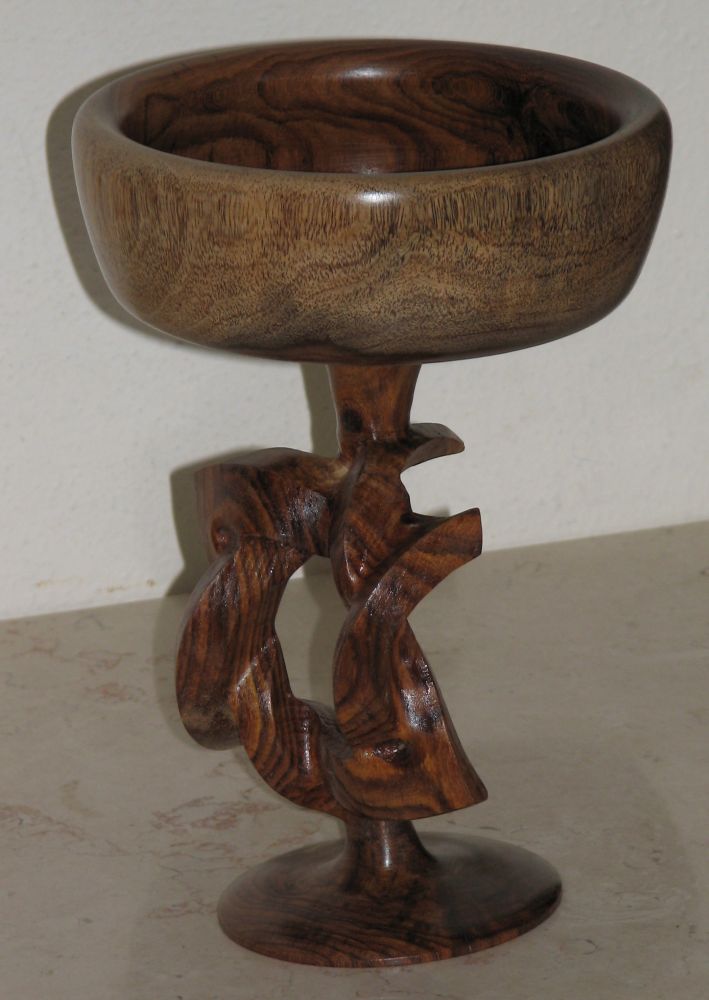
 Here is another variation of the David Star. Herein, the
Jewish David Star is shaped to look like the Islamic Crescent
Moon symbol from the side. As a result, this model presents
the Jewish David Star from one view and the Islamic Crescent
Moon from another. The image on the right shows the CNC
stage. Indian Rosewood tree.
Here is another variation of the David Star. Herein, the
Jewish David Star is shaped to look like the Islamic Crescent
Moon symbol from the side. As a result, this model presents
the Jewish David Star from one view and the Islamic Crescent
Moon from another. The image on the right shows the CNC
stage. Indian Rosewood tree.
Top David Star bowls
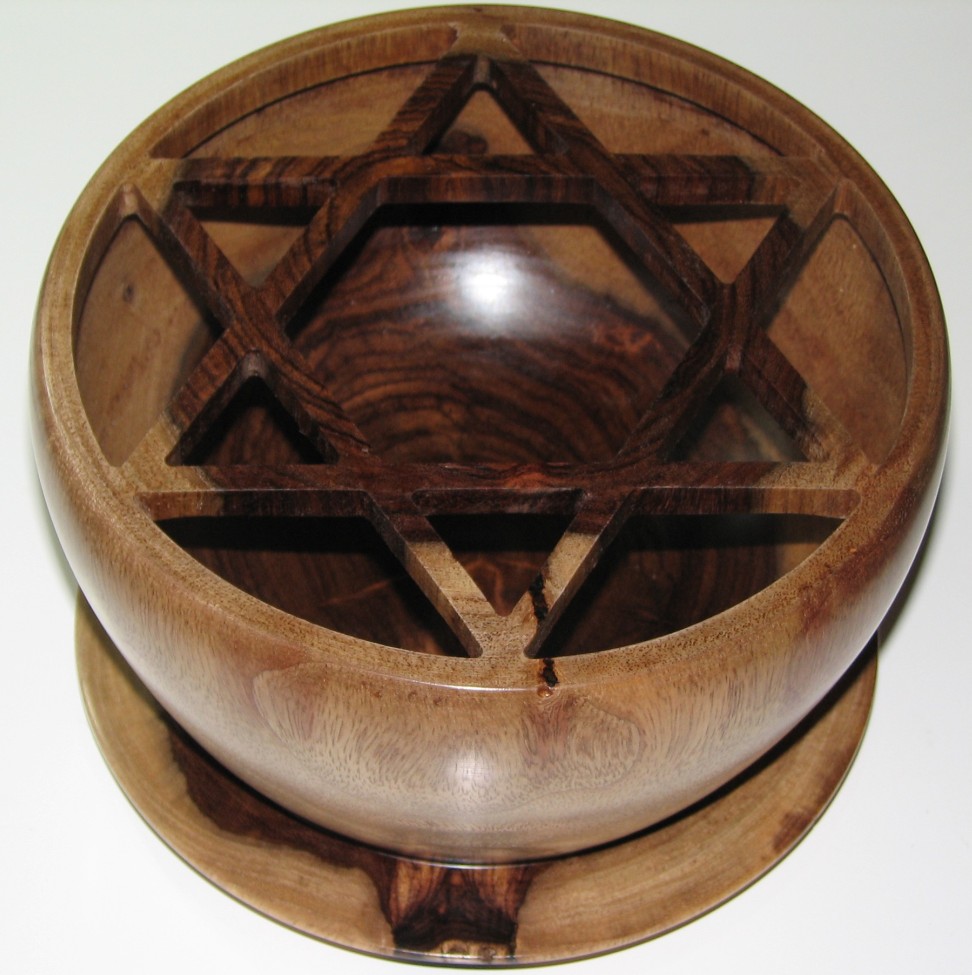
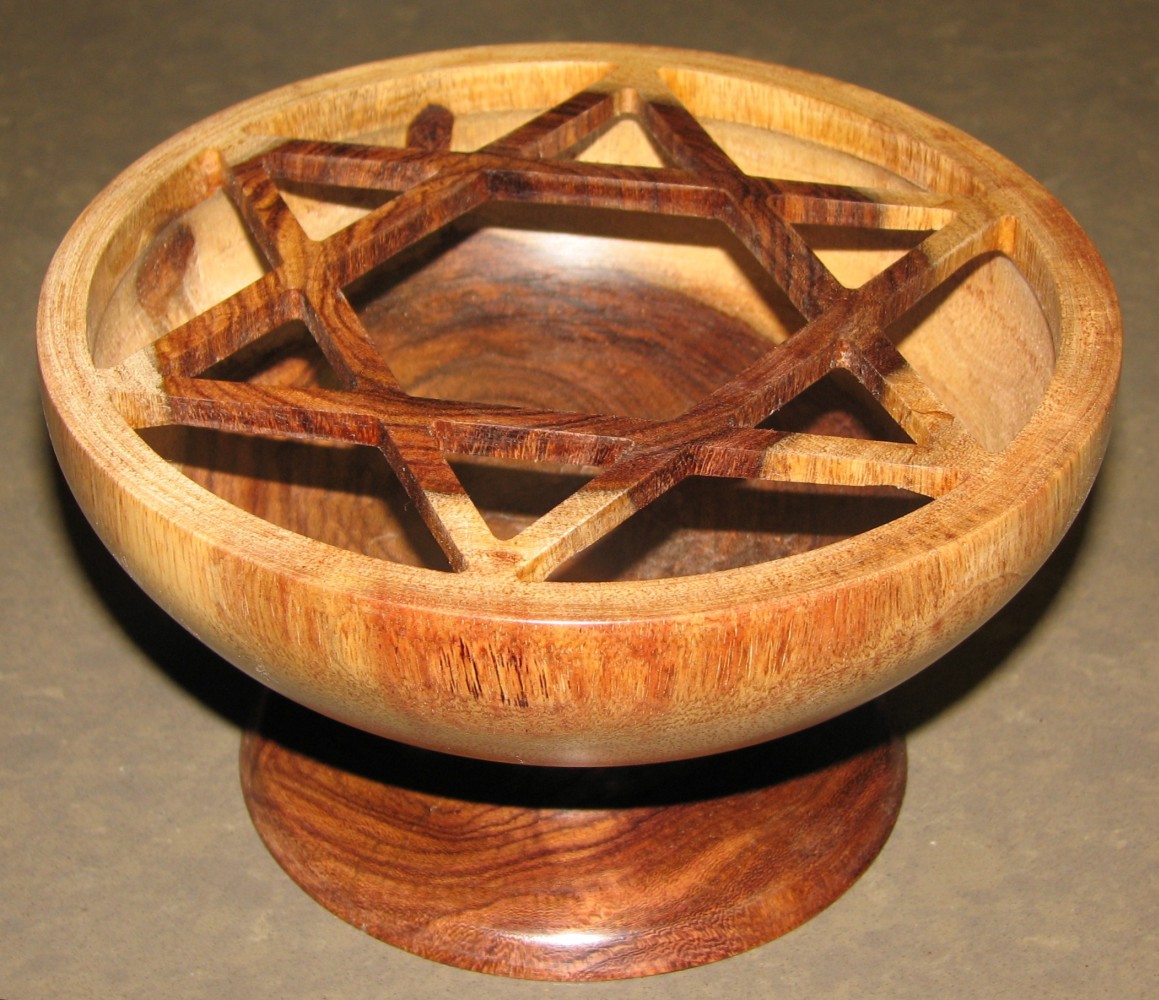
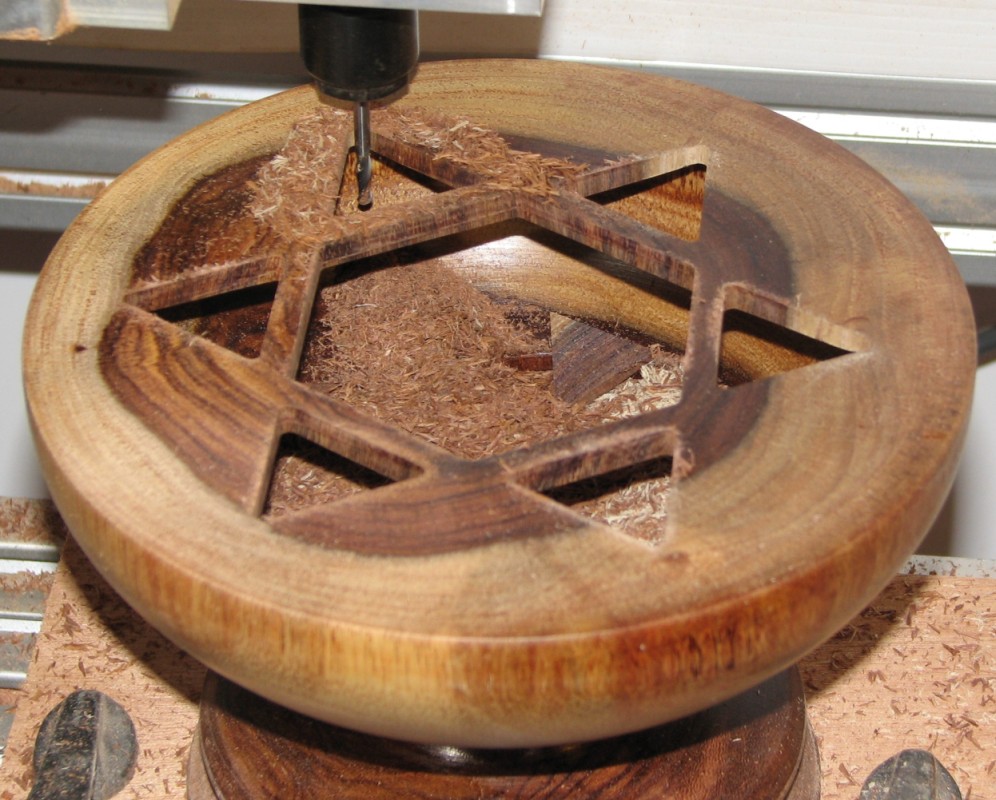
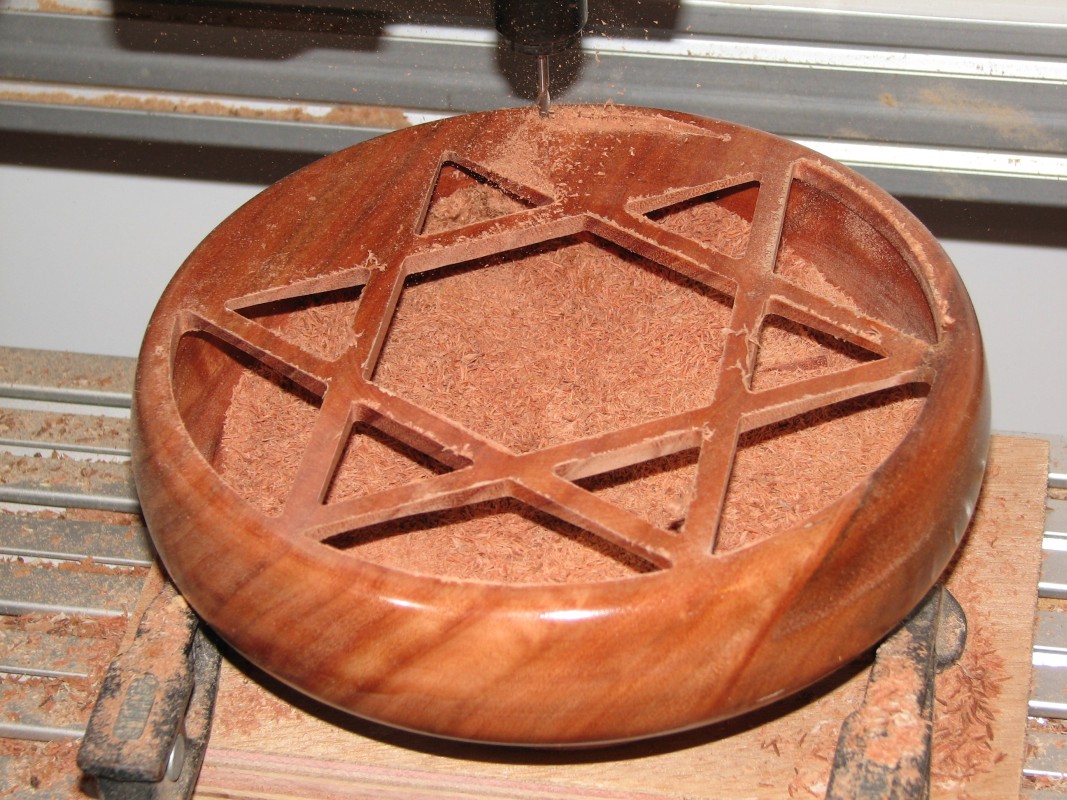
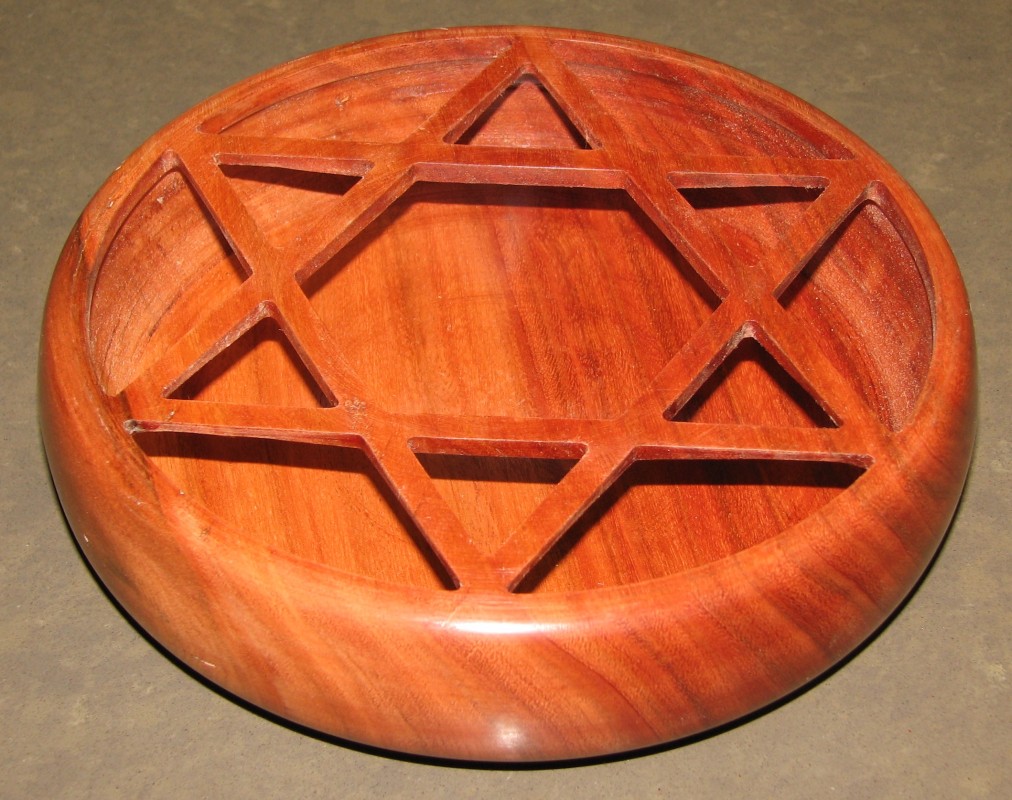 Three examples of bowls with a top David star curved out. Top
row shows the final pieces while bottom row shows snapshots of
the CNC in action. Indian Rosewood and Eucalyptus.
Three examples of bowls with a top David star curved out. Top
row shows the final pieces while bottom row shows snapshots of
the CNC in action. Indian Rosewood and Eucalyptus.

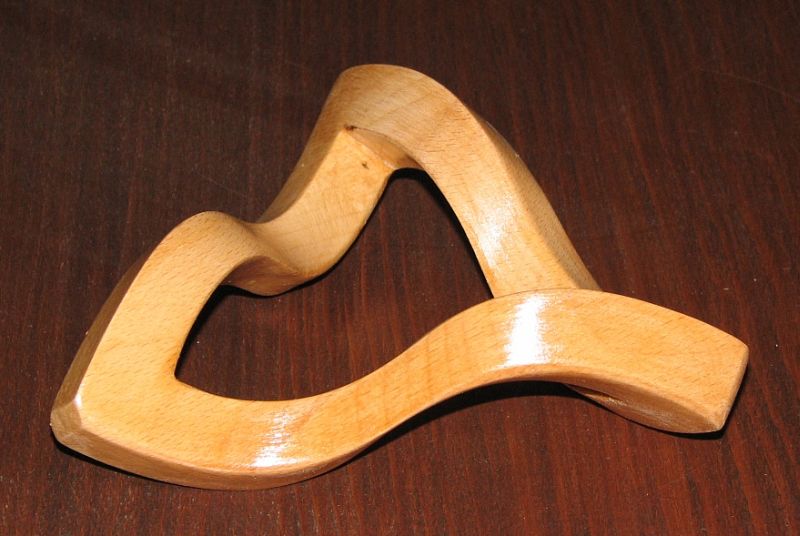
Top heart spherical bowl
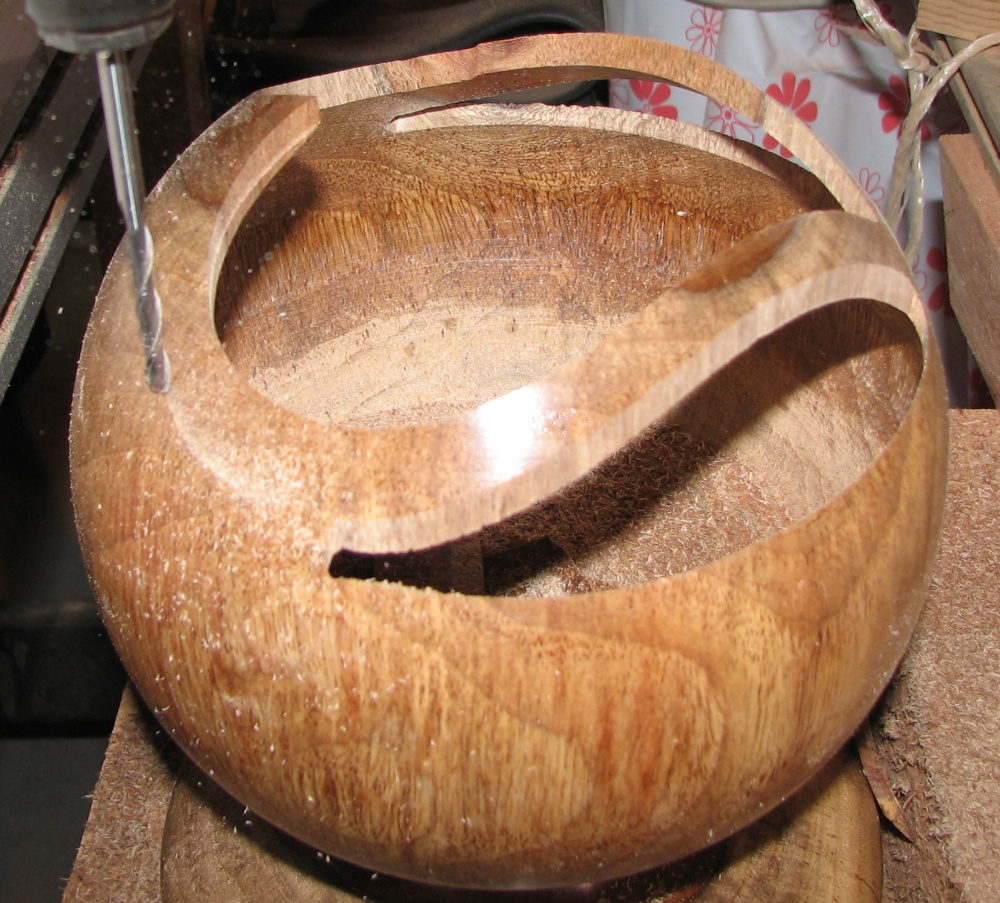

 An example of a spherical bowl with a heart outline on the top.
On the left is a snapshot of the CNC in action. Indian Rosewood tree.
An example of a spherical bowl with a heart outline on the top.
On the left is a snapshot of the CNC in action. Indian Rosewood tree.
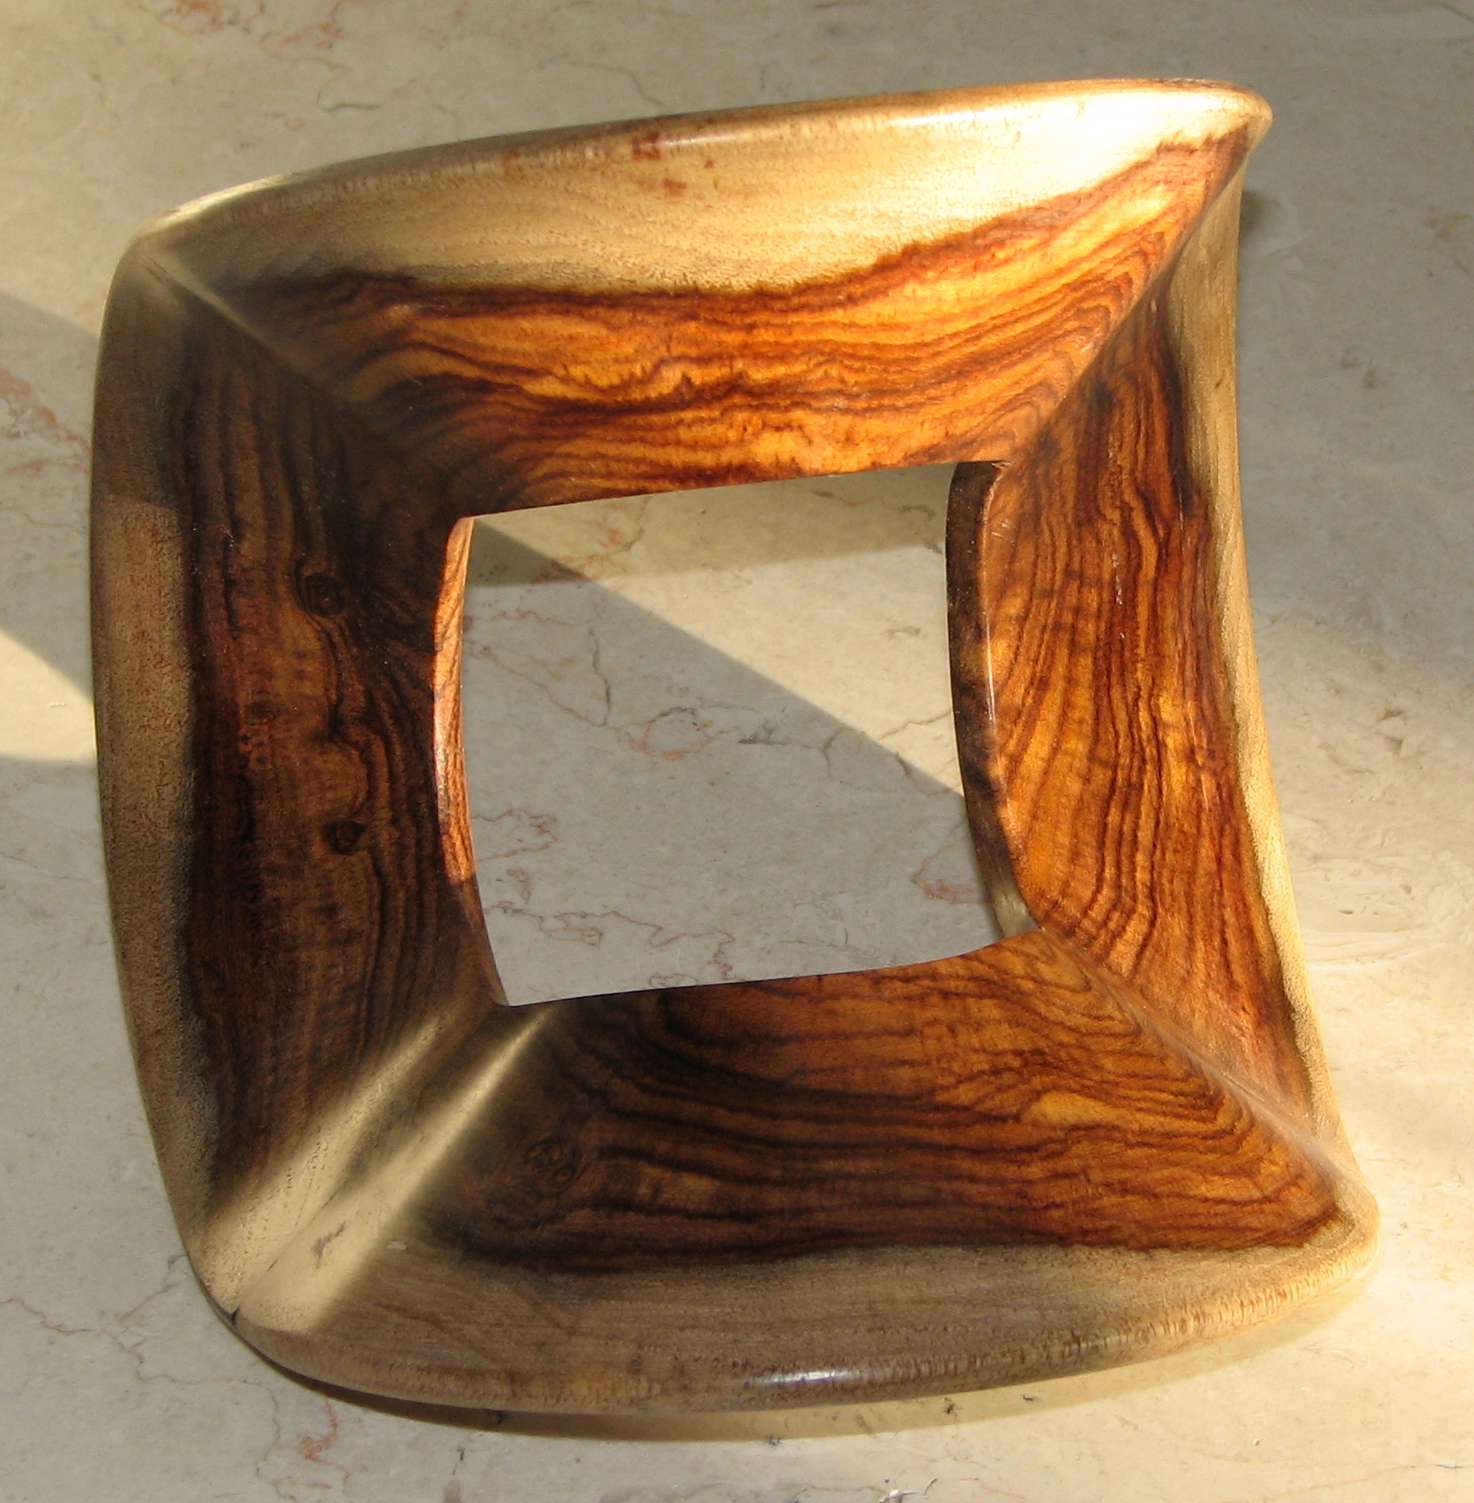
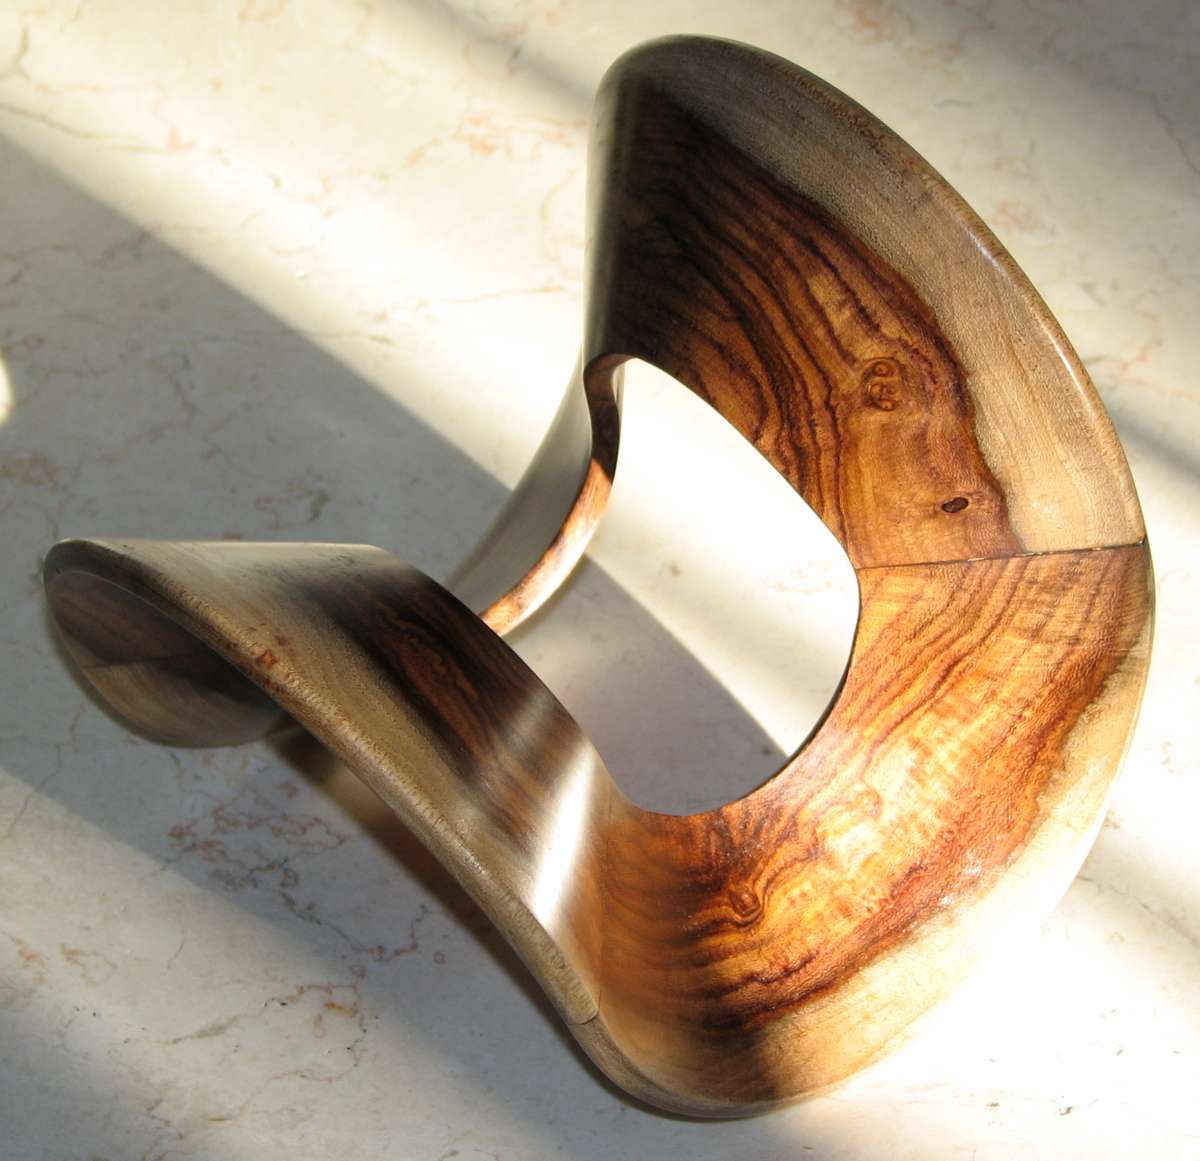
Windowed Vessel


 An example of a windowed vessel. The windows were 'punched'
by parallel saw slices as can be seen on the left only to be
completed with circular drilled holes as can be seen in the middle.
Olive tree.
An example of a windowed vessel. The windows were 'punched'
by parallel saw slices as can be seen on the left only to be
completed with circular drilled holes as can be seen in the middle.
Olive tree.
Wood Chains
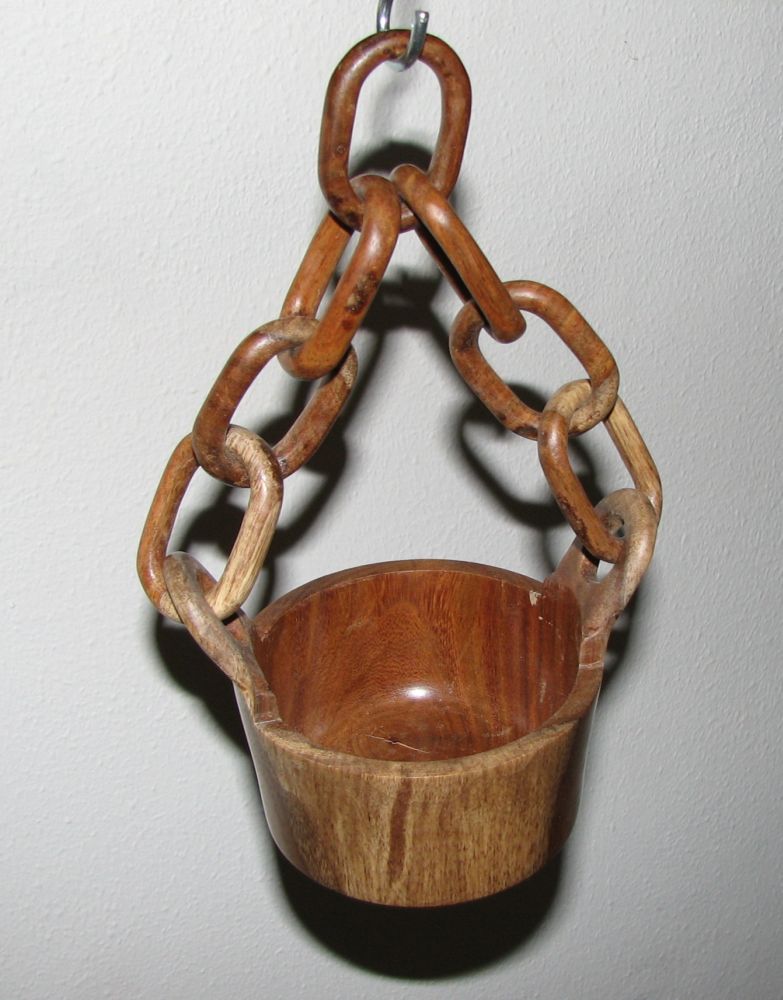

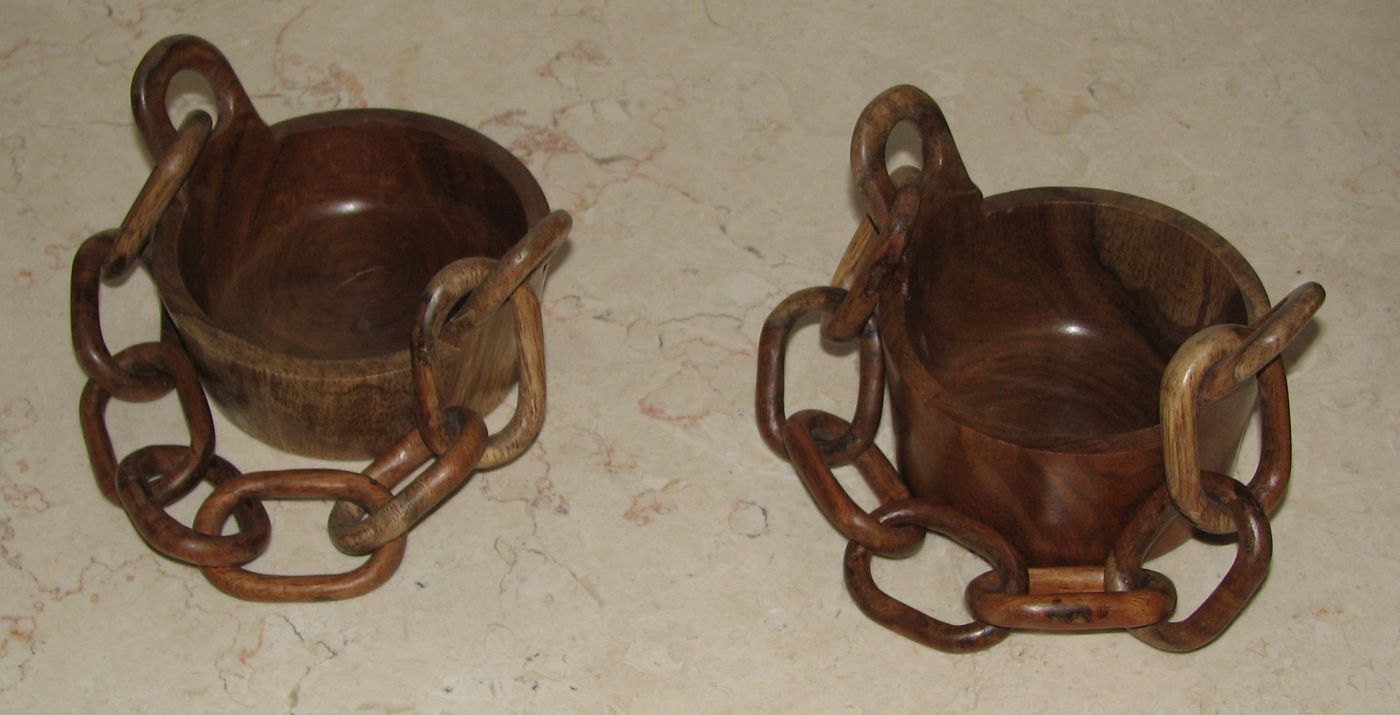
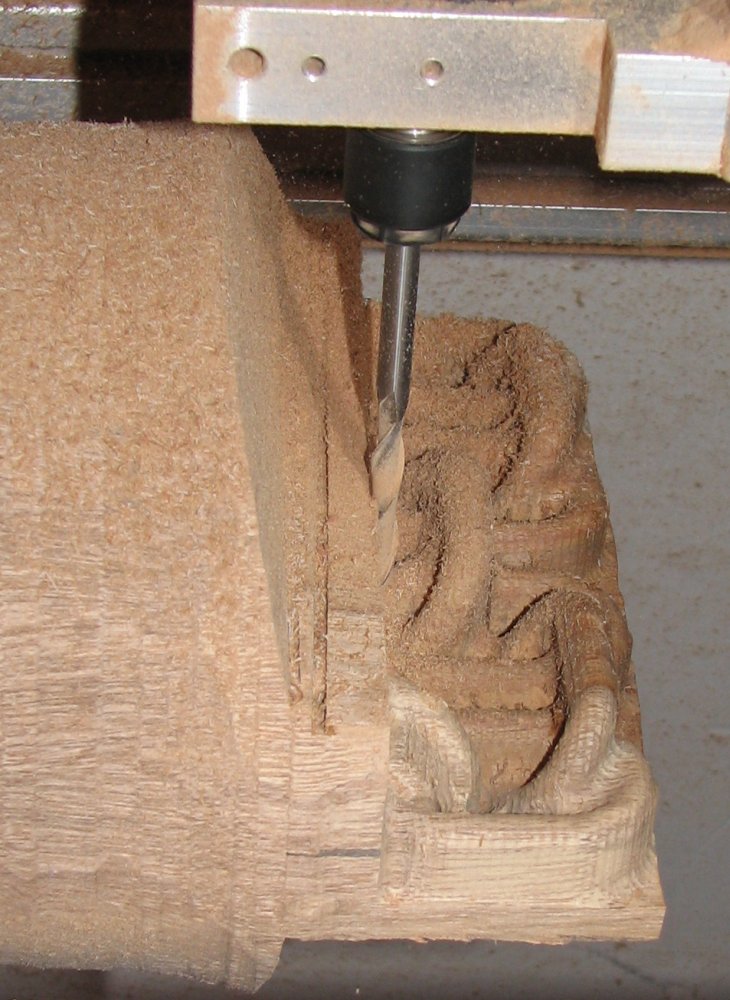 Examples of small wooden buckets with wooden chains, built from
one wood block (Indian rosewood). The image on the right depicts
the CNC step. Indian Rosewood tree.
Examples of small wooden buckets with wooden chains, built from
one wood block (Indian rosewood). The image on the right depicts
the CNC step. Indian Rosewood tree.
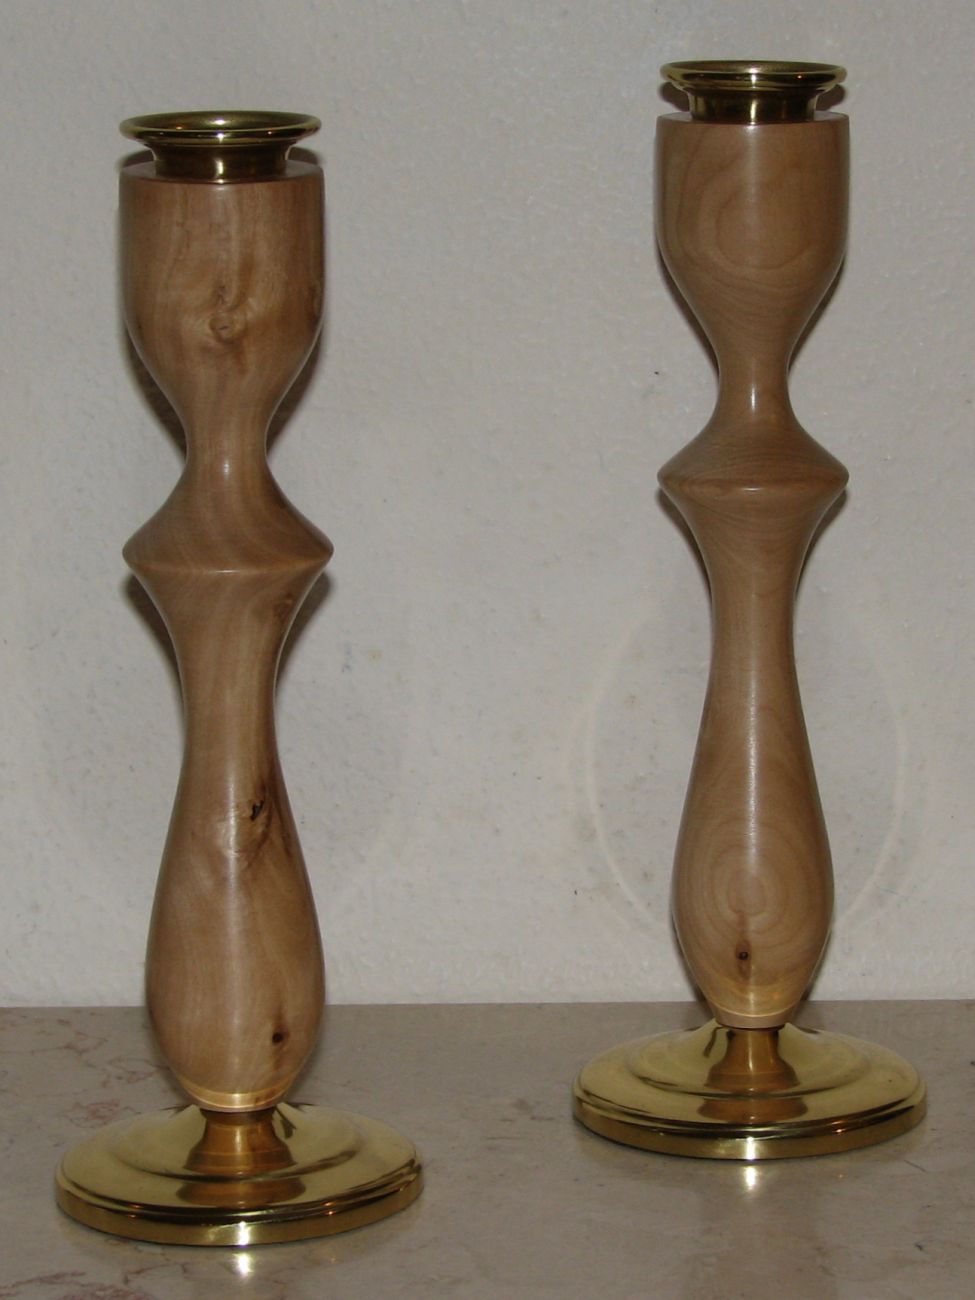
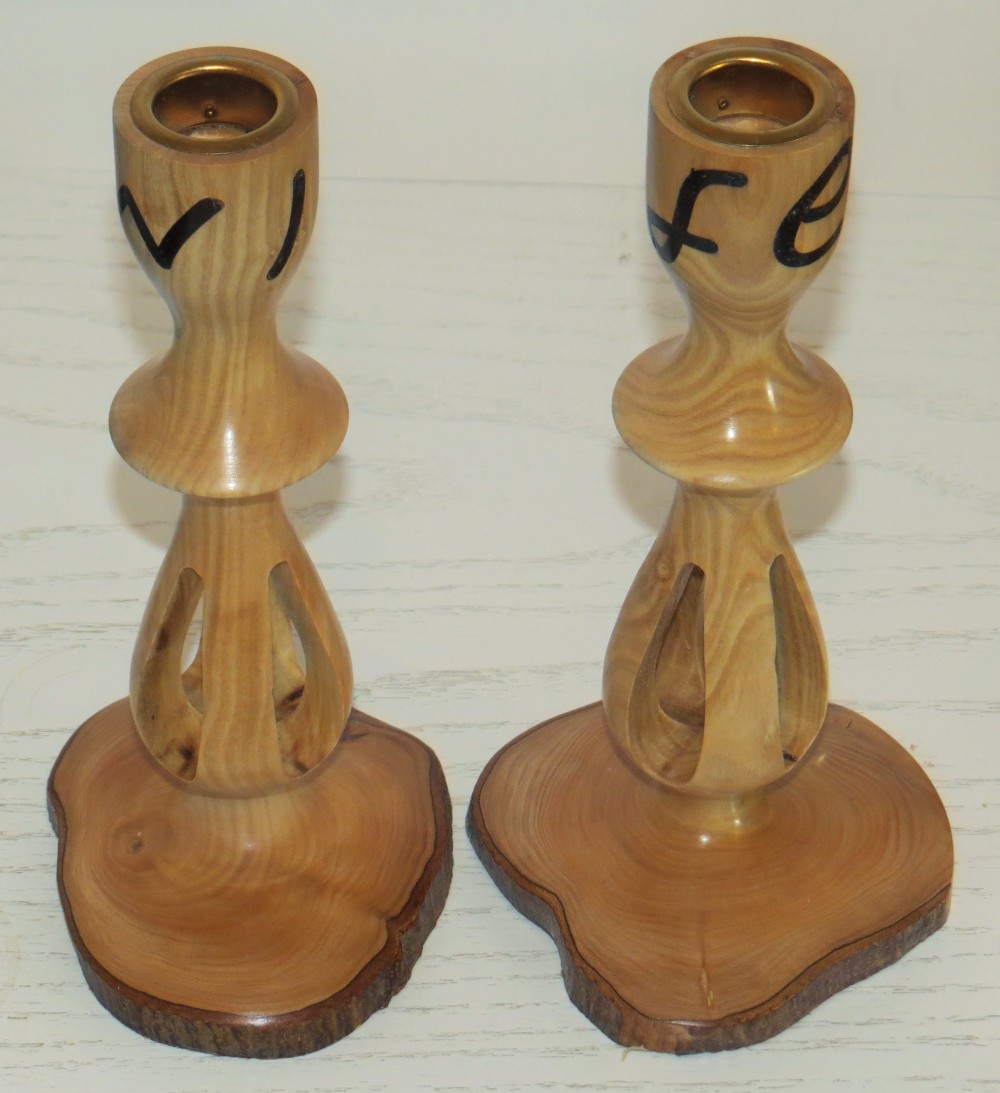
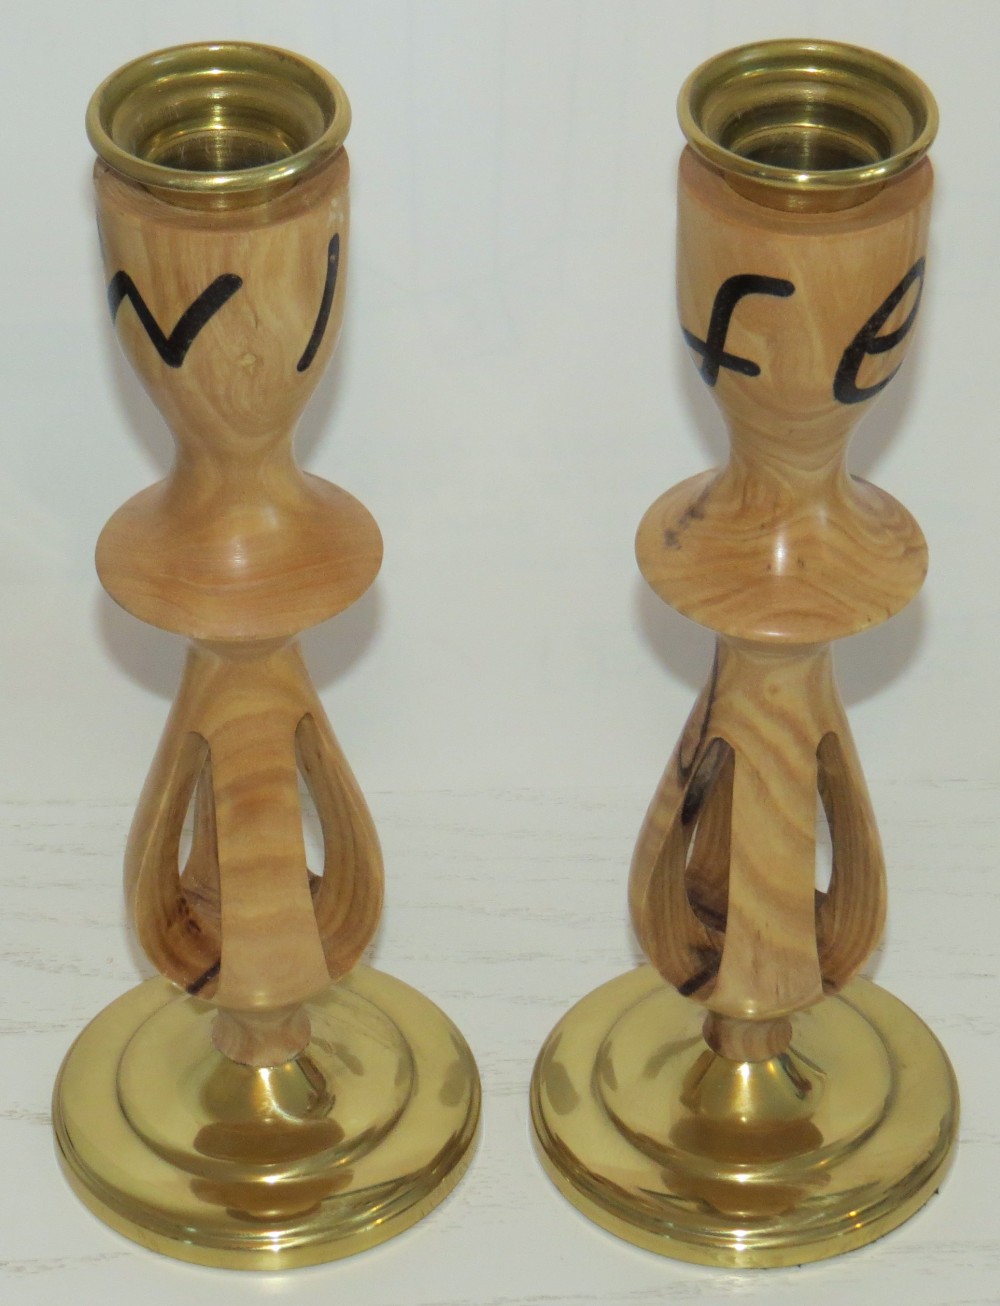
Candle Sticks
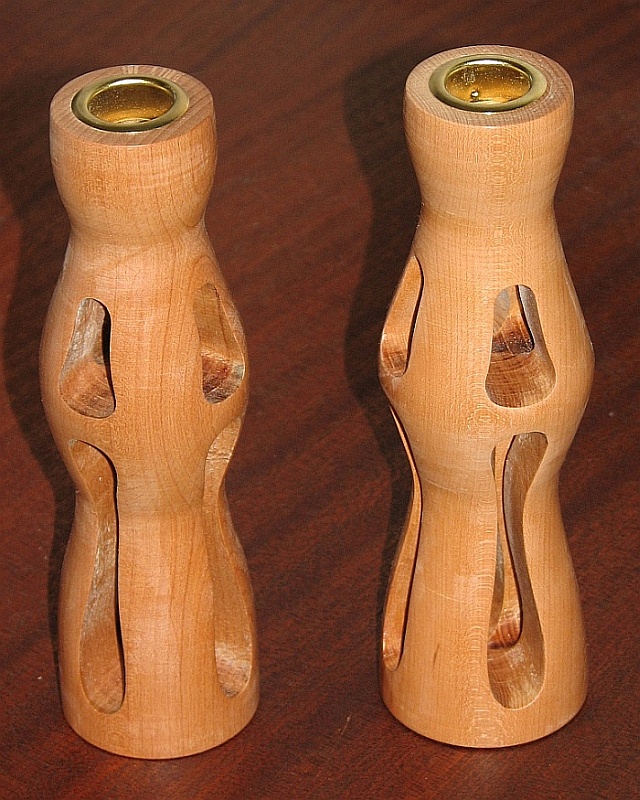
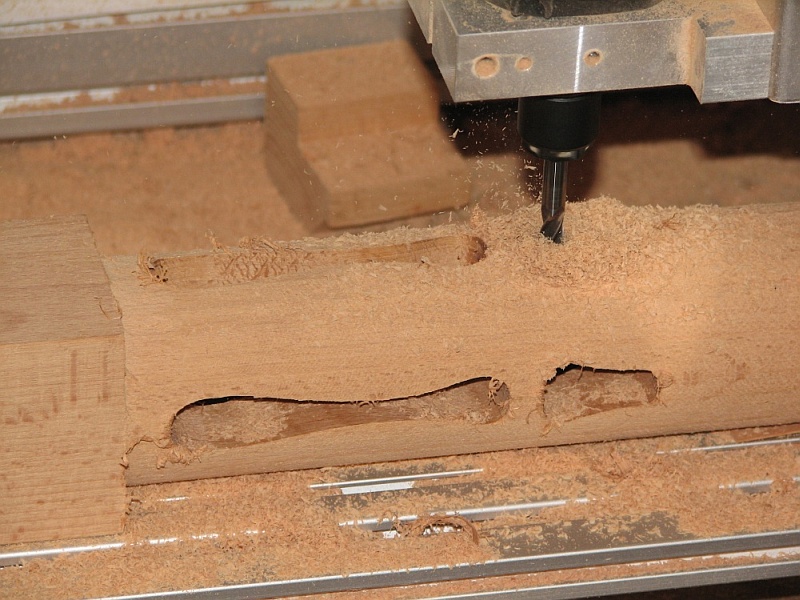
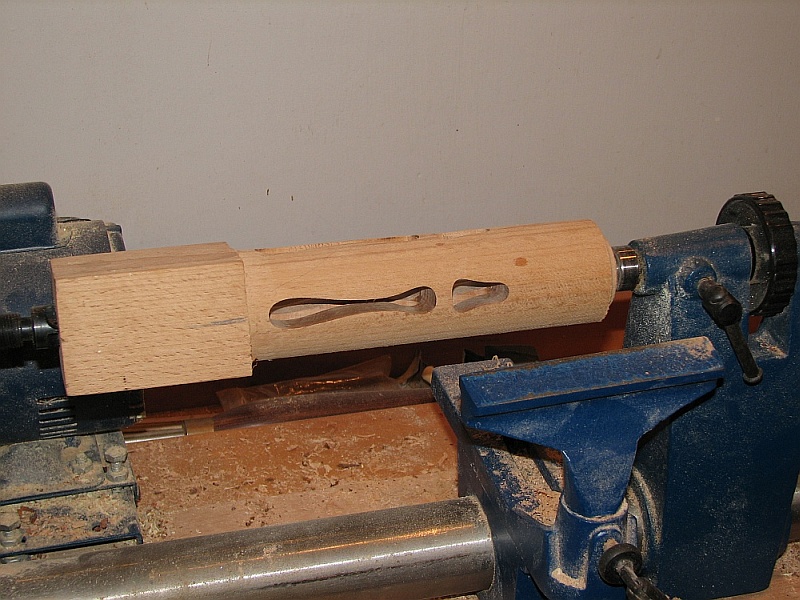 A combination of NC machining and turning. The image second
from the right shows the NC setup while the right image shows
the final NC part before turning. Beech wood.
A combination of NC machining and turning. The image second
from the right shows the NC setup while the right image shows
the final NC part before turning. Beech wood.
 More combinations of NC machining and turning.
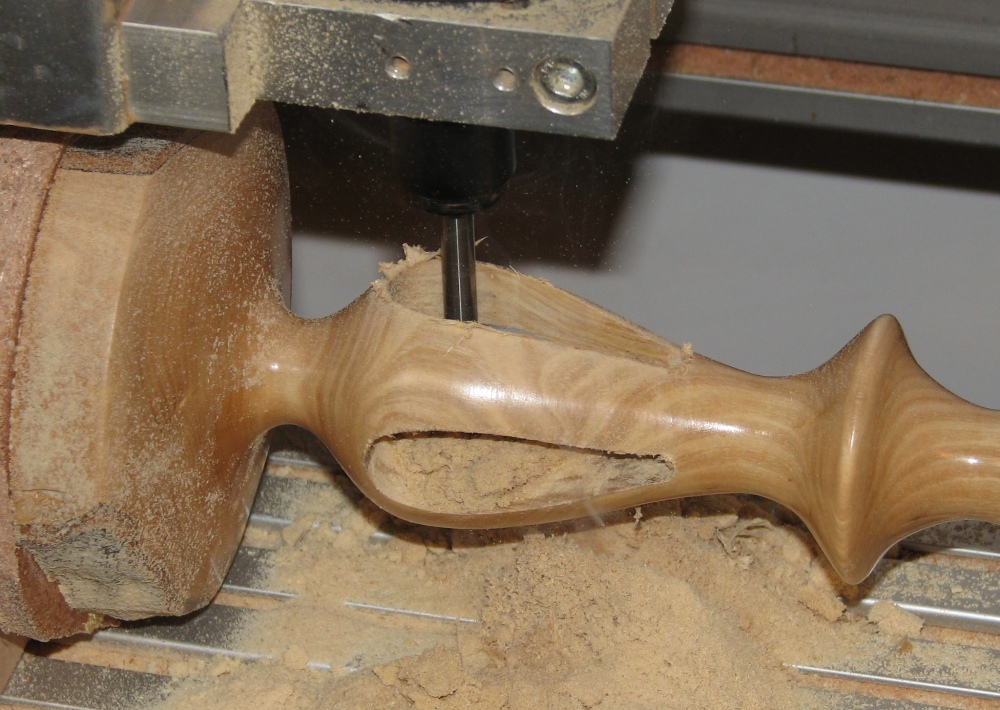
 These images show the NC setup. Olive tree.
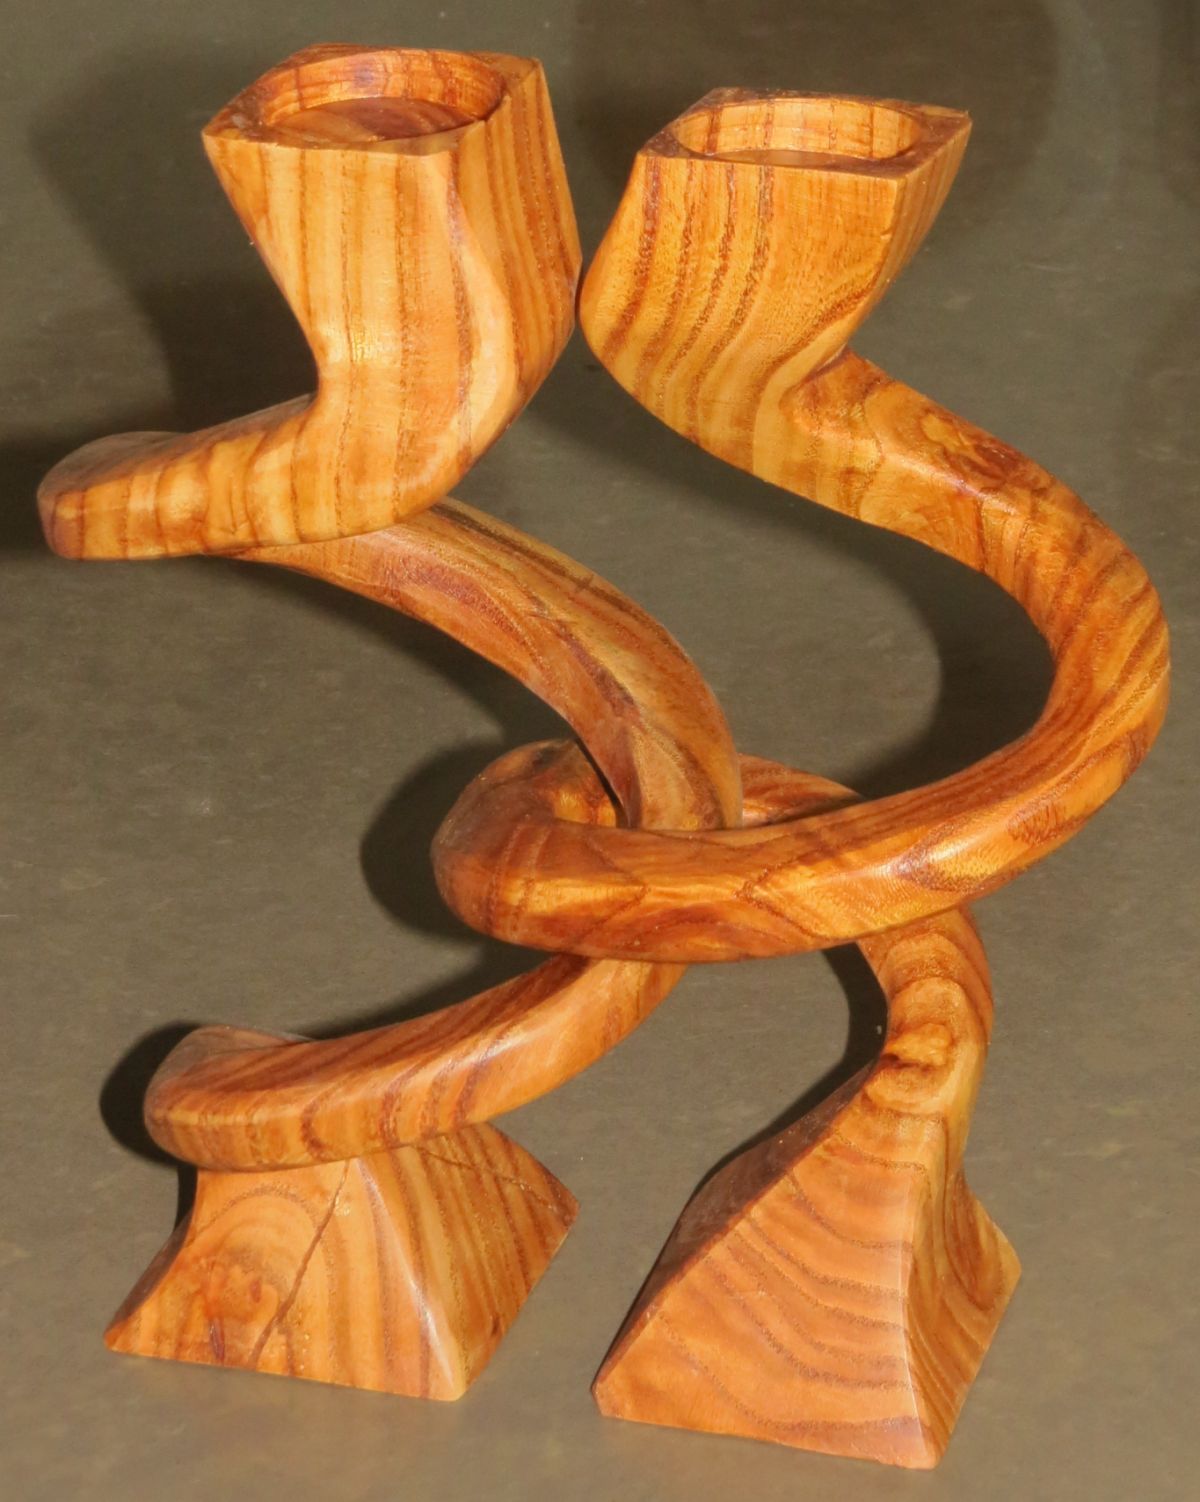 Another variation of (twisted) candle sticks. Each created by
cutting a rectangular block on the band saw and removing most of the
excessive materials as shown in the front and side view in this
attached pdf file .
The final clean-up was done by manual carving. Chinaberry
(Melia azedarach) wood.
Another variation of (twisted) candle sticks. Each created by
cutting a rectangular block on the band saw and removing most of the
excessive materials as shown in the front and side view in this
attached pdf file .
The final clean-up was done by manual carving. Chinaberry
(Melia azedarach) wood.


Another variant of candle sticks. (Rotten...) Indian Rosewood tree.


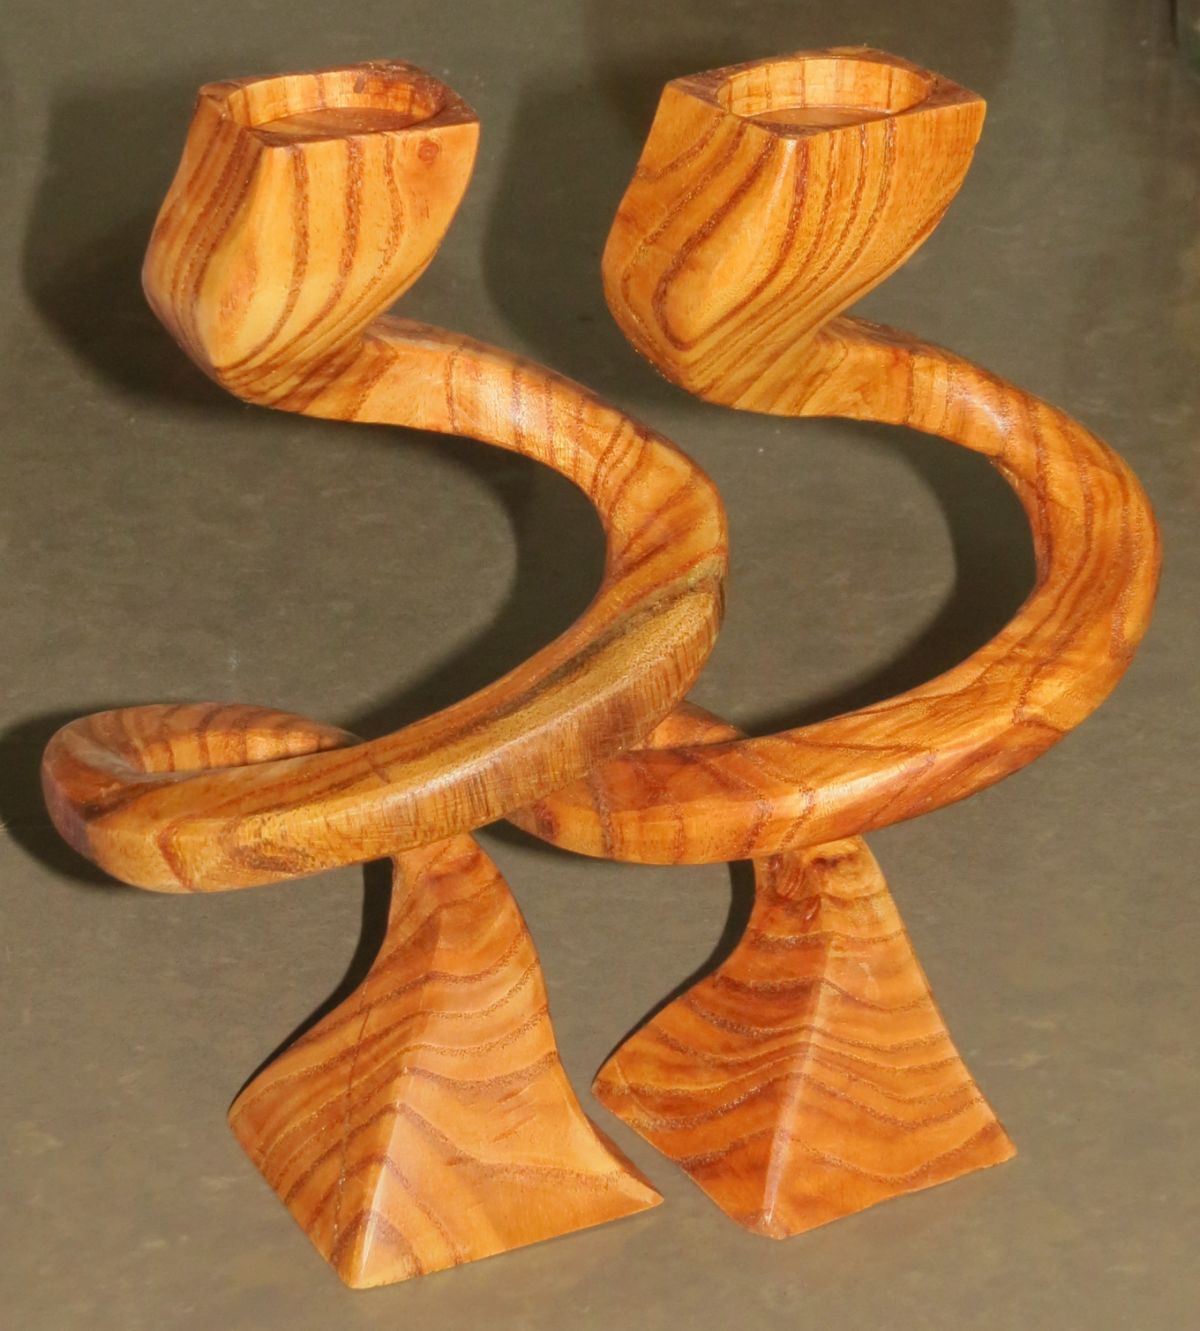
 And another variant of candle sticks, using off-center (See also
off-center vases ) 3-sided
turning. An Olive tree final result in the top left and (really
rotten) Carob wood on the middle and one the right (partially
augmented with Epoxy). The image on the left shows the 3-sided
off center turning, in action.
And another variant of candle sticks, using off-center (See also
off-center vases ) 3-sided
turning. An Olive tree final result in the top left and (really
rotten) Carob wood on the middle and one the right (partially
augmented with Epoxy). The image on the left shows the 3-sided
off center turning, in action.
The Vase of Two Hands
 A vase being held by two hands. A combination of NC machining and
turning. The image on the left shows the NC step. The
geometry was creating by deforming a 3D model of a hand using a
geometric modeling technique called freeform deformation, that uses
trivariate splines. Olive tree.
A vase being held by two hands. A combination of NC machining and
turning. The image on the left shows the NC step. The
geometry was creating by deforming a 3D model of a hand using a
geometric modeling technique called freeform deformation, that uses
trivariate splines. Olive tree.
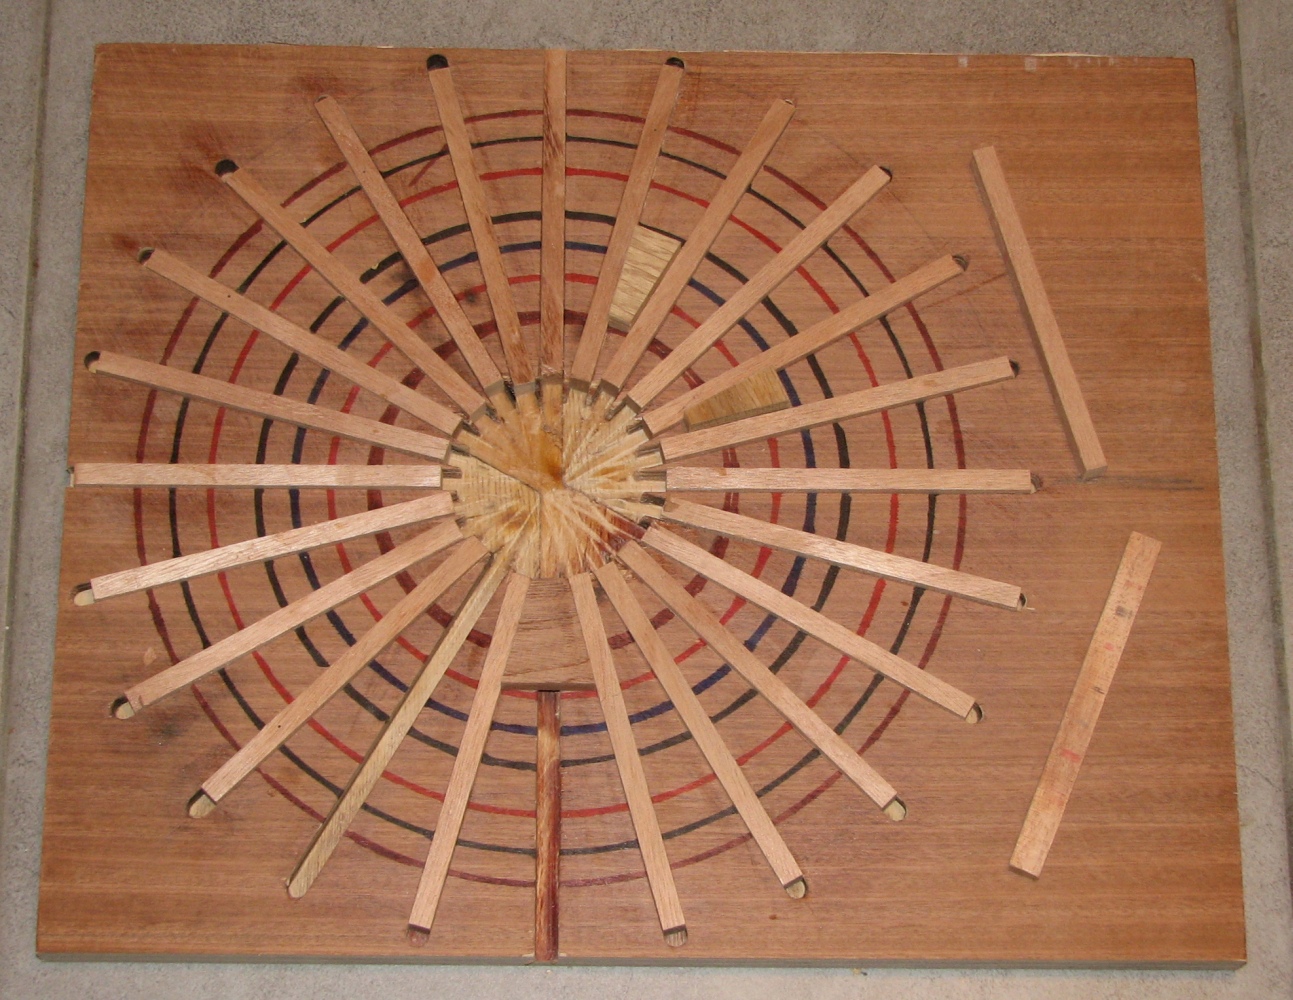
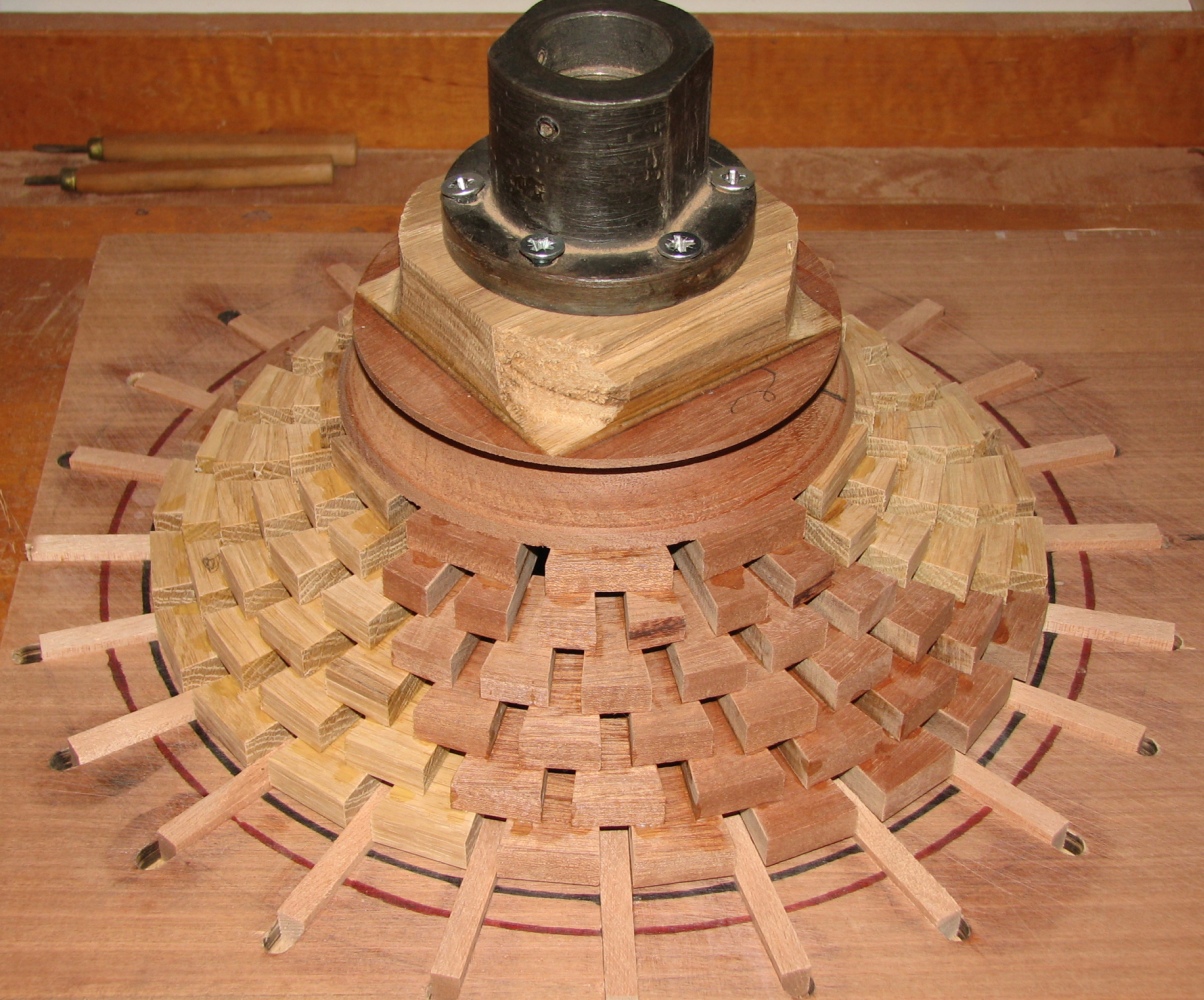
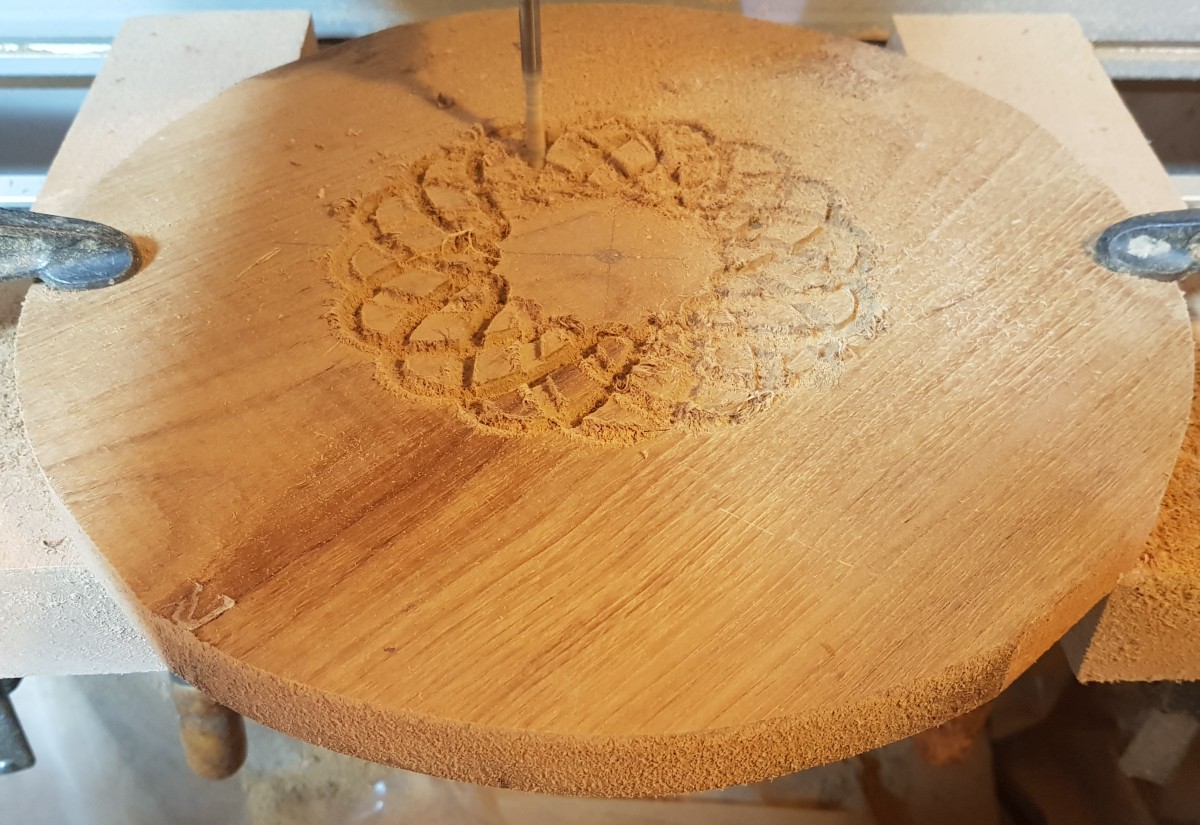
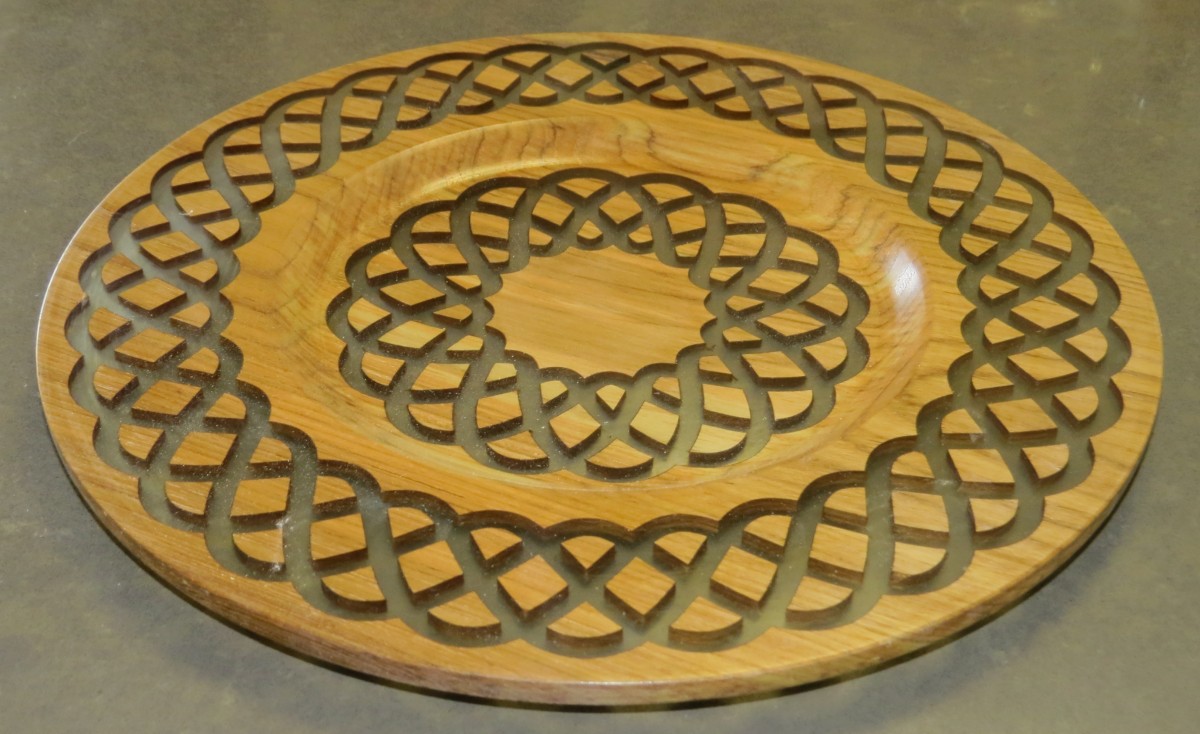
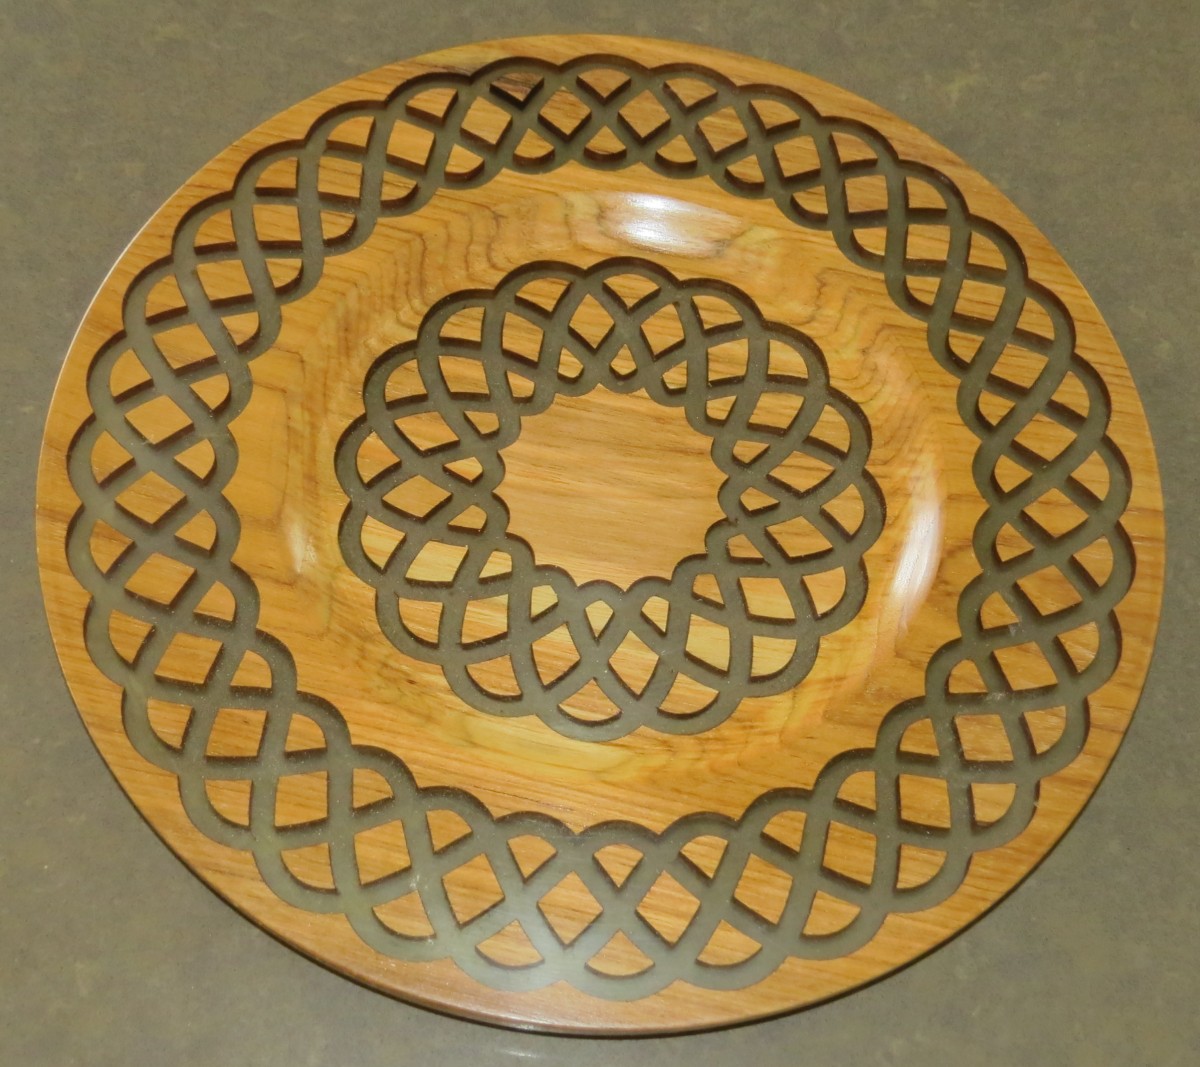
Wicker style Vessels
 Wicker style tops for wood (olive tree) vessels.
The left image shows the CNC stage.
Wicker style tops for wood (olive tree) vessels.
The left image shows the CNC stage.
2 Cones
 Two cones turned on a lathe, sliced and glued together... Indian
Rosewood tree.
Two cones turned on a lathe, sliced and glued together... Indian
Rosewood tree.
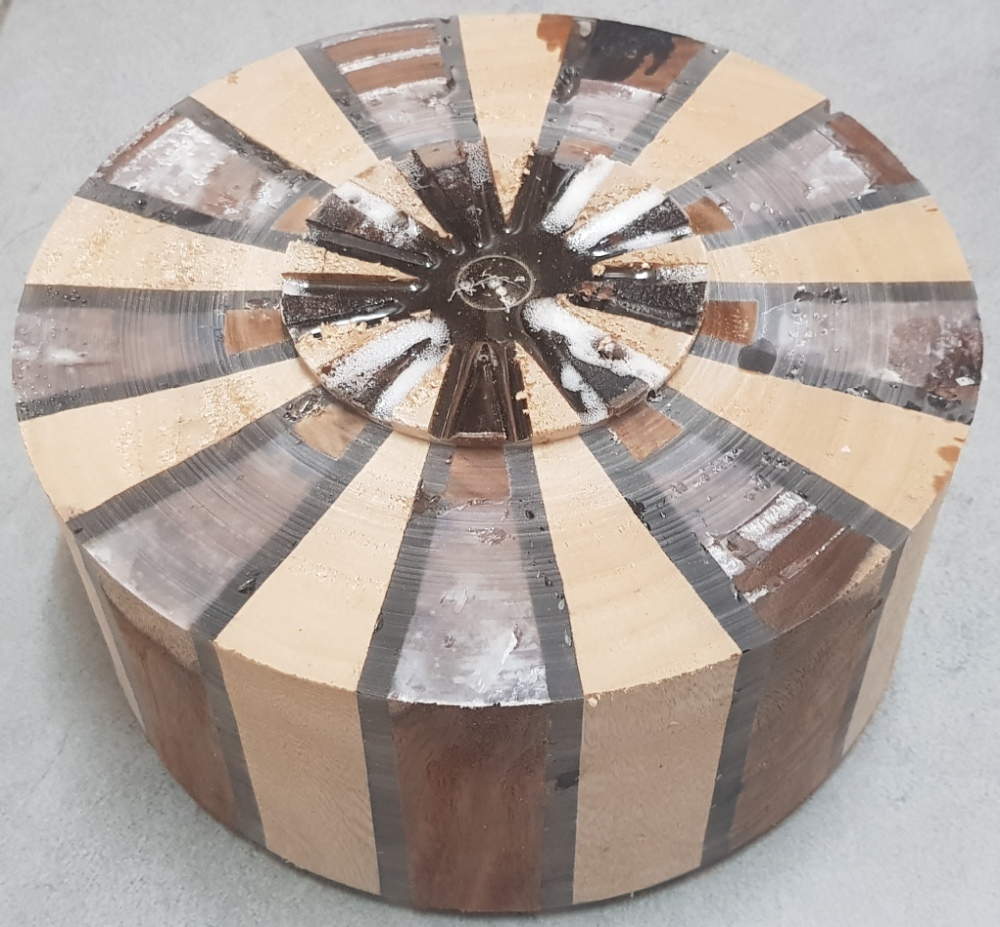
Segmented turning using a CNC Jig I
 This segmented turning piece (a combination of Mahogany and
Oak) is created one layer after another, using a Jig that
divides the entire circle to 24 parts. The Jig is made of
simple 24 170mm radius lines (12 340mm diameter lines) equally
spaced around the circle. You can find the CNC G-code for
this one here (the cuts are done
in 4 mm deep zigzag motion in Z to a total depth of 8 mm).
Note the dividers in the Jig can be taken out to create a
division of the circle to 12 (as is the case for the first
layer in the final piece), 6, 4, or 3 parts.
This segmented turning piece (a combination of Mahogany and
Oak) is created one layer after another, using a Jig that
divides the entire circle to 24 parts. The Jig is made of
simple 24 170mm radius lines (12 340mm diameter lines) equally
spaced around the circle. You can find the CNC G-code for
this one here (the cuts are done
in 4 mm deep zigzag motion in Z to a total depth of 8 mm).
Note the dividers in the Jig can be taken out to create a
division of the circle to 12 (as is the case for the first
layer in the final piece), 6, 4, or 3 parts.
Segmented turning using a CNC Jig II
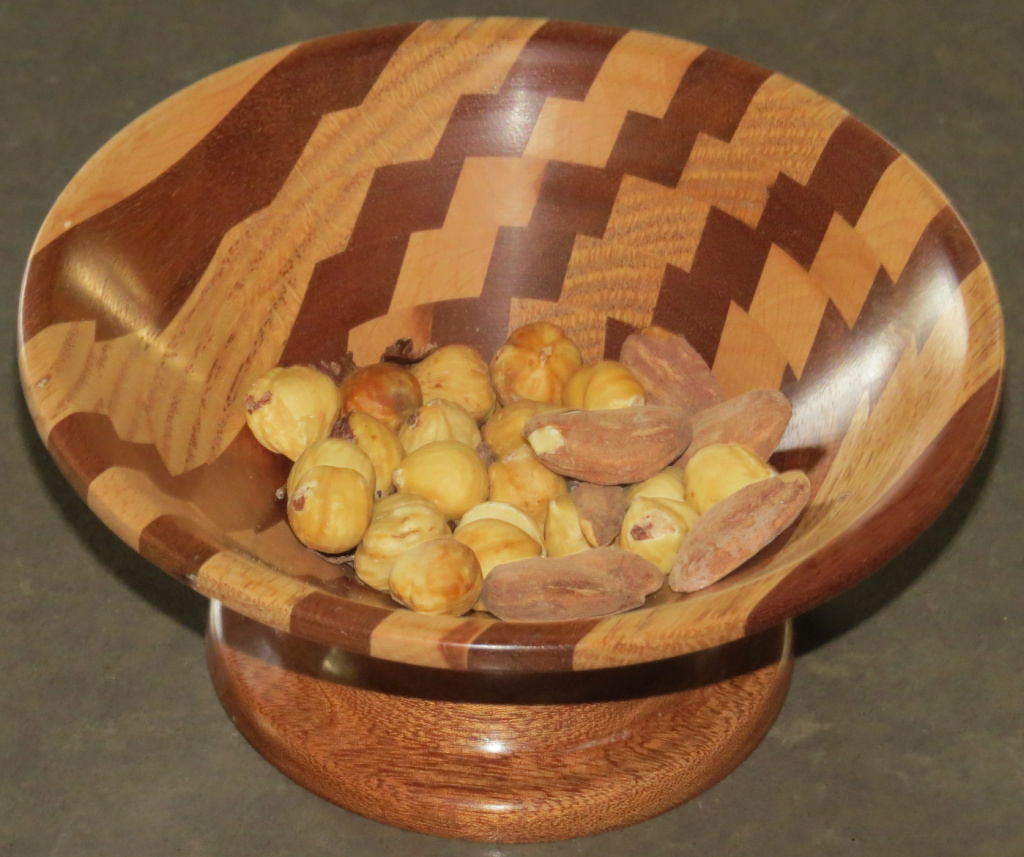
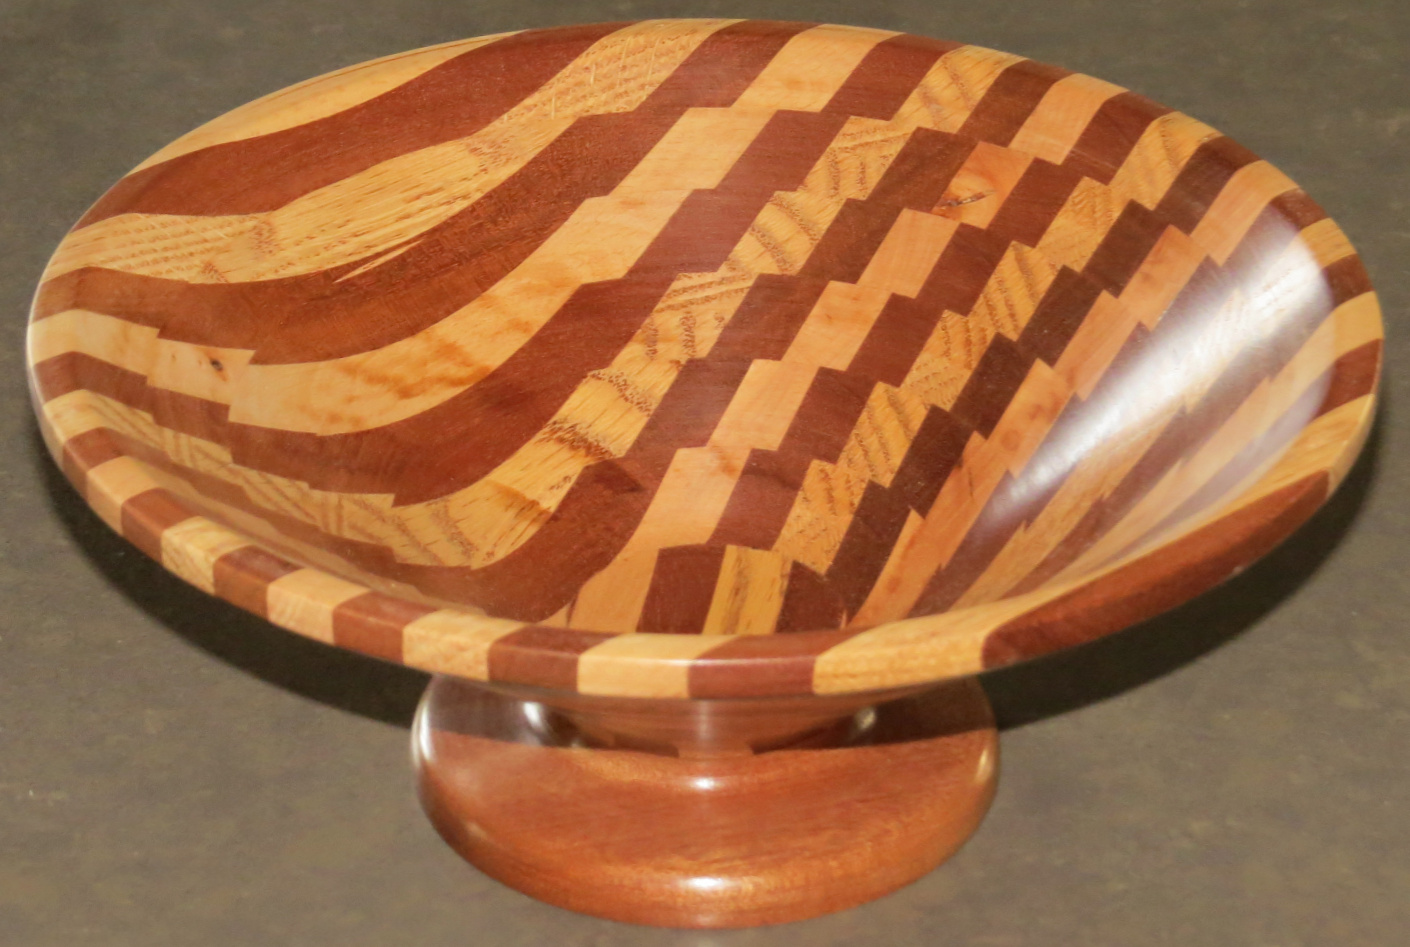 This segmented turning piece (a combination of Mahogany, Beech
and Oak) is created by glowing stripes of the different wood
type, as can be seen on the left image, only to diagonally cut
circular rings out of the plate using a scroll saw and glow
them stacked together (twisted) into a conical shape. The
images on the right show two different final results.
This segmented turning piece (a combination of Mahogany, Beech
and Oak) is created by glowing stripes of the different wood
type, as can be seen on the left image, only to diagonally cut
circular rings out of the plate using a scroll saw and glow
them stacked together (twisted) into a conical shape. The
images on the right show two different final results.
Segmented turning using a CNC Jig III


 This segmented turning piece is aimed to create an illusion of a 3D
hollowed vessel... After a similar work by ThePapa1947 (YouTube).
The image on the left shows the pieces before
cutting the diagonal edges on the table saw. The two
images on the right show the final result.
This segmented turning piece is aimed to create an illusion of a 3D
hollowed vessel... After a similar work by ThePapa1947 (YouTube).
The image on the left shows the pieces before
cutting the diagonal edges on the table saw. The two
images on the right show the final result.
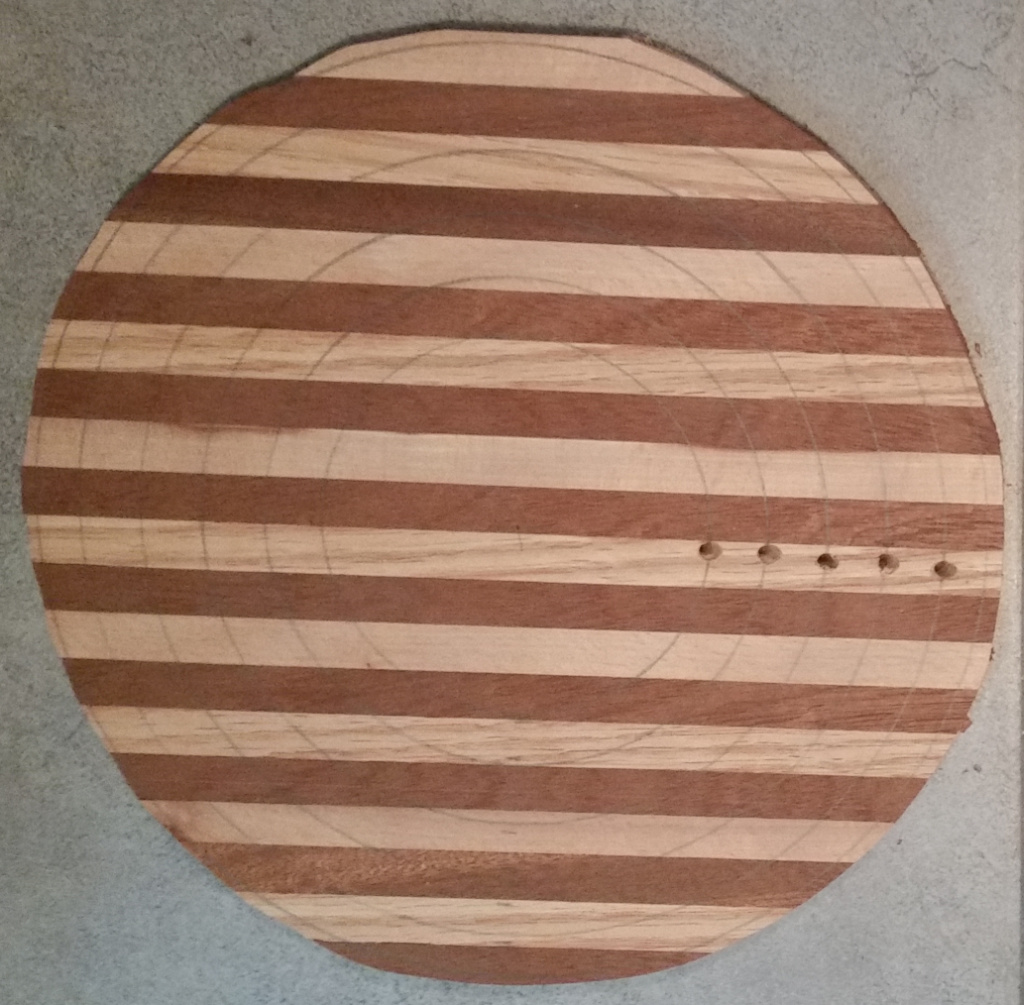
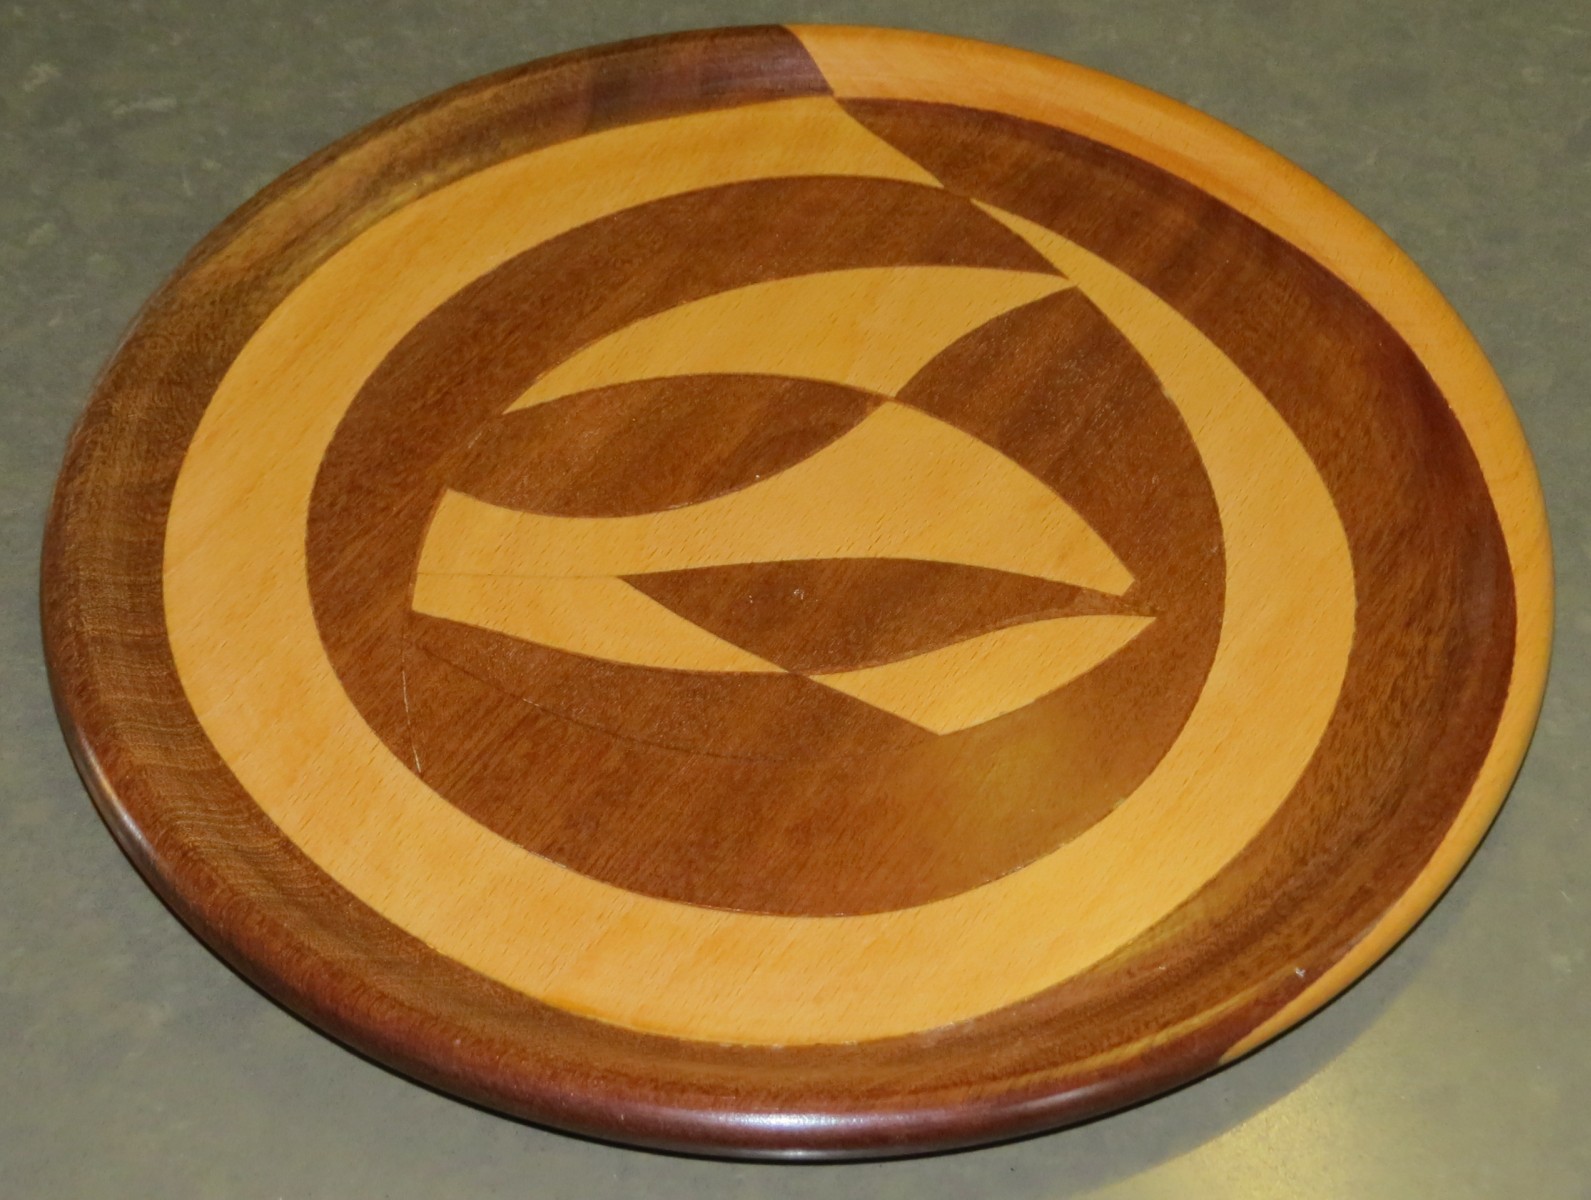
Wild Chess Board Plate I
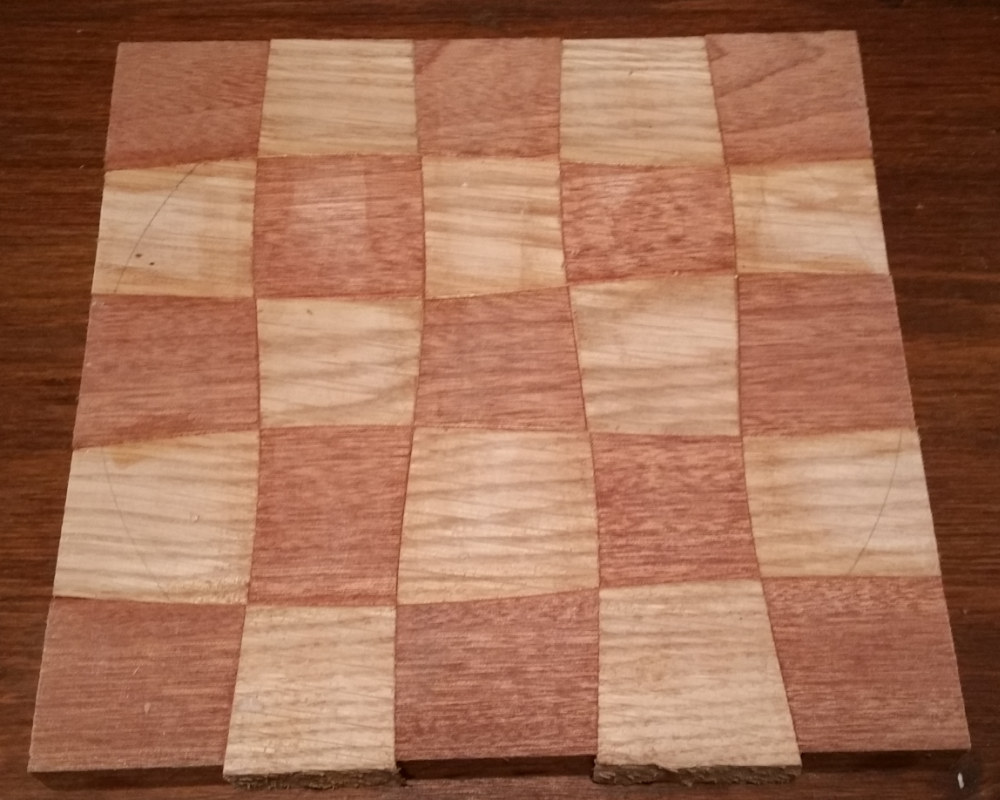
 Turning the plate on the right is the easy part once you have the
board on the left.
However, can you envision how the board on the left was made?
The original credit should go to this
movie
Turning the plate on the right is the easy part once you have the
board on the left.
However, can you envision how the board on the left was made?
The original credit should go to this
movie
Wild Chess Board Plate II


 Turning the plates on the right is, again, the easy part once
you have the board. Another variation of a wild chess board,
employing radial coordinates, and the top row shows the
process: We first perform these circular cuts on a band saw
(top left), glue them (using dark epoxy) together (top middle)
while flipping alternativing wood (Ash and Mahogany), only to
perform the radial, cake pieces-like, cuts as a second step
(top tight), alternating the pieces and glueing them again...
Turning the plates on the right is, again, the easy part once
you have the board. Another variation of a wild chess board,
employing radial coordinates, and the top row shows the
process: We first perform these circular cuts on a band saw
(top left), glue them (using dark epoxy) together (top middle)
while flipping alternativing wood (Ash and Mahogany), only to
perform the radial, cake pieces-like, cuts as a second step
(top tight), alternating the pieces and glueing them again...
High Tea
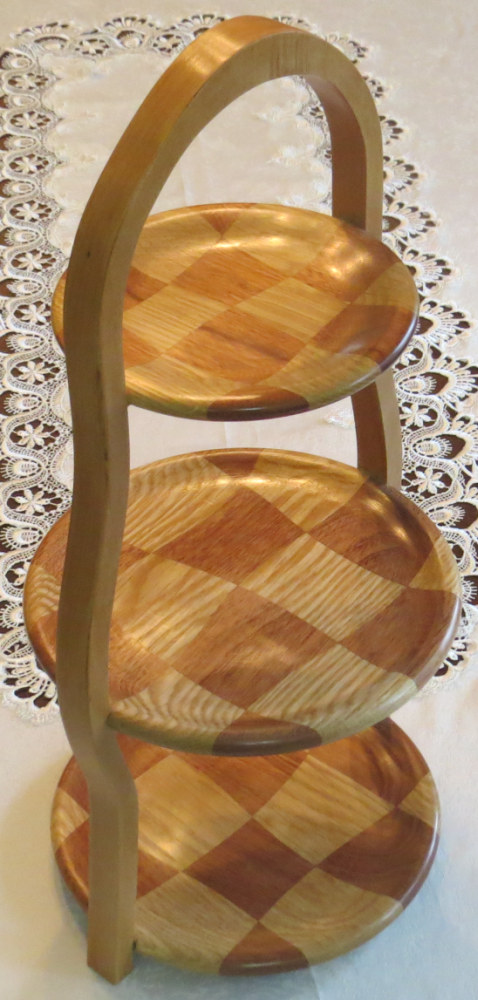
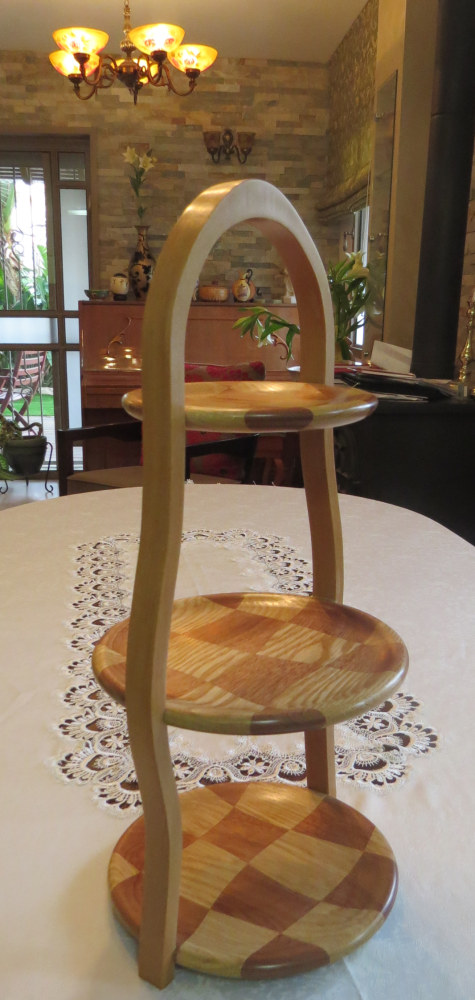
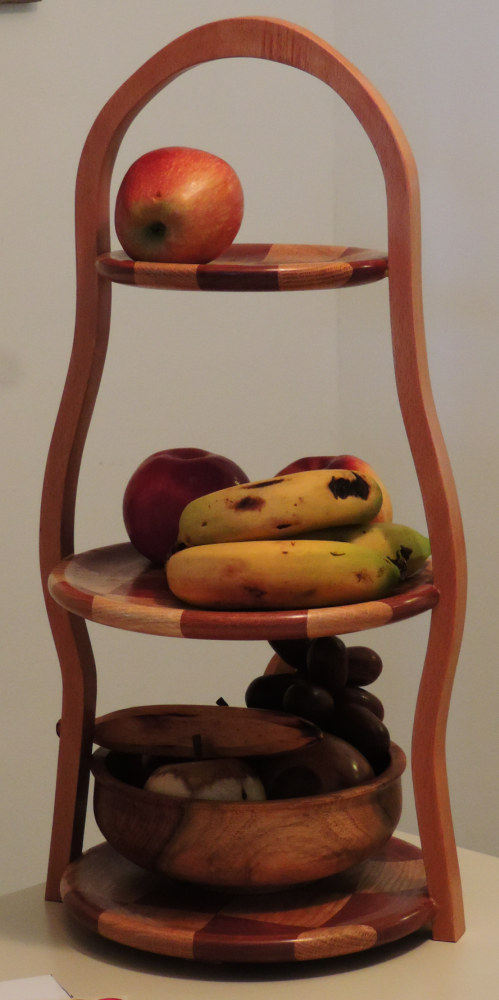
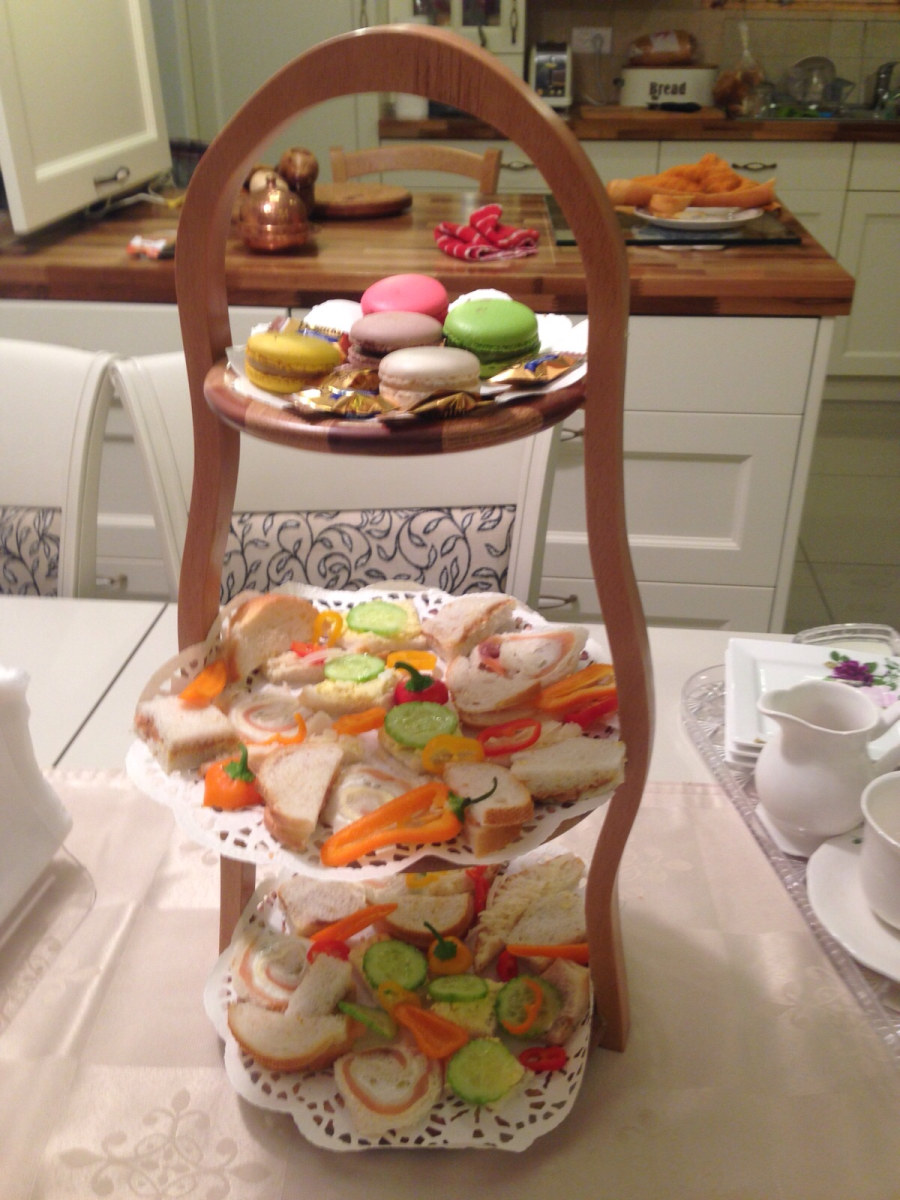
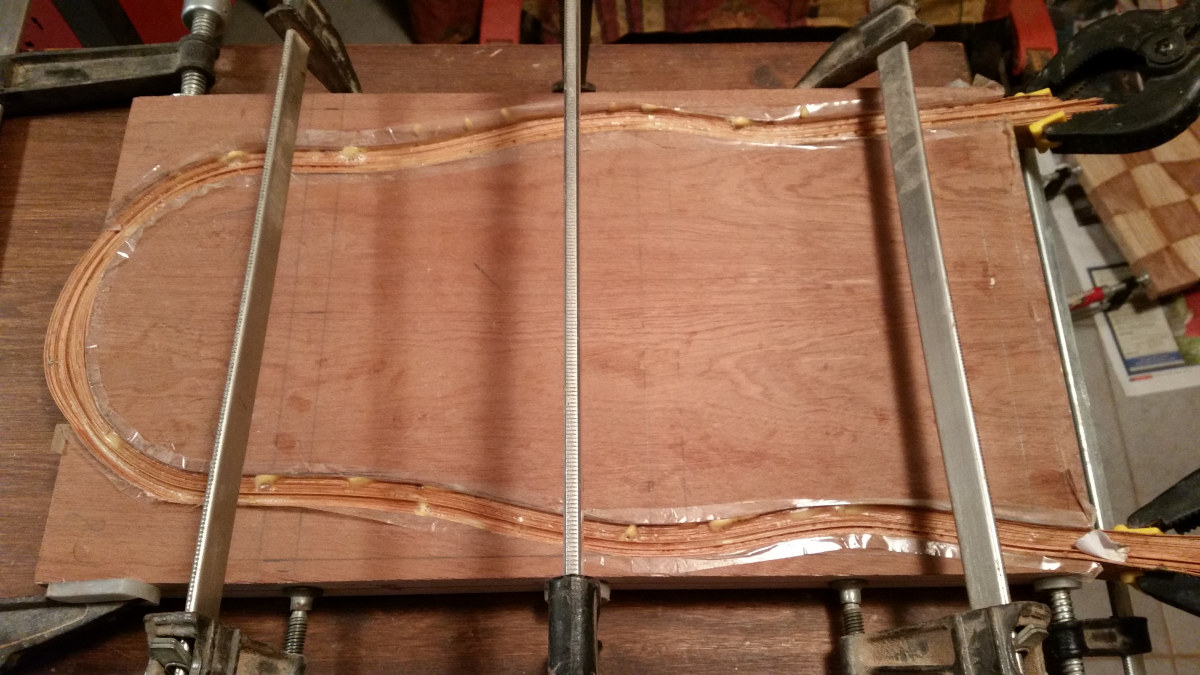 High tea service using three wild chess board plates as above.
Interestingly the wavy holder was made using many strips of veneer
glued together using the jig shown on the right.
High tea service using three wild chess board plates as above.
Interestingly the wavy holder was made using many strips of veneer
glued together using the jig shown on the right.
Segmented Black Hole...

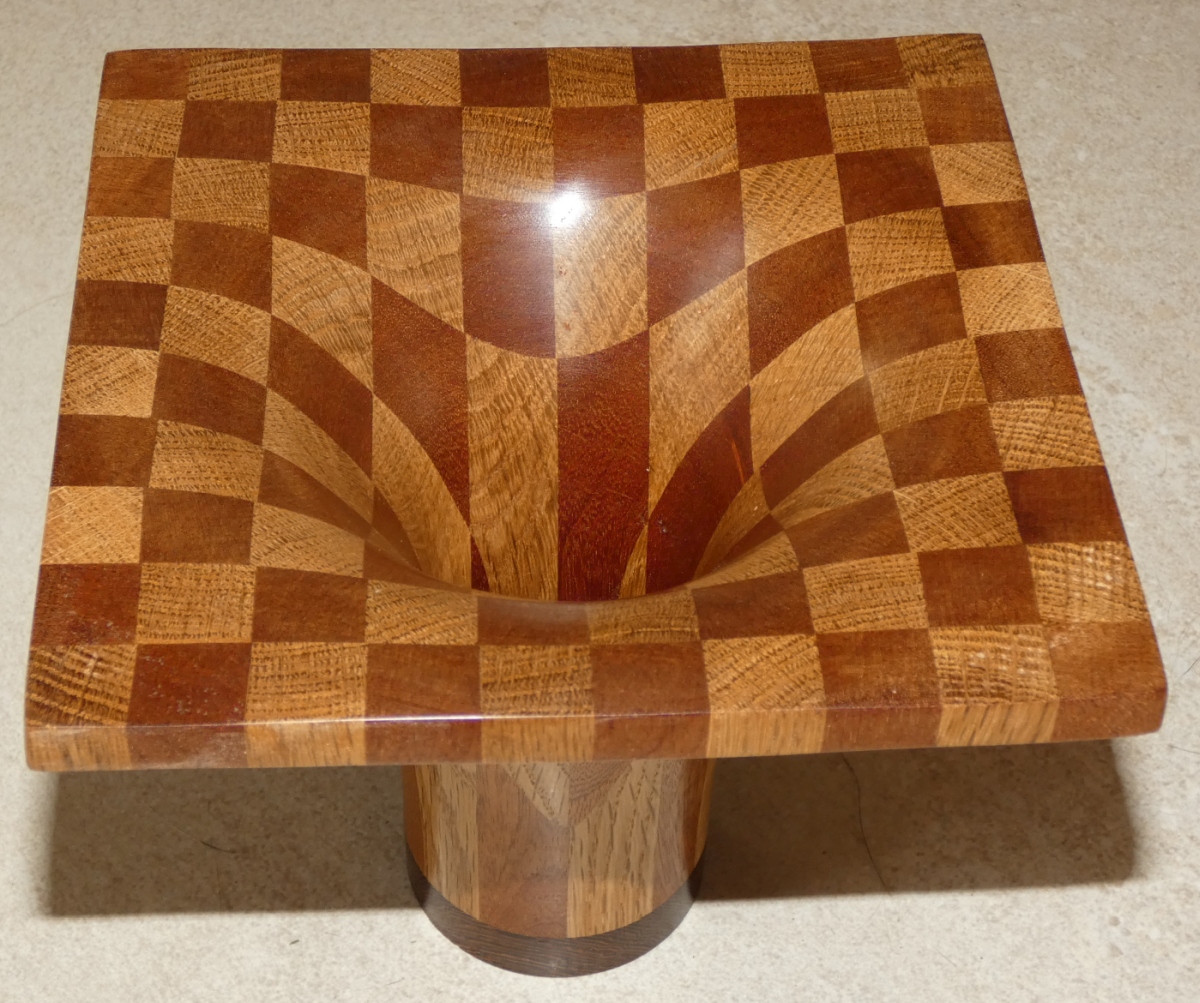
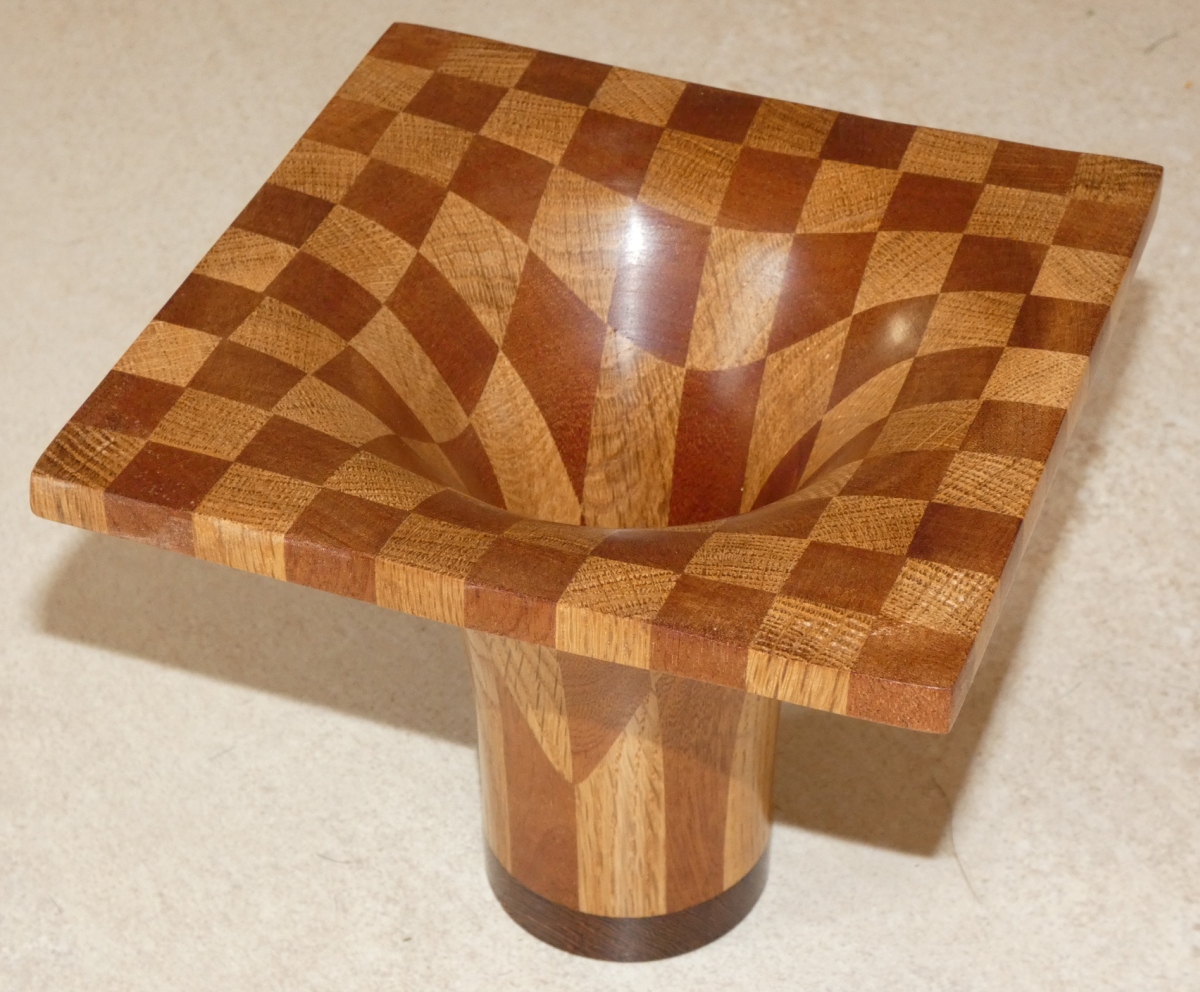 A segmented black hole vase turned from a square pattern formed out
of two types of wood (Mahogany and Oak). The black base is Zebrano.
A segmented black hole vase turned from a square pattern formed out
of two types of wood (Mahogany and Oak). The black base is Zebrano.
Hexagonal Segmented Bowl
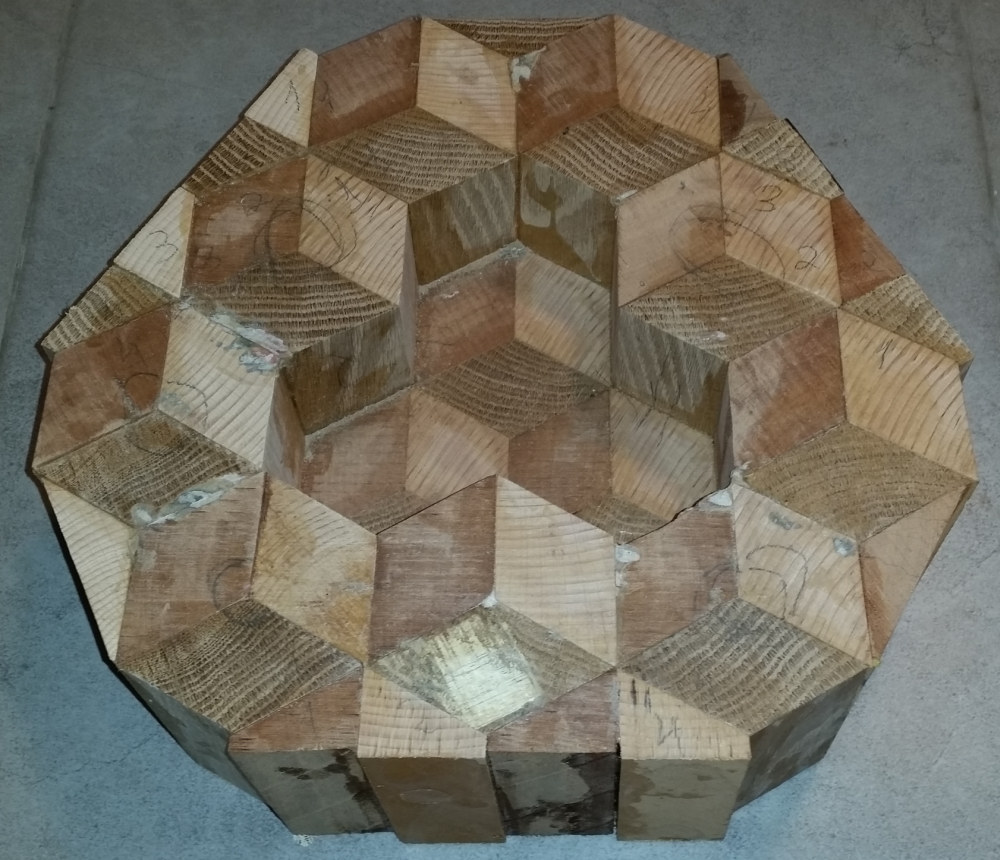

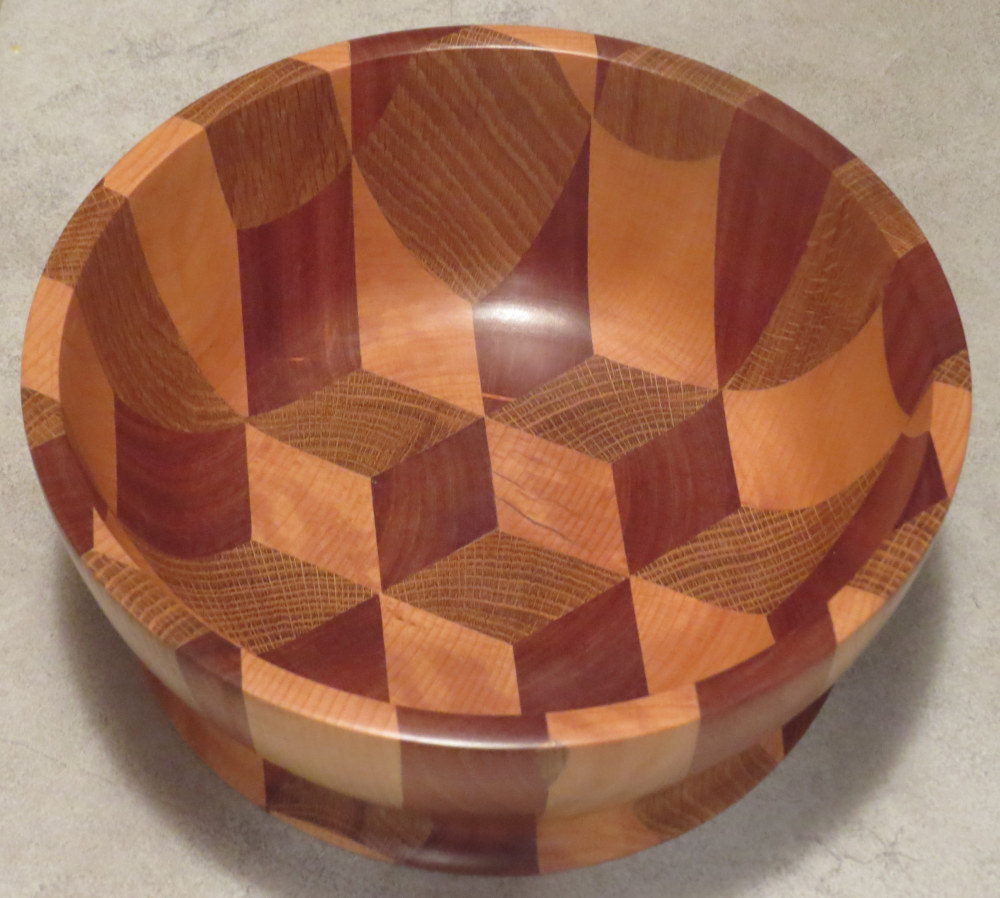 A bowl turned from hexagonal patterning formed out of three types of
wood (Beech, Mahogany, and Oak). The left images show the glued
pieces (note the interior pieces are not as high as the outer ones).
The original credit should go to this
movie
A bowl turned from hexagonal patterning formed out of three types of
wood (Beech, Mahogany, and Oak). The left images show the glued
pieces (note the interior pieces are not as high as the outer ones).
The original credit should go to this
movie
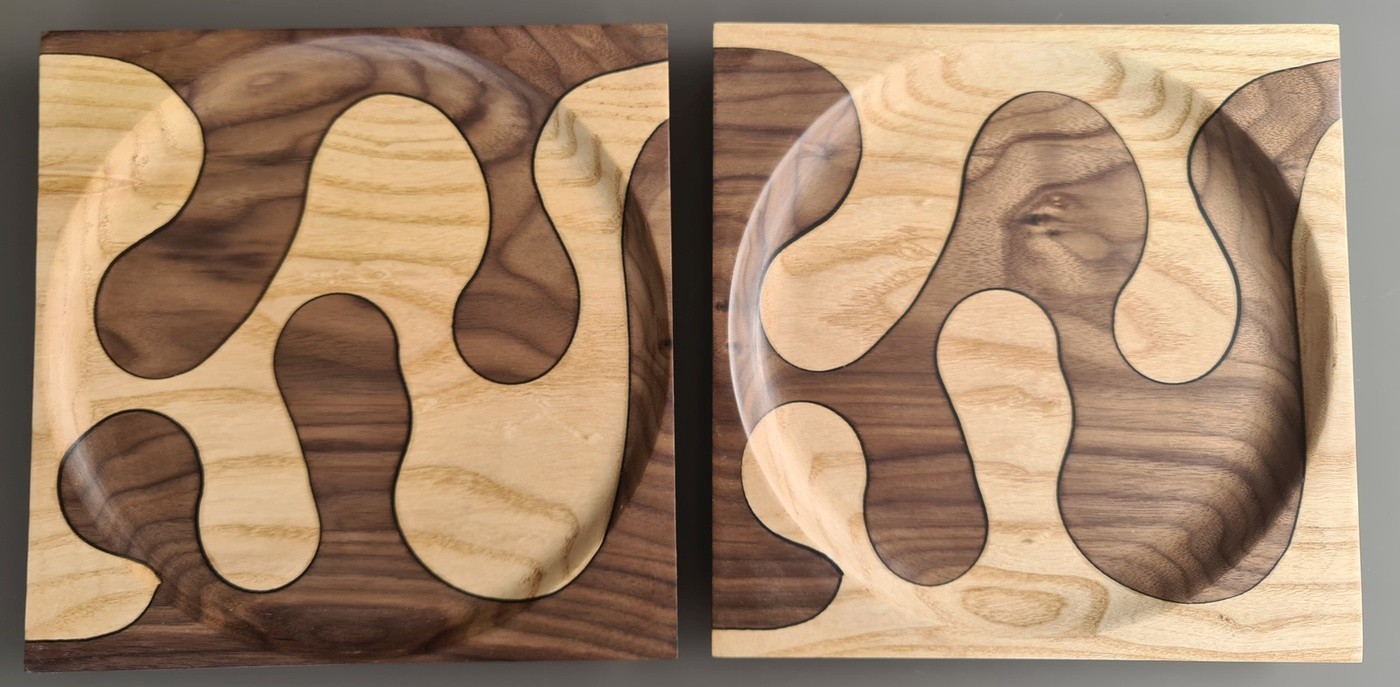
Plates with alternating (random) cuts
 Two plates with random cuts of pieces from Beech and Mahogany
wood. Can you imagine how this what done? A hint: There is
an anti-symmetry relation between the two presented plates.
Two plates with random cuts of pieces from Beech and Mahogany
wood. Can you imagine how this what done? A hint: There is
an anti-symmetry relation between the two presented plates.
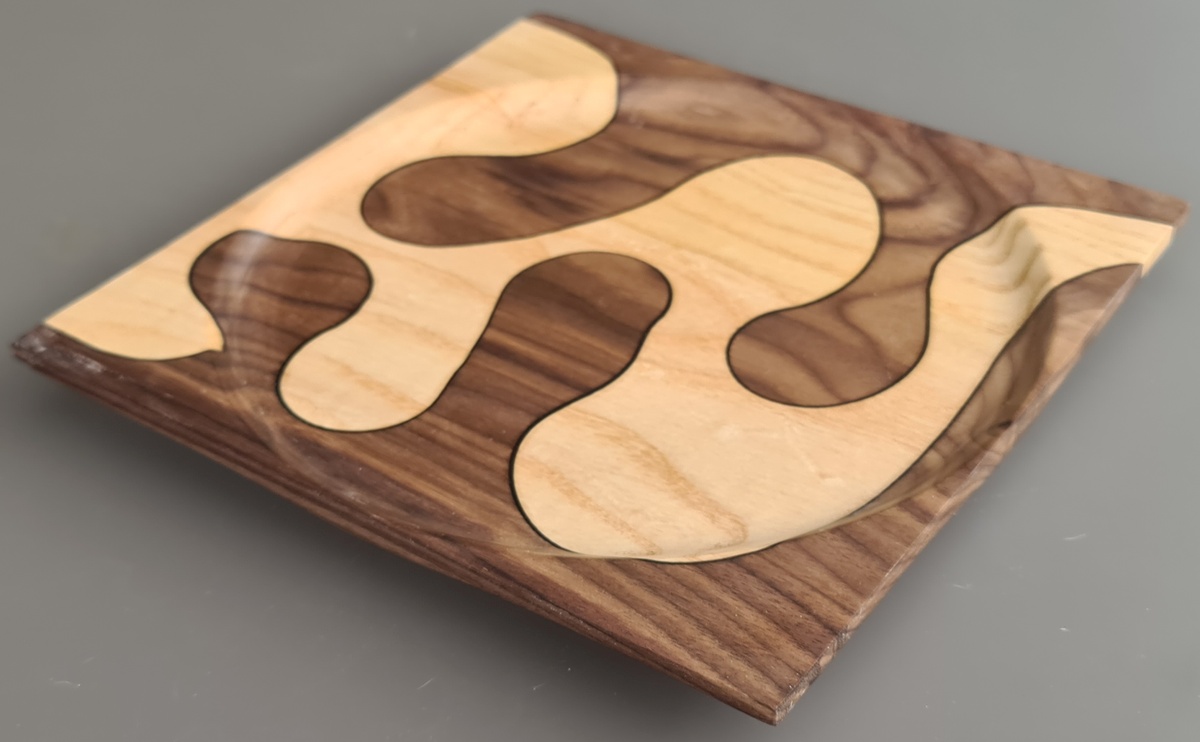 Two additional variations of the same idea.
Ash and Walnut wood, and epoxy with black-die at the gaps.
Two additional variations of the same idea.
Ash and Walnut wood, and epoxy with black-die at the gaps.
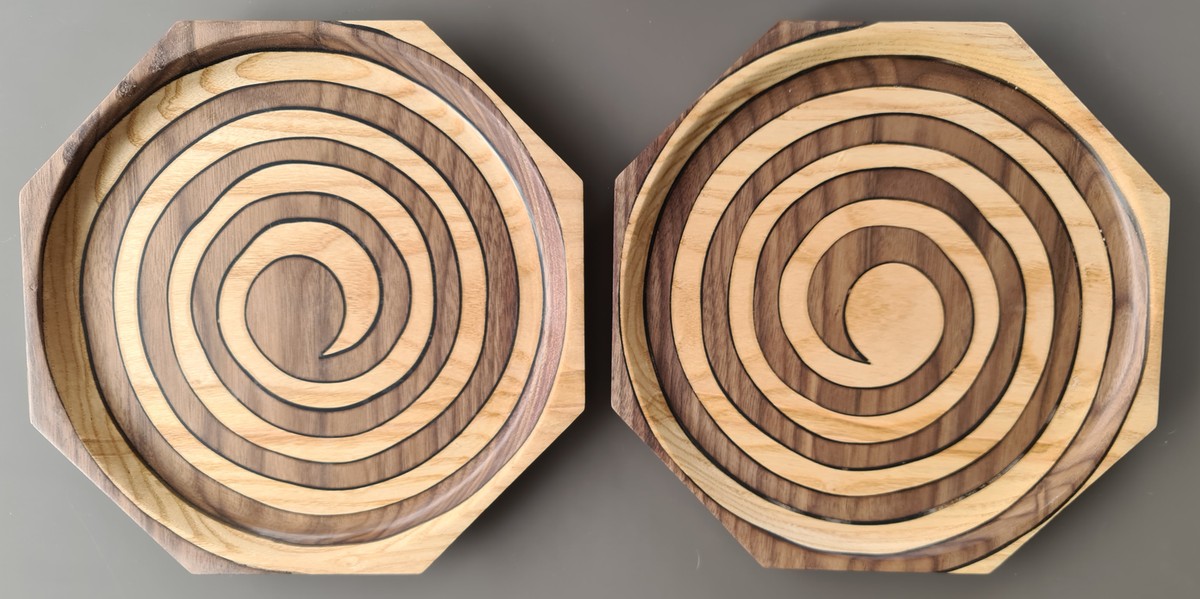
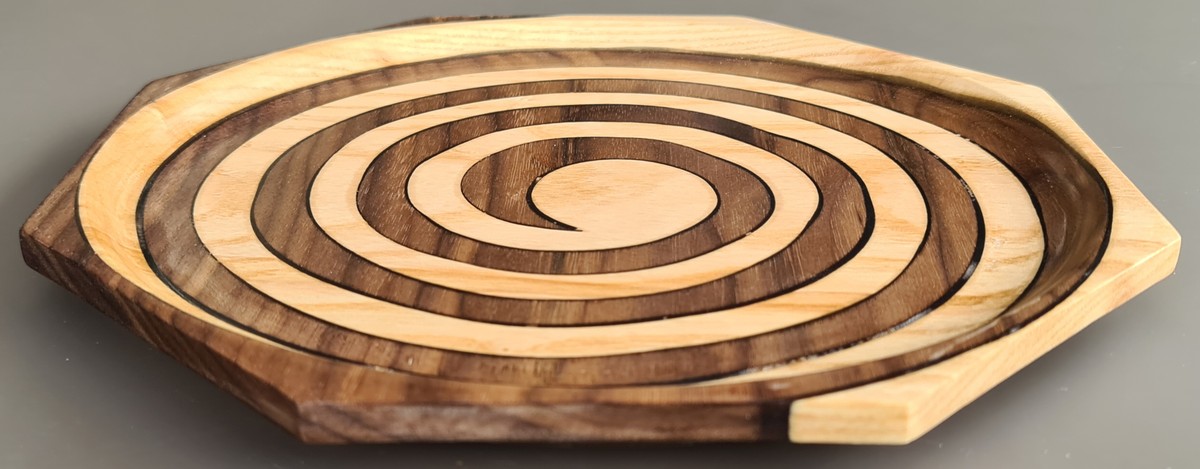
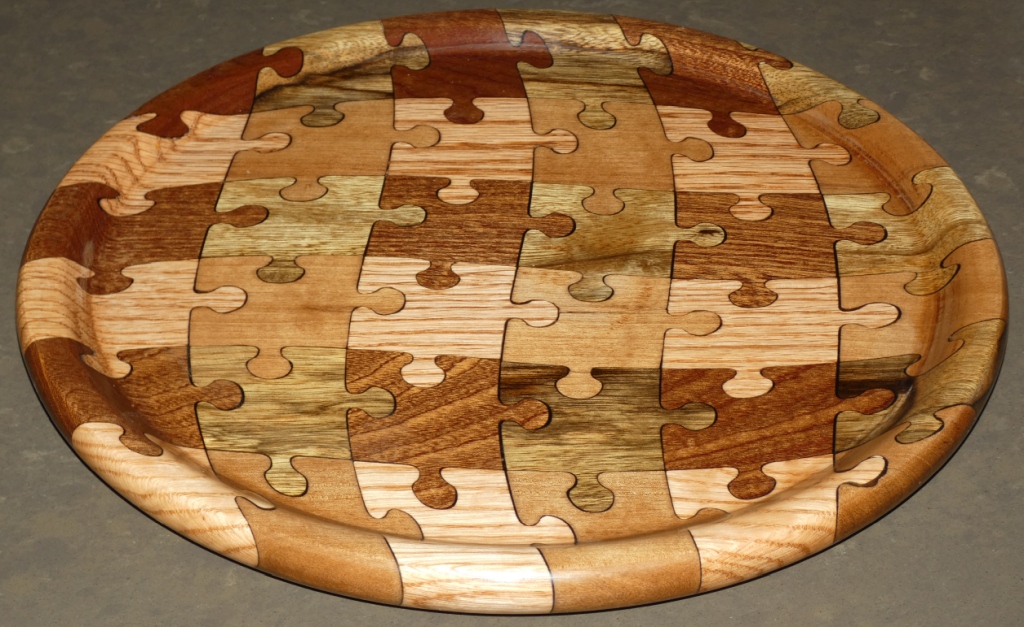
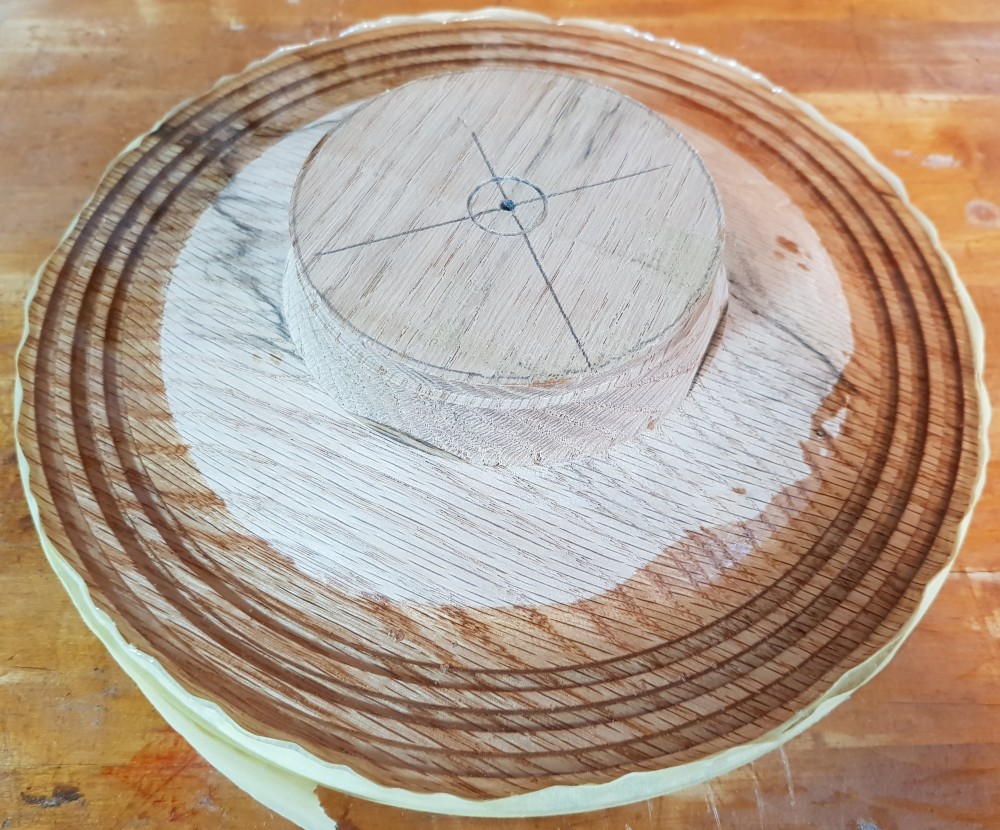
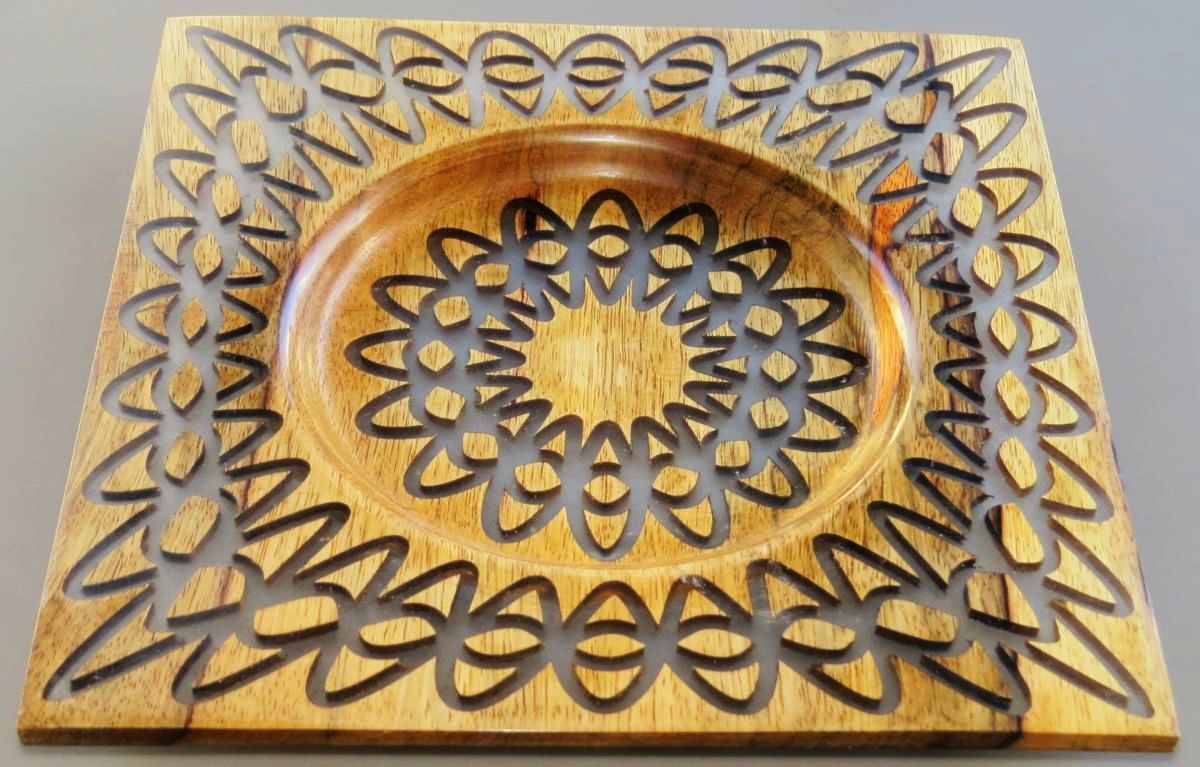
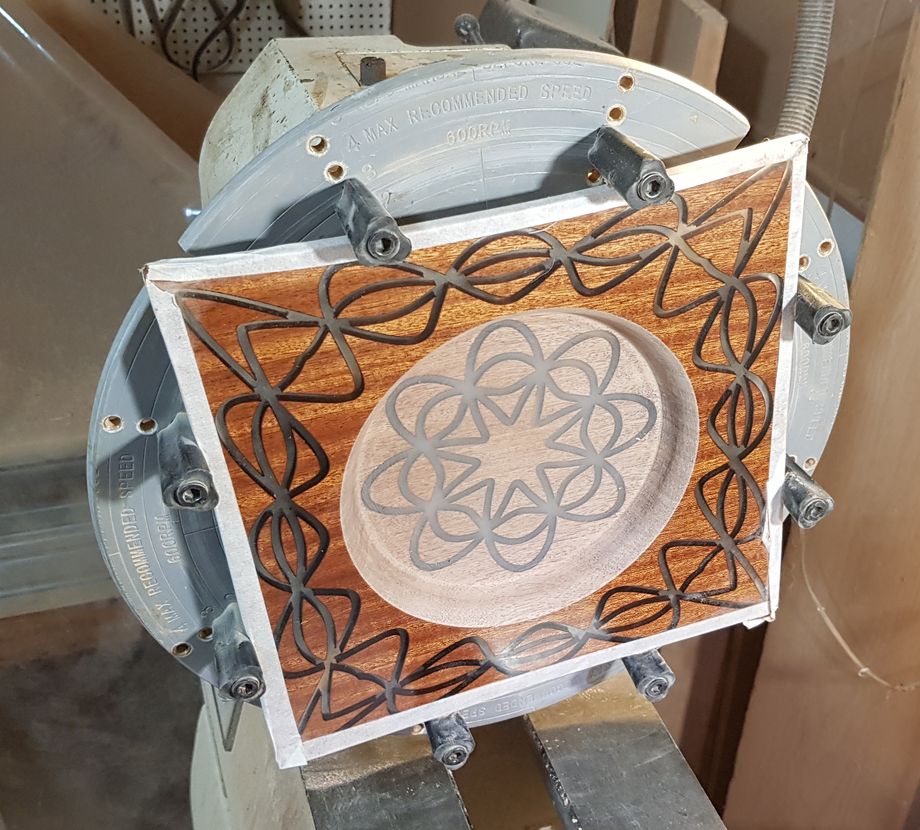
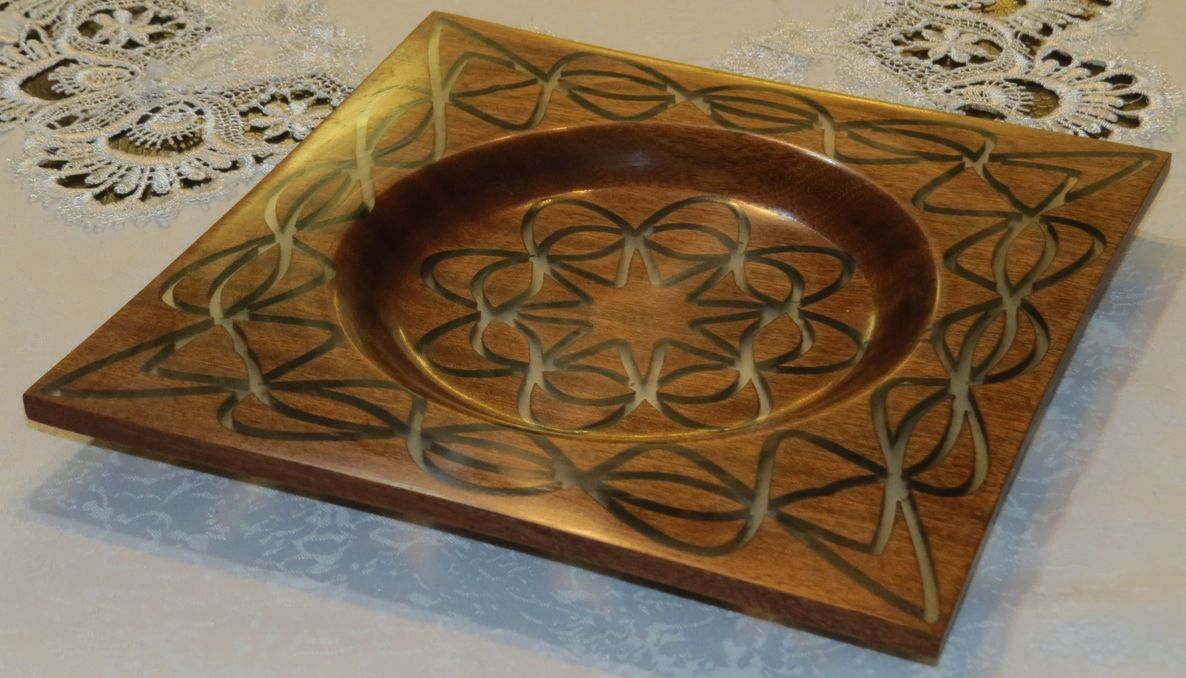
Plate using puzzle-like tiling I
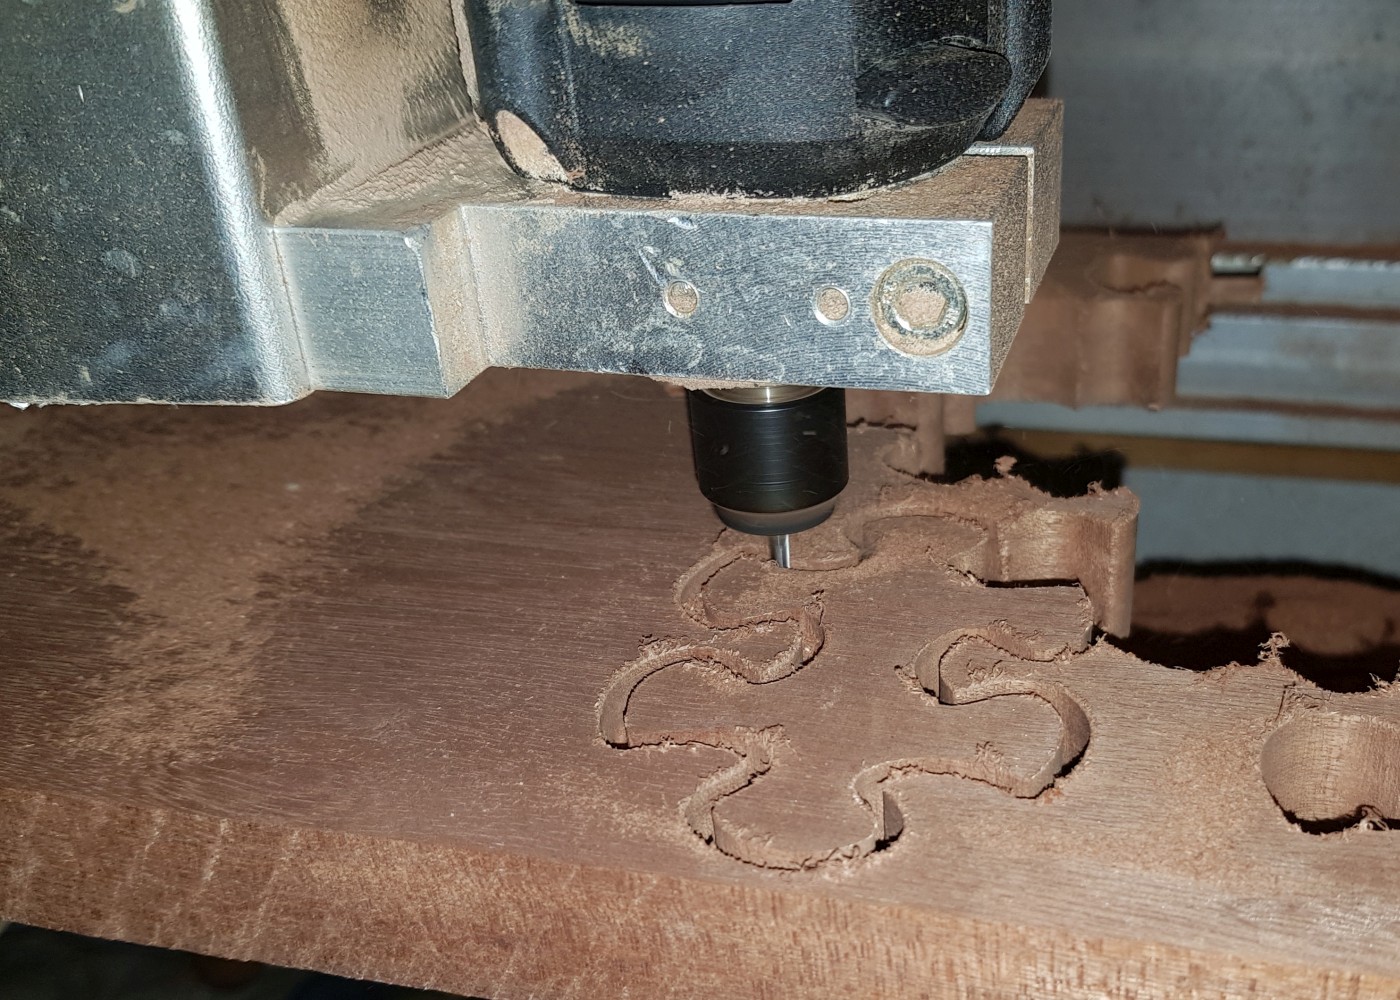
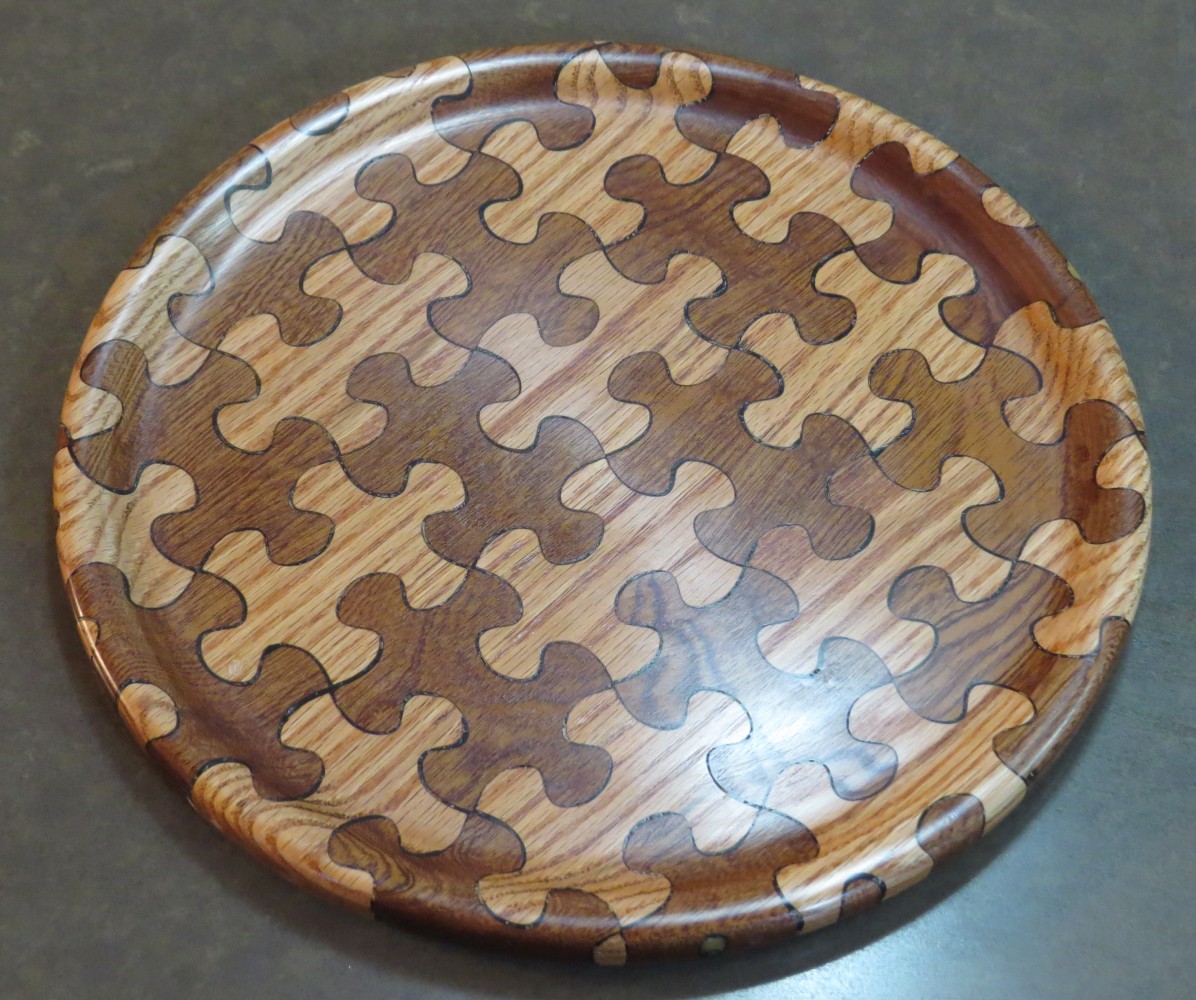
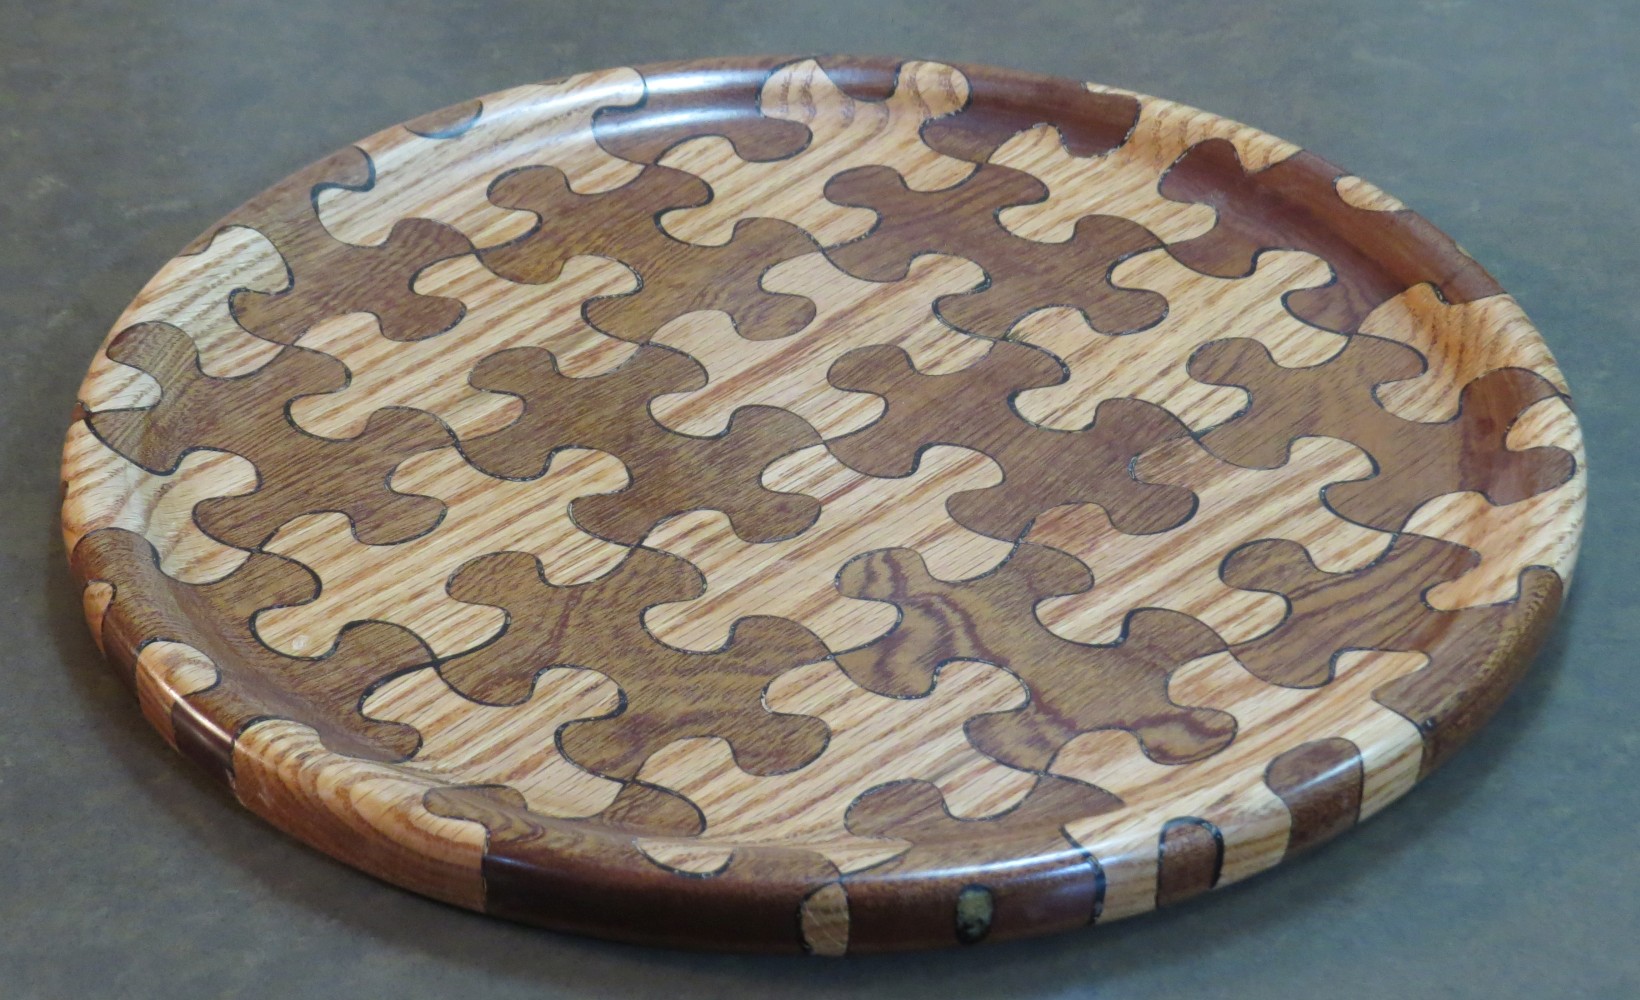 A plate with puzzle-like tiles. All tiles are identical, up to
rigid motion (rotation and translation). Tiles are made of Oak
and Mahogany wood, cut using CNC (See left image), and
alternatively placed.
A plate with puzzle-like tiles. All tiles are identical, up to
rigid motion (rotation and translation). Tiles are made of Oak
and Mahogany wood, cut using CNC (See left image), and
alternatively placed.
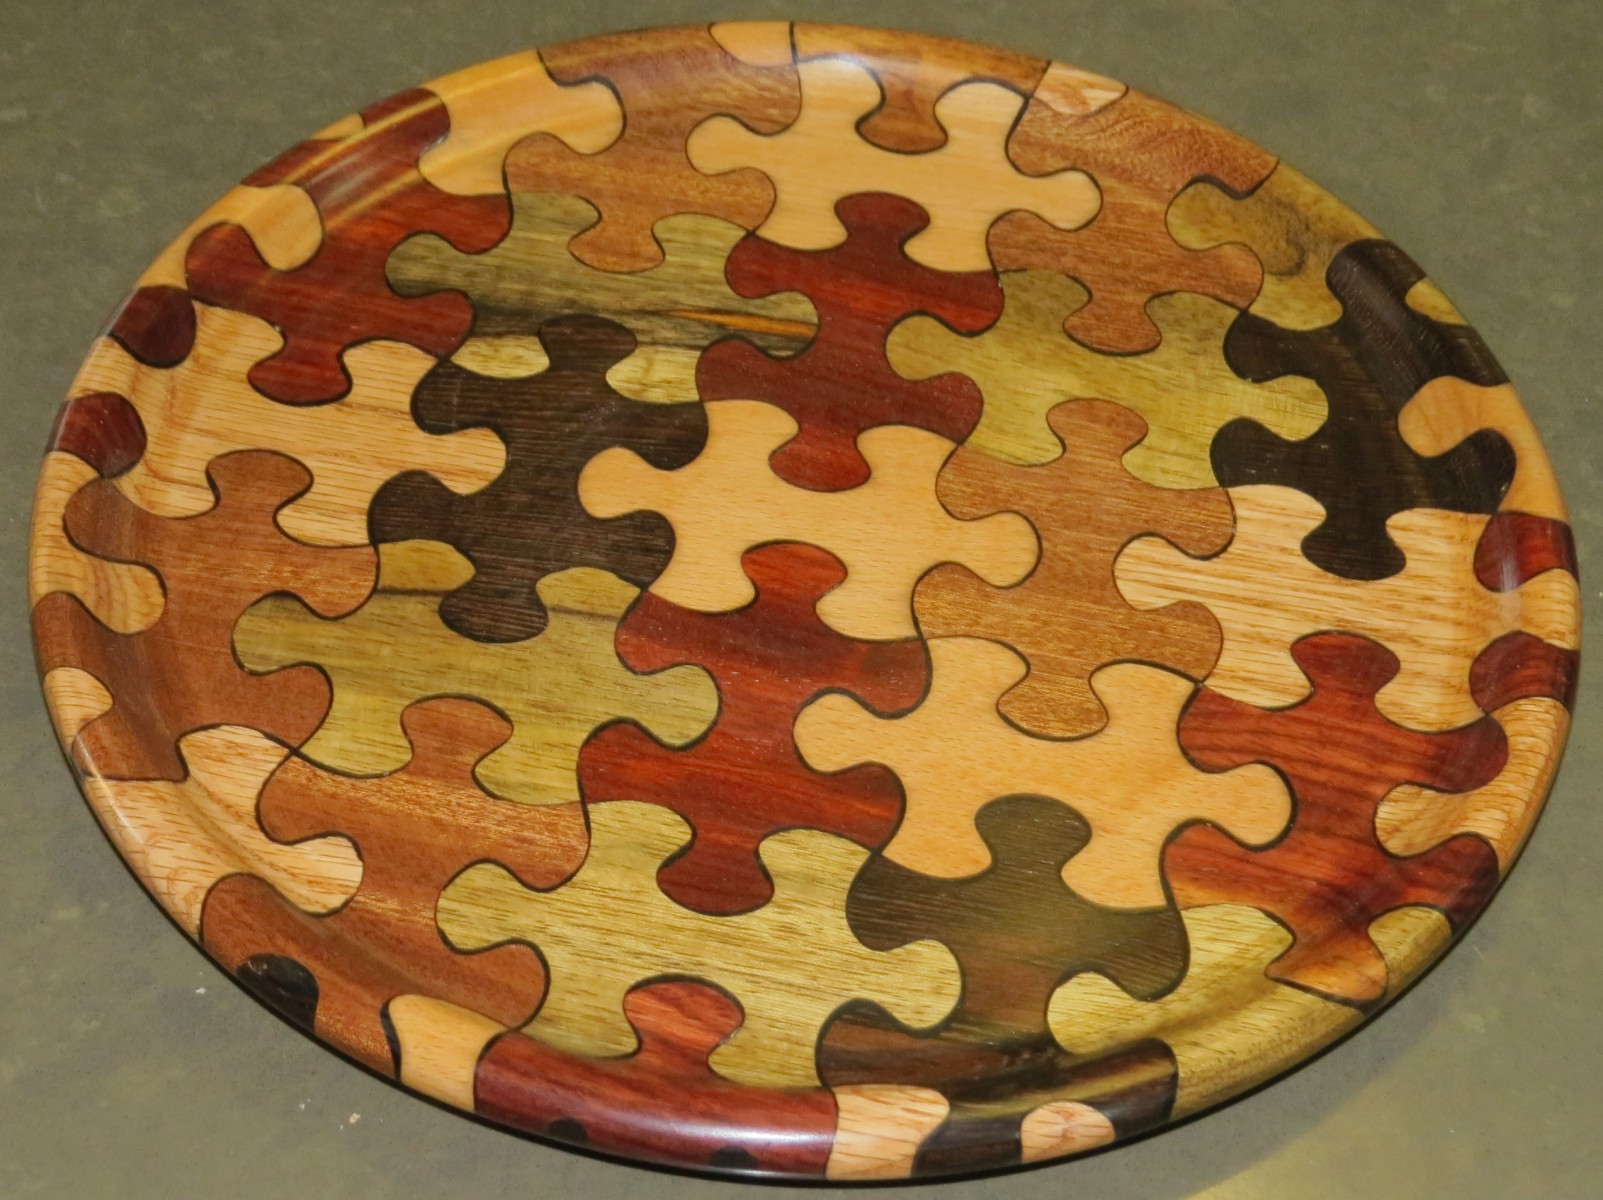
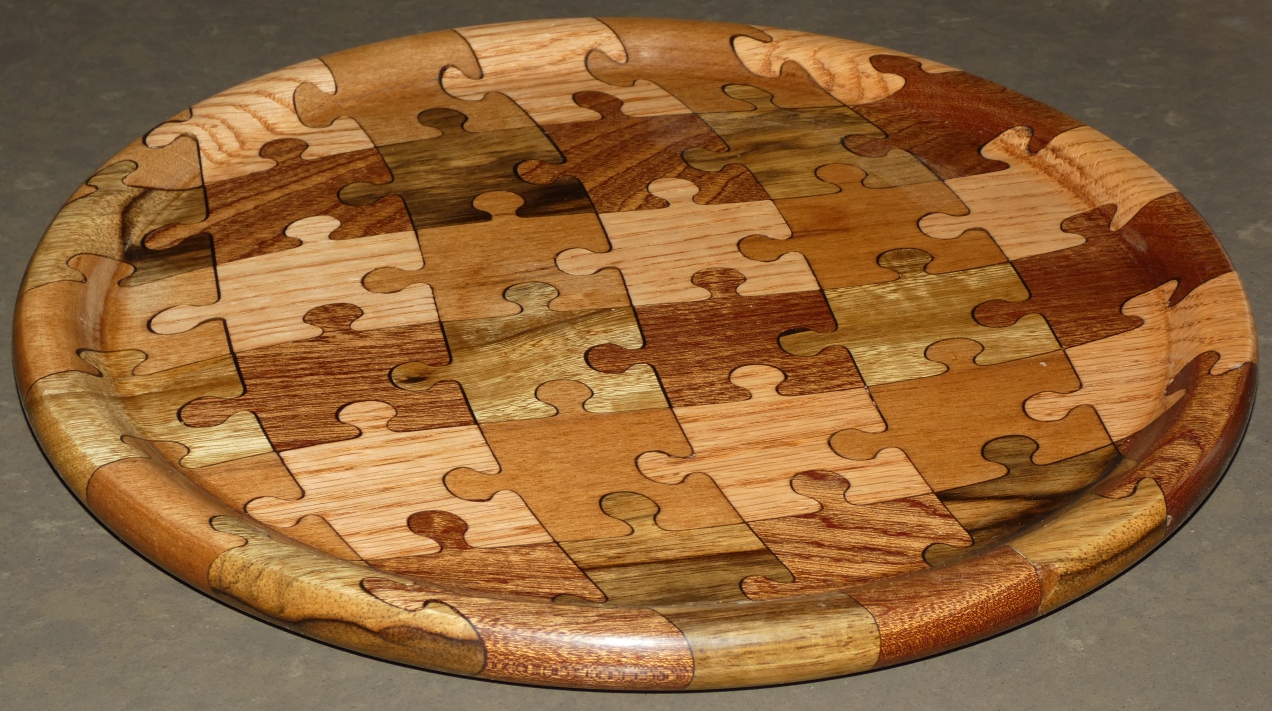
 Another variation with a multitude of wood-types: Mahogany,
Beech, Oak, Zebrano, Limba, and Paduk.
Another variation with a multitude of wood-types: Mahogany,
Beech, Oak, Zebrano, Limba, and Paduk.
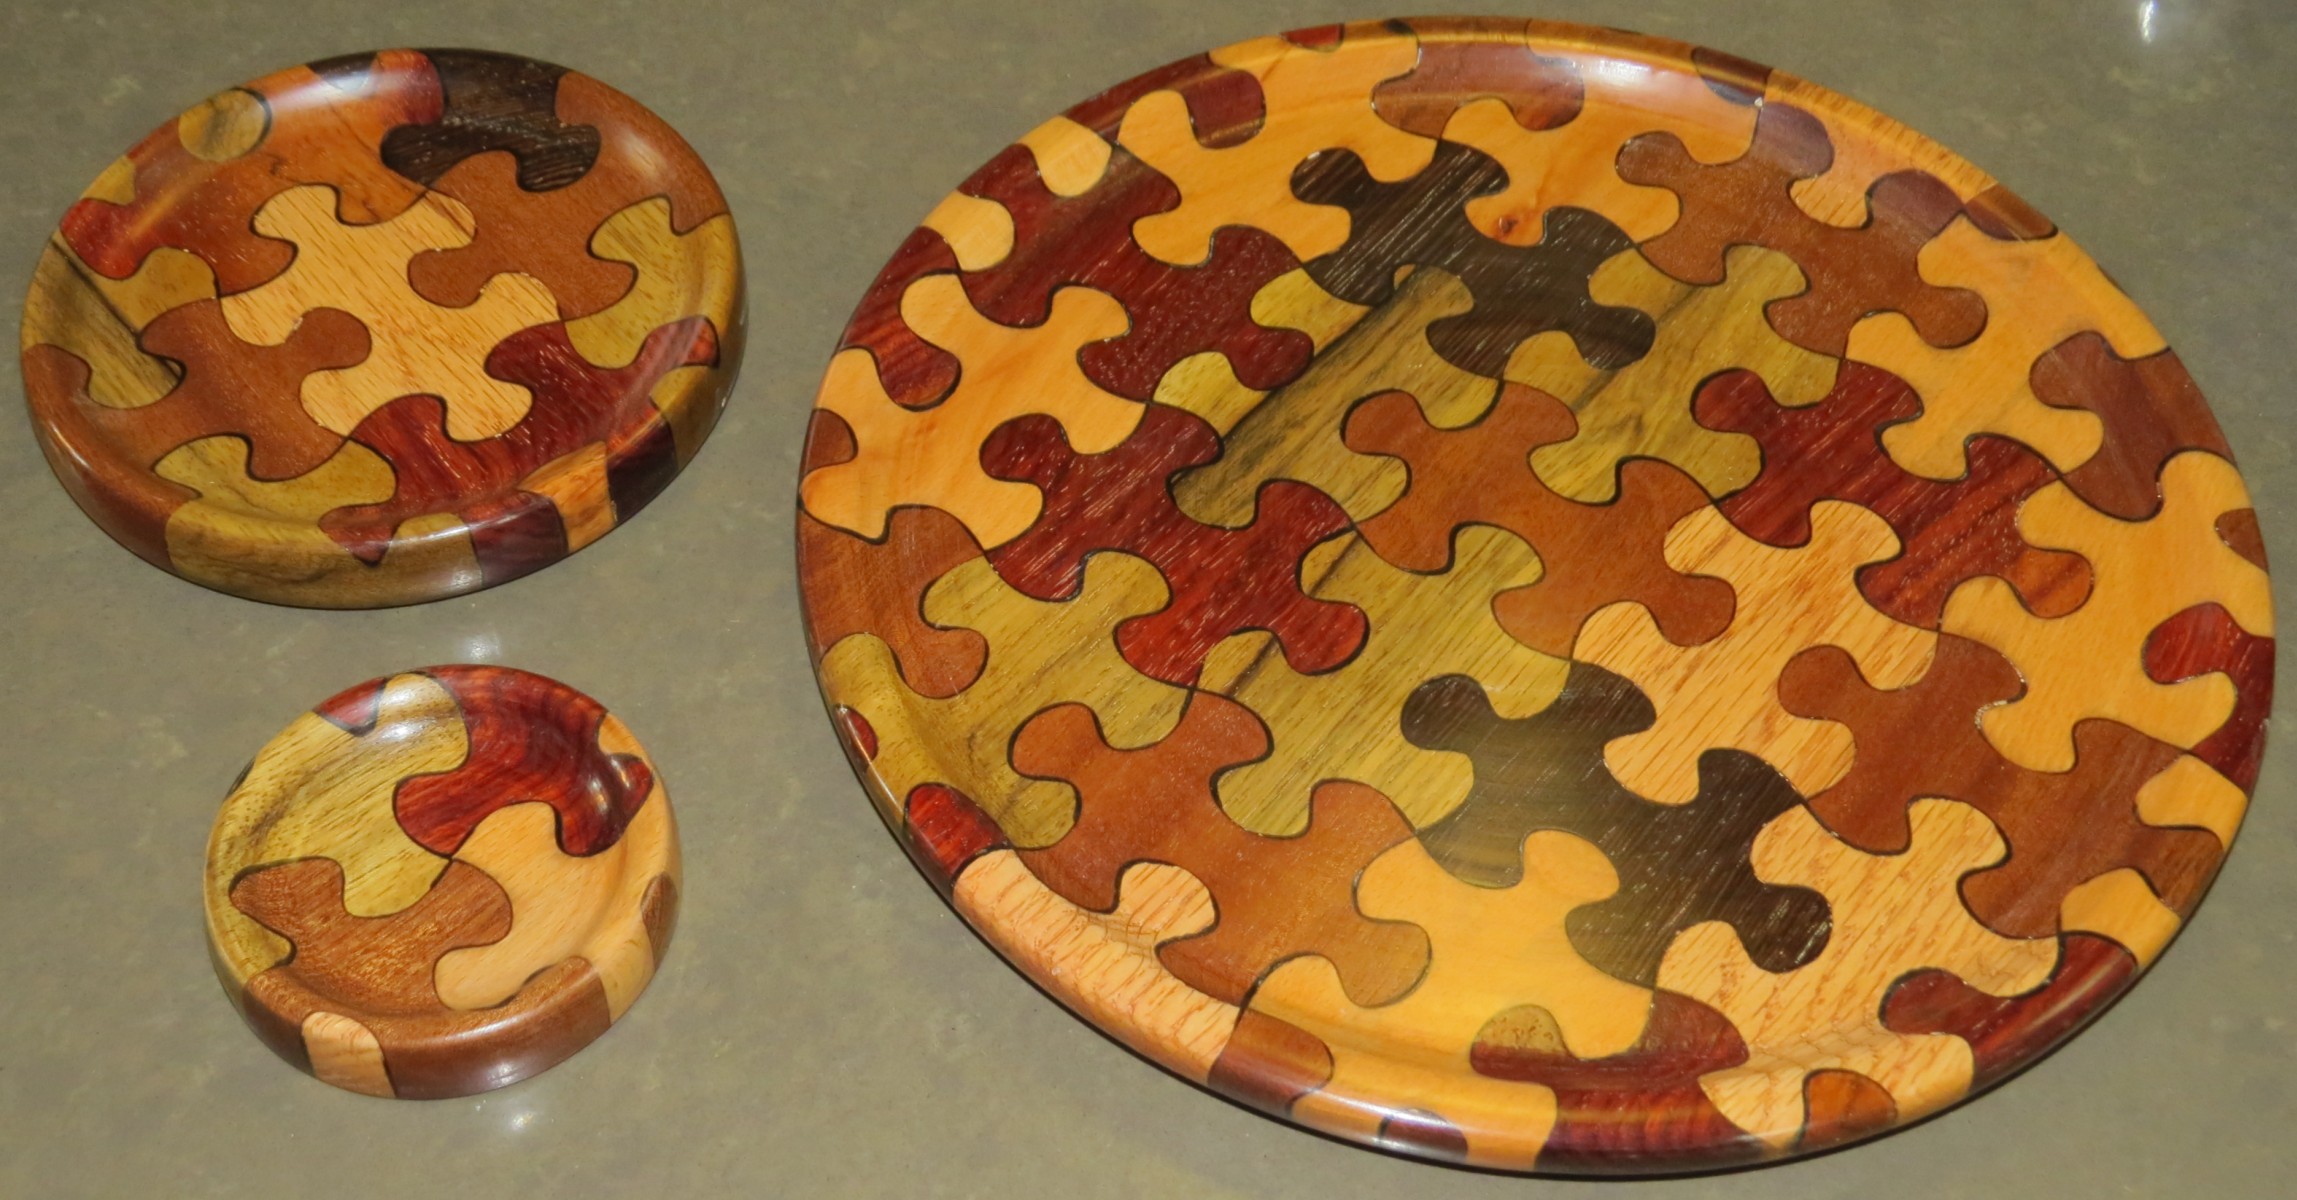
Plate using a puzzle tiling II

 And yet another. Here all tiles are different.
After the CNC step (left) and while the tiles had excellent
fit (middle), epoxy, darkened with black hue, was used to seal
the bonding (right). Employing: Mahogany, Oak, Walnut and Enigma.
And yet another. Here all tiles are different.
After the CNC step (left) and while the tiles had excellent
fit (middle), epoxy, darkened with black hue, was used to seal
the bonding (right). Employing: Mahogany, Oak, Walnut and Enigma.
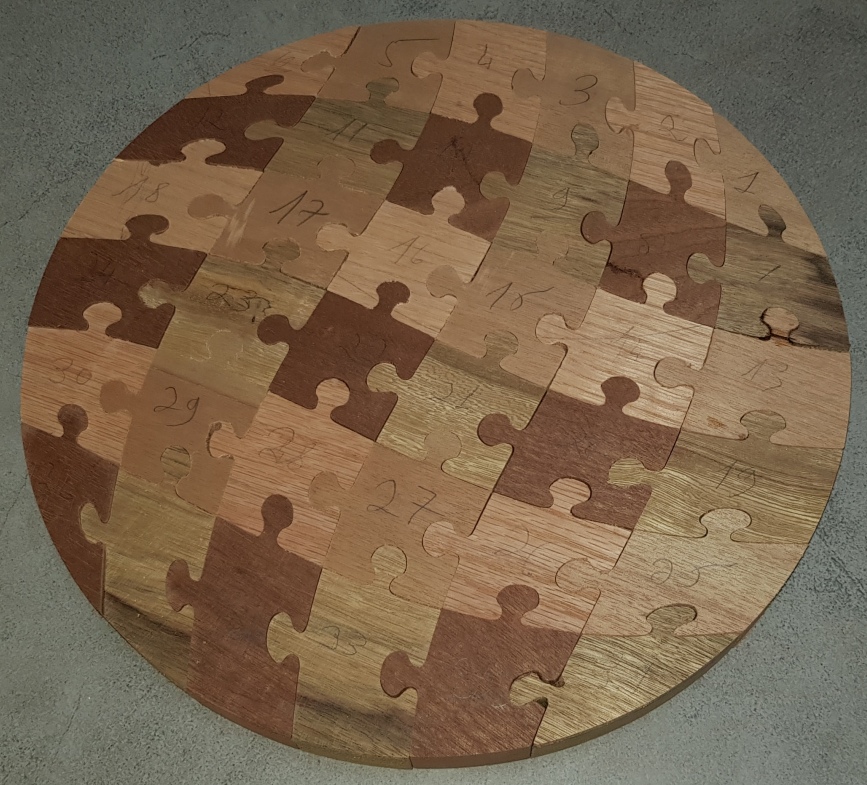
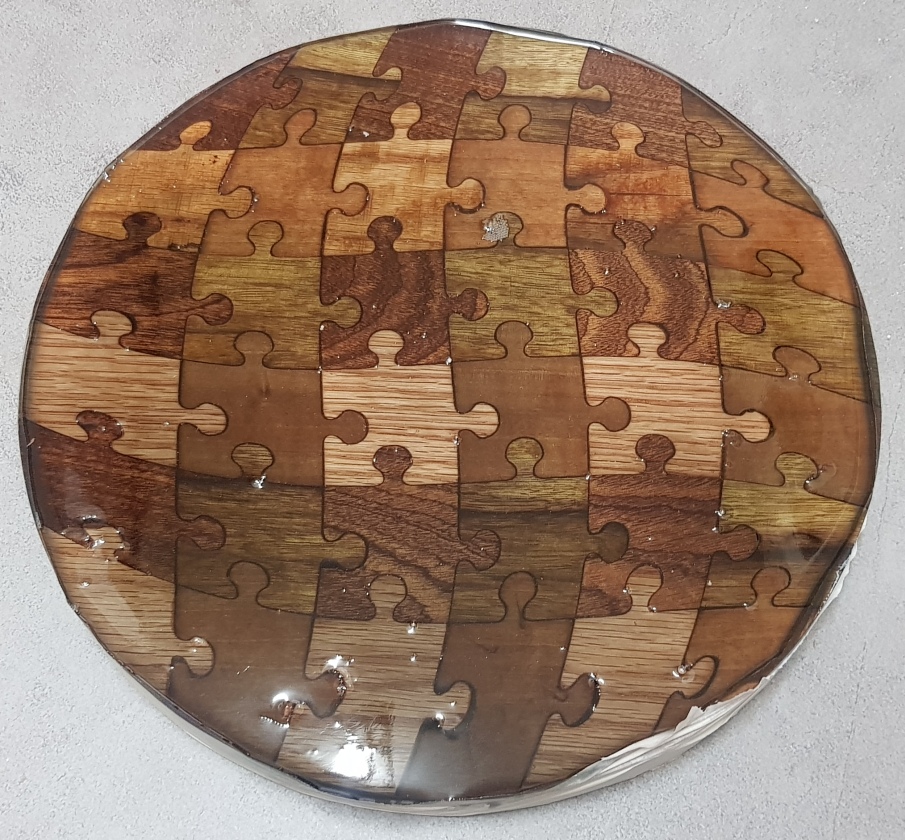
Plate using a puzzle tiling III

 An epoxy based puzzle. Here tiles are deformed to fit a circular
shape. Left shows the CNC process whereas the right presents the
final plate.
An epoxy based puzzle. Here tiles are deformed to fit a circular
shape. Left shows the CNC process whereas the right presents the
final plate.

 Now the plate is being employed as a top of a stool...
Note how the diagonal joint of the legs were made (left)
Now the plate is being employed as a top of a stool...
Note how the diagonal joint of the legs were made (left)
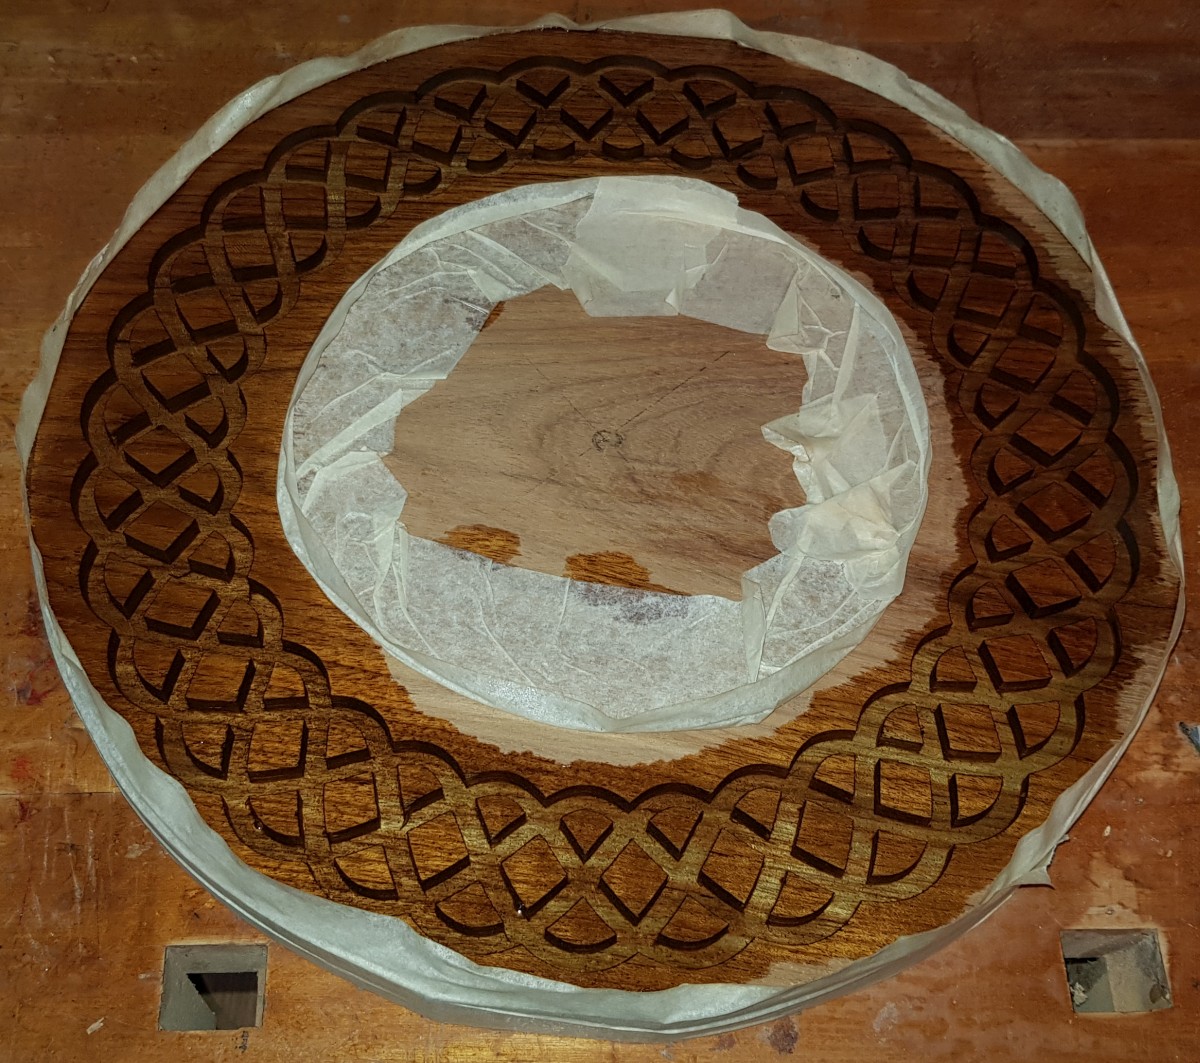
An Escher-pattern bowl
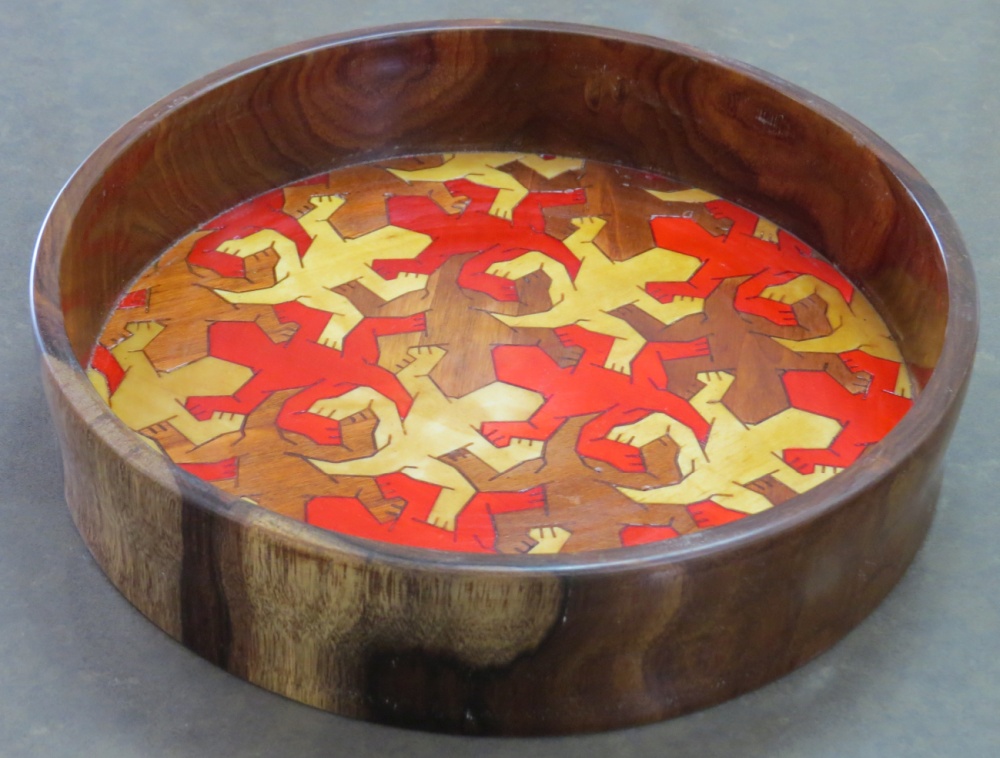
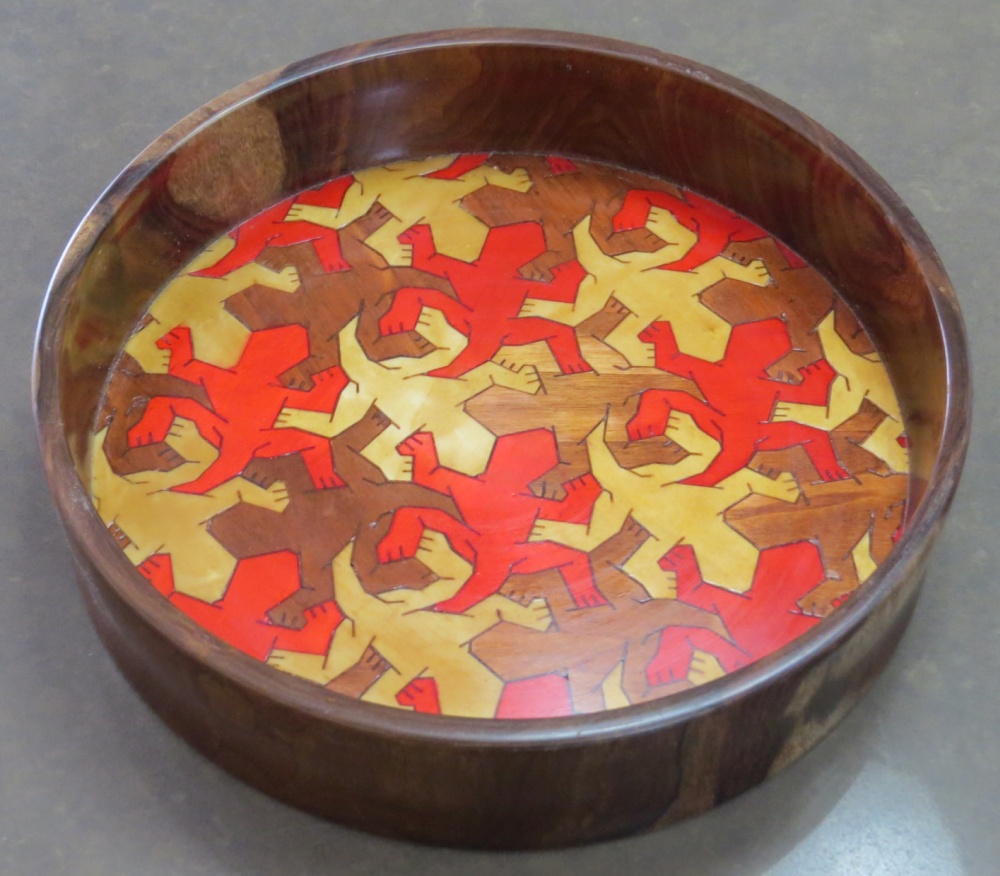 A bowl with Escher-style pattern at the bottom.
The lizards were cut (using CNC) from a 3mm Populus plywood only to be
water-painted, for the brown and red colors. Then, the pieces were
re-glued together.
A bowl with Escher-style pattern at the bottom.
The lizards were cut (using CNC) from a 3mm Populus plywood only to be
water-painted, for the brown and red colors. Then, the pieces were
re-glued together.
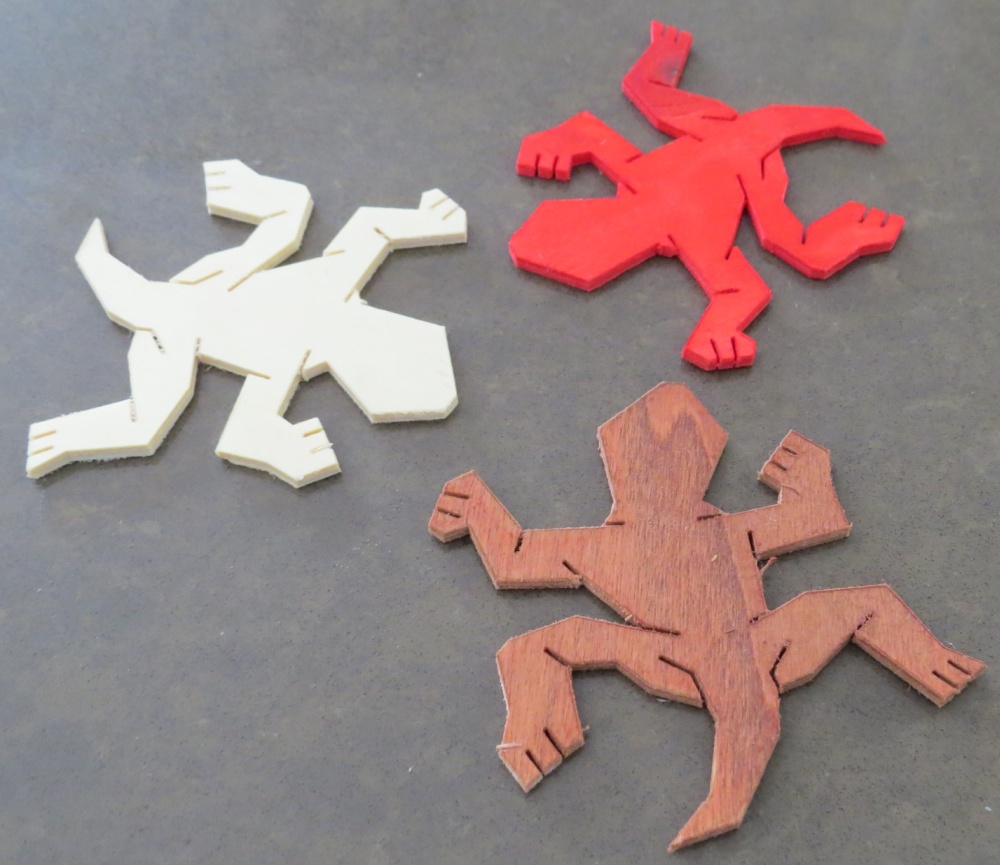
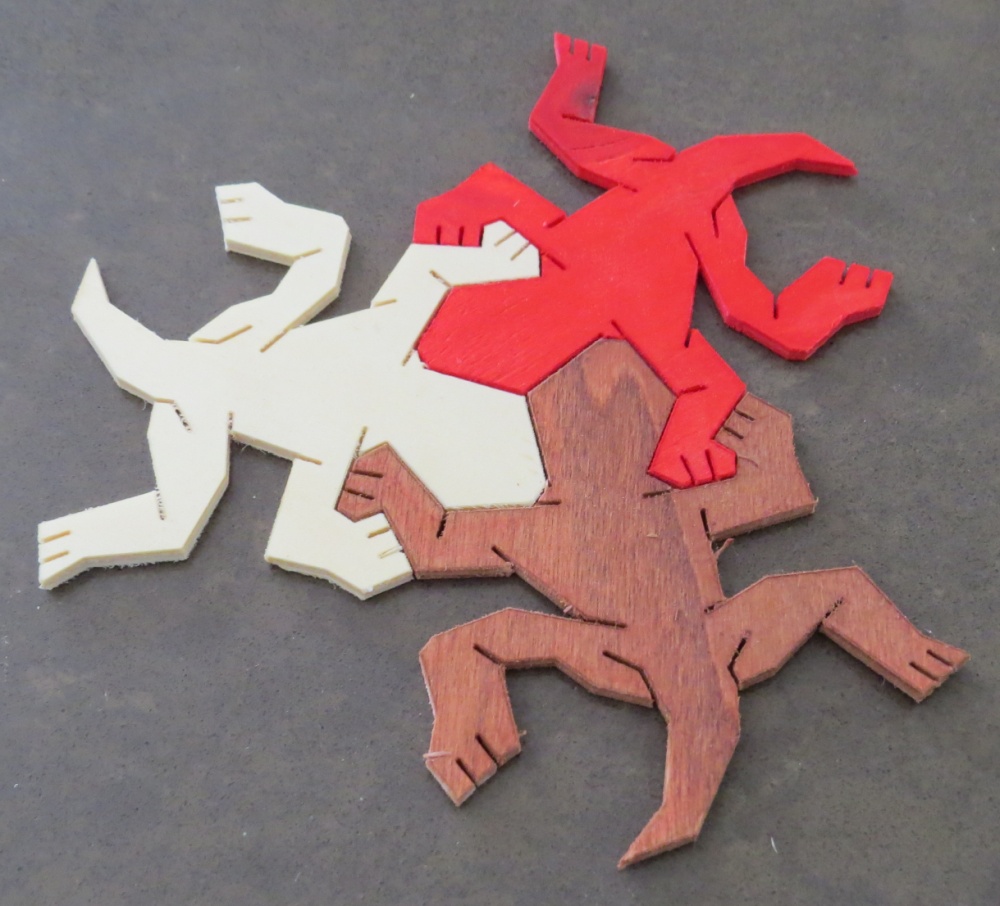 These two images show the pieces before the gluing, separated
(left), and interlocked (right).
These two images show the pieces before the gluing, separated
(left), and interlocked (right).
A plate with left-over rectangular pieces
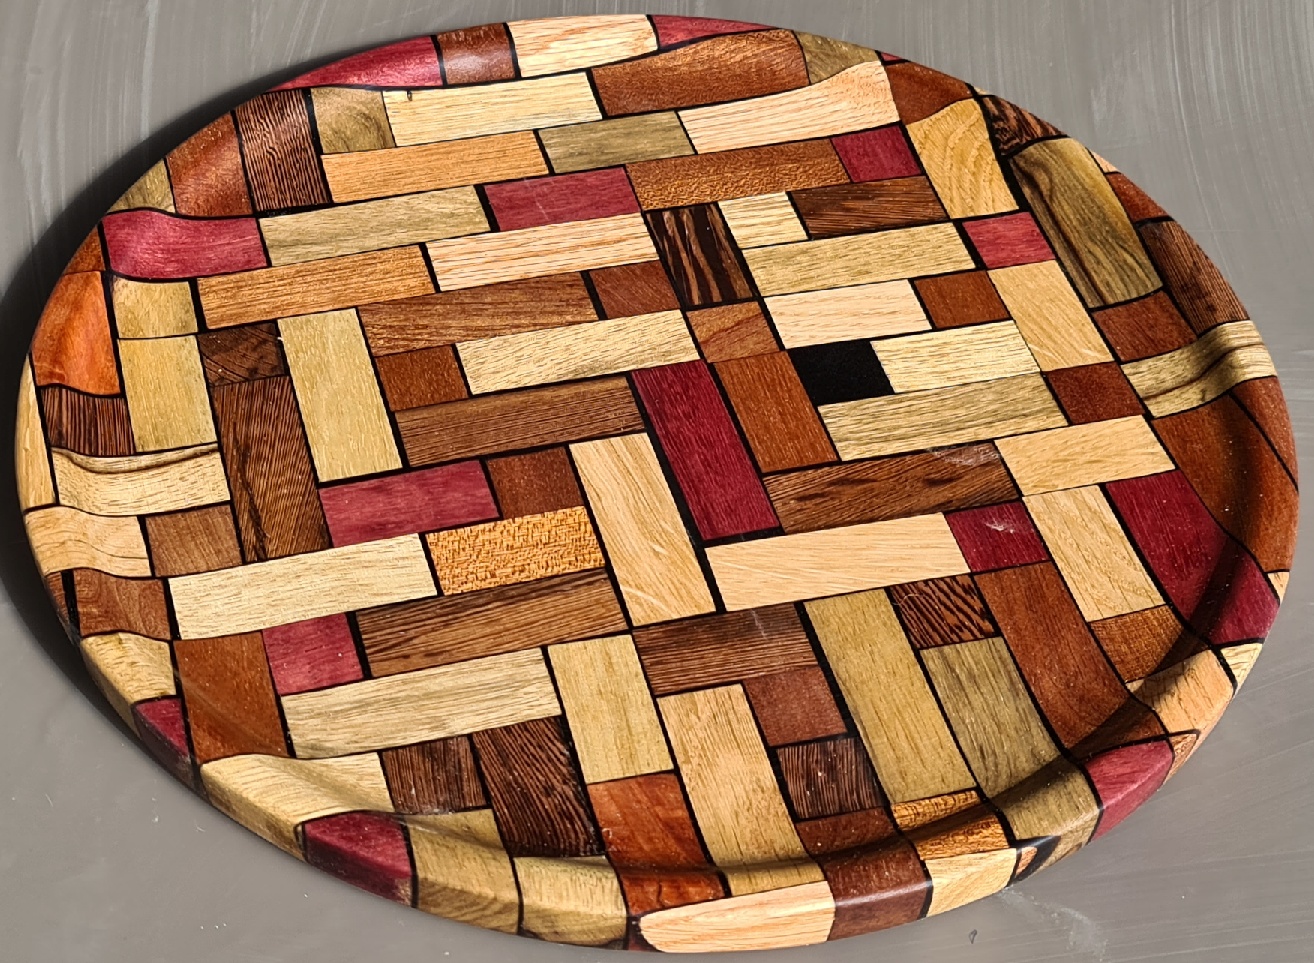
 A plate made from small left-over pieces. Adaptation from a
similar idea from this YouTube
movie. Pieces are (n x n), (n x 2n), and (n x 3n) in
size. Two variations are presented, with black epoxy in
between the parts on the left and middle, and tightly glued on
the right. From (at least...) Oak, Zebrano, Mahogany, Paduk, Walnut,
and a black epoxy square if you can find it!
A plate made from small left-over pieces. Adaptation from a
similar idea from this YouTube
movie. Pieces are (n x n), (n x 2n), and (n x 3n) in
size. Two variations are presented, with black epoxy in
between the parts on the left and middle, and tightly glued on
the right. From (at least...) Oak, Zebrano, Mahogany, Paduk, Walnut,
and a black epoxy square if you can find it!
A Threaded box with cover
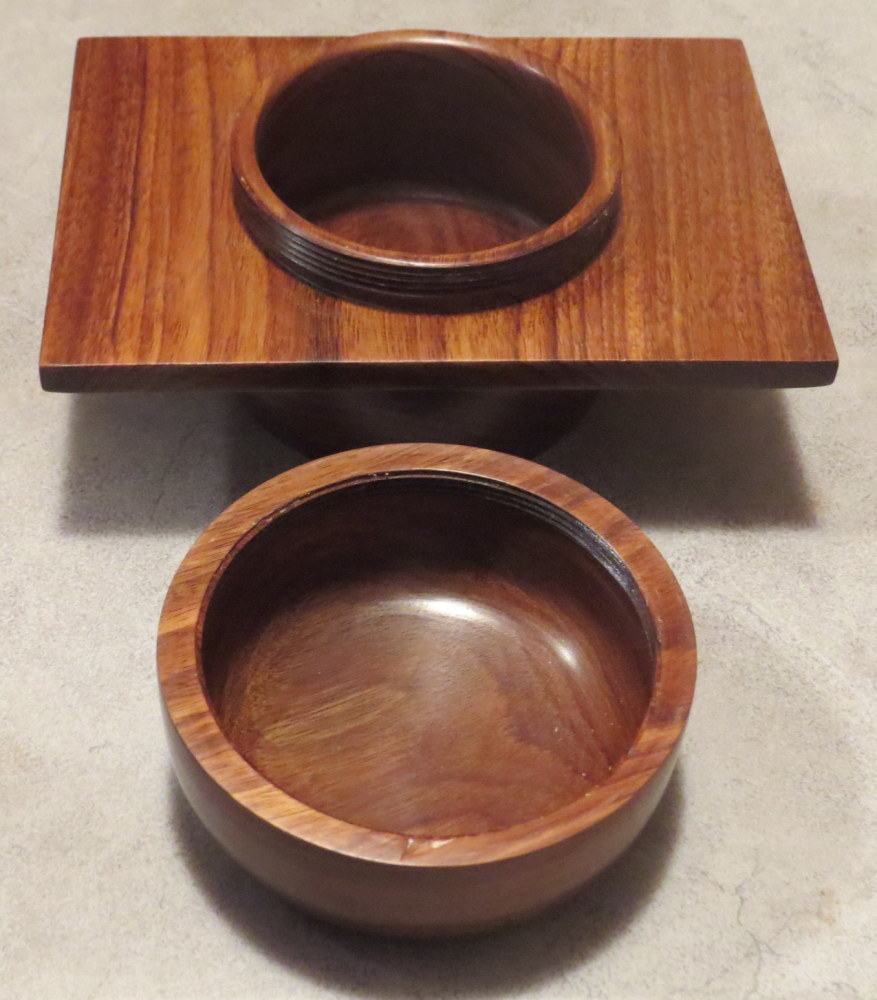
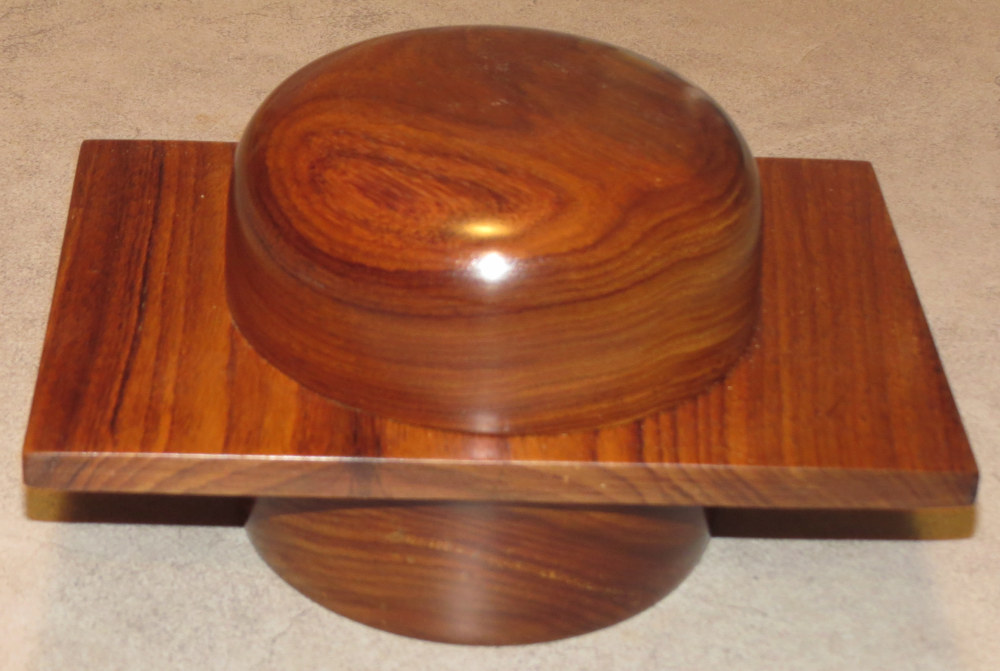 A box with a cover, both with threading's. Left shows the two parts
while the right shows the box closed. Indian Rosewood tree.
A box with a cover, both with threading's. Left shows the two parts
while the right shows the box closed. Indian Rosewood tree.
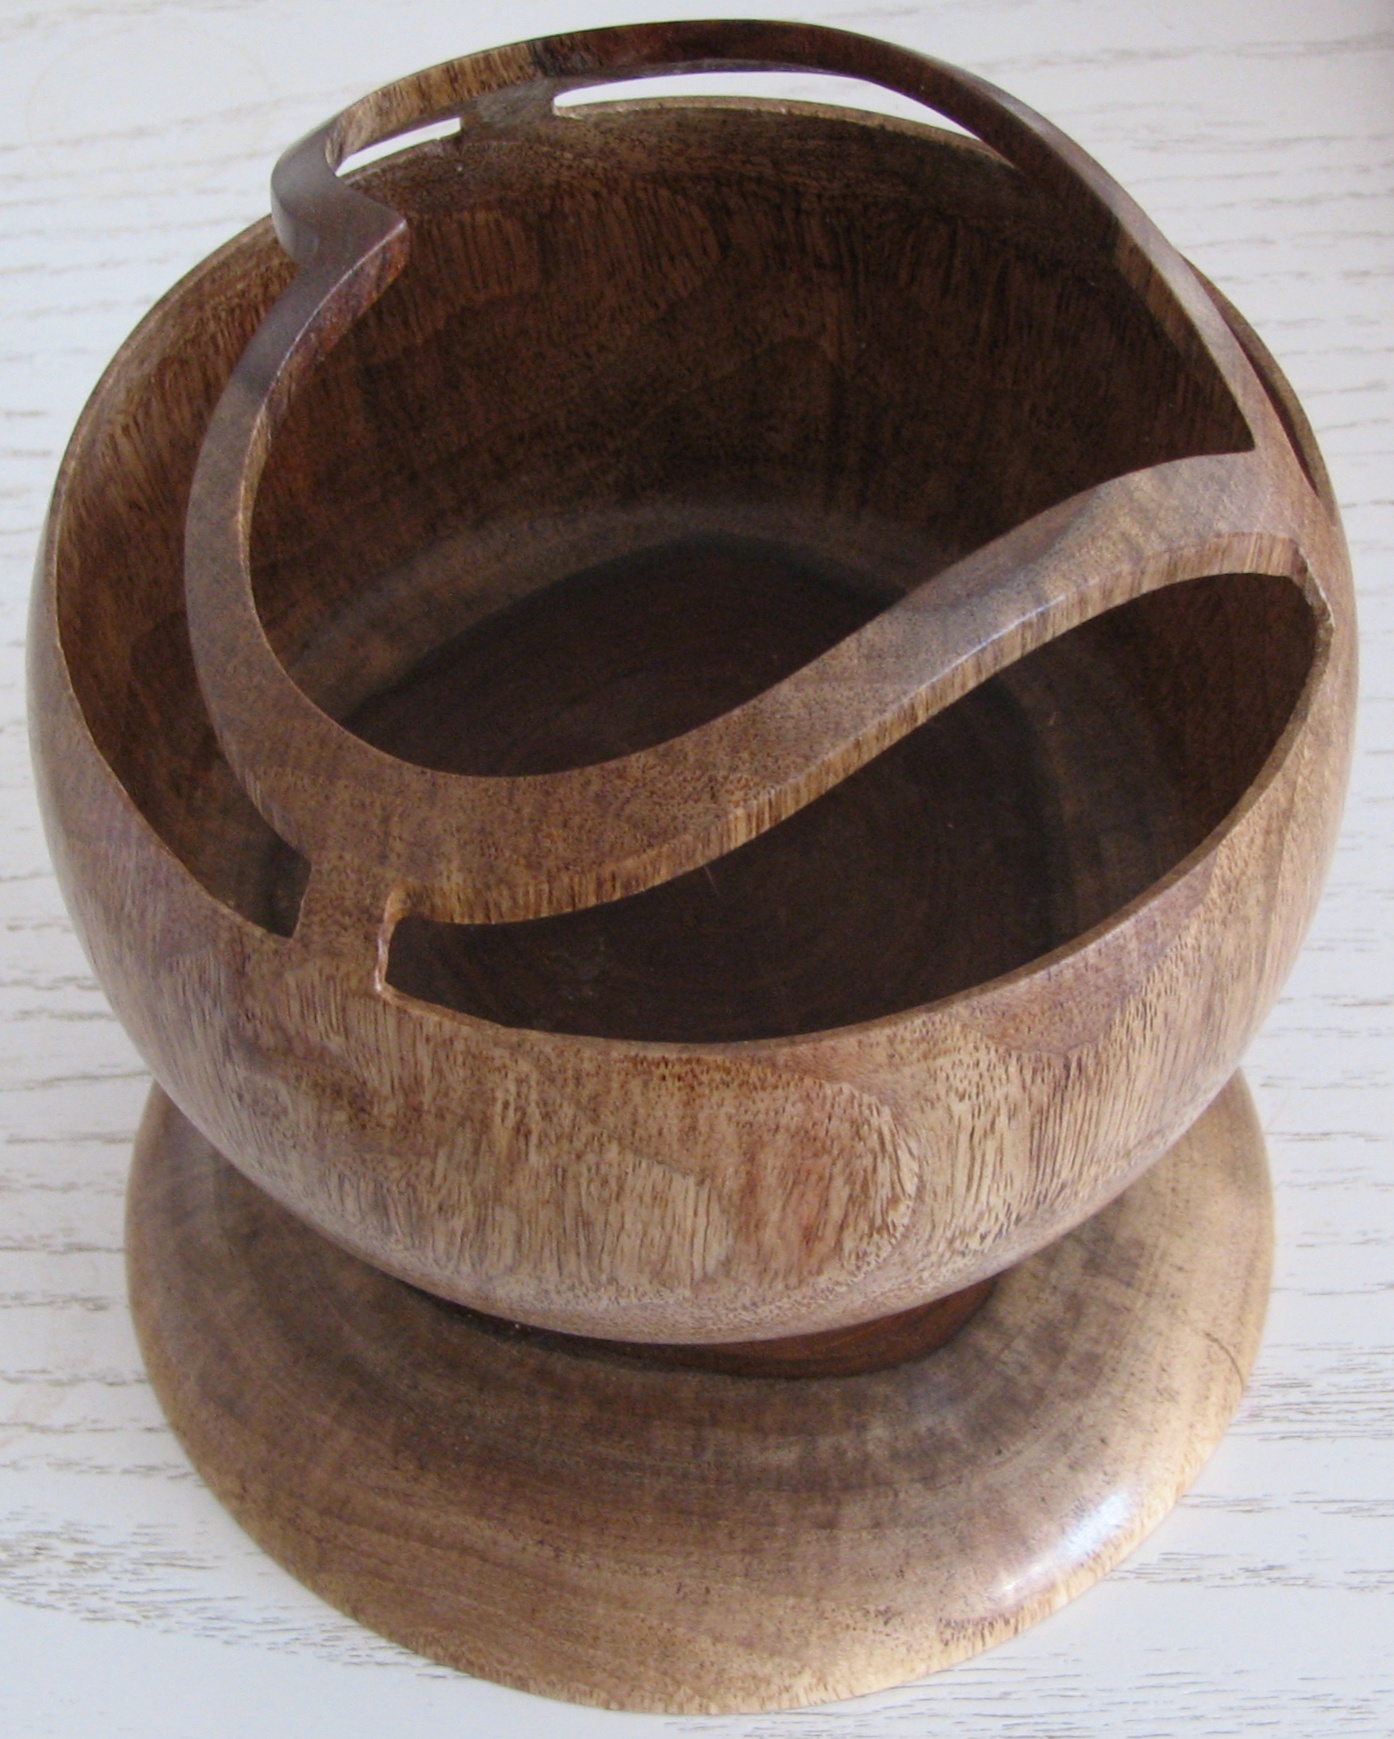
Handled Bowls
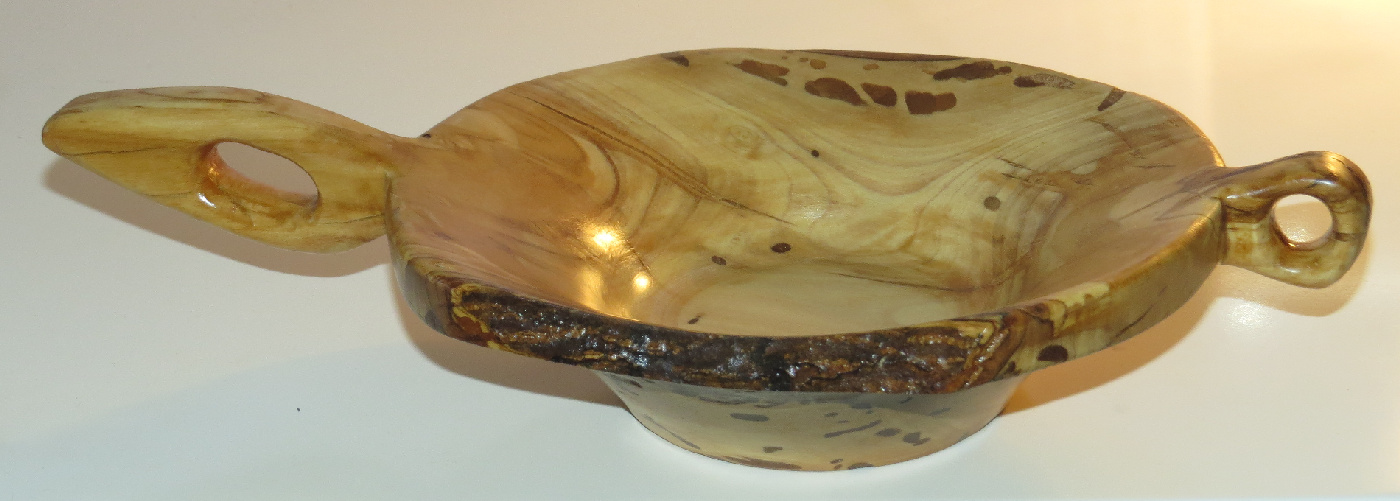
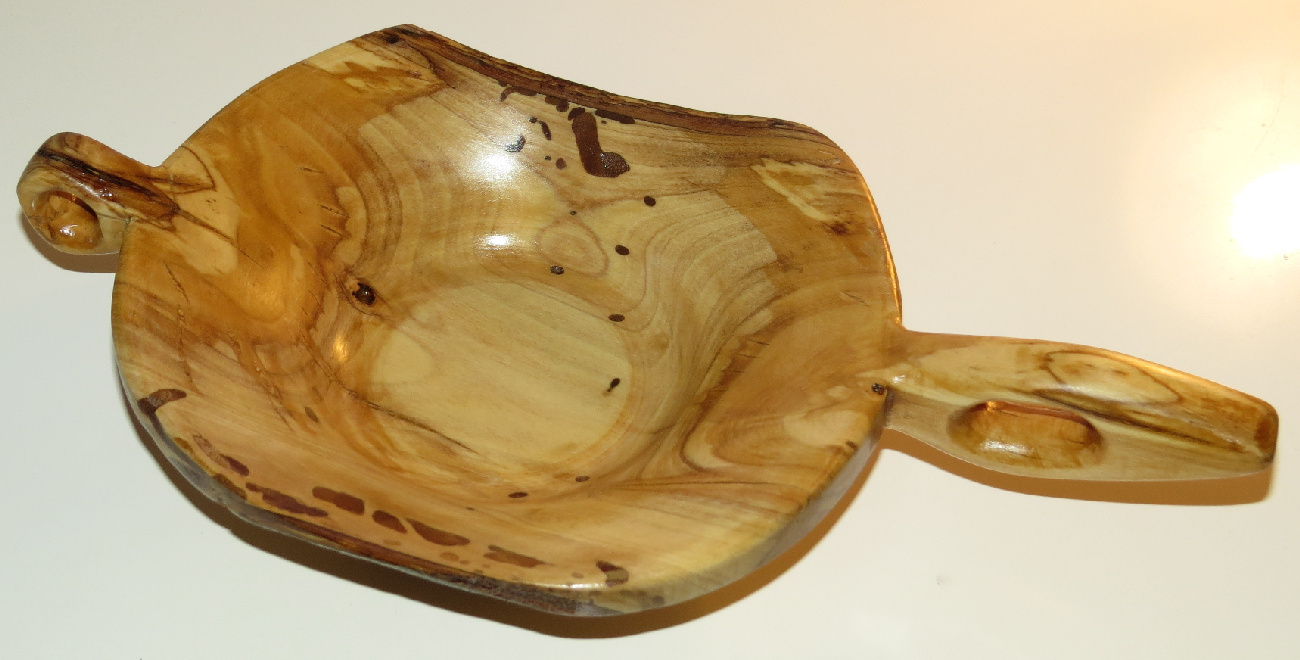
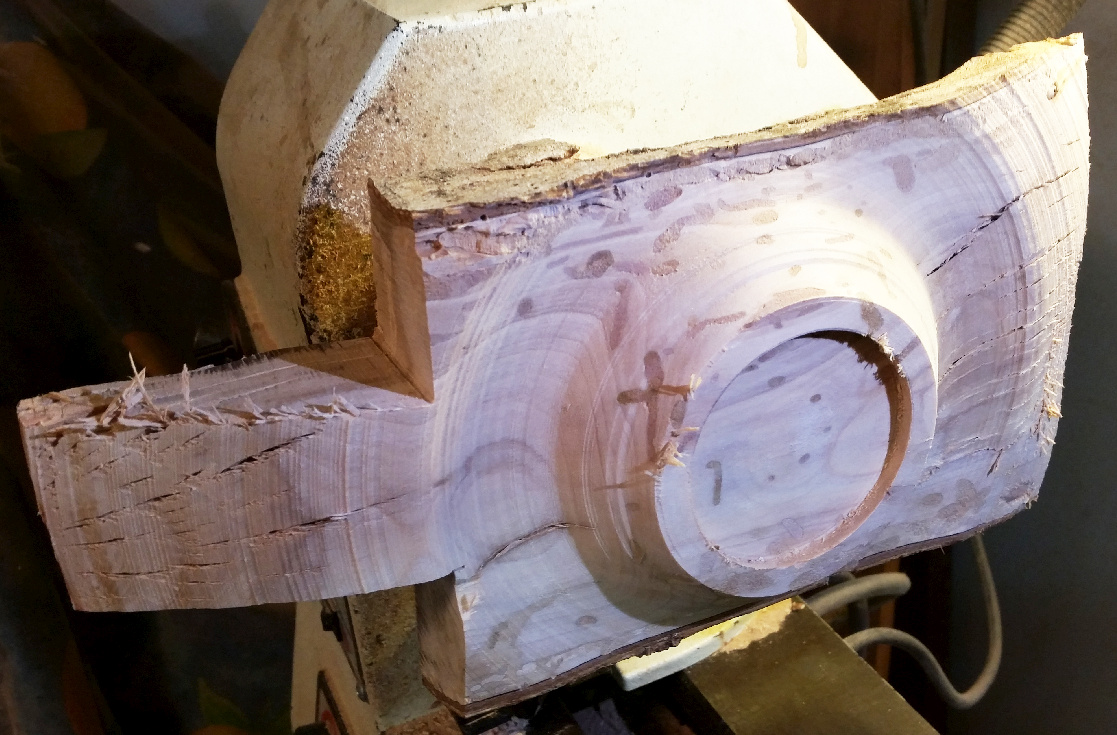 A bowl with handled. Image on the bottom right shows the (fairly)
balanced piece on the lather. Olive tree.
A bowl with handled. Image on the bottom right shows the (fairly)
balanced piece on the lather. Olive tree.
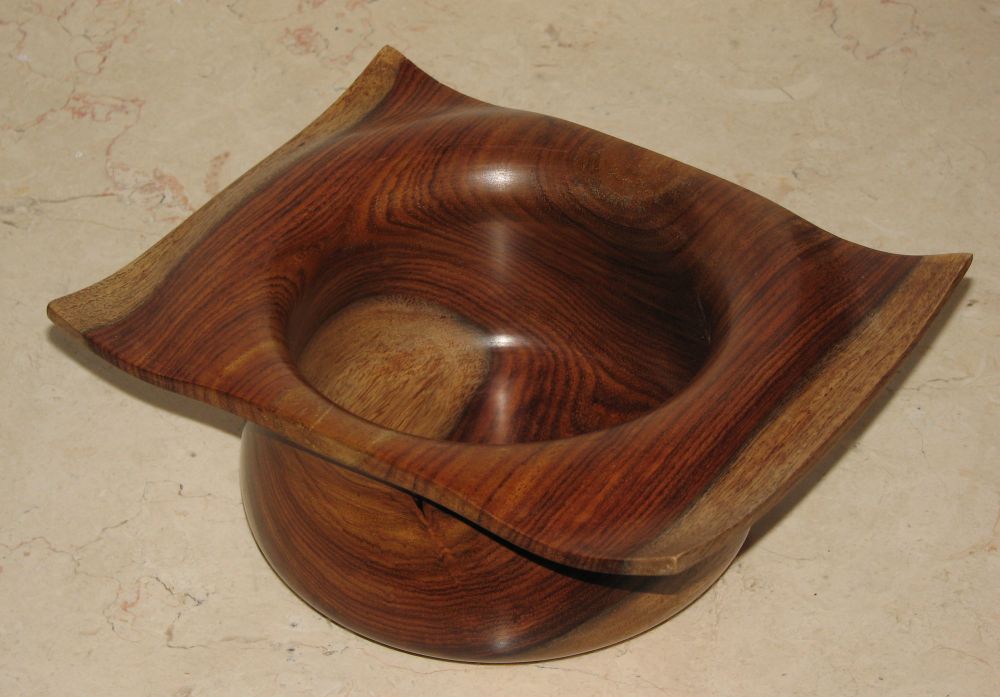
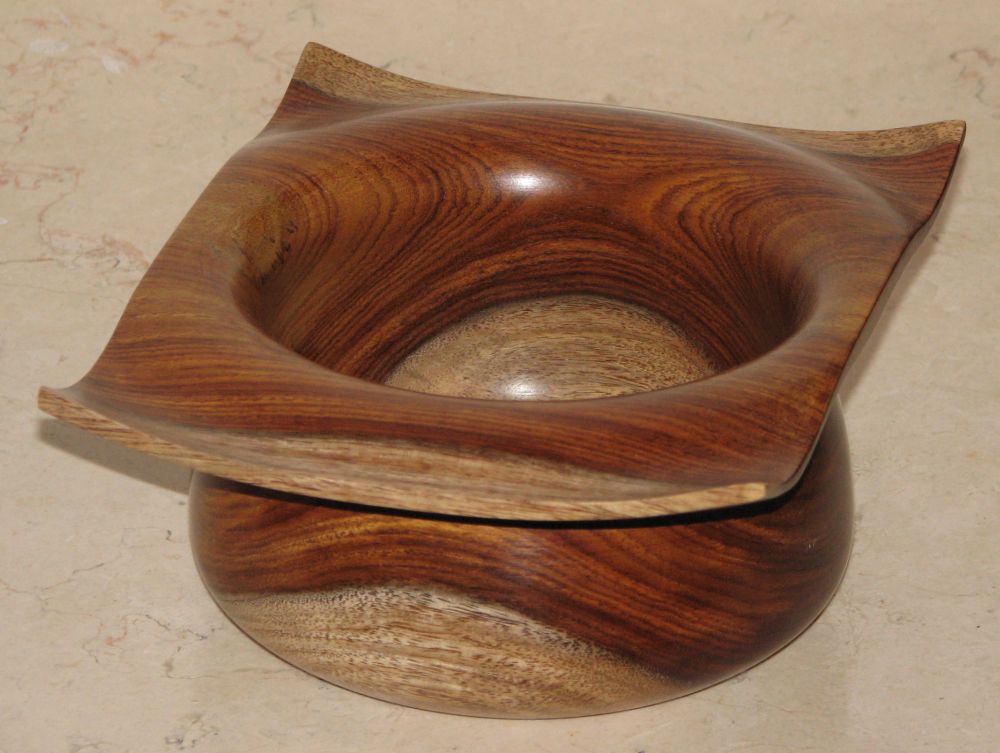
Some Winged Bowls
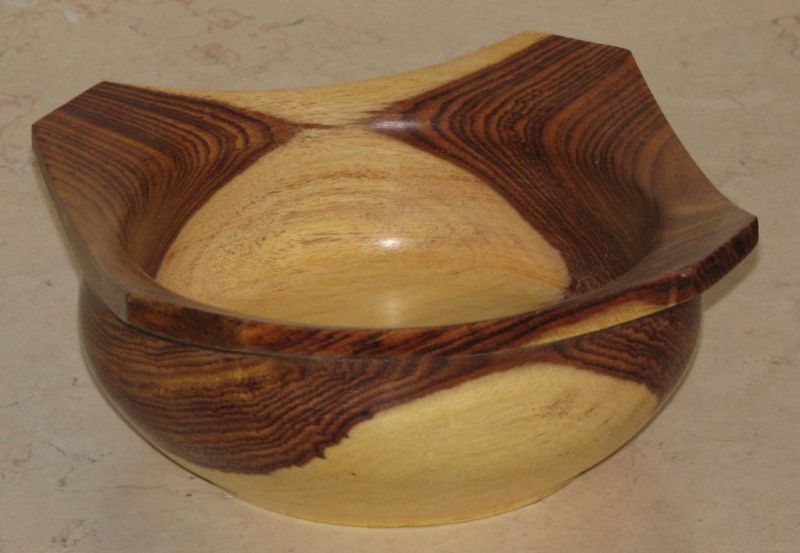
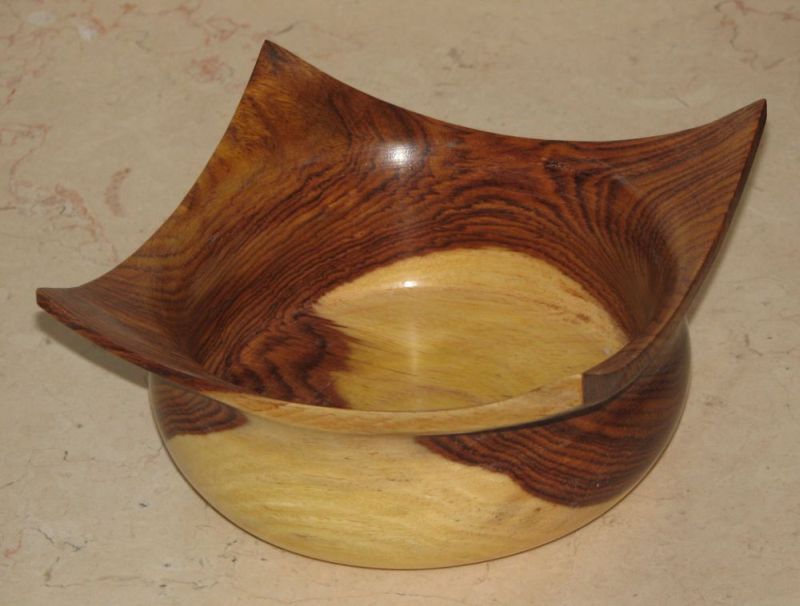 Indian Rosewood.
 Indian Rosewood.
Asymmetric Neck Bowl
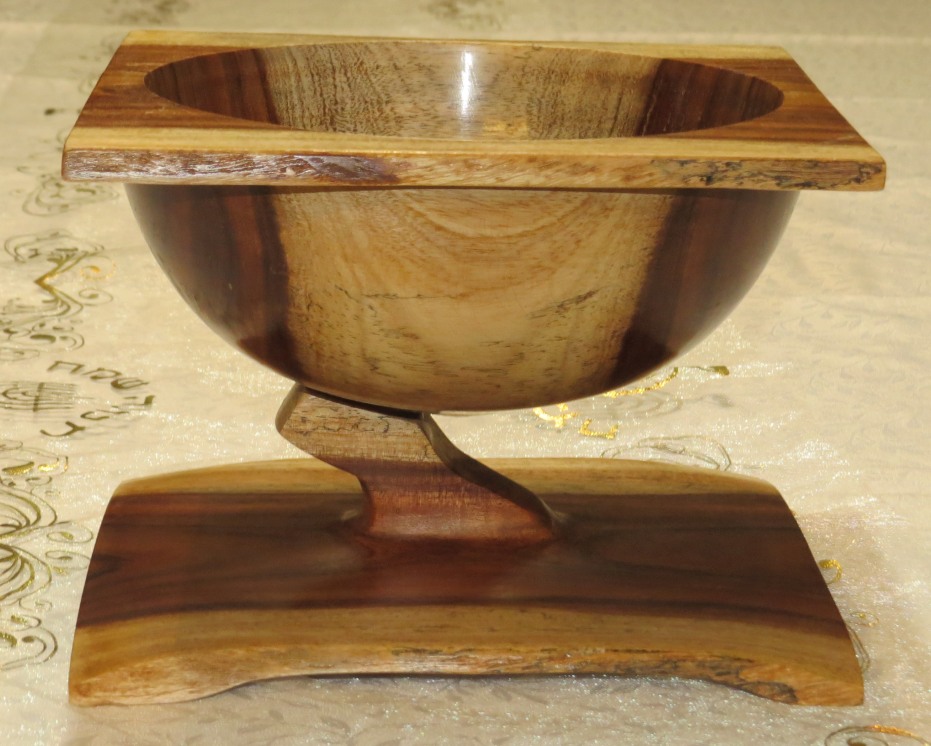
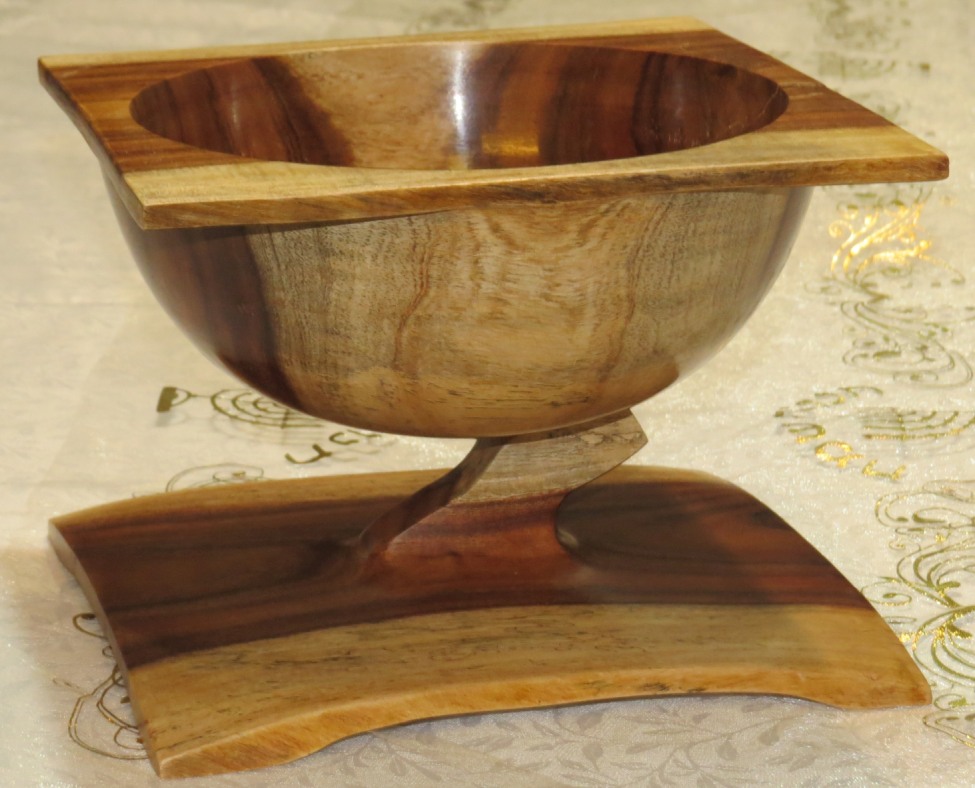 A bowl with an asymmetric neck. For those who wonder how this
is done, a hint: it was created from two different pieces. Indian
Rosewood.
A bowl with an asymmetric neck. For those who wonder how this
is done, a hint: it was created from two different pieces. Indian
Rosewood.
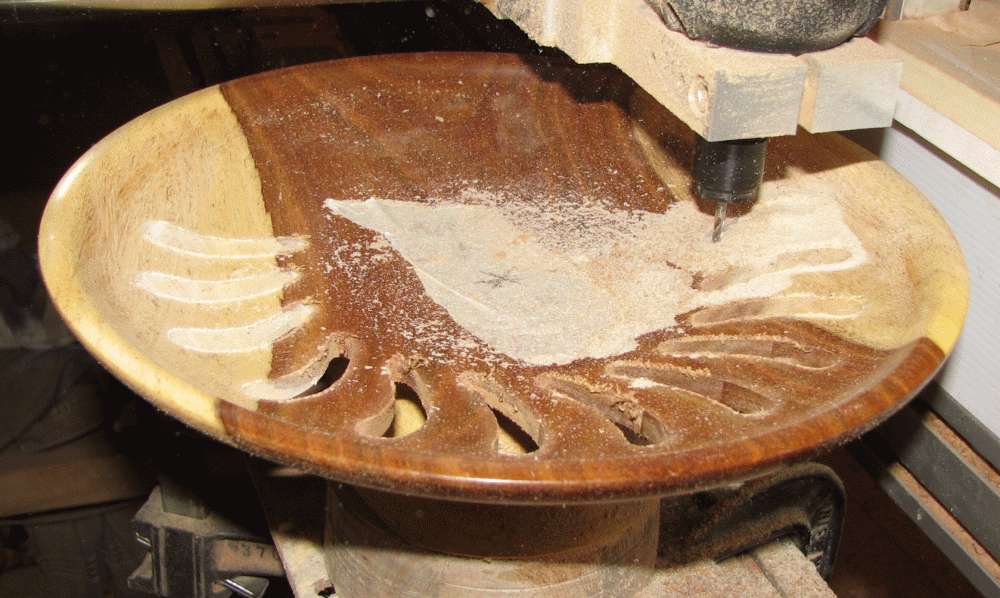
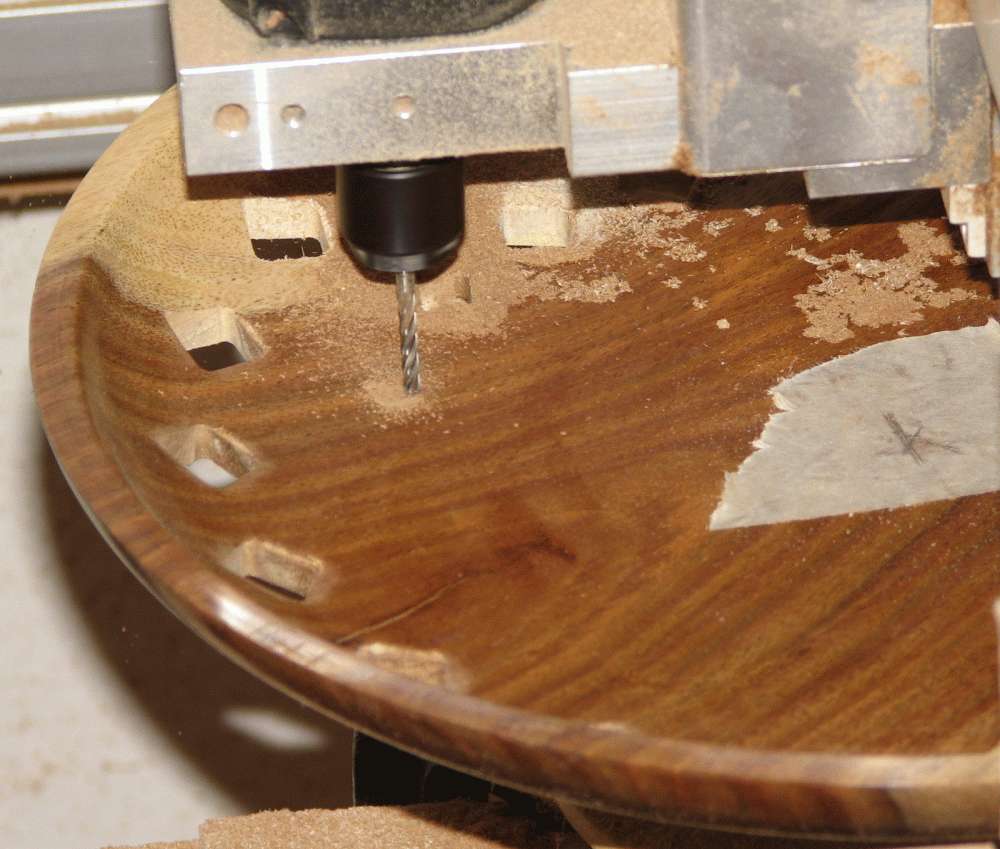
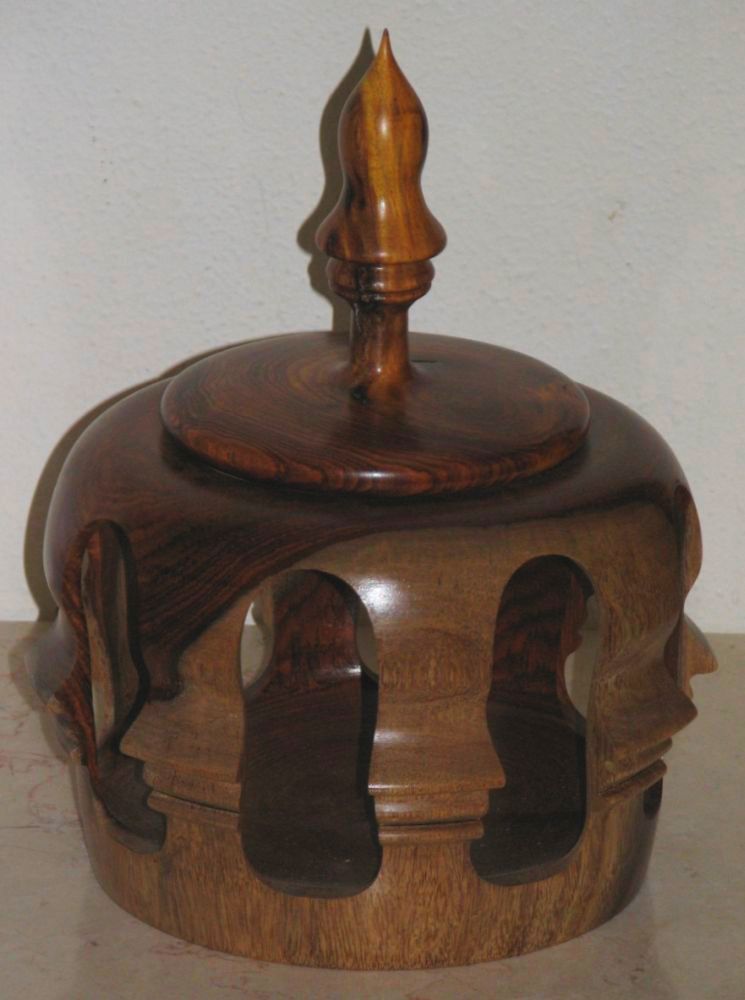
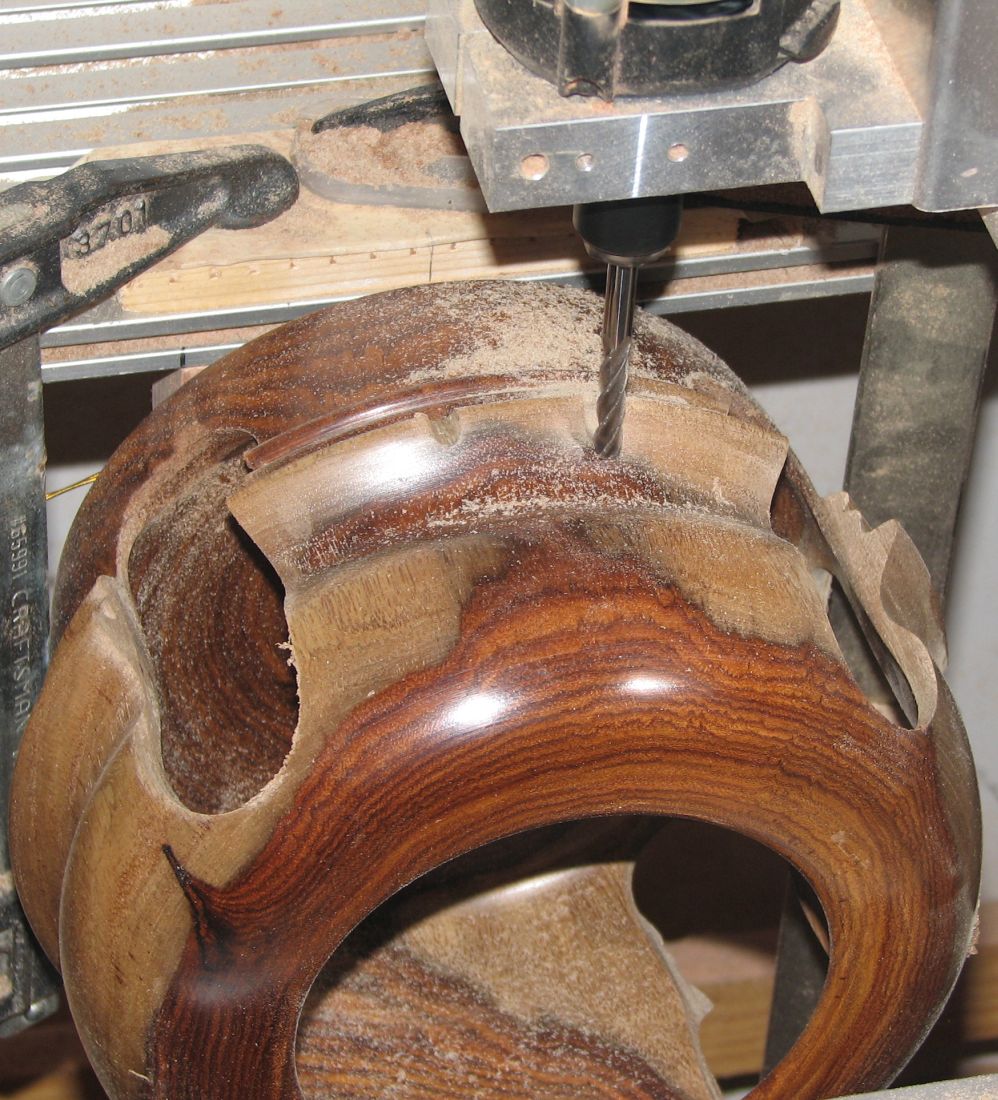
CNC patterned Bowls
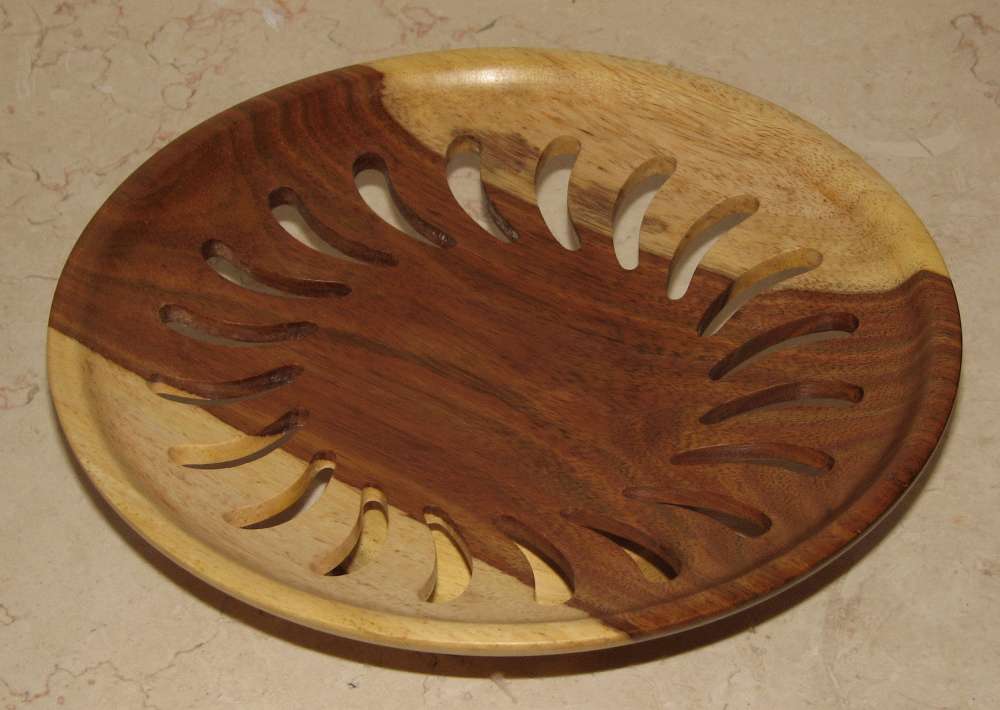
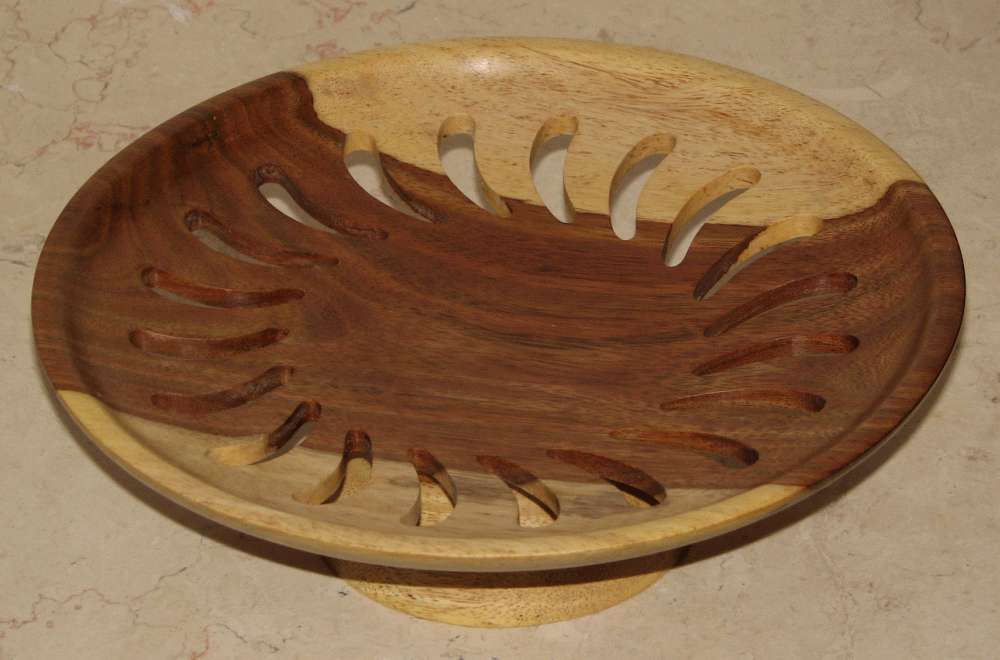 Banana shaped holes. Image below shows the CNC in action.
Indian Rosewood tree.
Banana shaped holes. Image below shows the CNC in action.
Indian Rosewood tree.
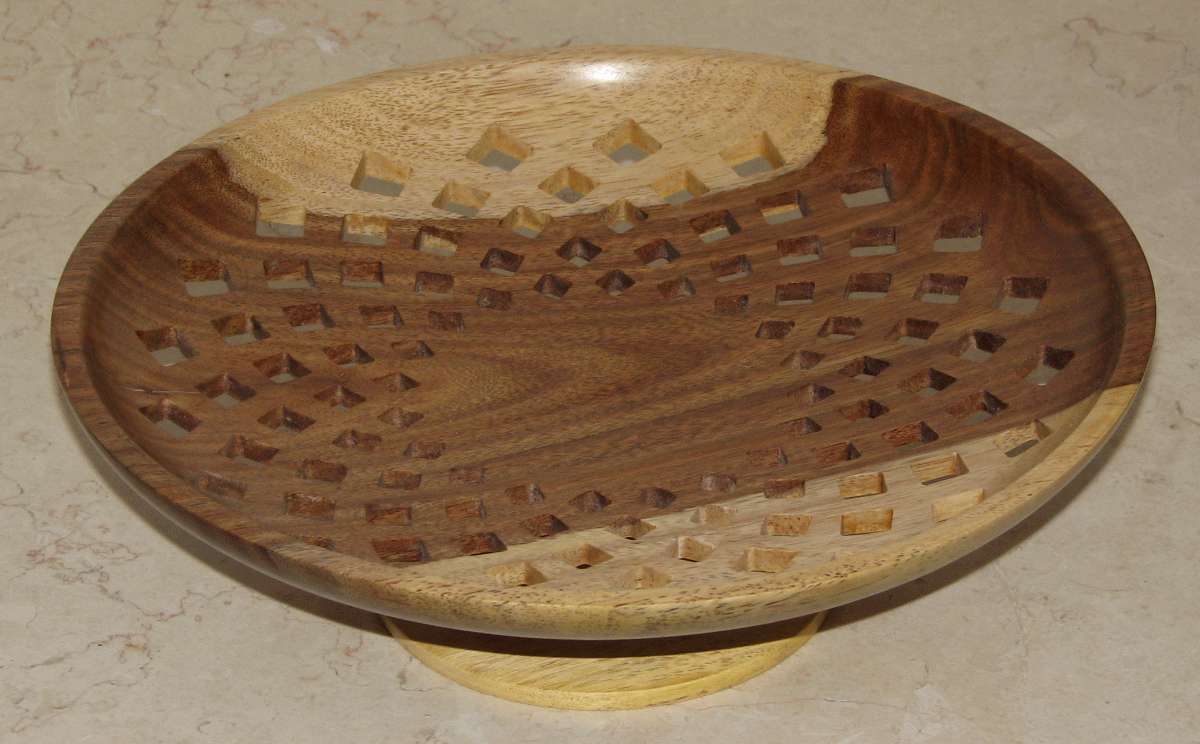
 Diamond shaped holes. Left image shows the CNC in action.
Indian Rosewood tree.
Diamond shaped holes. Left image shows the CNC in action.
Indian Rosewood tree.
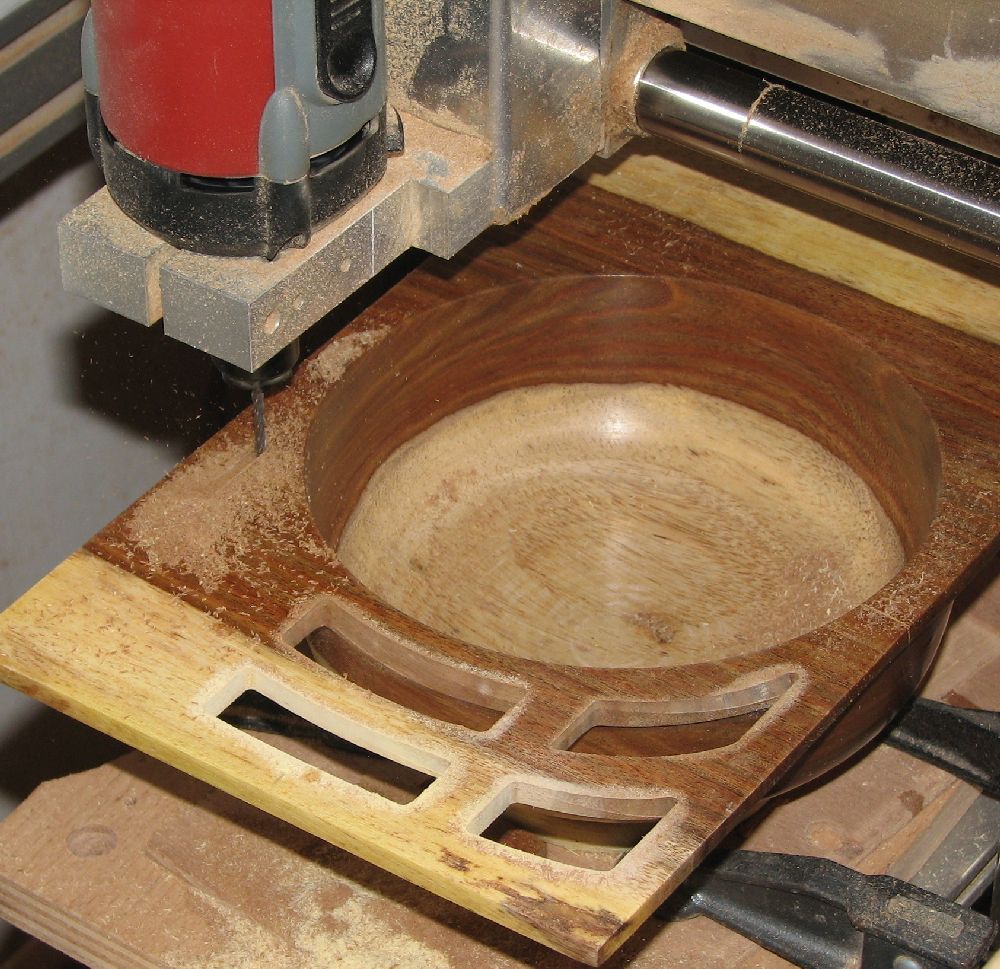
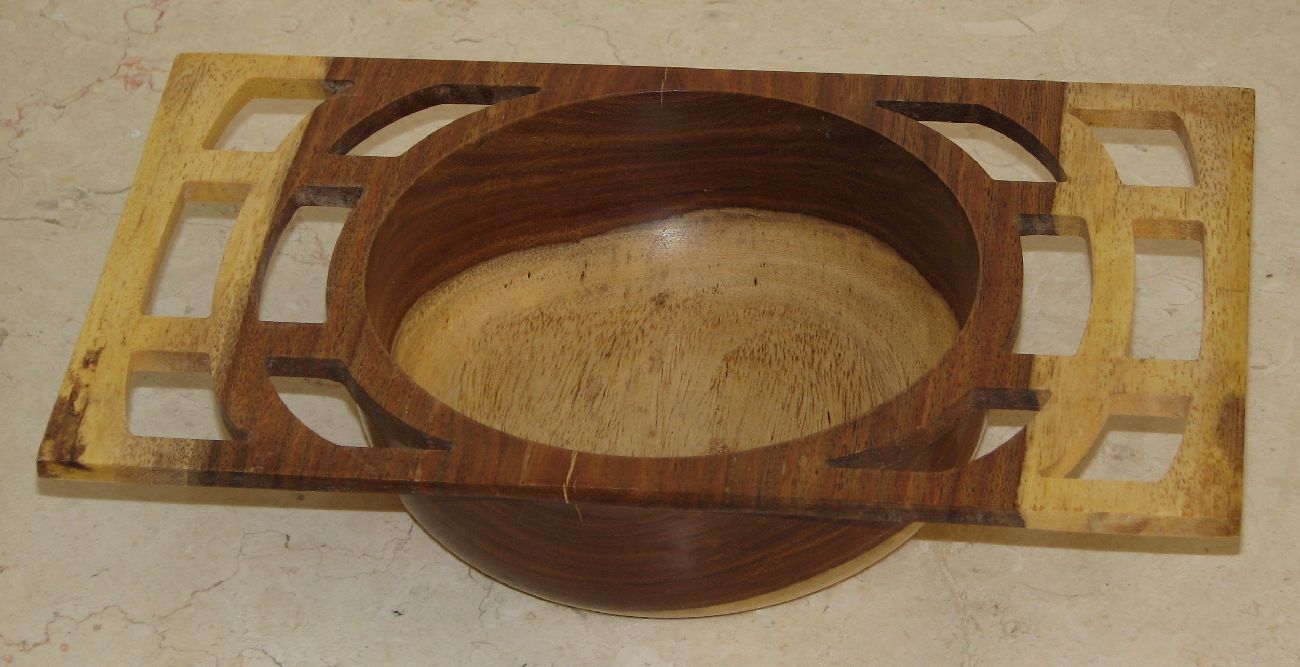
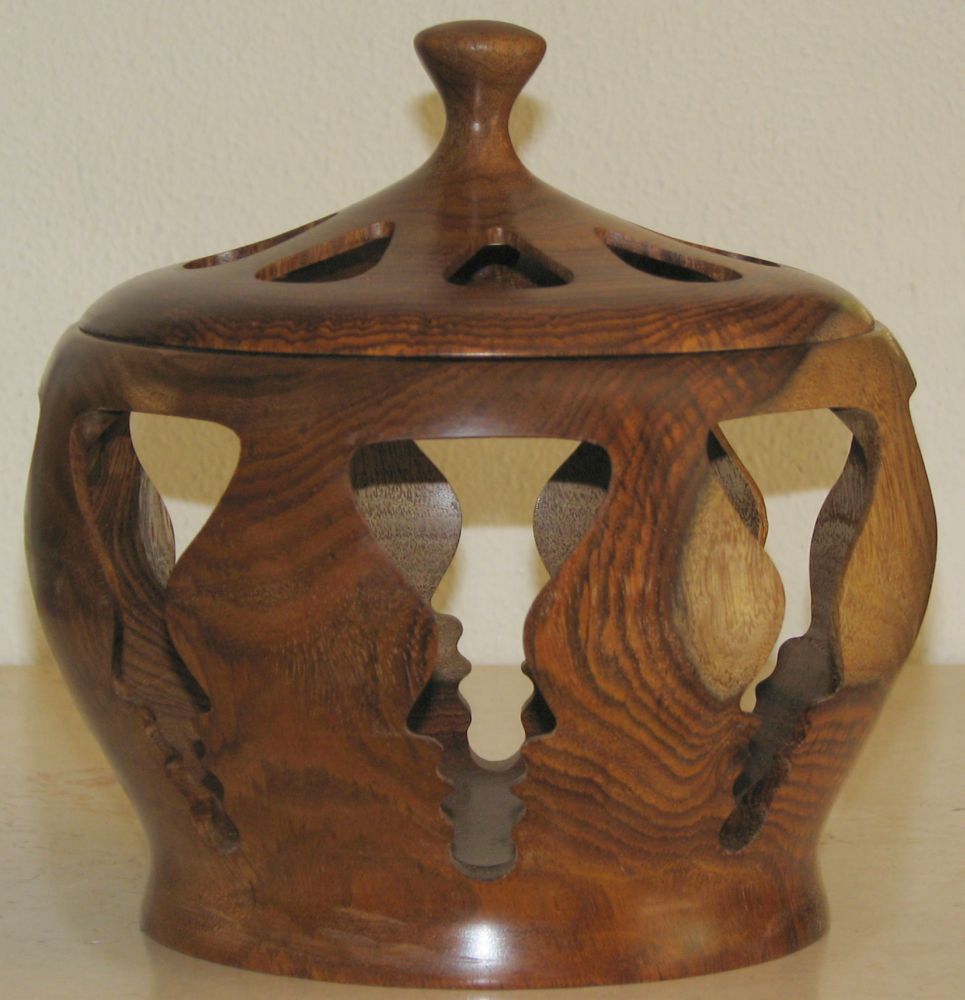
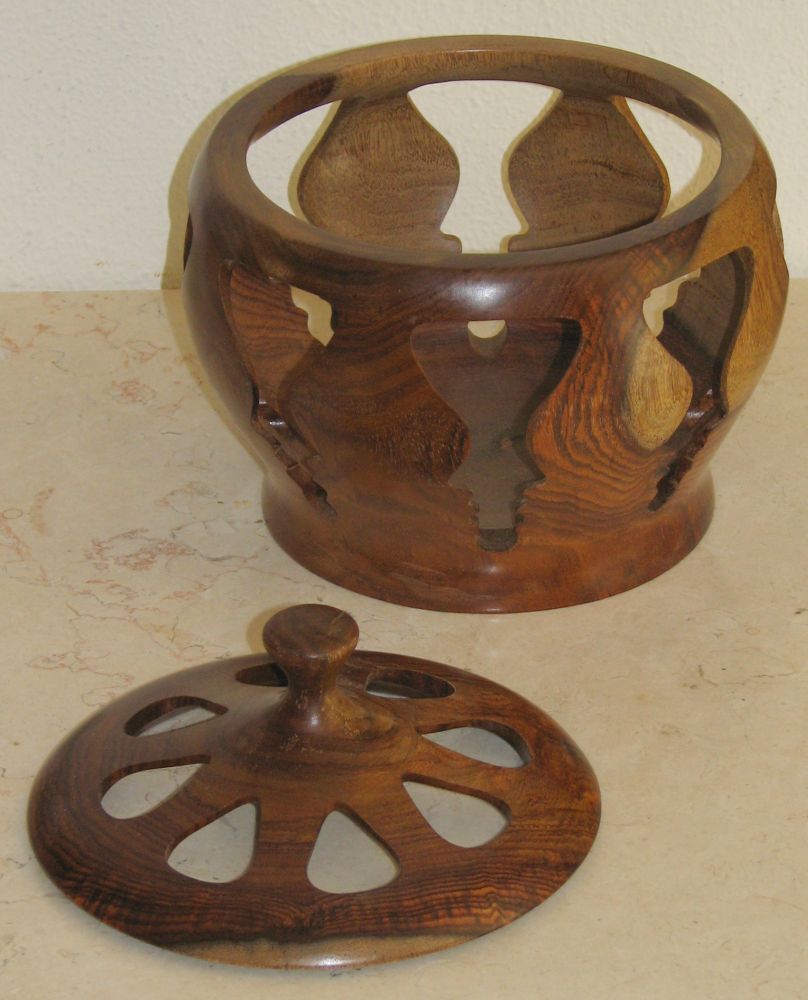
 A Bowl with pierced wings. Left image shows the CNC in action.
Indian Rosewood tree.
A Bowl with pierced wings. Left image shows the CNC in action.
Indian Rosewood tree.

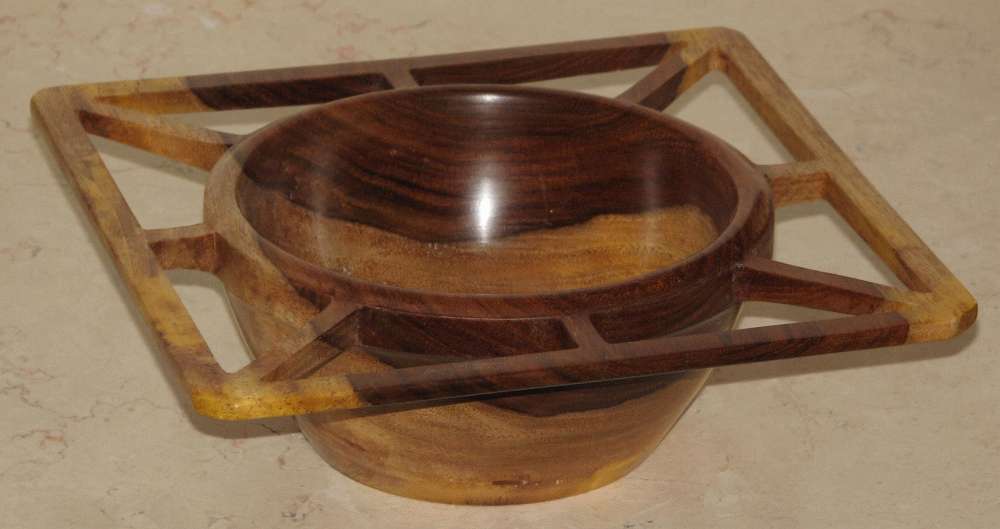 Another Bowl with pierced wings. Image below shows the CNC in action.
Indian Rosewood tree.
Another Bowl with pierced wings. Image below shows the CNC in action.
Indian Rosewood tree.

Some Vases
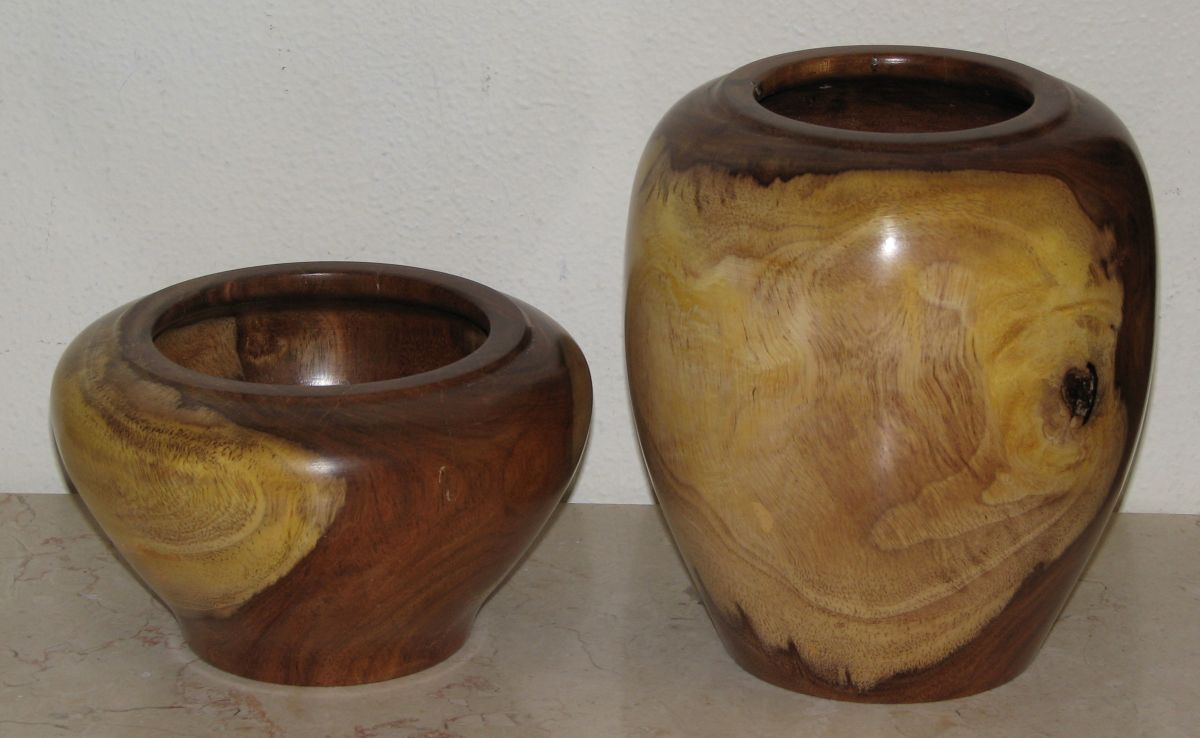
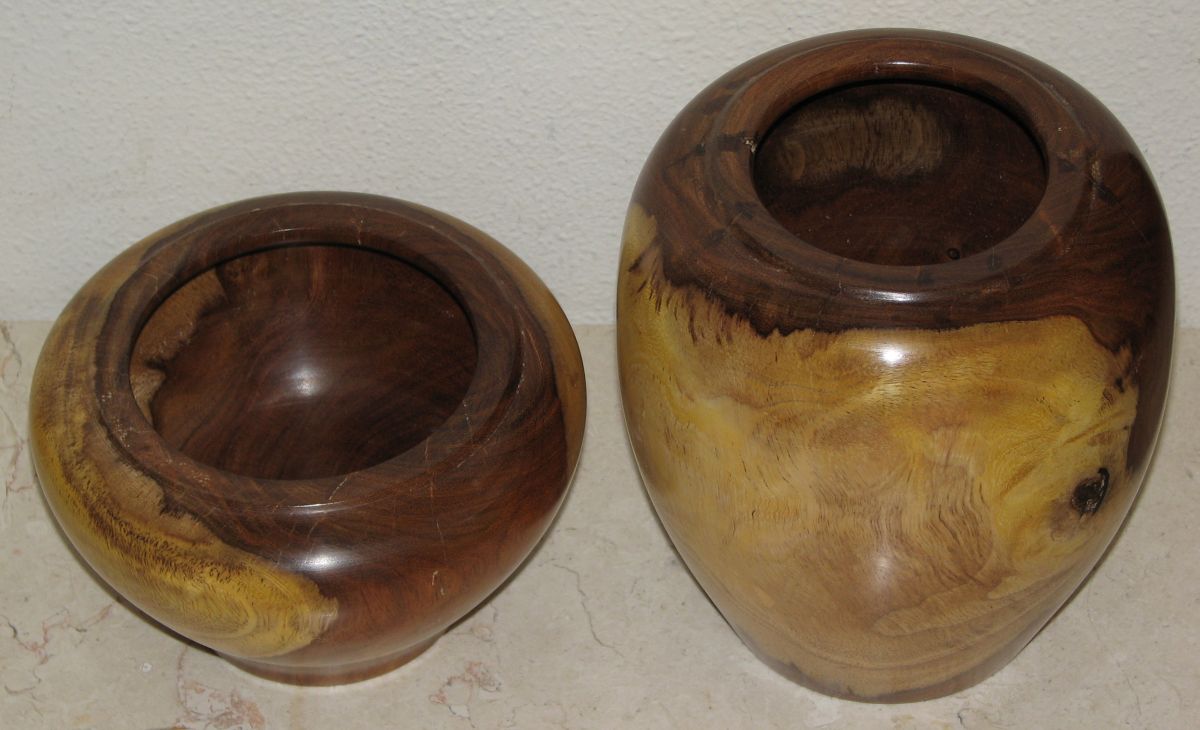 Indian Rosewood tree.
 A vessel with natural wings. Turning in two different axes,
only to clean with some carving. Indian Rosewood tree.
A vessel with natural wings. Turning in two different axes,
only to clean with some carving. Indian Rosewood tree.
Vases with Inlays

 Small vessels with black inlays, made using 2mm CNC cutter. Top left shows the CNC process. Can you guess how the CNC was centered? Top right shows the final piece and left shows a similar style piece.
Zipper and buttoned vases
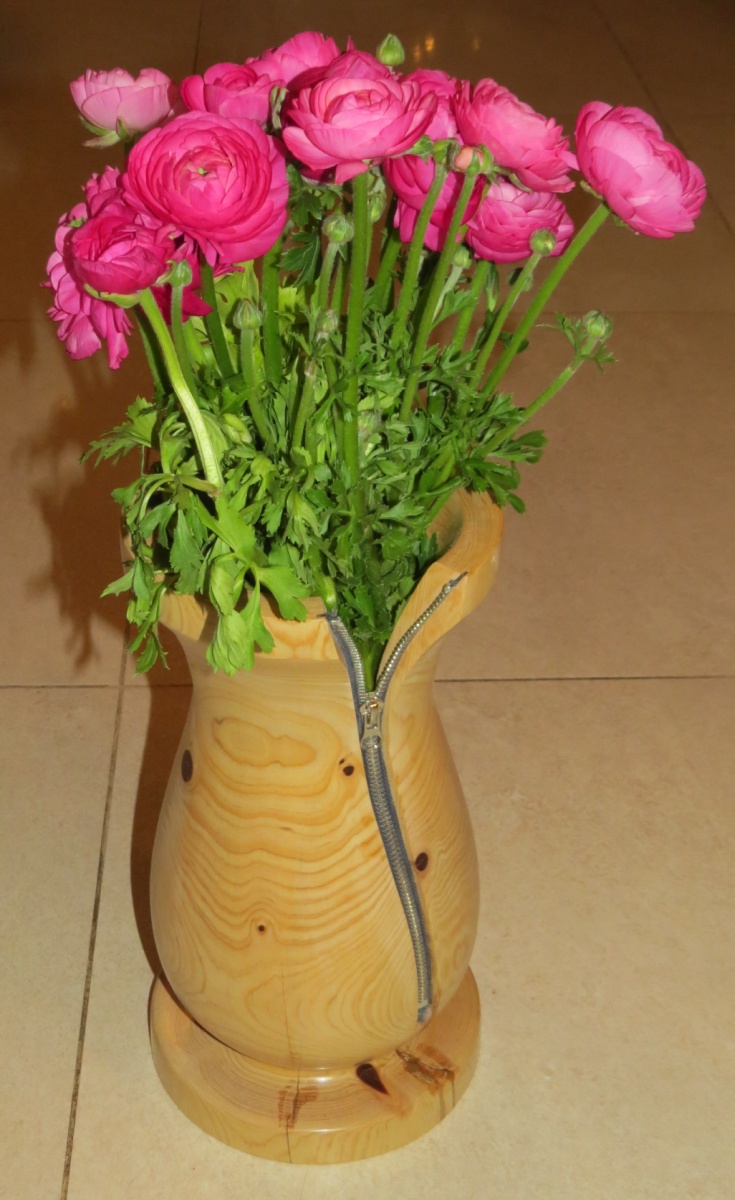
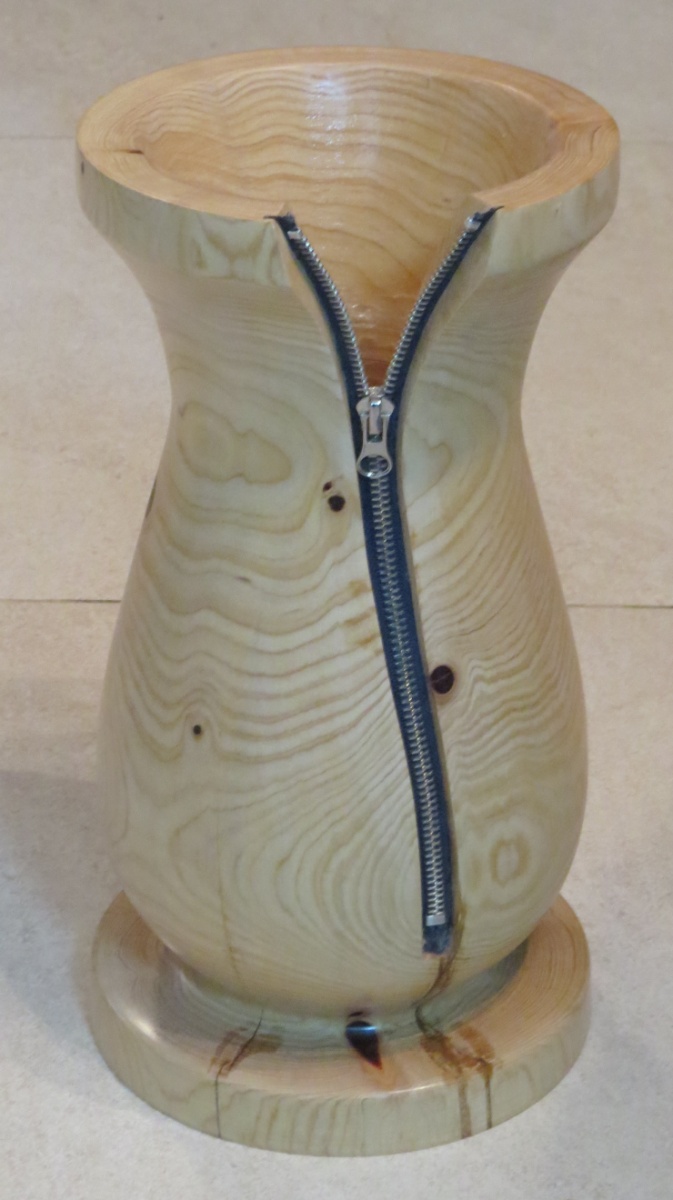
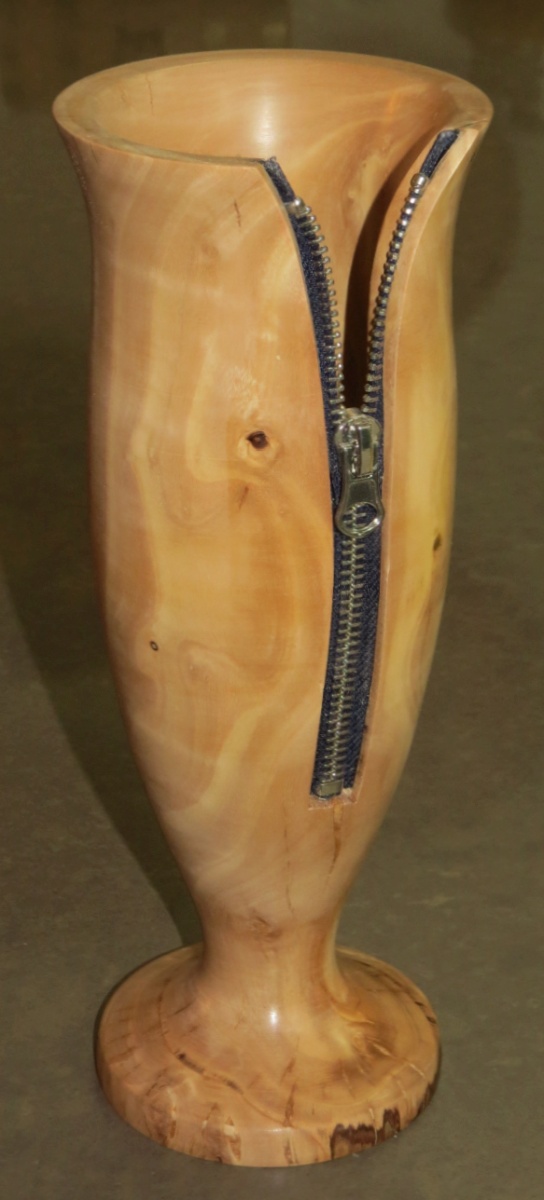
 Some vases with (real) zippers (and real flowers).


 and some vases with (real) buttons (and real flowers).
Shoelaces vases
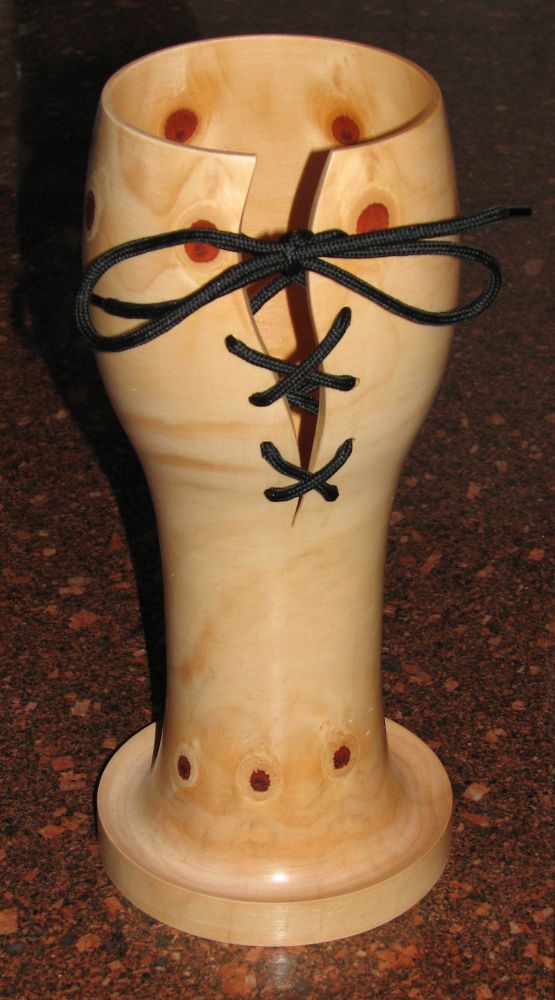
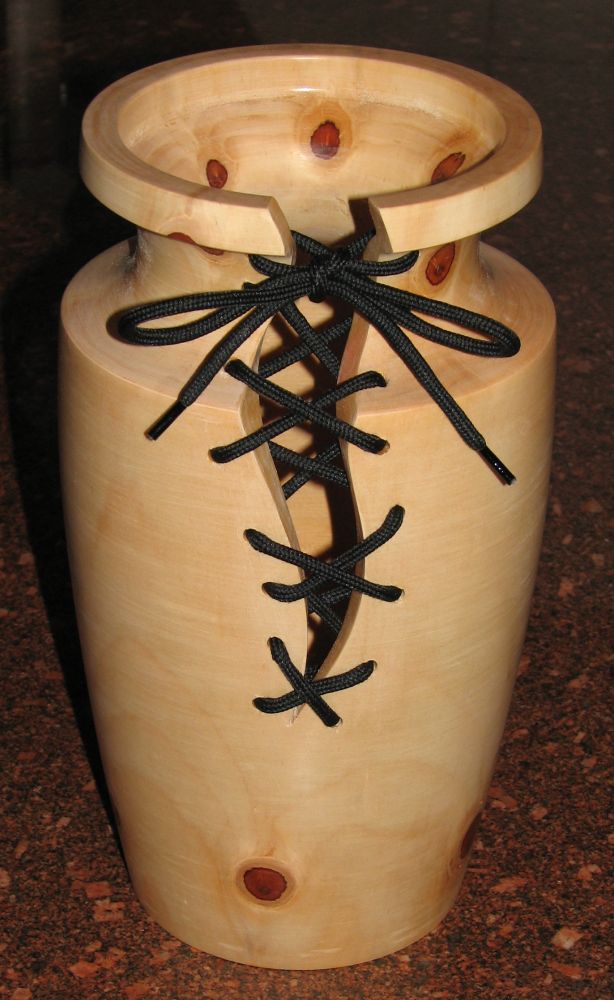
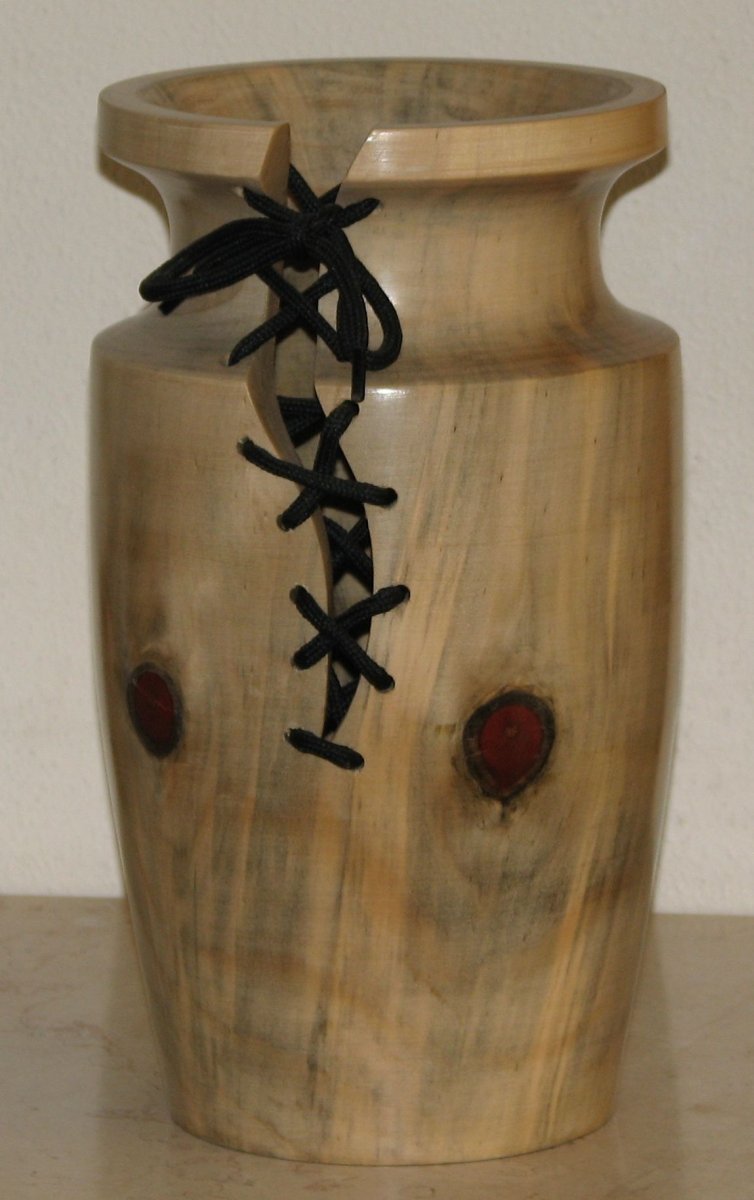

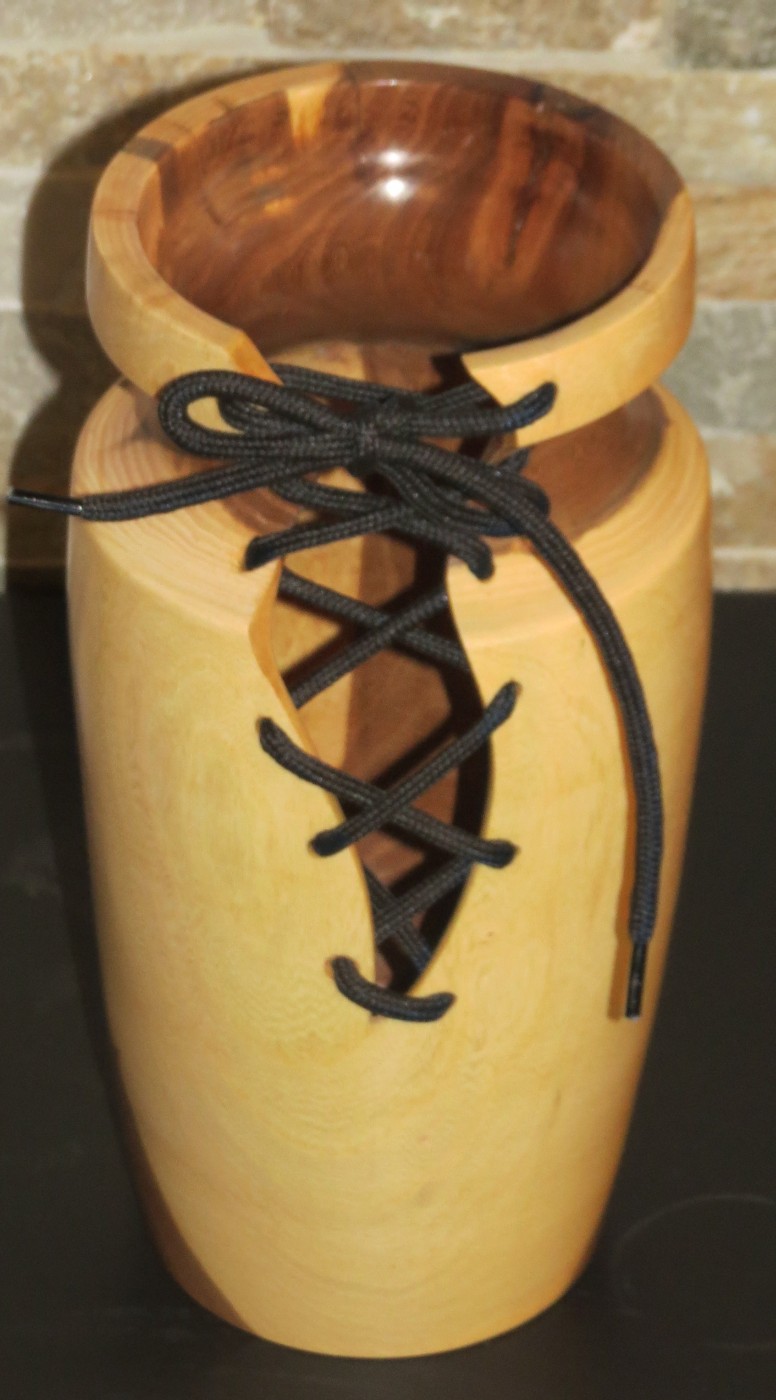 Shoe knots, with real shoelaces...
Schizo vases

 Schizo Vases (google "Schizo Vase"!). The image on the right shows
the way the slots were made using a special Jig to guide the cutting
tool.
Schizo Vases (google "Schizo Vase"!). The image on the right shows
the way the slots were made using a special Jig to guide the cutting
tool.
More Vases
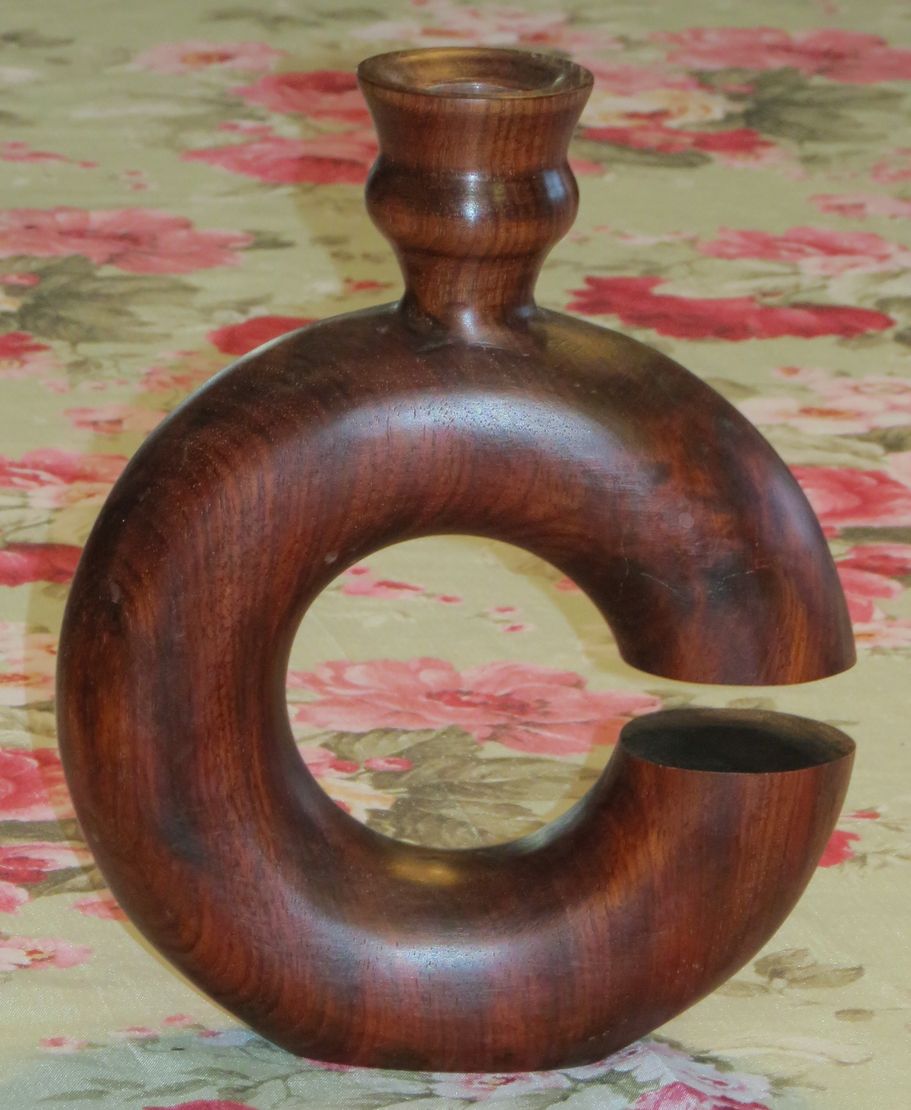
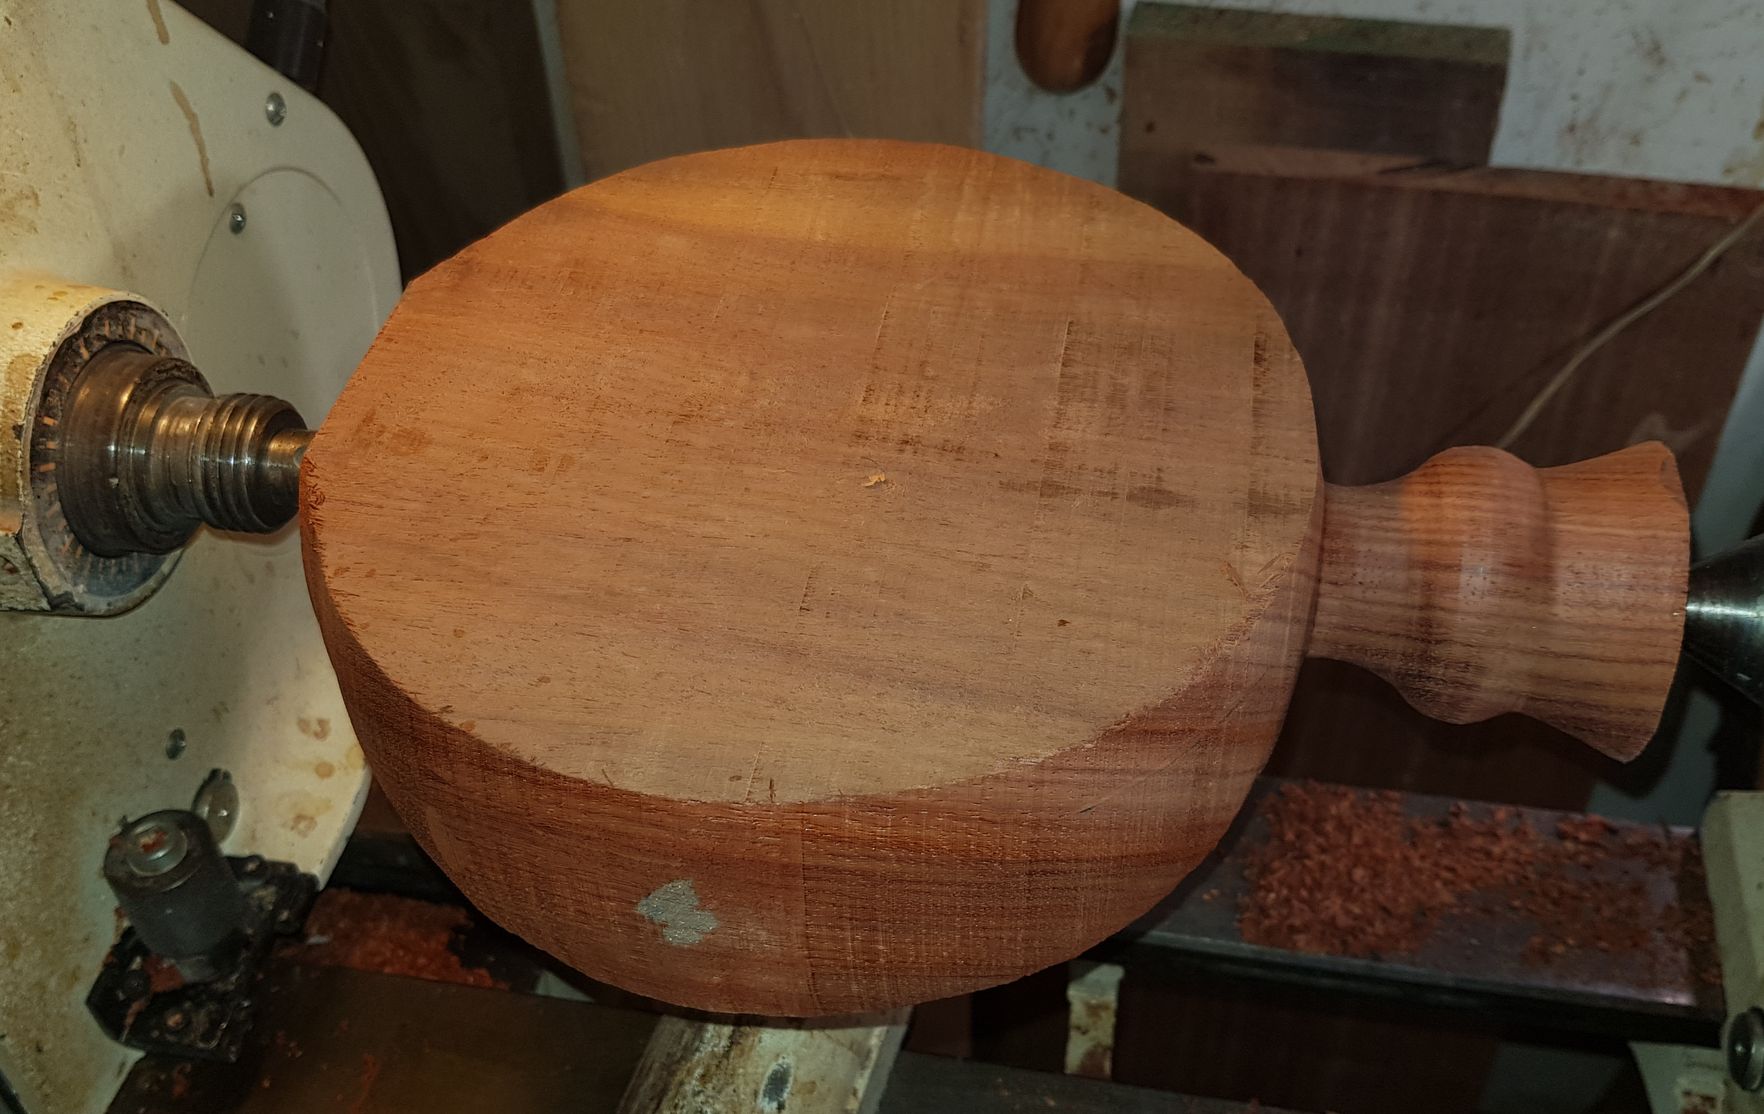
 A Torus vase. The two images on the right show the stages of
making this vase.
A Torus vase. The two images on the right show the stages of
making this vase.
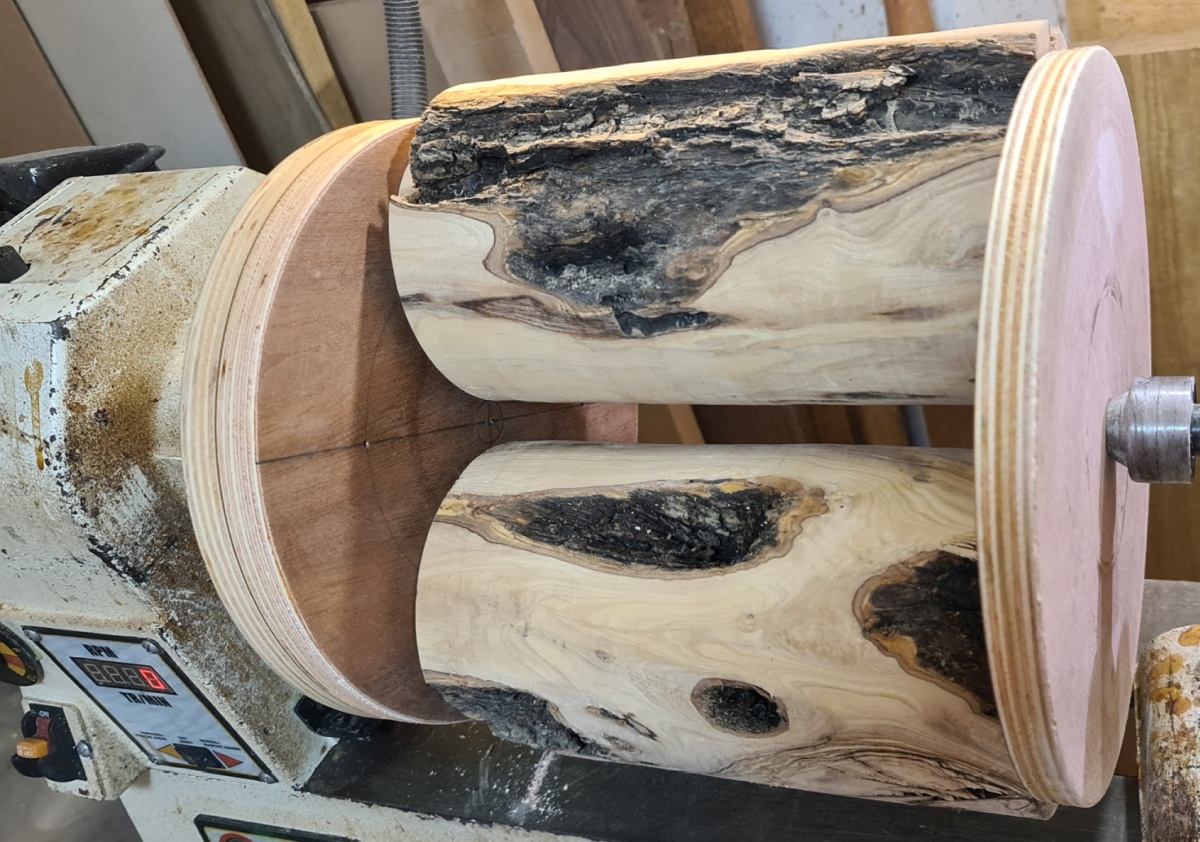
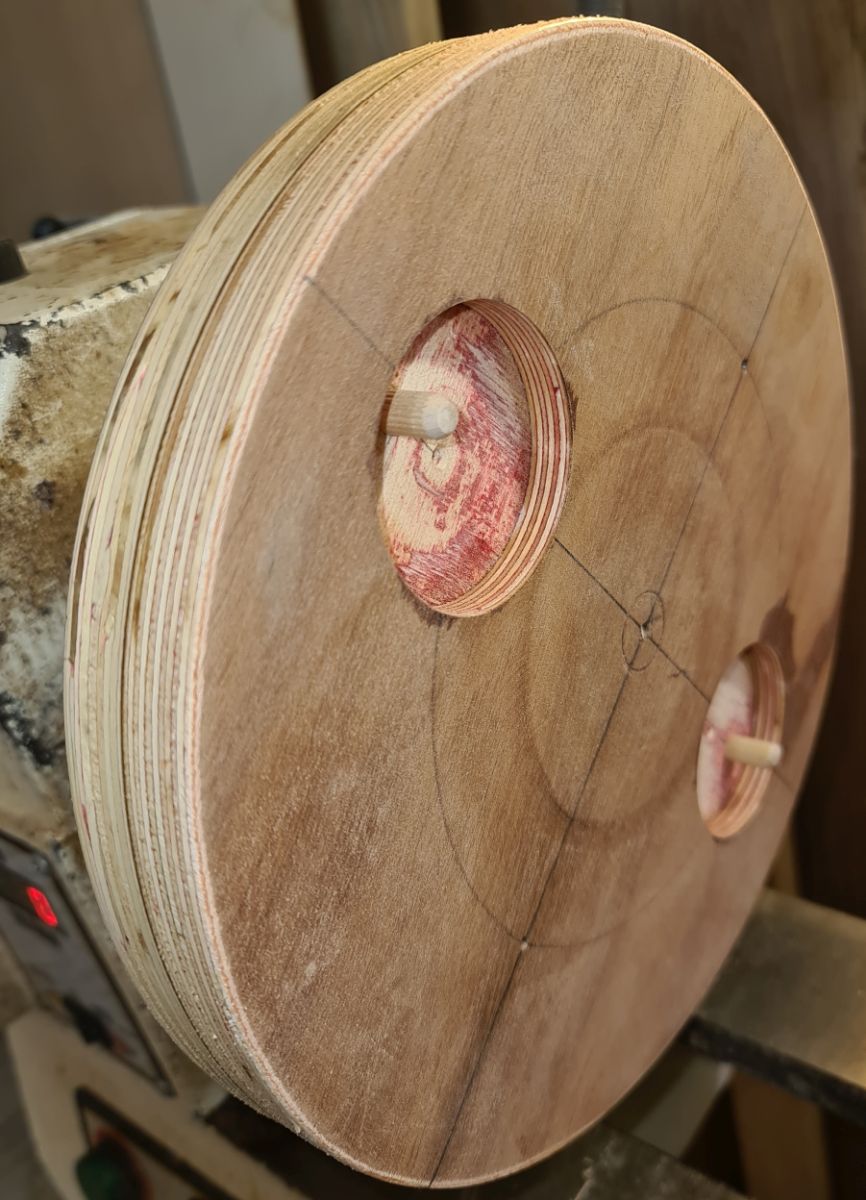
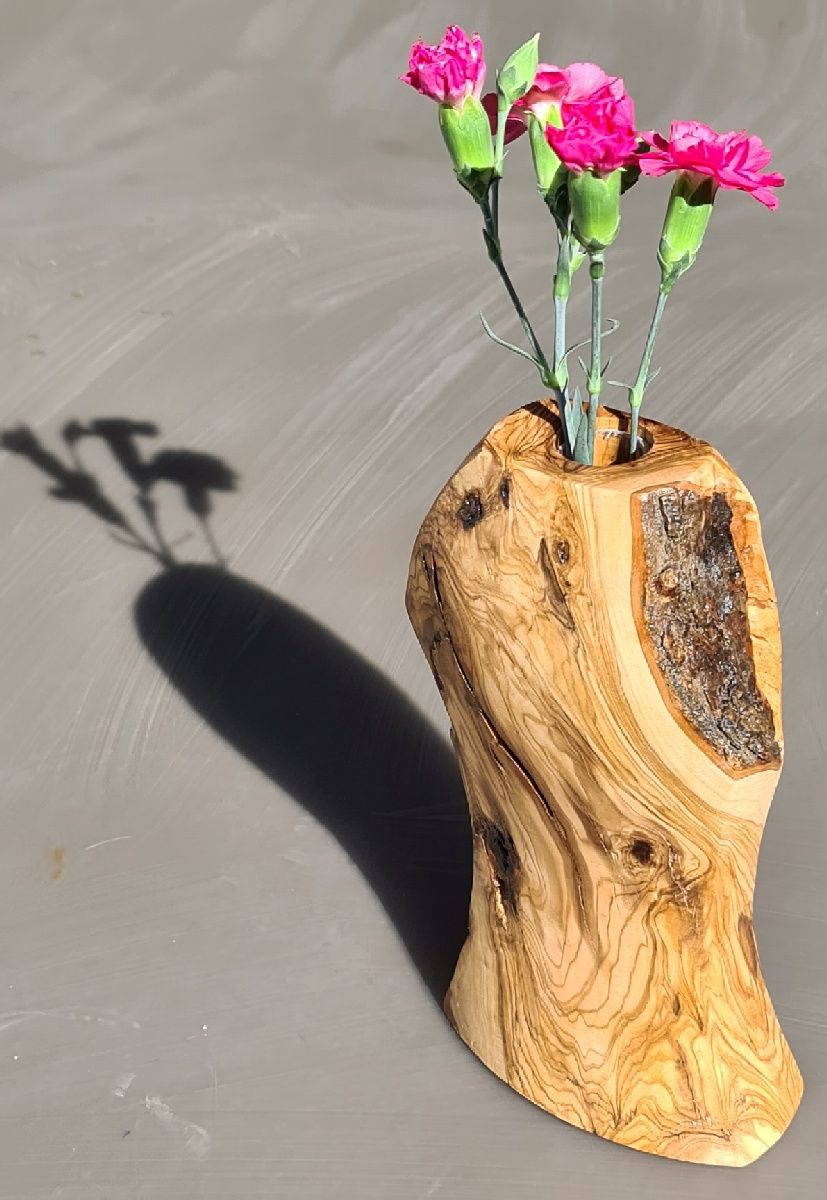
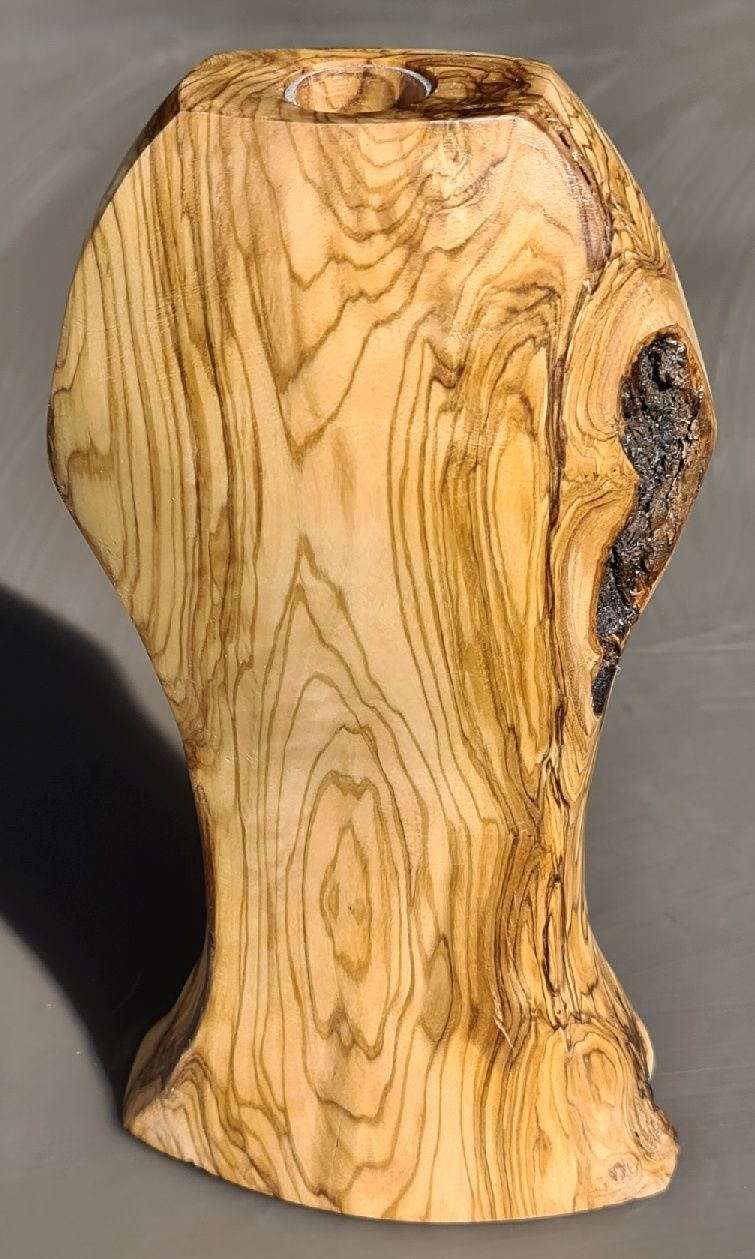 An off-center (aka
therming)
turned vase. Two vases are simultaneously turned as you can
see in the setup on the left image. Second from the left is
the back disk that is on the chucks and one can see how it was
hooked to the turned pieces. The two images on the right show
the final pieces. Olive tree.
An off-center (aka
therming)
turned vase. Two vases are simultaneously turned as you can
see in the setup on the left image. Second from the left is
the back disk that is on the chucks and one can see how it was
hooked to the turned pieces. The two images on the right show
the final pieces. Olive tree.


 Vases with handles. From Cypress (left one).
Interior has a plastic jar glued in (with silicon) for the flowers...
Vases with handles. From Cypress (left one).
Interior has a plastic jar glued in (with silicon) for the flowers...
 Another combination of turning and NC machining. Carefully inspect the
cross sections! The image on the right shows the CNC process.
Indian Rosewood tree.
Another combination of turning and NC machining. Carefully inspect the
cross sections! The image on the right shows the CNC process.
Indian Rosewood tree.
 Yet another combination of turning and NC machining, of a vase
and its cover. The images on the right show the CNC
process. Indian Rosewood tree.
Yet another combination of turning and NC machining, of a vase
and its cover. The images on the right show the CNC
process. Indian Rosewood tree.
Epoxy Virtual Plants


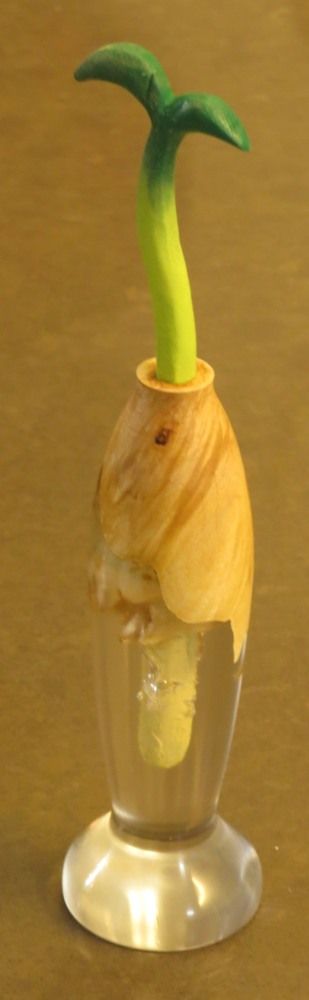
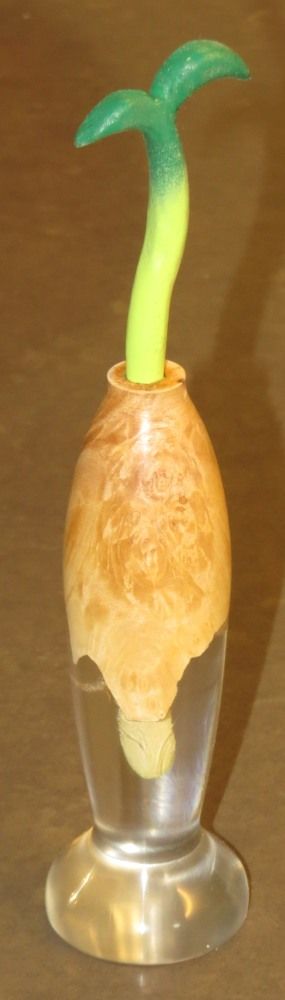
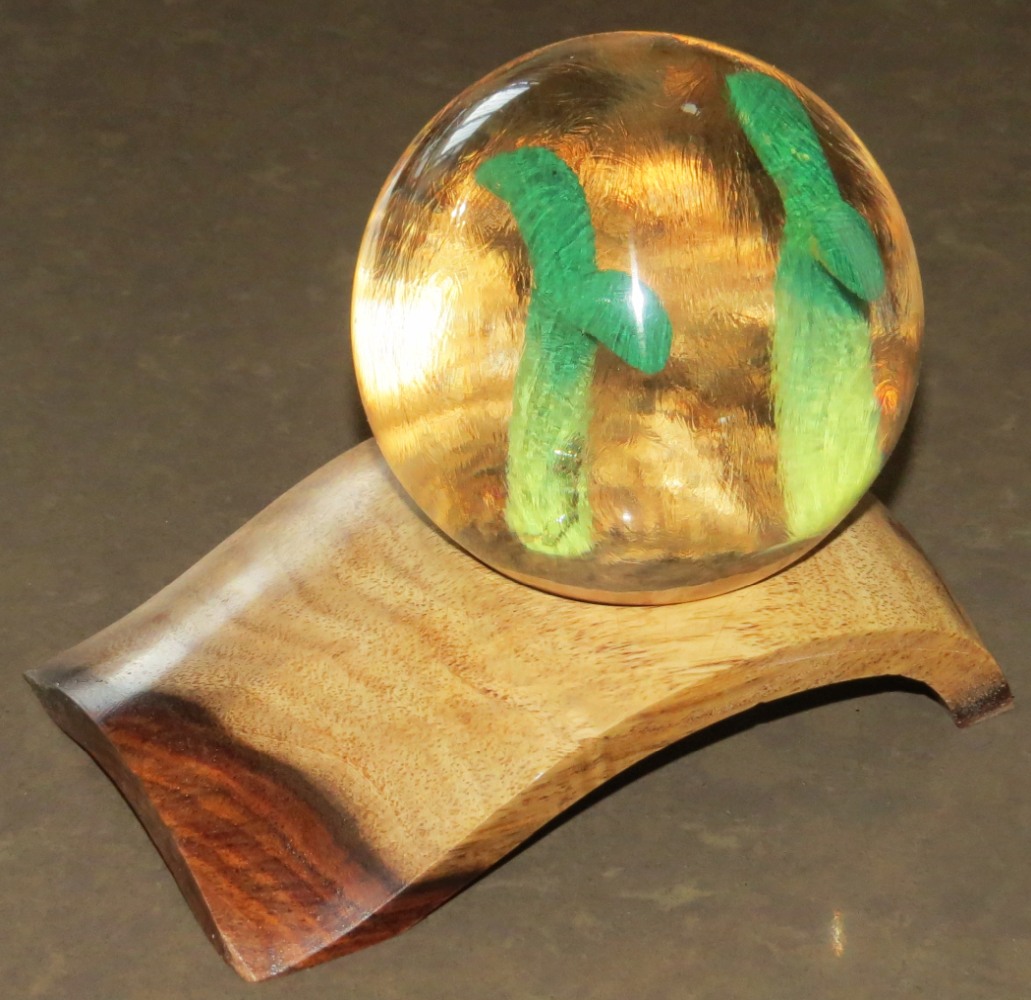
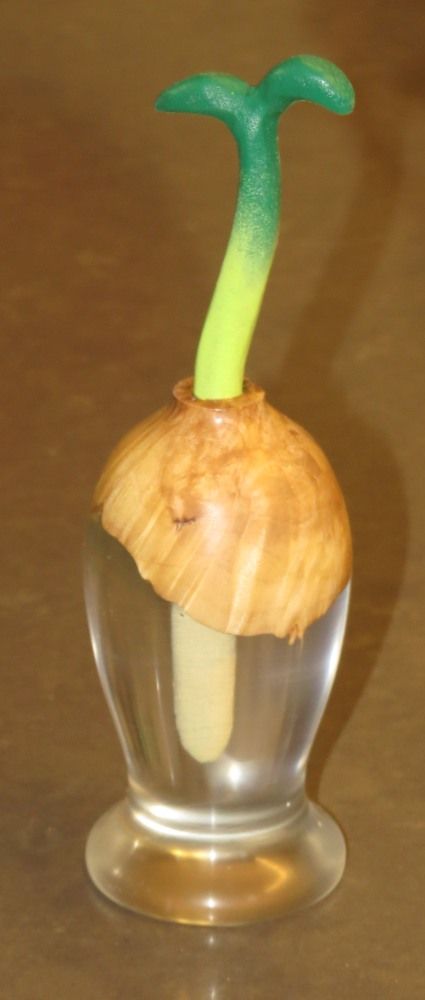 These virtual plants in epoxy are made after a great demo made
as part of the 2021 AAW symposium by Rebecca DeGroot. The
left example has some blue dye in the epoxy and bobbles, as
this sample was not placed in a pressure chamber.
Interestingly, the lensing effect of the epoxy, magnifies the
root, that as a result, looks a bit thicker than expected...
These virtual plants in epoxy are made after a great demo made
as part of the 2021 AAW symposium by Rebecca DeGroot. The
left example has some blue dye in the epoxy and bobbles, as
this sample was not placed in a pressure chamber.
Interestingly, the lensing effect of the epoxy, magnifies the
root, that as a result, looks a bit thicker than expected...
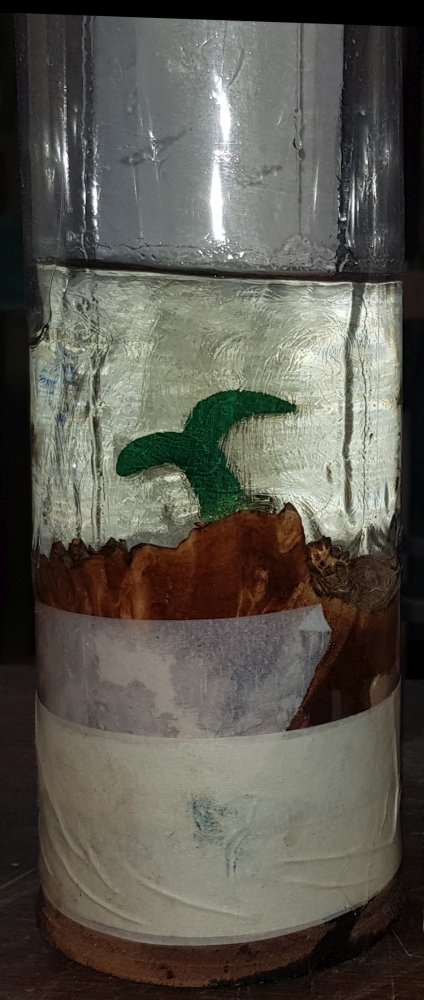
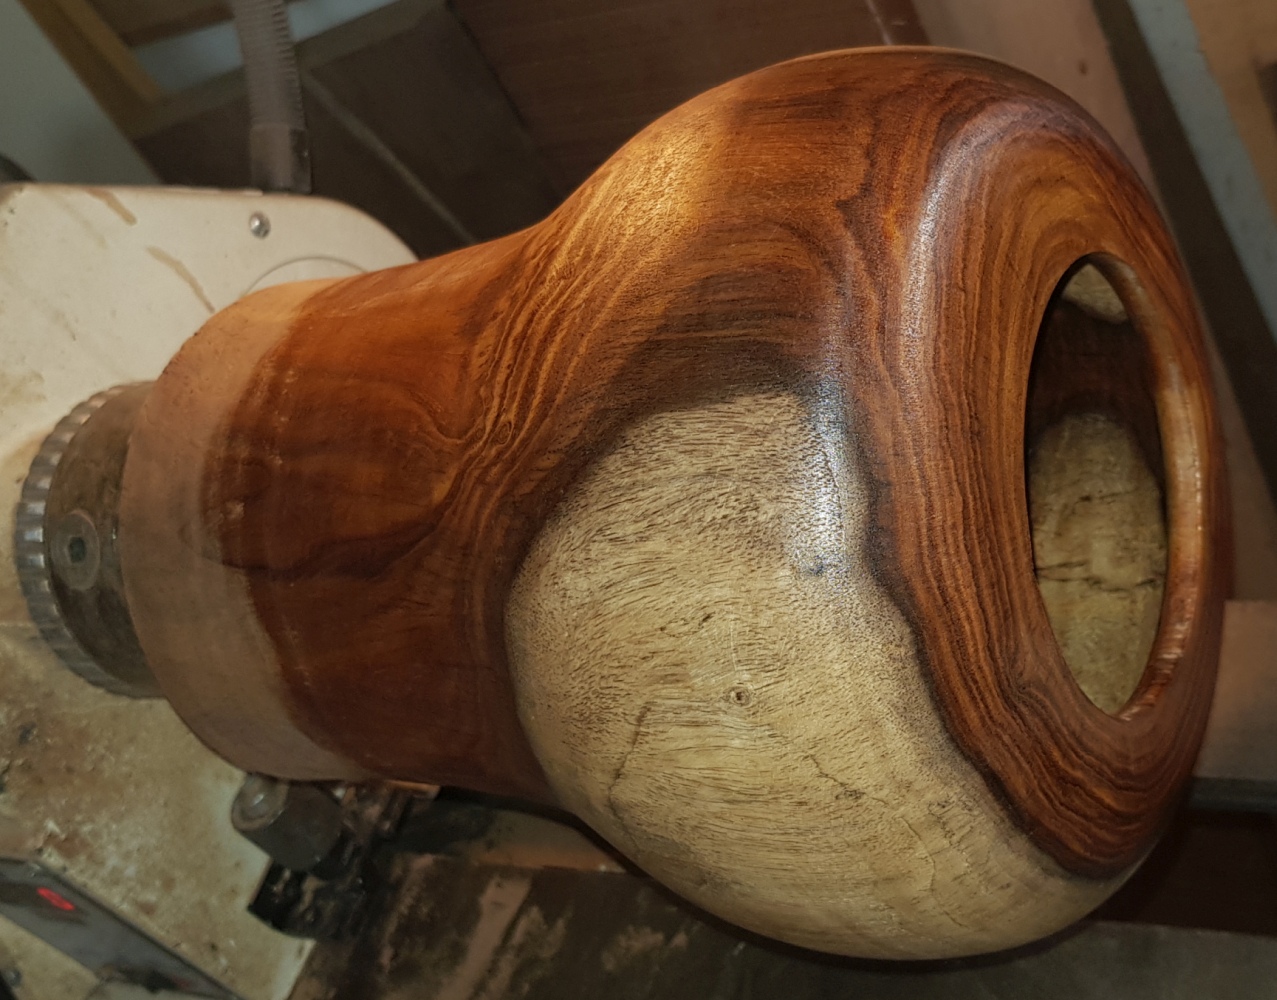
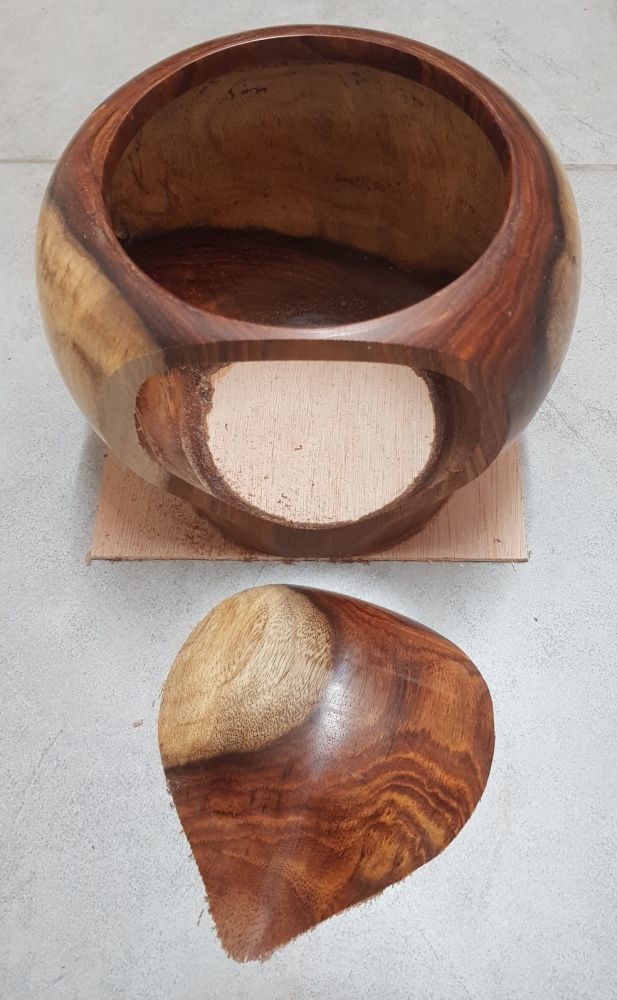
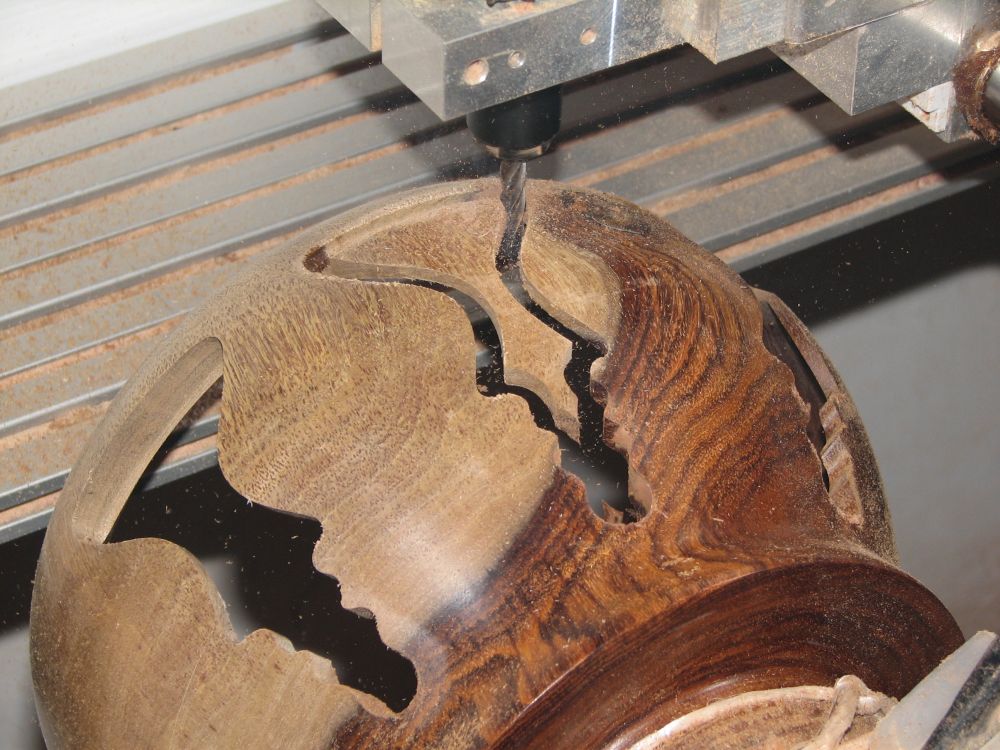
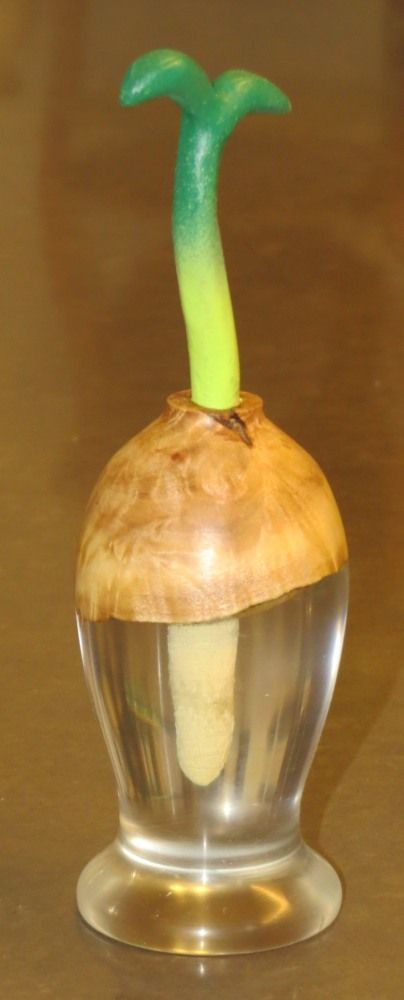
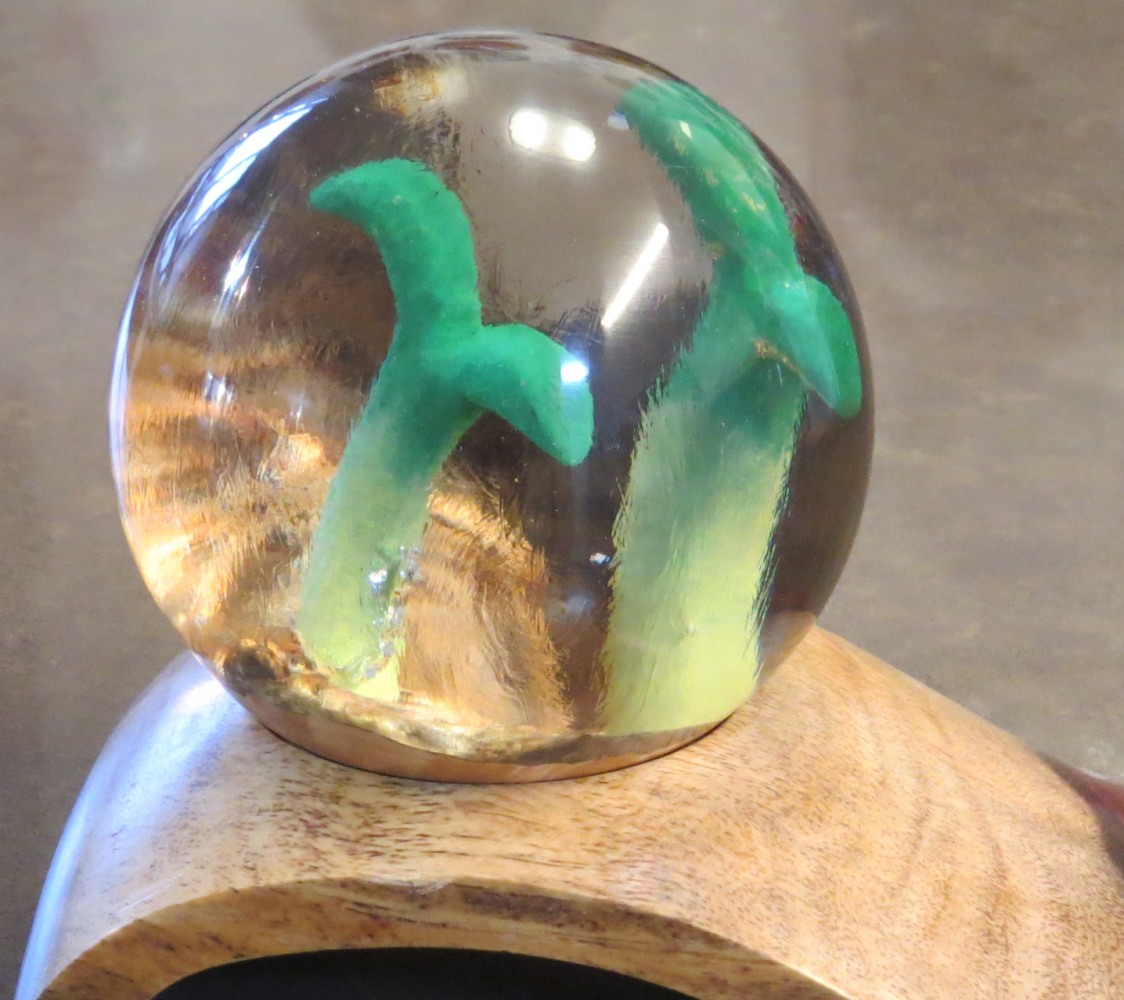
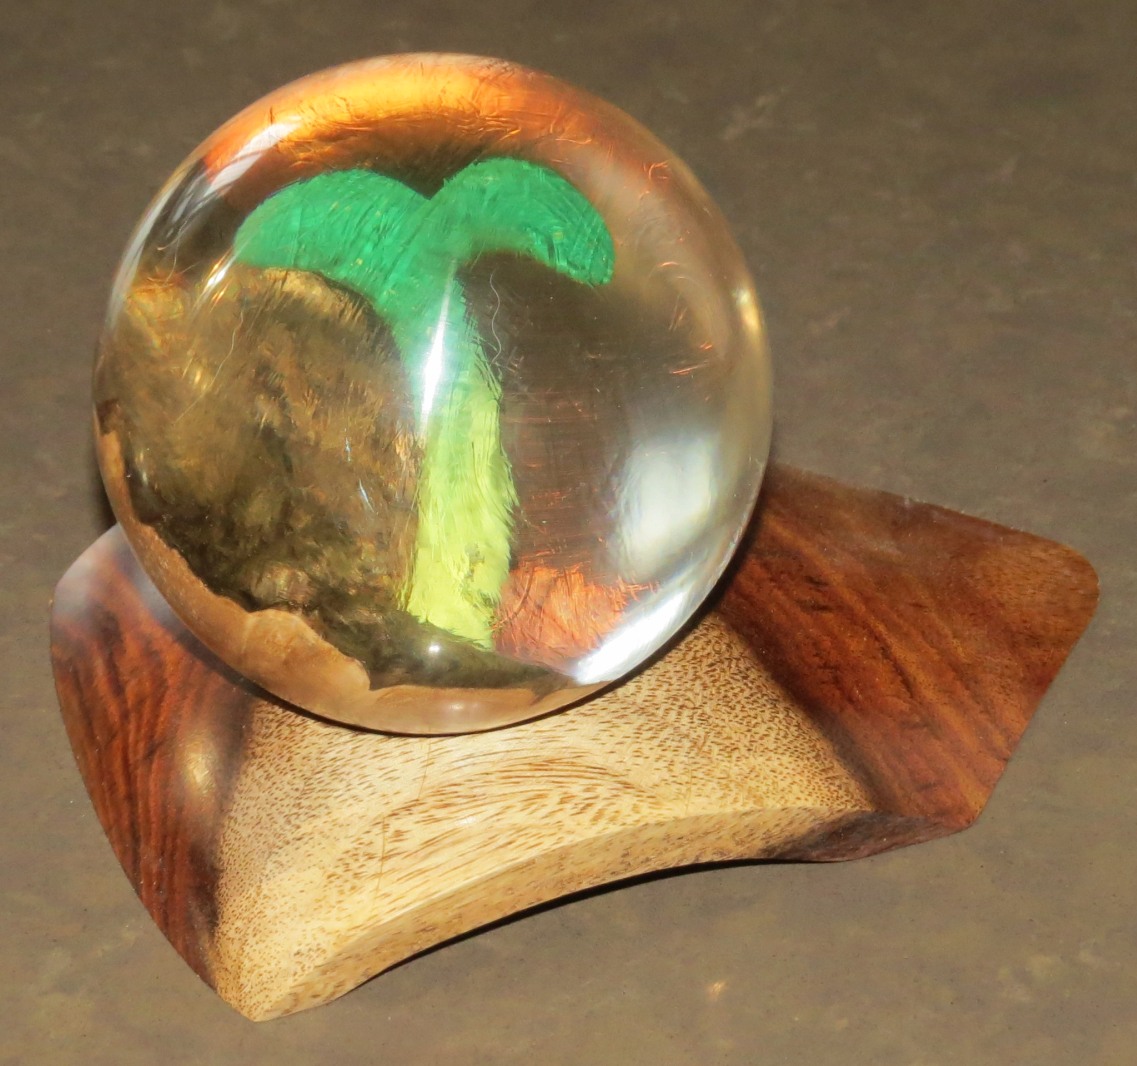
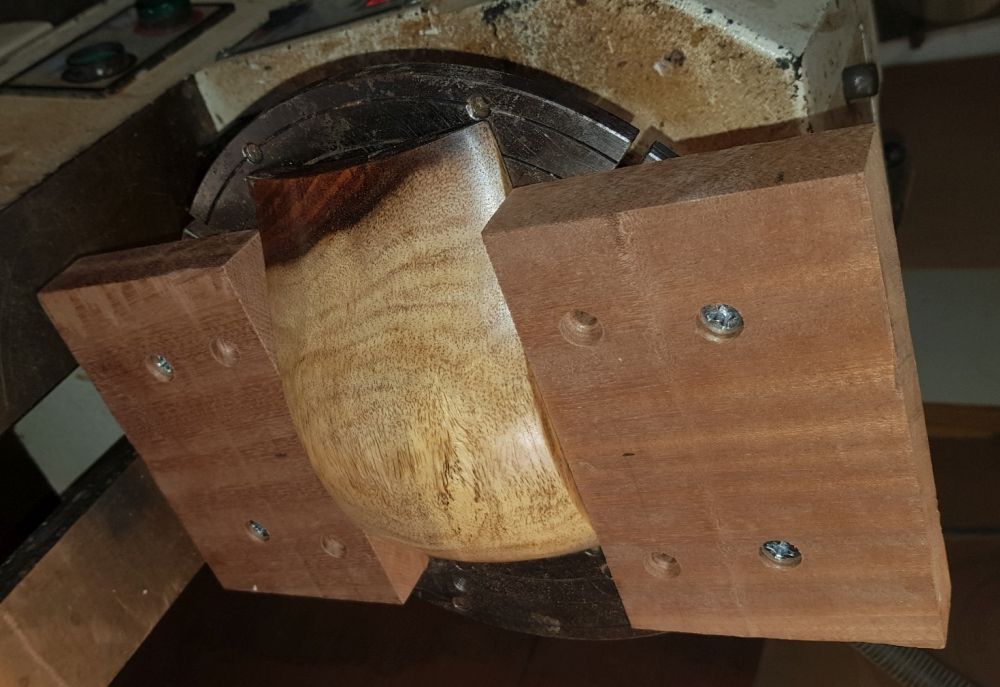 A second variant of virtual plants in epoxy, in a sphere this
time. The left shows the epoxy casting where the middle turned
vessel (from Indian Rosewood) was vertically sliced as can be
seen, to form the (four) bases for the spheres. The right
shows the fixture used to cut the circular hole in the base to
hold the sphere. Below are pictures of two final examples,
with one/two virtual plants.
A second variant of virtual plants in epoxy, in a sphere this
time. The left shows the epoxy casting where the middle turned
vessel (from Indian Rosewood) was vertically sliced as can be
seen, to form the (four) bases for the spheres. The right
shows the fixture used to cut the circular hole in the base to
hold the sphere. Below are pictures of two final examples,
with one/two virtual plants.

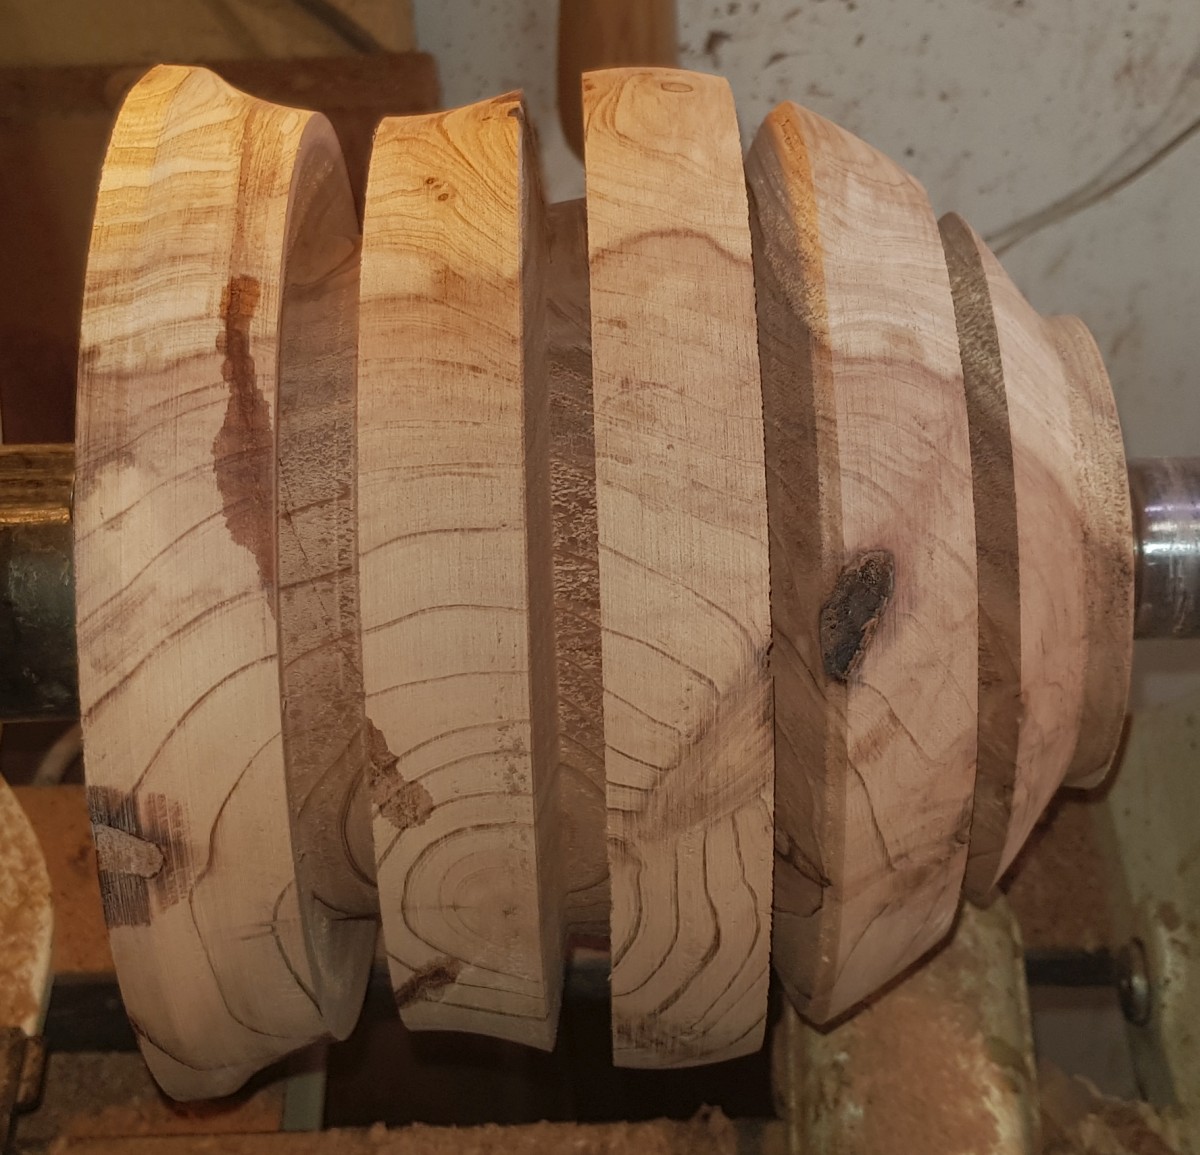
Epoxy Vessels
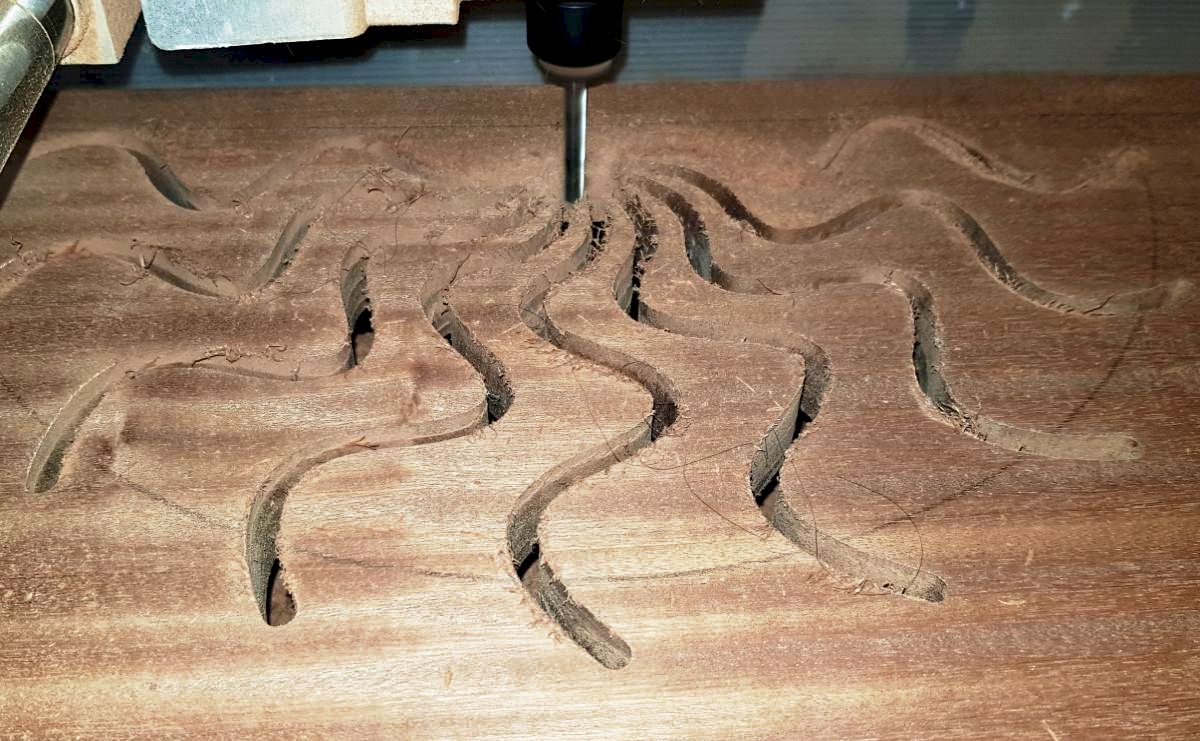
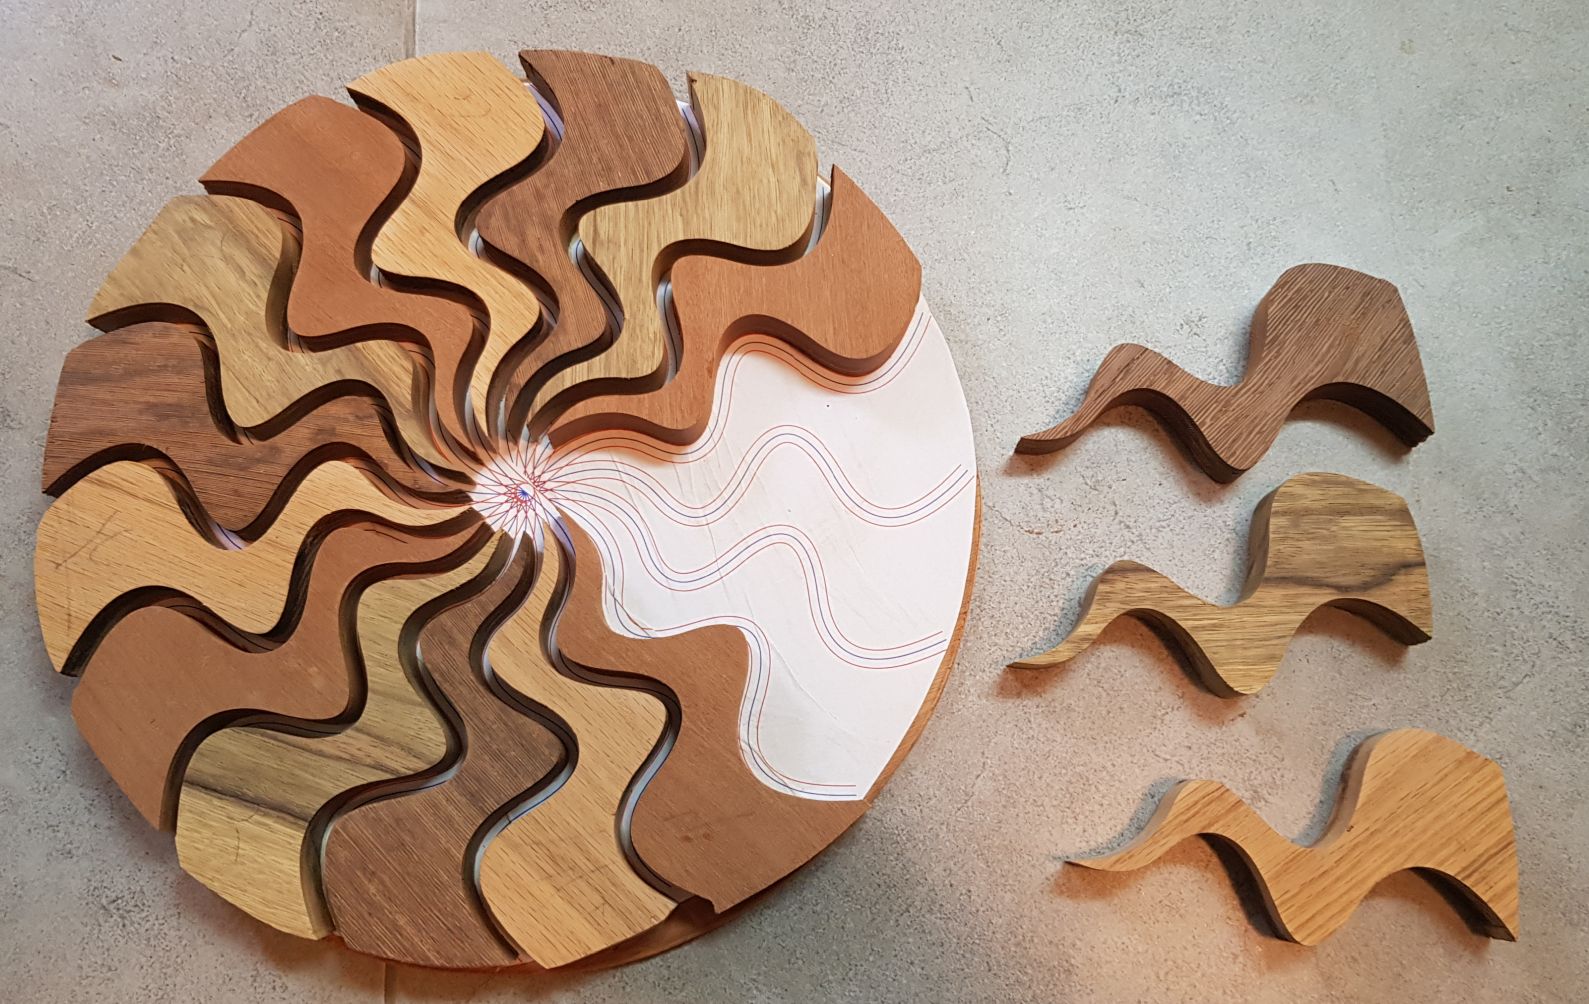
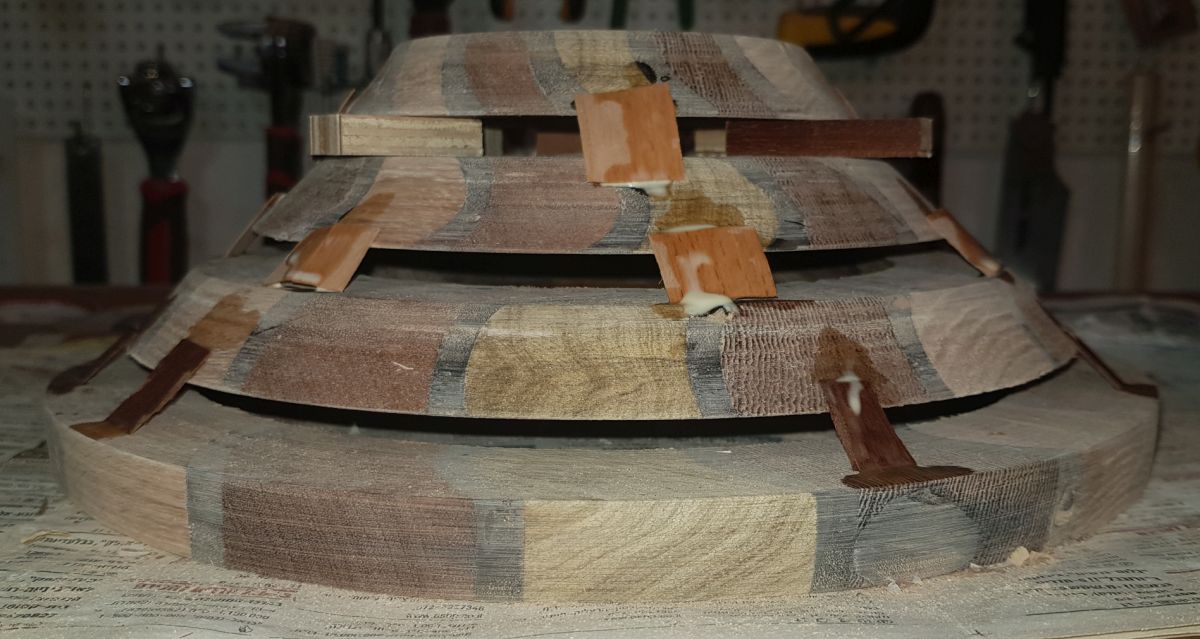
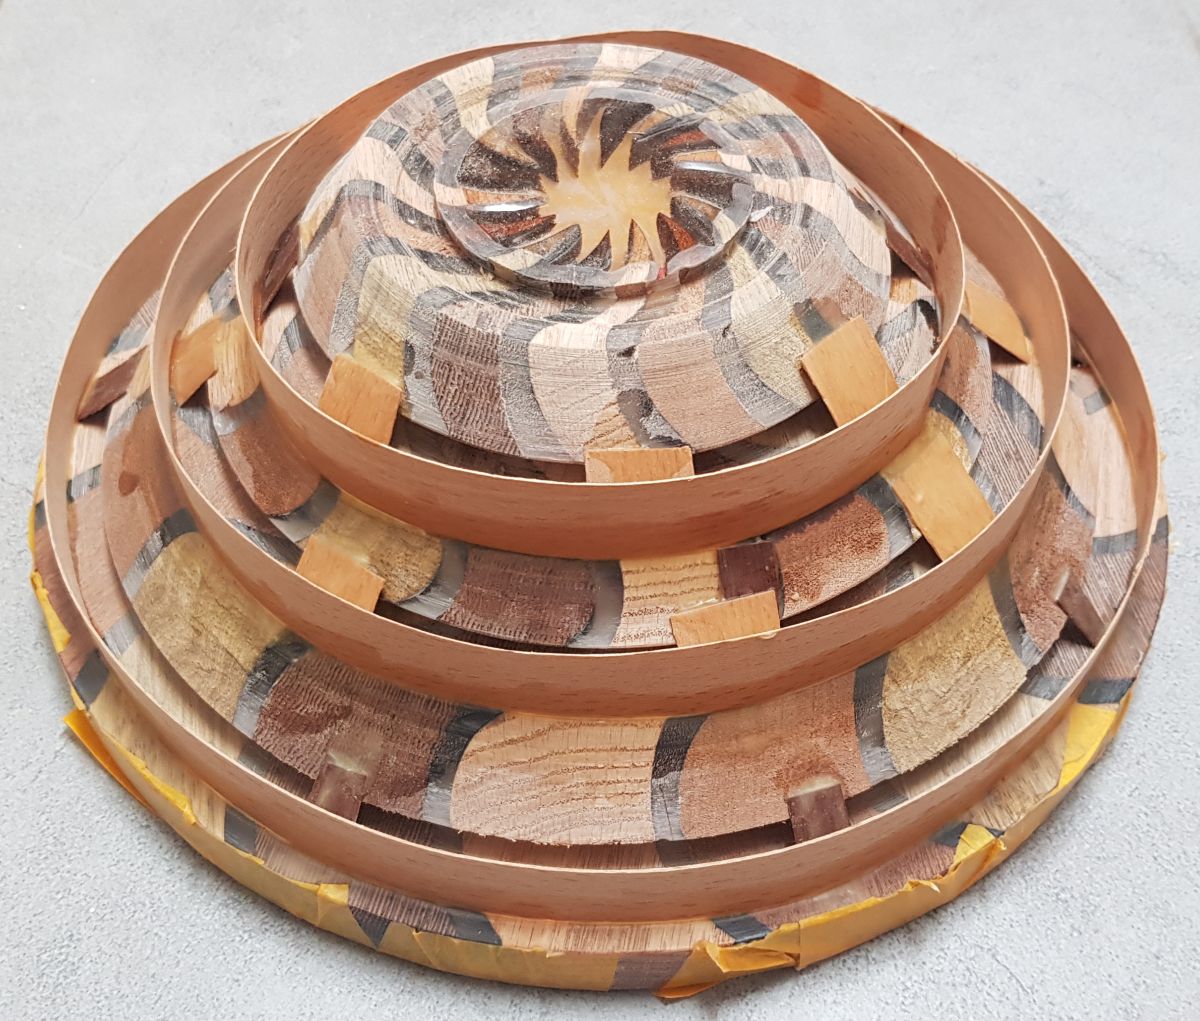
 This vessel was made from ~25mm boards of Oak, Mahogany,
Walnut, and Zebrano. The individual wiggly pieces were cut
using CNC (top left). They were not glued directly but with
~6mm spacings for the epoxy (top right). After this first
stage epoxy, the single disk was sliced diagonally into
several rings to form four layers (middle left), and sealed
again (middle right) for a second stage of epoxy. The original
idea for the CNC wiggly pieces came from ThePapa1947. Thank you!
This vessel was made from ~25mm boards of Oak, Mahogany,
Walnut, and Zebrano. The individual wiggly pieces were cut
using CNC (top left). They were not glued directly but with
~6mm spacings for the epoxy (top right). After this first
stage epoxy, the single disk was sliced diagonally into
several rings to form four layers (middle left), and sealed
again (middle right) for a second stage of epoxy. The original
idea for the CNC wiggly pieces came from ThePapa1947. Thank you!

 Another variant of this vessel, this one with a cover.
The making of the vessel itself is pretty much the same as above...
Another variant of this vessel, this one with a cover.
The making of the vessel itself is pretty much the same as above...
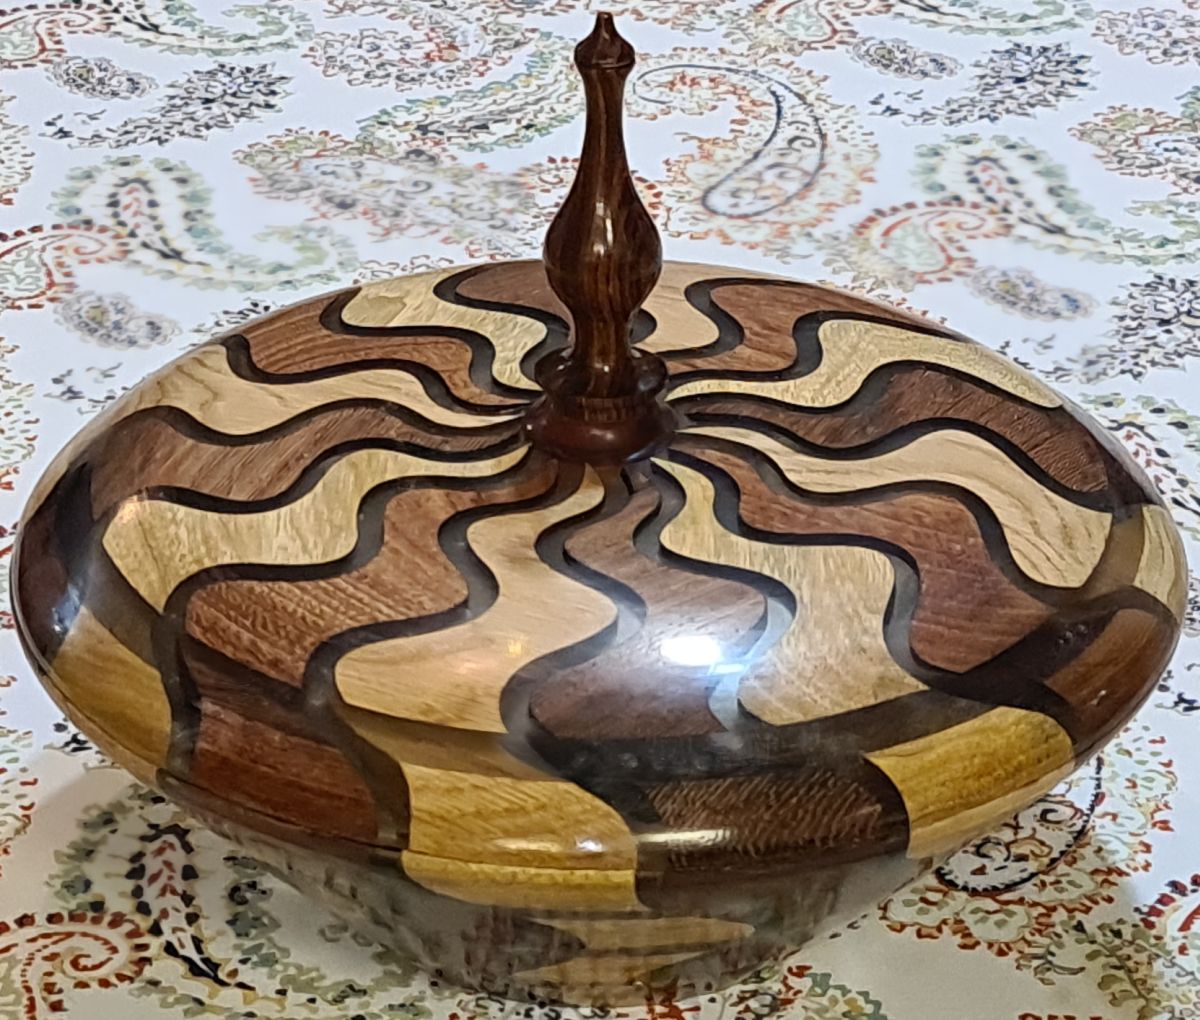
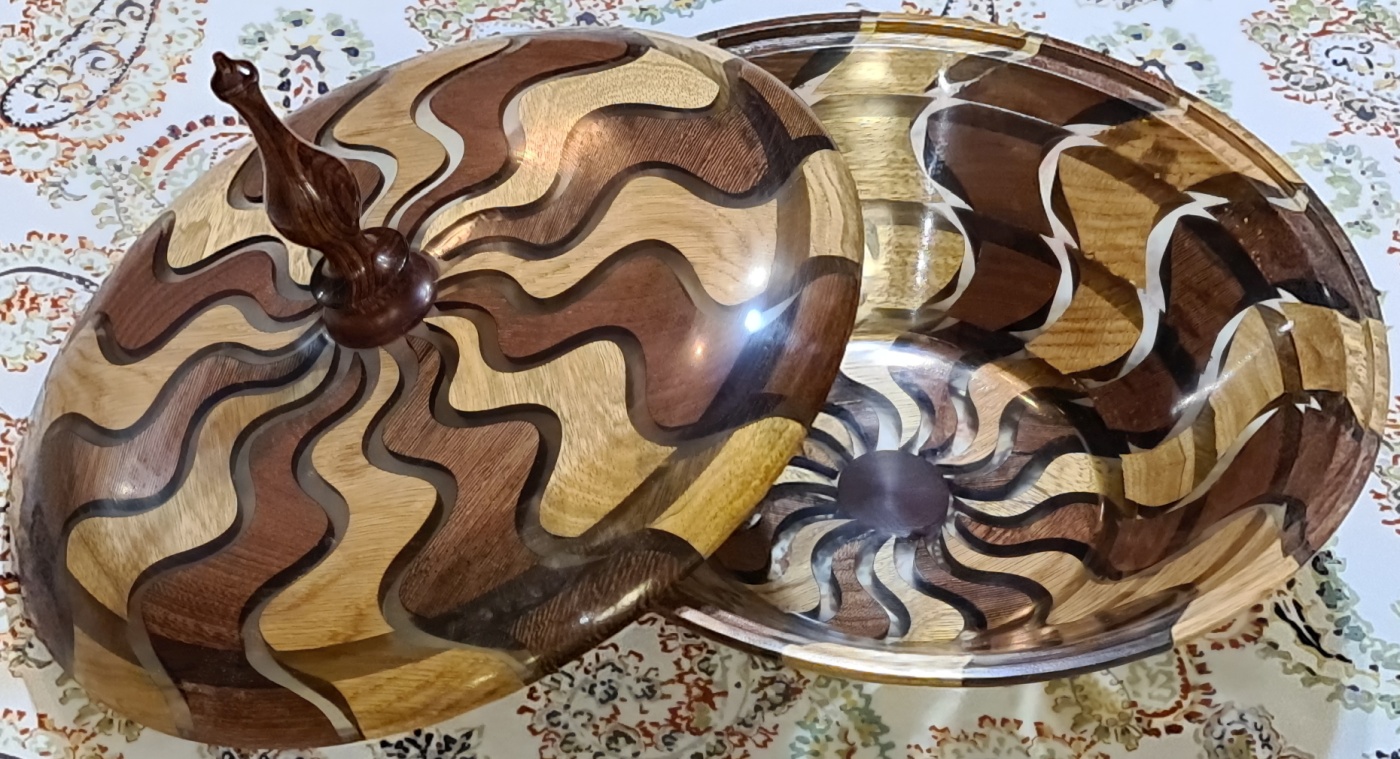 ... Yet, and while the vessel itself was made out of four
rings, the cover was made from two rings only (see above),
being much flatter. The final result is shown on the left.
... Yet, and while the vessel itself was made out of four
rings, the cover was made from two rings only (see above),
being much flatter. The final result is shown on the left.
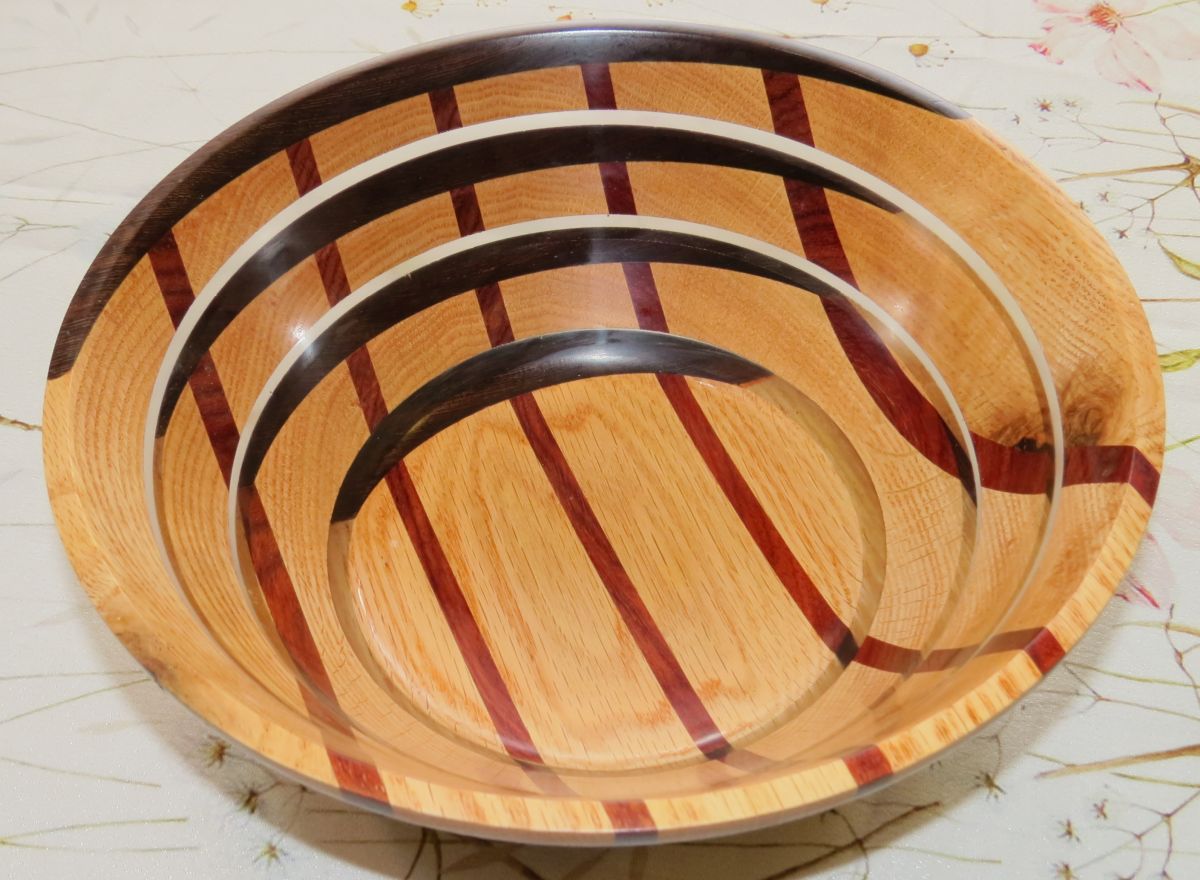
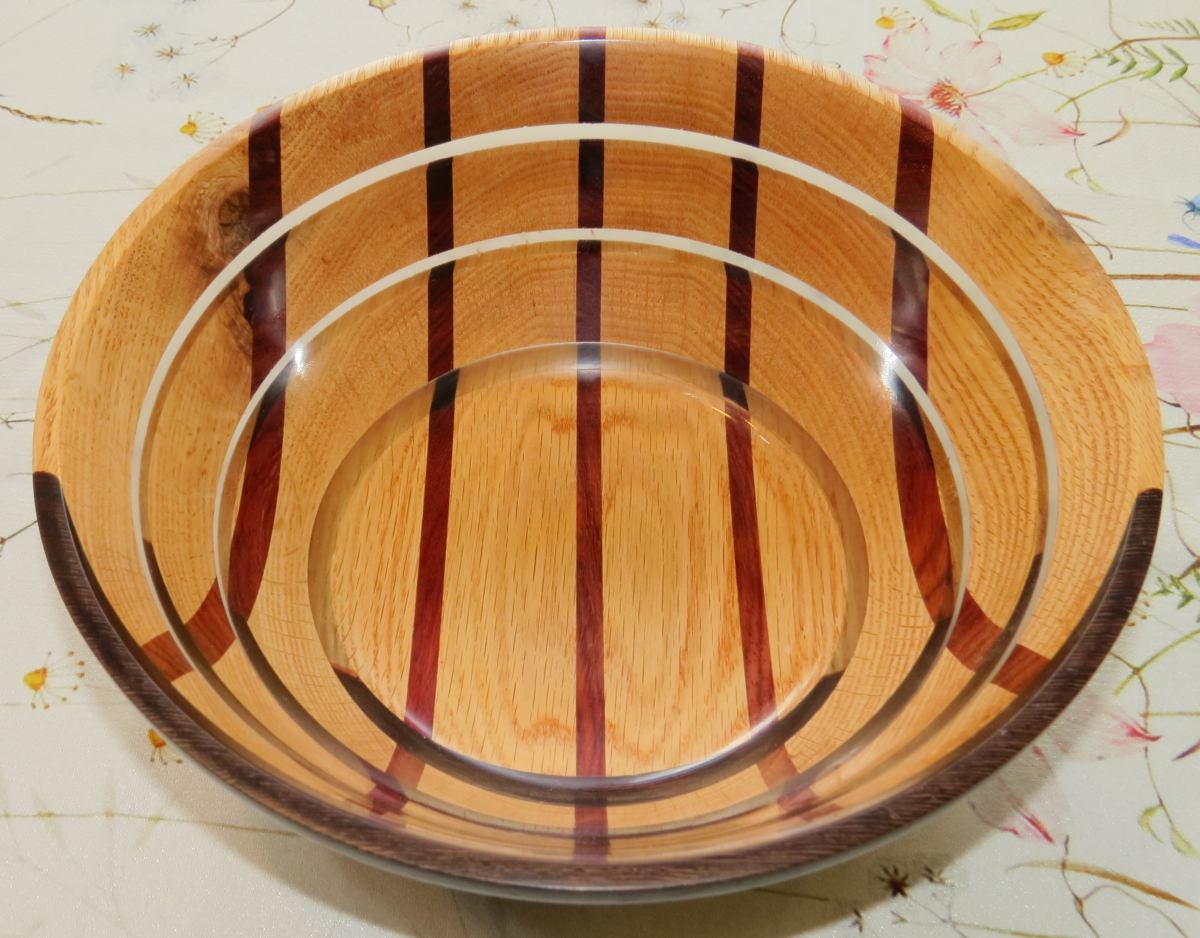
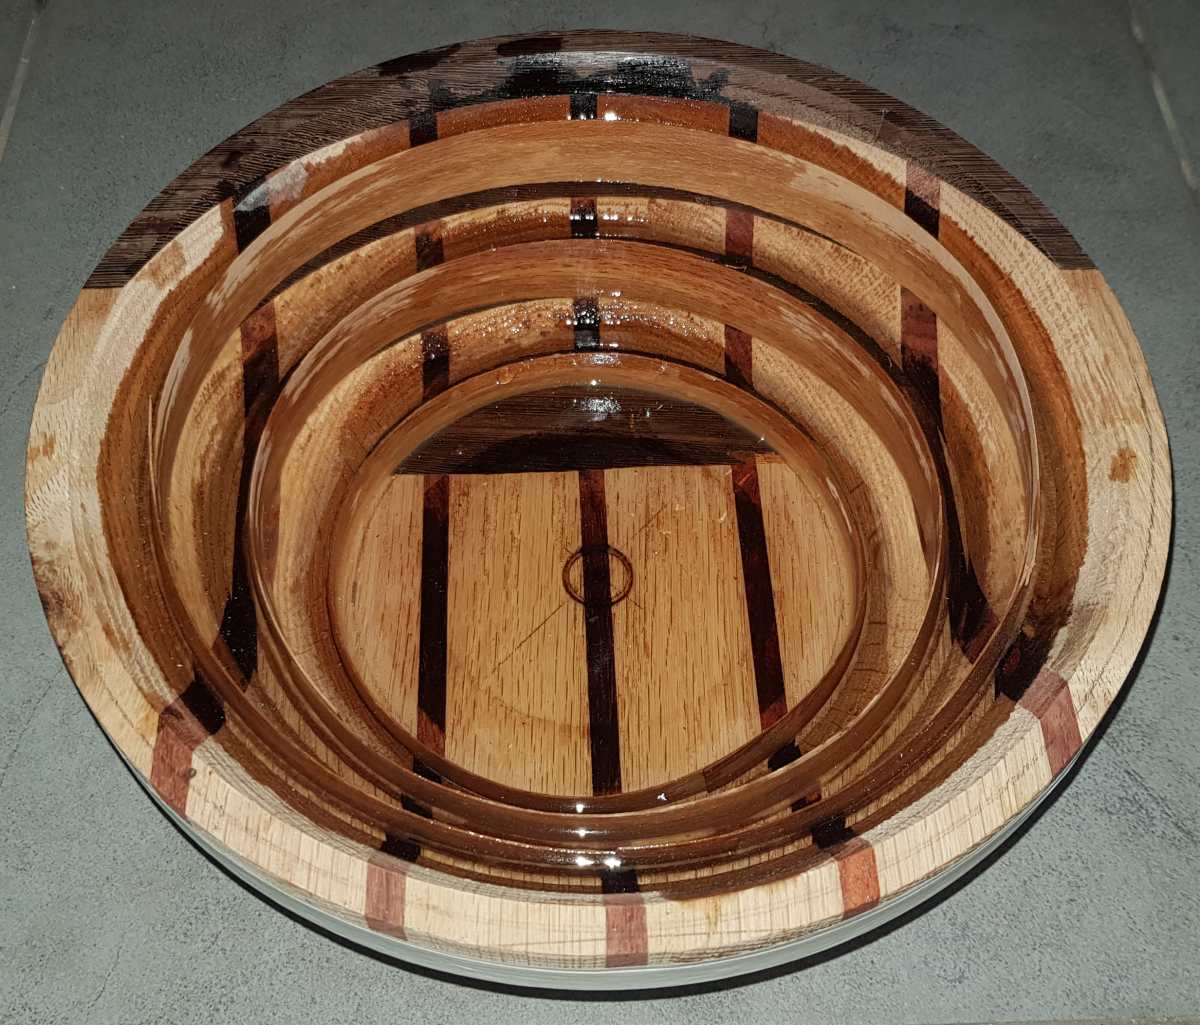
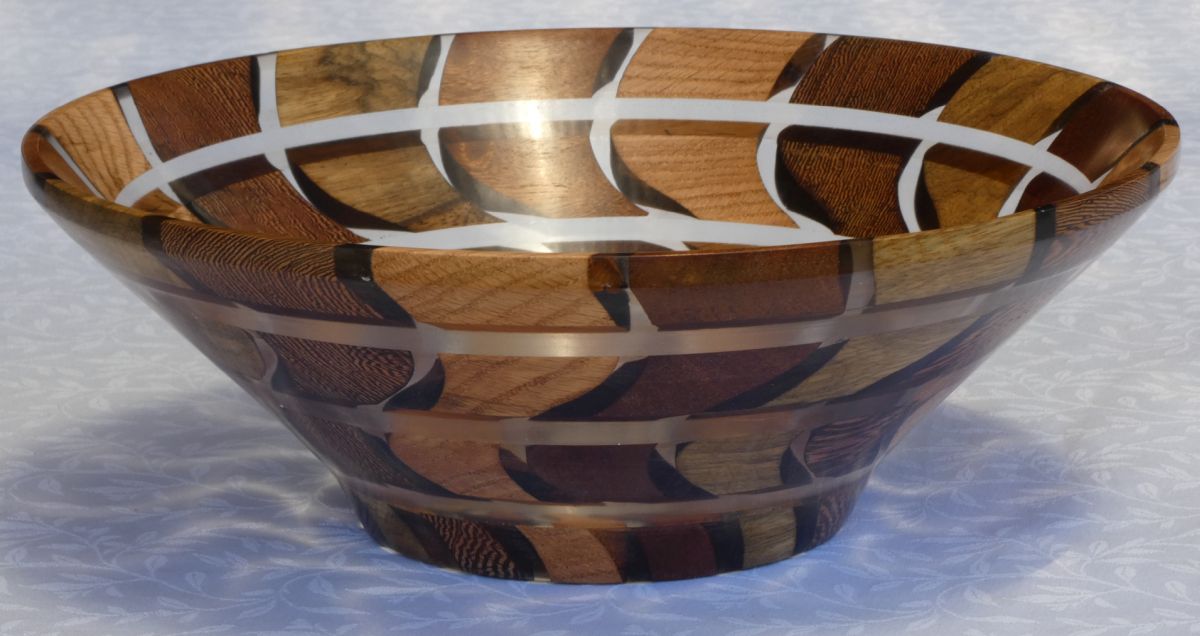
This vessel was made from a board of Oak with stripes of
Mahogany. The dark crescent wood is Zebrano. This basic
approach, of making a bowl from a single board, is nicely
presented by
Edward Robinson and here is an adaptation to "floating
rings", with translucent epoxy in between. The image on the
right portrays how the epoxy was sealed in the different
levels - using thin veneer walls...
Epoxy Vessels II
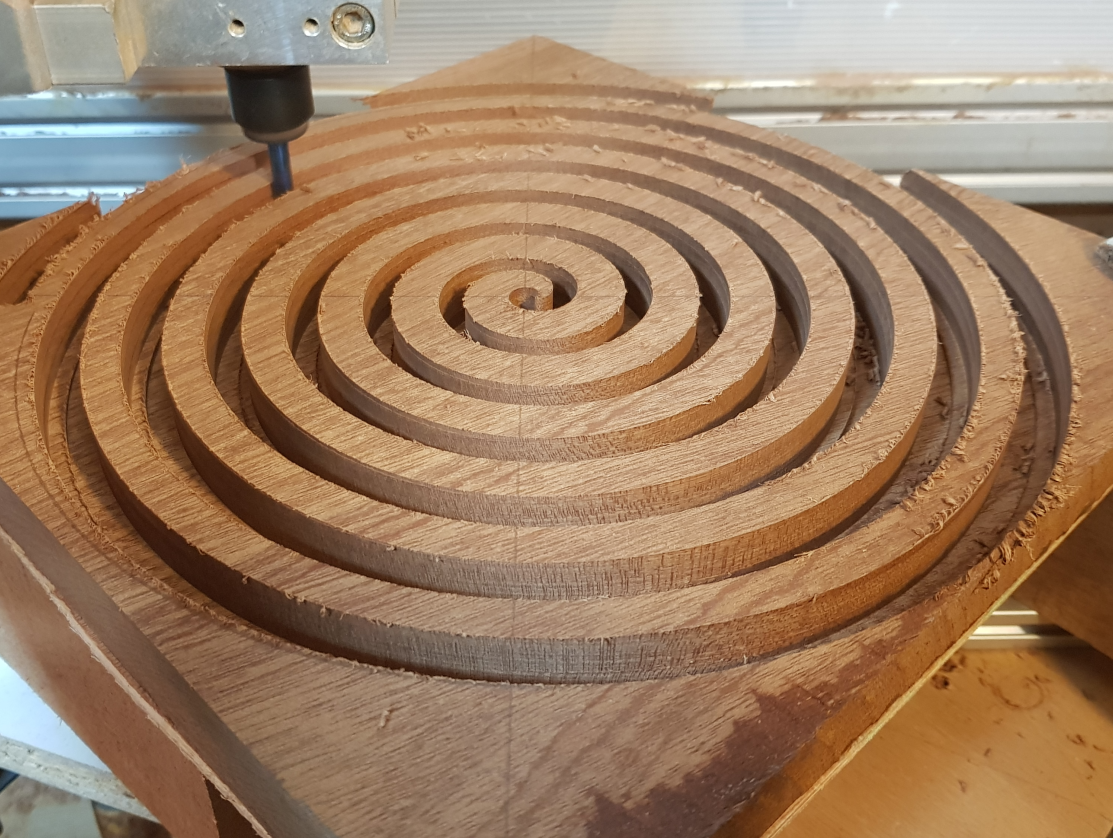
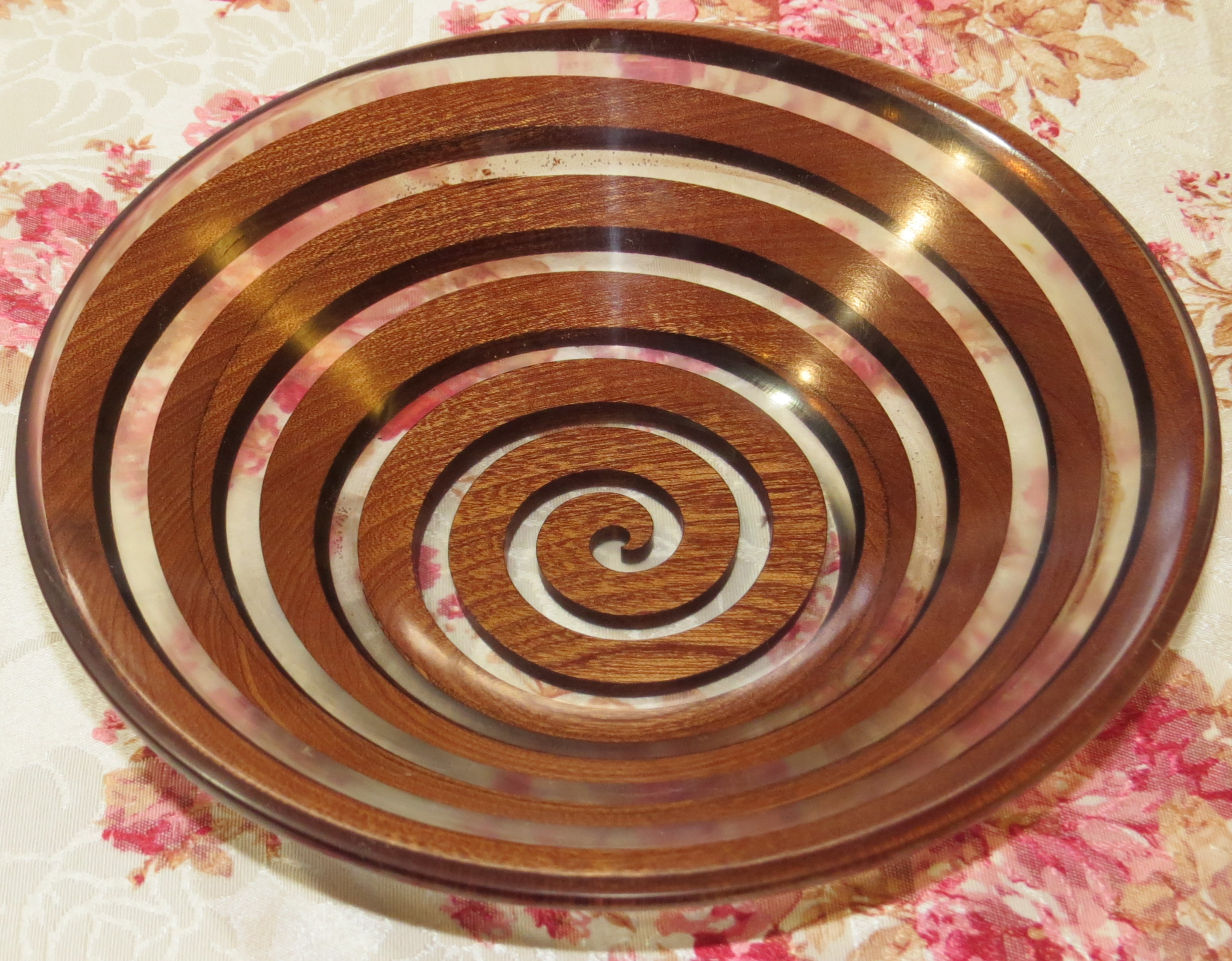
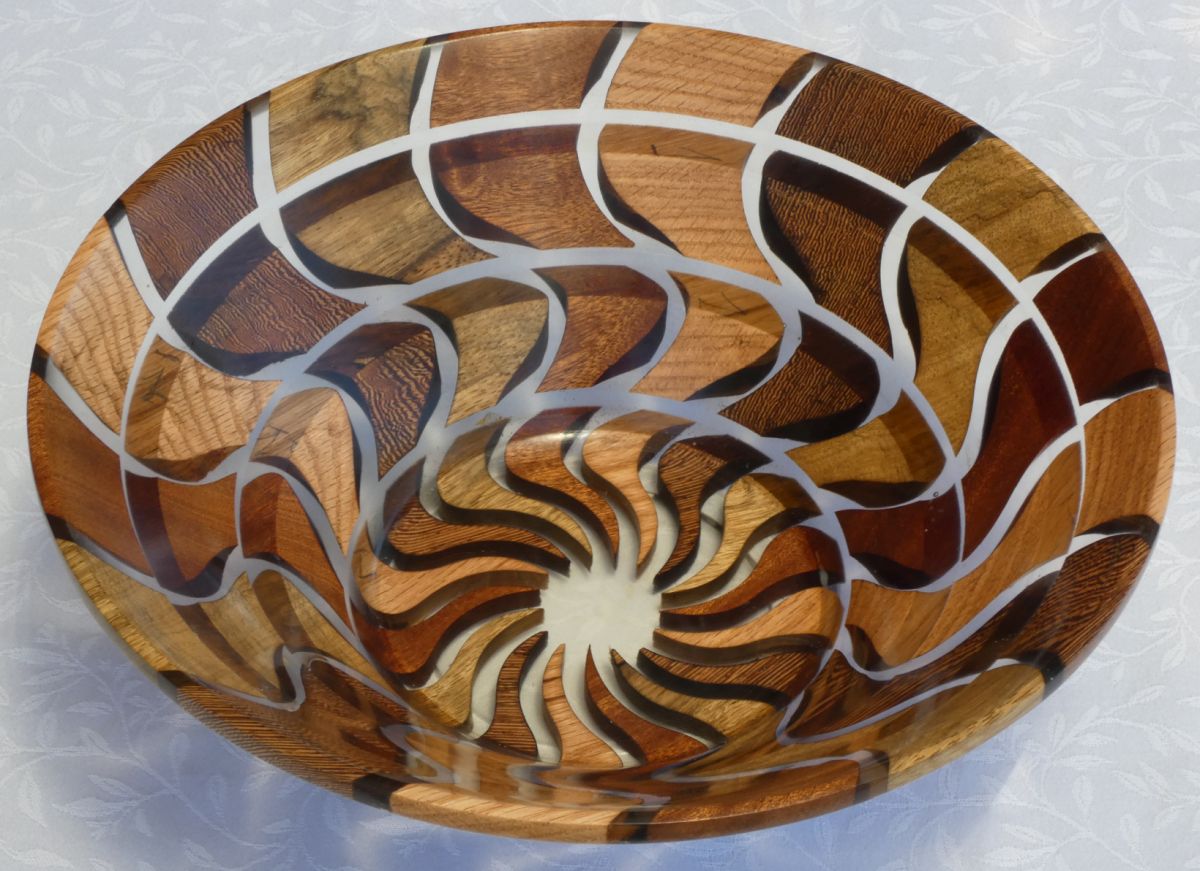
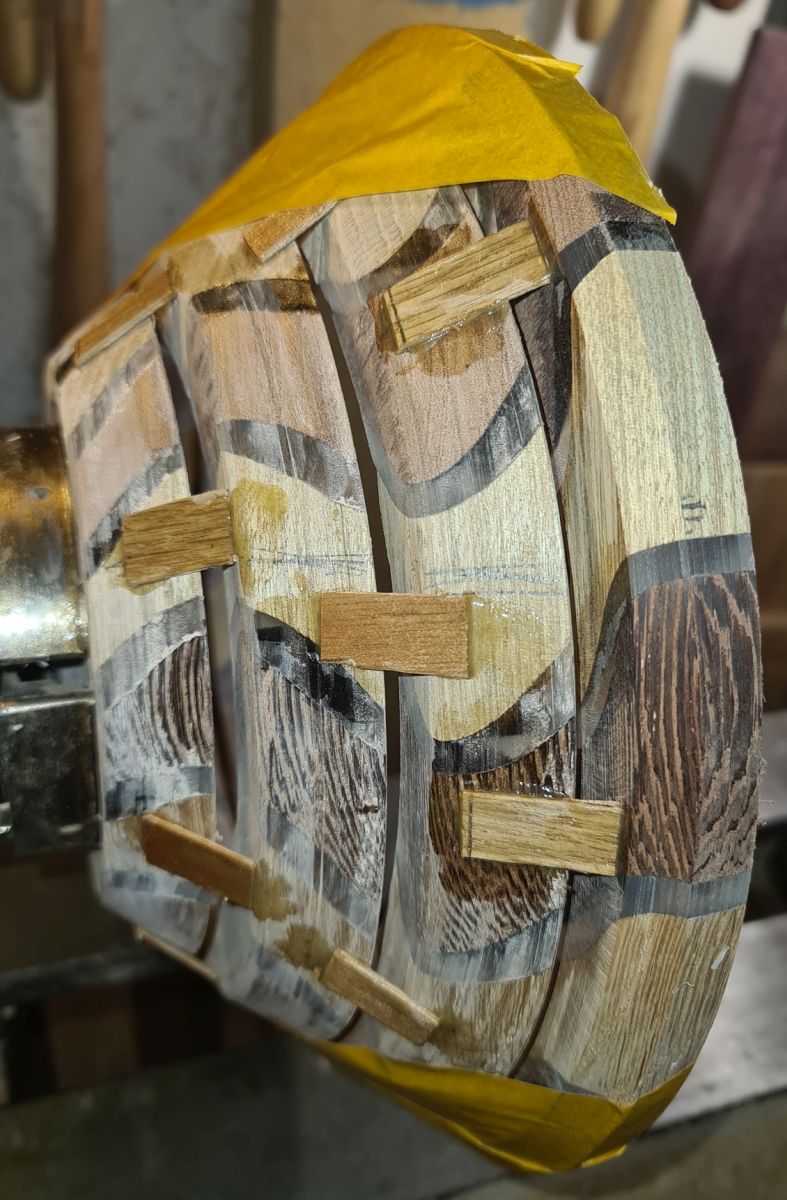
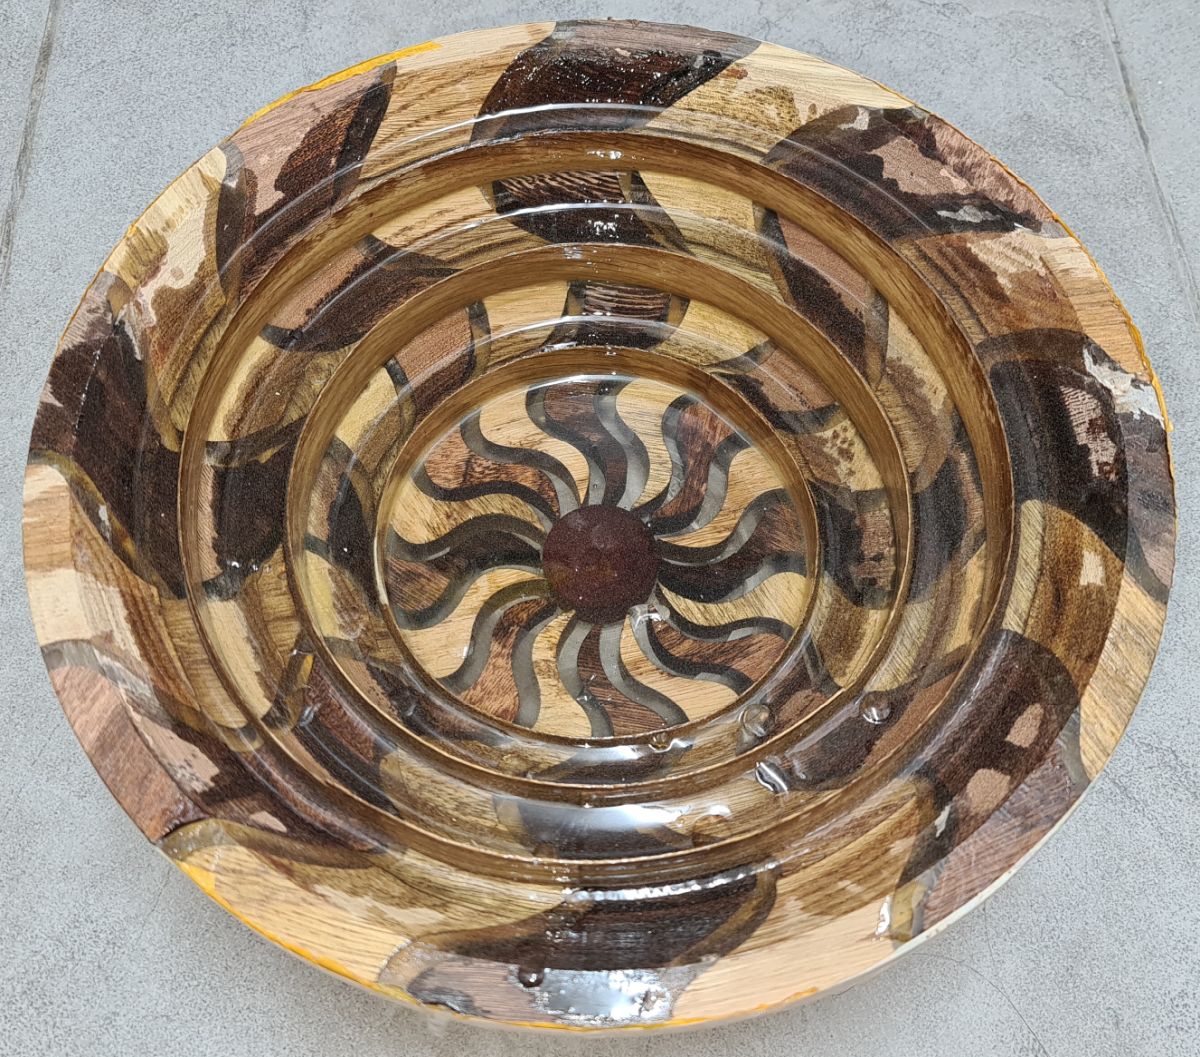
 A spiral pattern was carved, using CNC, ~25 mm deep, as can be seen
in the left image. Then, the scheme to make a vase out of a
flat board, as in previous wood-piece (See also
Edward Robinson) was employed, carefully aligning the
spirals.
A spiral pattern was carved, using CNC, ~25 mm deep, as can be seen
in the left image. Then, the scheme to make a vase out of a
flat board, as in previous wood-piece (See also
Edward Robinson) was employed, carefully aligning the
spirals.
 A variation on the spiral, using CNC, again ~25 mm deep, as
can be seen in the left image, also with some interruptions
across. Then, the scheme to make a vase out of a flat board,
as in previous wood-piece was employed, carefully aligning the
(interrupted) spirals.
A variation on the spiral, using CNC, again ~25 mm deep, as
can be seen in the left image, also with some interruptions
across. Then, the scheme to make a vase out of a flat board,
as in previous wood-piece was employed, carefully aligning the
(interrupted) spirals.
Epoxy Vessels III

 A checkerboard patterns ~20 mm deep (or more) was made using
the lathe (the round latitude rings - see top left image) and
on a table saw (the longitude lines along the vessel). Then,
the vessel was sealed and filled with Epoxy (top middle and
right images), only to turn it to the final results on the
left. Chinaberry (Melia azedarach) wood. Clearly not bubbles
free... See also Epoxy Glasses .
A checkerboard patterns ~20 mm deep (or more) was made using
the lathe (the round latitude rings - see top left image) and
on a table saw (the longitude lines along the vessel). Then,
the vessel was sealed and filled with Epoxy (top middle and
right images), only to turn it to the final results on the
left. Chinaberry (Melia azedarach) wood. Clearly not bubbles
free... See also Epoxy Glasses .


 Two more variances of the checkerboard pattern. Here again
the latitude rings were made on the lathe but the longitude
lines were carved using the presented router on a flat bed,
using a 6mm cutter. This epoxy example was employing a
pressure chamber while the epoxy is cured and lo and behold,
almost bubbles free.
Two more variances of the checkerboard pattern. Here again
the latitude rings were made on the lathe but the longitude
lines were carved using the presented router on a flat bed,
using a 6mm cutter. This epoxy example was employing a
pressure chamber while the epoxy is cured and lo and behold,
almost bubbles free.
 Cypress wood.
Epoxy Vessels IV
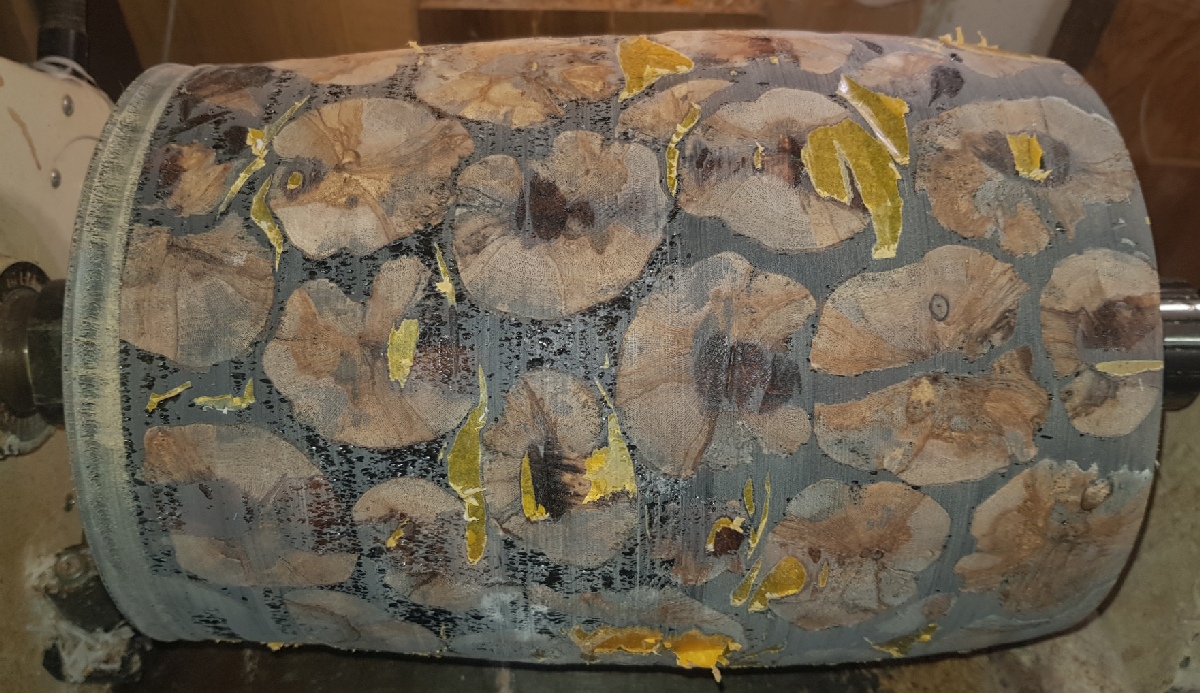
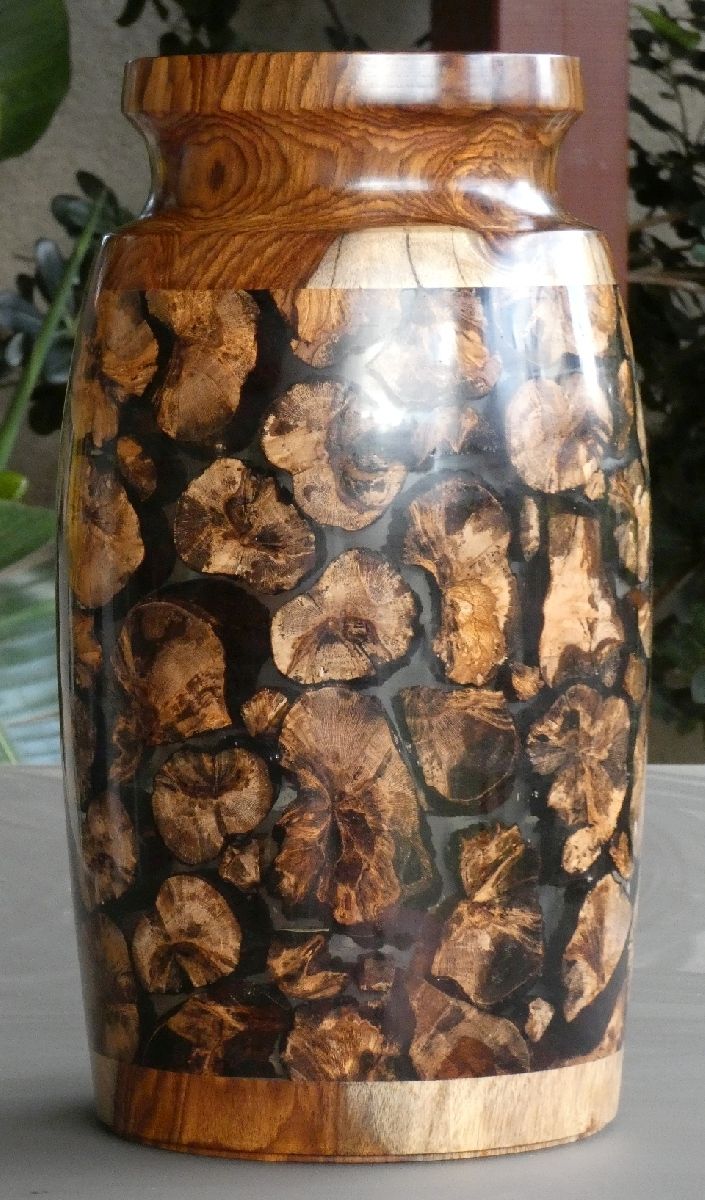
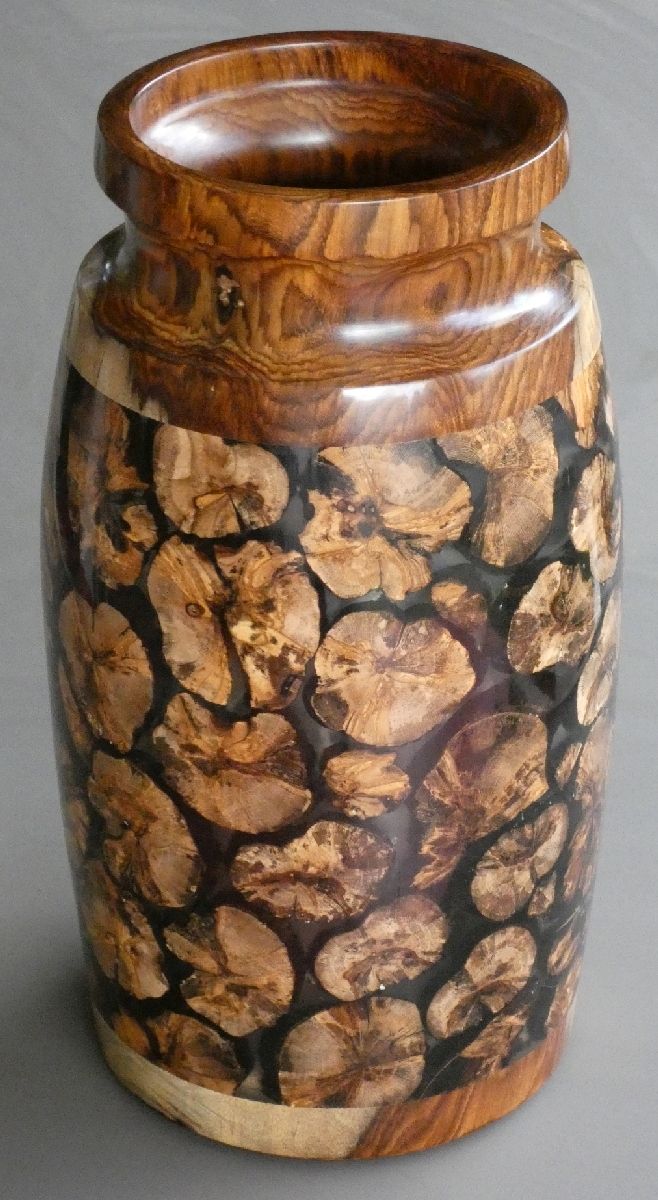
 An attempt to use epoxy in vessels. Wood pieces are Olive tree.
 Another example of using epoxy in vessels. Vertical random
cuts are prepared Using a router (see left image) and then
'randomized' using a Foredom carver (middle). Indian Rosewood
tree.
Another example of using epoxy in vessels. Vertical random
cuts are prepared Using a router (see left image) and then
'randomized' using a Foredom carver (middle). Indian Rosewood
tree.
 Yet another attempt to use epoxy in vessels. Top and bottom
are made of Indian Rosewood tree. The rounded rings in the
middle are mode of unknown wood. Left shows the gluing stage of
the rings over a scrap wood mold, and after the pouring the
epoxy and rough cleaning in the middle. That piece was then
turned, and the scrap wood completely removed from the inside.
Yet another attempt to use epoxy in vessels. Top and bottom
are made of Indian Rosewood tree. The rounded rings in the
middle are mode of unknown wood. Left shows the gluing stage of
the rings over a scrap wood mold, and after the pouring the
epoxy and rough cleaning in the middle. That piece was then
turned, and the scrap wood completely removed from the inside.
Epoxy Vessels V
 Another version of a vessel from a plate. The left shows the
original stock, made from wedges of alternating wood types (Indian
rose wood and Enigma),
with the first stage of the vertical (cured) epoxy spacers.
In fact, this stock generates three vessels, out of which one
is shown in the image on the right, ready for the second stage
epoxy. Below are images of the final results.
Another version of a vessel from a plate. The left shows the
original stock, made from wedges of alternating wood types (Indian
rose wood and Enigma),
with the first stage of the vertical (cured) epoxy spacers.
In fact, this stock generates three vessels, out of which one
is shown in the image on the right, ready for the second stage
epoxy. Below are images of the final results.


Epoxy Vessels VI
 On October 7th, 2023, the hearts of millions of Israelis
shattered. Yet, despite of these horrifying events, near
Gaza strip, we will prevail!
On October 7th, 2023, the hearts of millions of Israelis
shattered. Yet, despite of these horrifying events, near
Gaza strip, we will prevail!


 The steps in making this wine glass version are shown on the
left, before and after the epoxy pouring, with the final result
on the right two images.
The steps in making this wine glass version are shown on the
left, before and after the epoxy pouring, with the final result
on the right two images.
Epoxy Plates I
 Thin slots in the shape of David star were made, almost
through the depth of the stock (to ensure constant width),
only to fill the slots with transparent epoxy. The slots were
made using CNC on the left image and final result in the
middle. In the right plate, the slots were made on a table
saw.
Thin slots in the shape of David star were made, almost
through the depth of the stock (to ensure constant width),
only to fill the slots with transparent epoxy. The slots were
made using CNC on the left image and final result in the
middle. In the right plate, the slots were made on a table
saw.

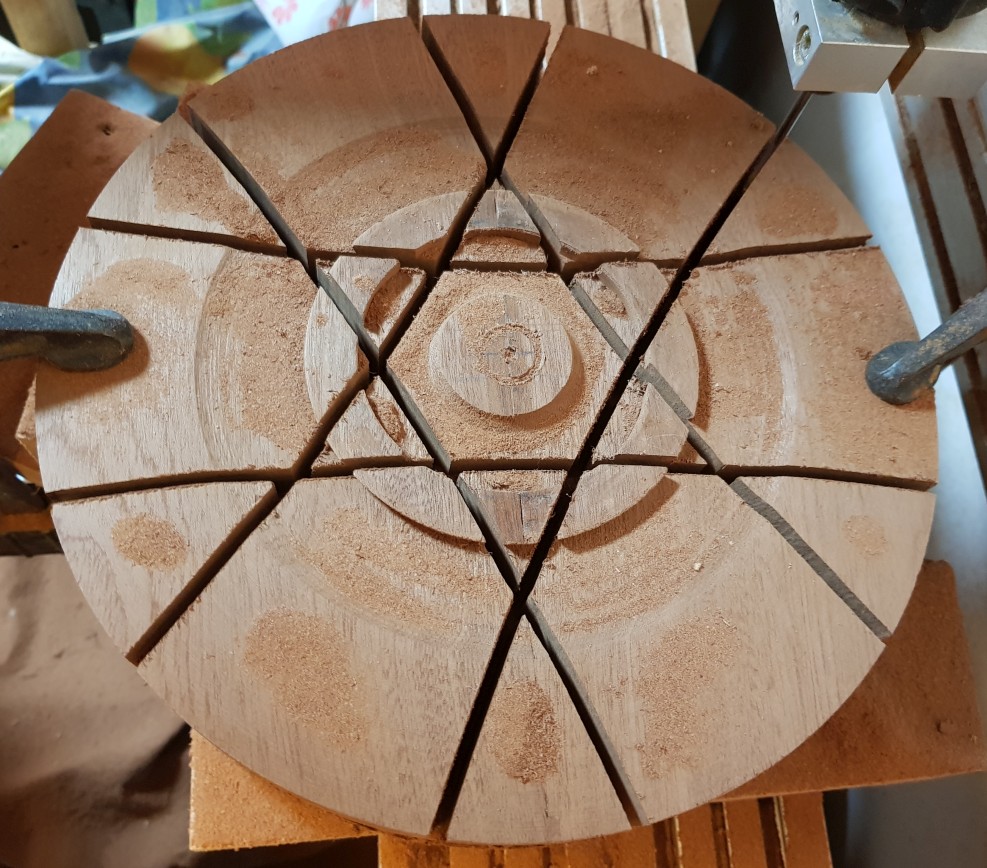
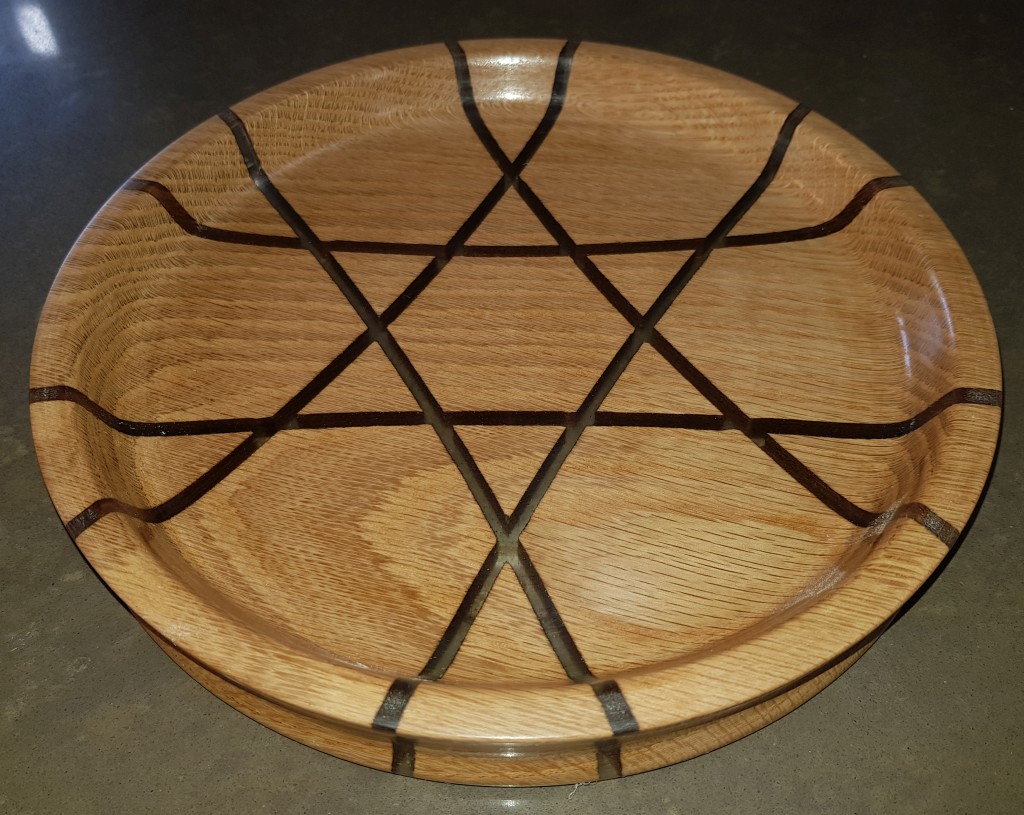
 Another David star shape but with diagonal cuts (see article by
Alan Finn, AAW April 2026), almost
through the depth of the stock (to ensure constant width),
only to fill the slots with translucent bluish epoxy. The diagonal
slots were made using a table saw. Mahogany.
Another David star shape but with diagonal cuts (see article by
Alan Finn, AAW April 2026), almost
through the depth of the stock (to ensure constant width),
only to fill the slots with translucent bluish epoxy. The diagonal
slots were made using a table saw. Mahogany.


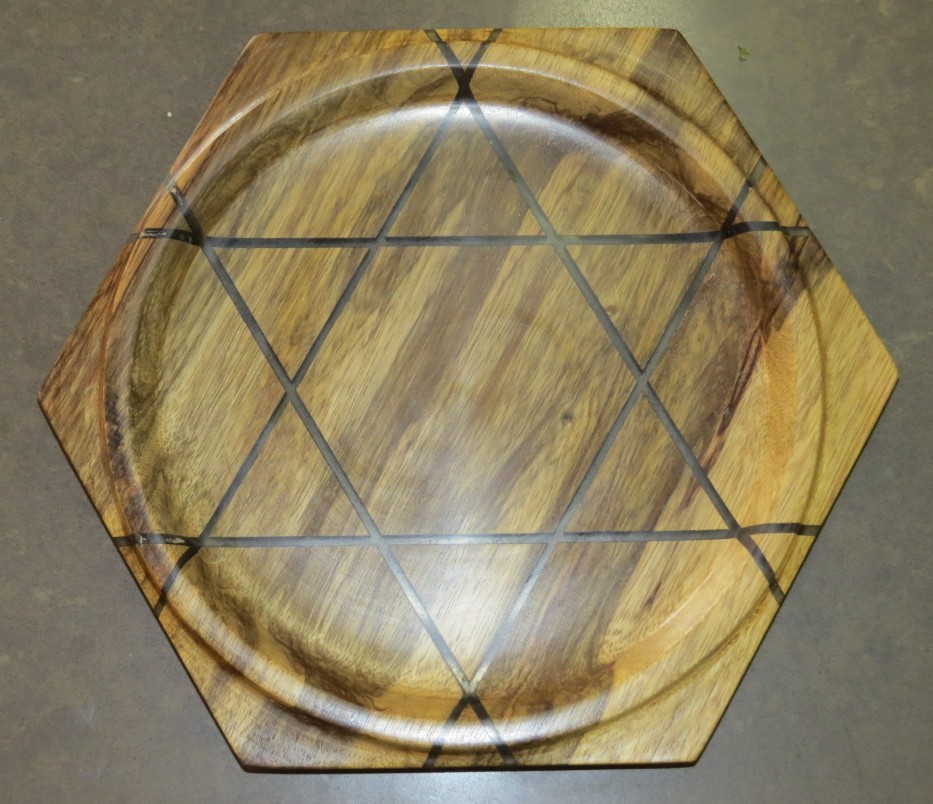
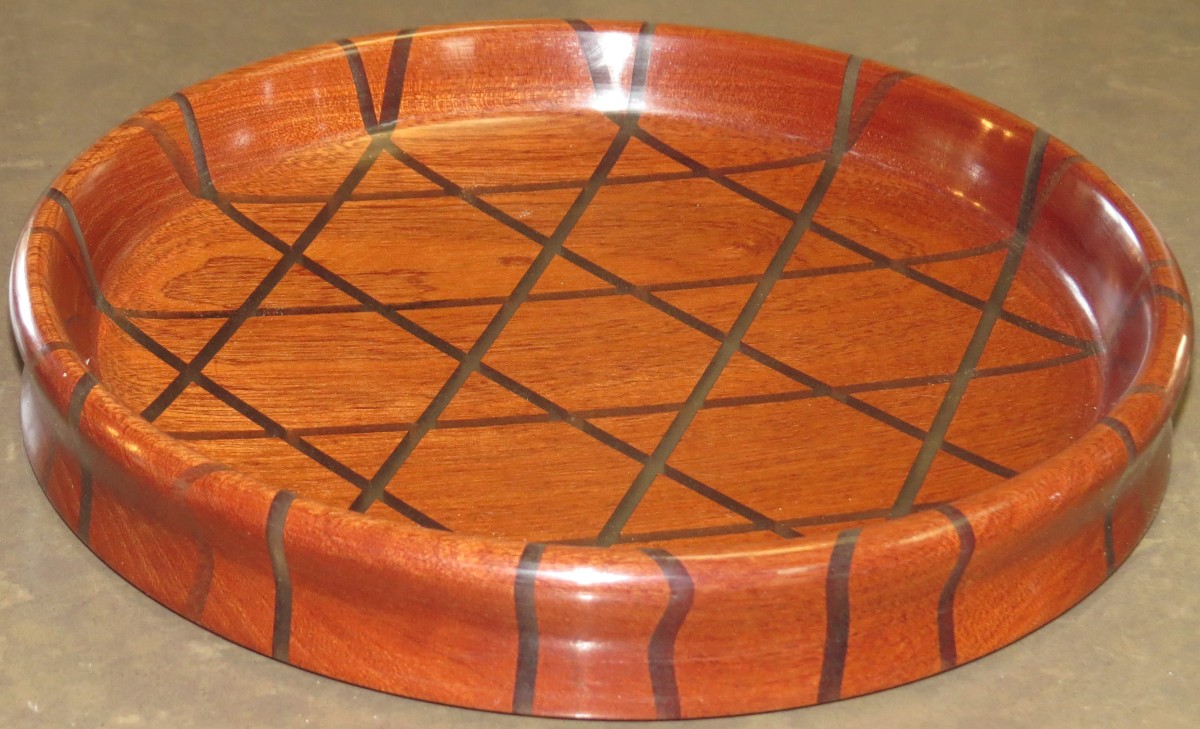 A few more examples of David star semi-regular (mixed triangles
and hexagons) pattern. Left shows the part tight and ready for the
epoxy. Slots were made on a table saw.
A few more examples of David star semi-regular (mixed triangles
and hexagons) pattern. Left shows the part tight and ready for the
epoxy. Slots were made on a table saw.
 A two stages' epoxy deposition (from below and from the
above). The left image shows the result after casting the
epoxy from below.
A two stages' epoxy deposition (from below and from the
above). The left image shows the result after casting the
epoxy from below.
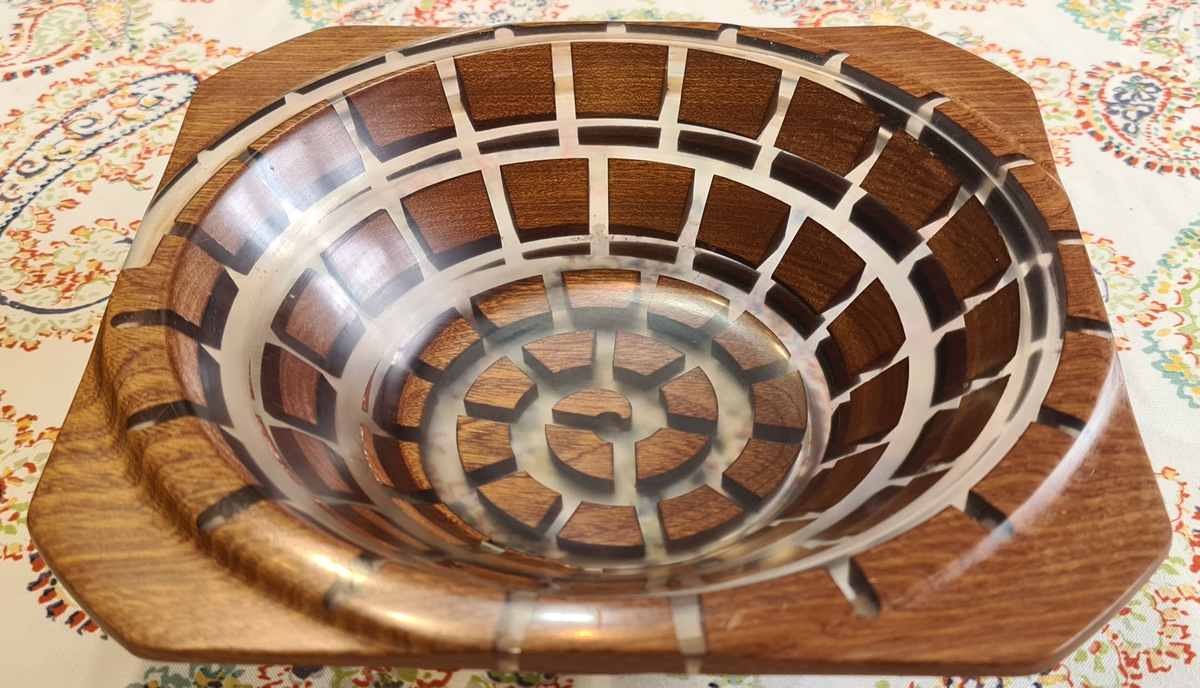
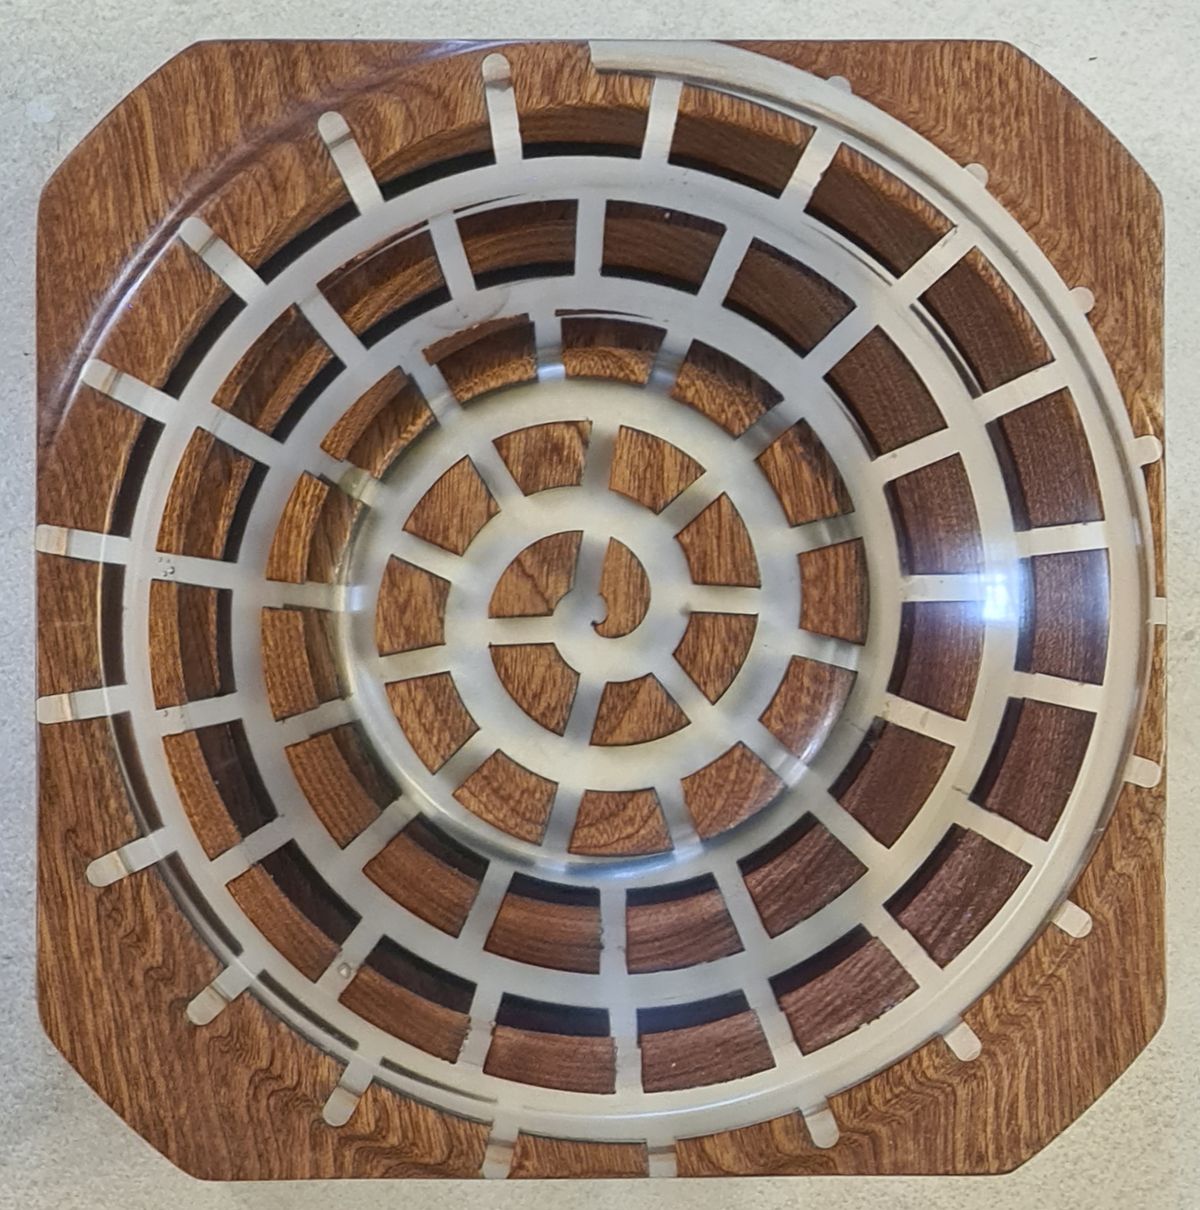
Epoxy Plates II
 Another two stages' epoxy deposition (from below and from the
above). The left two images show the result after the CNC and
after casting the epoxy from above. The right image shows the
result after the CNC from below. The CNC cuts were made to
half the thickness of the plate.
Another two stages' epoxy deposition (from below and from the
above). The left two images show the result after the CNC and
after casting the epoxy from above. The right image shows the
result after the CNC from below. The CNC cuts were made to
half the thickness of the plate.
 The final plate. Teak wood.

 Another similar example. Walnut.
 And yet another. Mahogany. The left image shows the final stage of
finishing the center.
And yet another. Mahogany. The left image shows the final stage of
finishing the center.

 And yet another plate with a zig-zag pattern.


 A color version. Ash wood. Eight carvings using CNC (four on
top and four from the bottom) and eight colored epoxy
pouring...
A color version. Ash wood. Eight carvings using CNC (four on
top and four from the bottom) and eight colored epoxy
pouring...
Epoxy Plates III
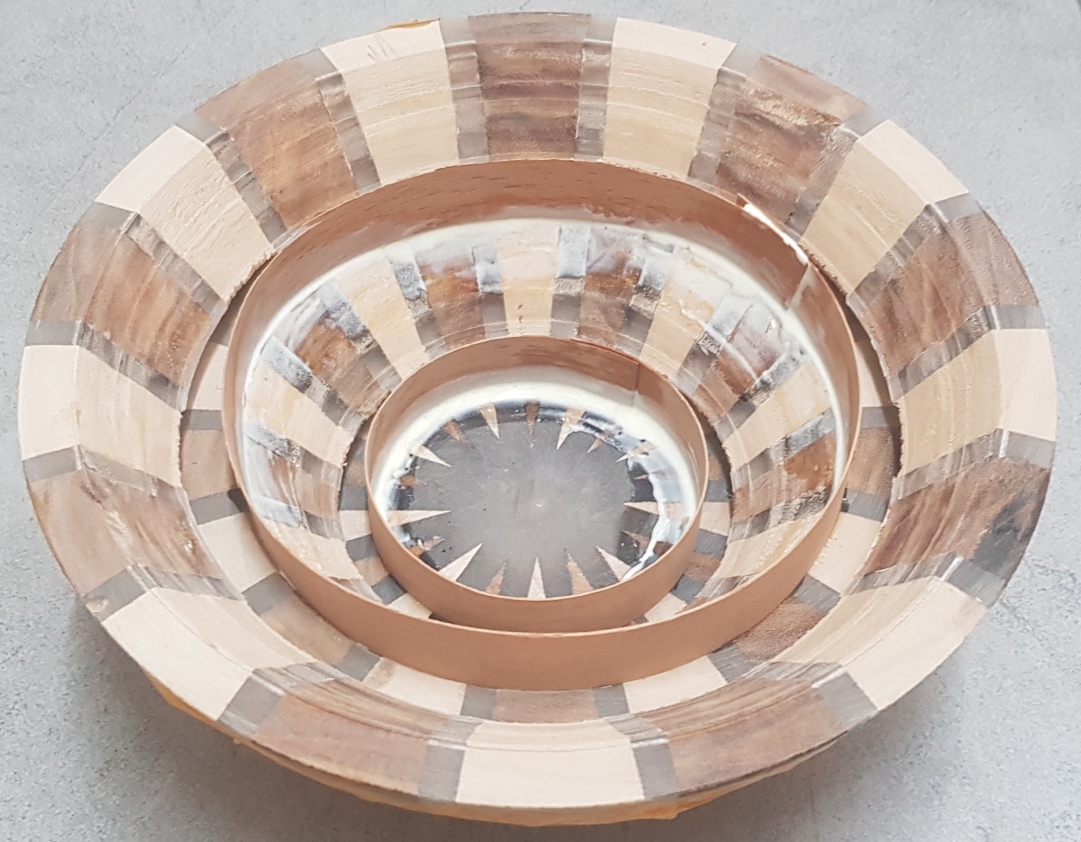
 A translucent epoxy double spiral deep vessel from four layers
using the idea of vessel from plate (See also here).
Walnut.
A translucent epoxy double spiral deep vessel from four layers
using the idea of vessel from plate (See also here).
Walnut.
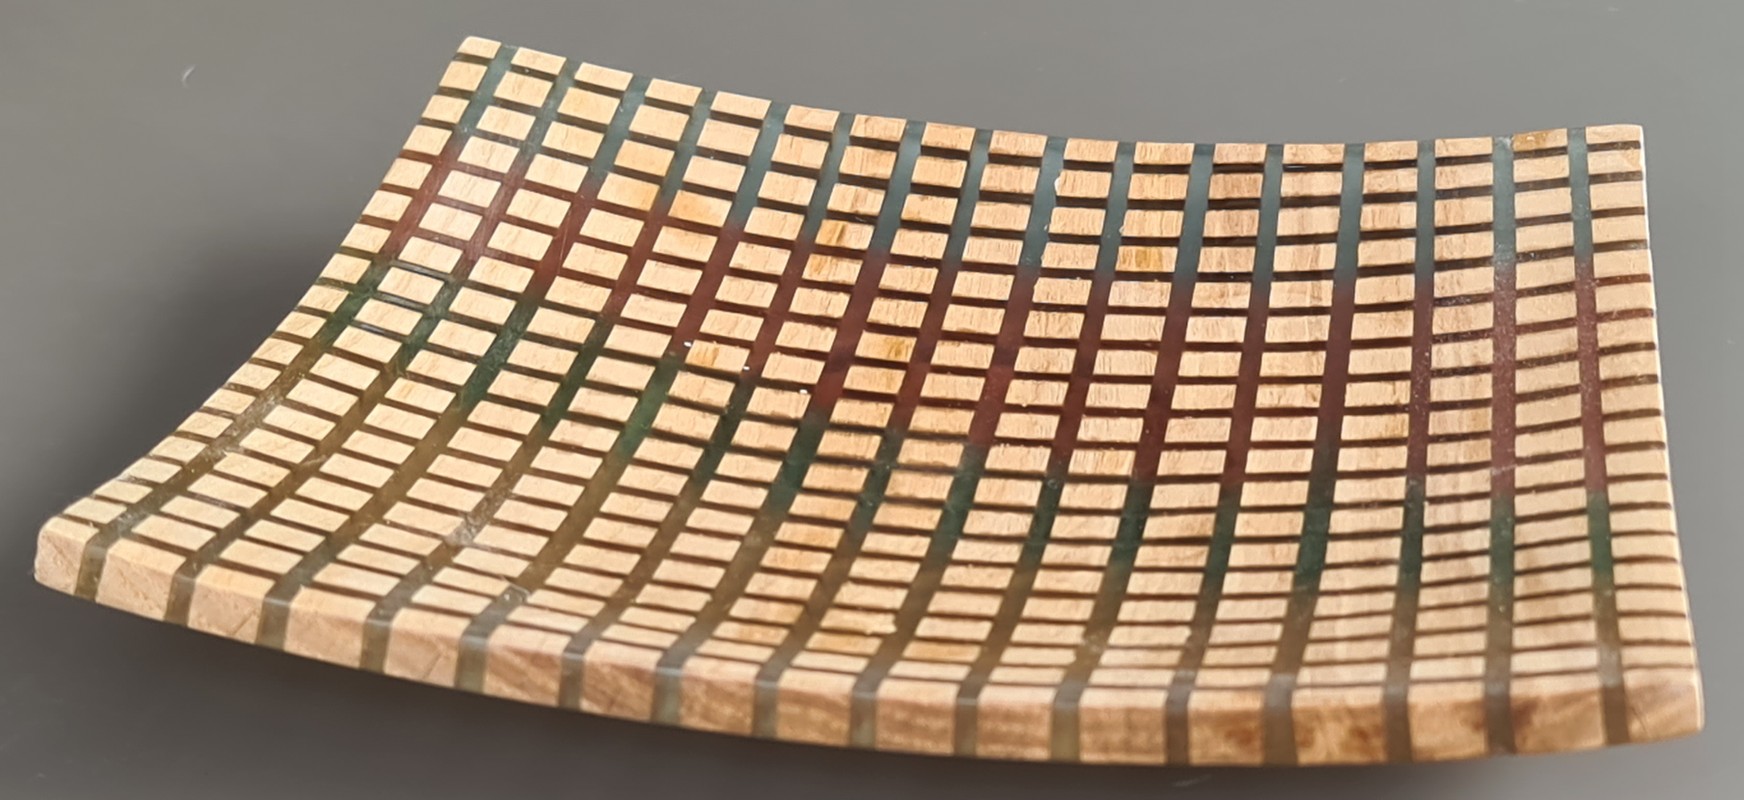

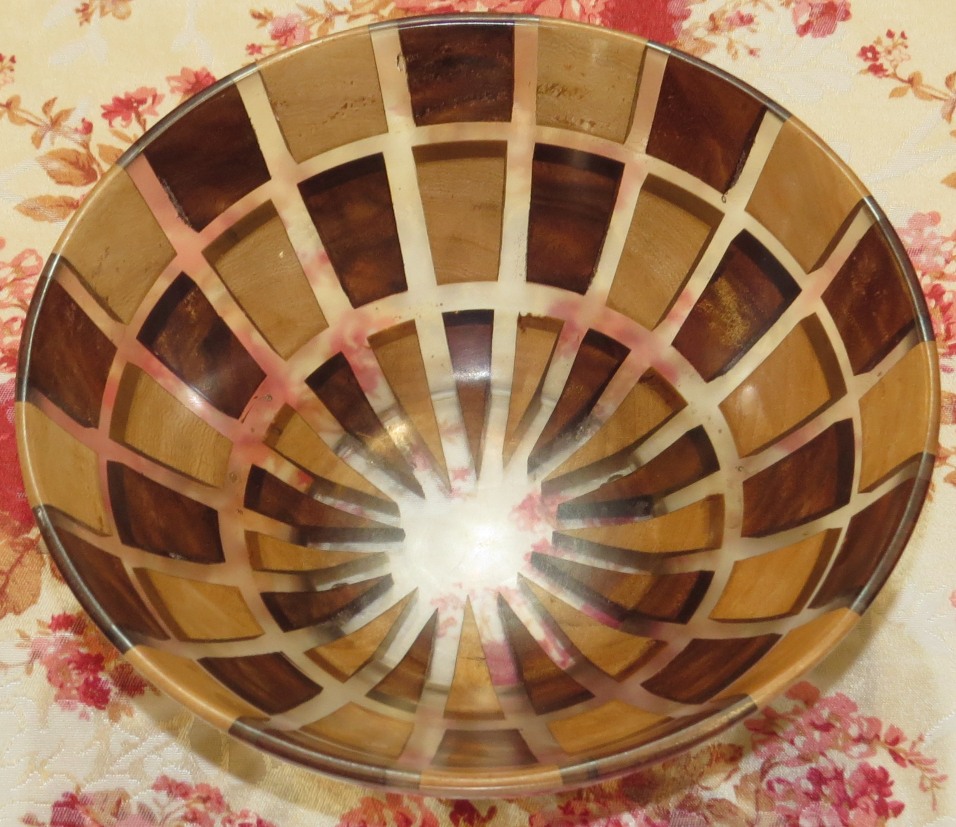
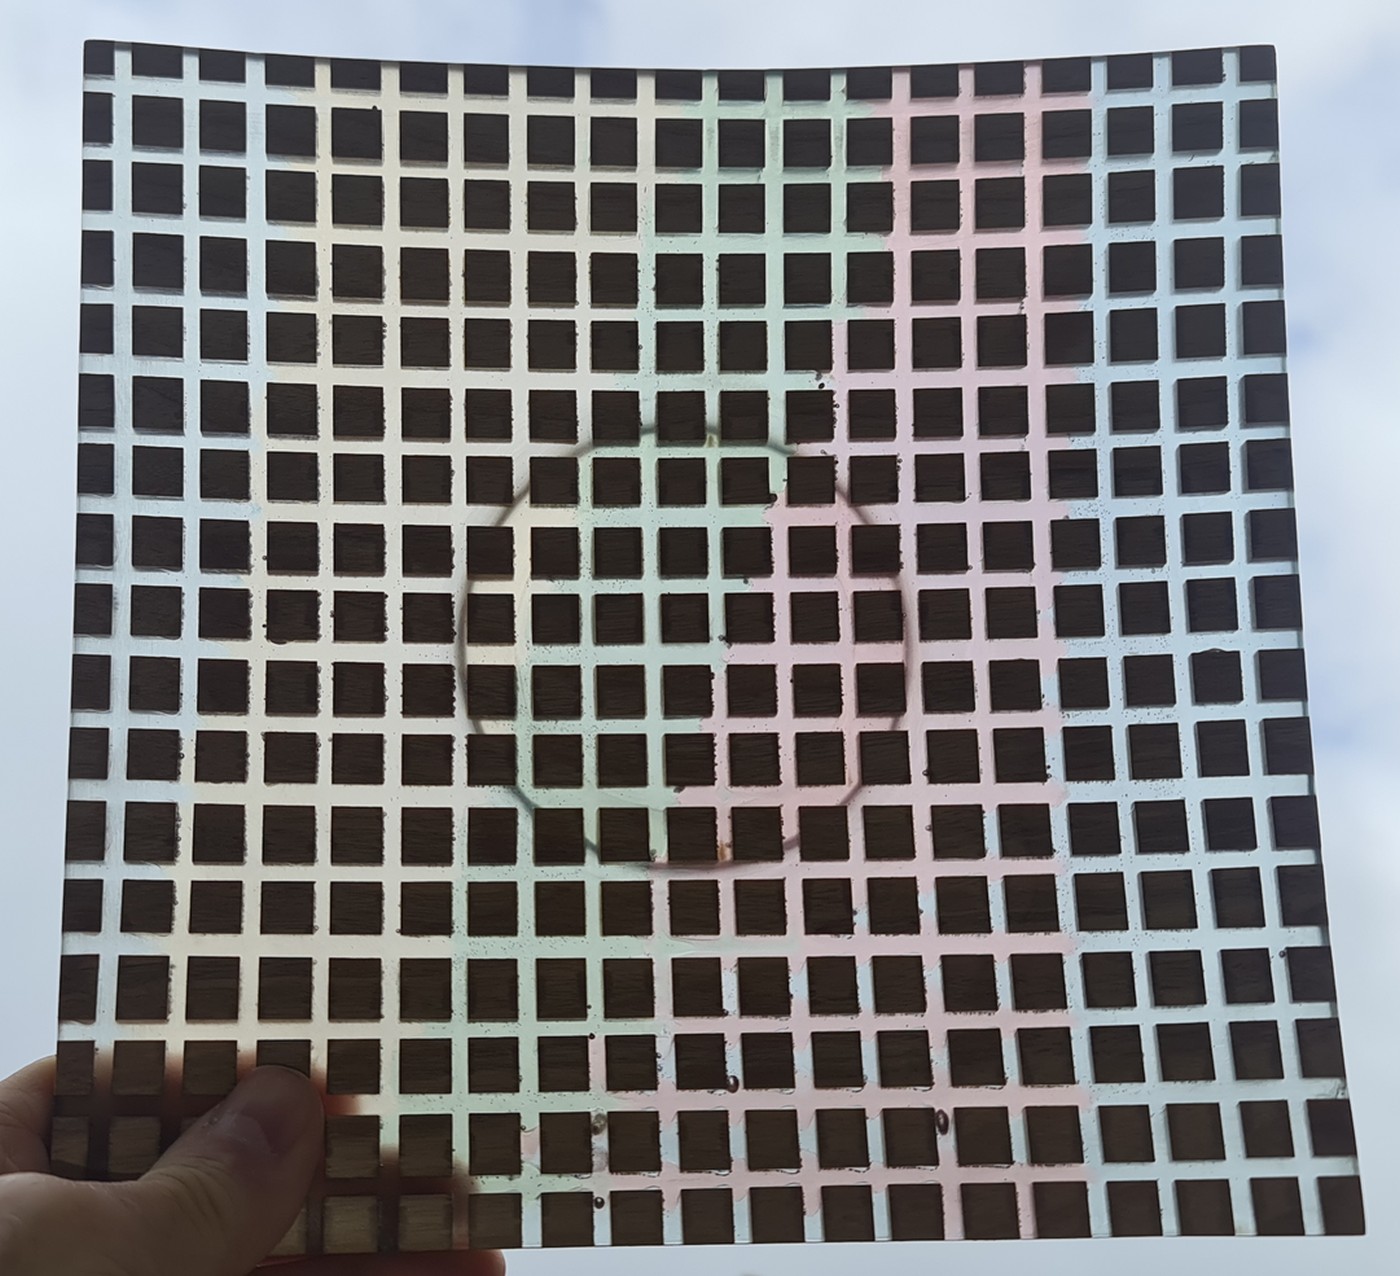 A curved plate (inspect the orientation of the blocks, from the
side). The gaps are filled with epoxy with dies in several
light colors. Oak wood.
A hint on how this can be done can be found in the the
beginning of this YouTube
movie.
A curved plate (inspect the orientation of the blocks, from the
side). The gaps are filled with epoxy with dies in several
light colors. Oak wood.
A hint on how this can be done can be found in the the
beginning of this YouTube
movie.
Epoxy Plates IV


 A plate with a translucent epoxy with a blue-die, resembling the
Israeli flag.
Left shows the CNC step of the David Star, preparing the voids for the
epoxy.
A plate with a translucent epoxy with a blue-die, resembling the
Israeli flag.
Left shows the CNC step of the David Star, preparing the voids for the
epoxy.
Epoxy Plates V


 Another plate with a translucent epoxy, in which the outer
silhouette is not rounded (a sine wave pattern, CNC'ed). Left
shows a snapshot from the CNC step,
preparing the voids for the epoxy and the middle (Walnut) and
right (Ash) images two final plates.
Another plate with a translucent epoxy, in which the outer
silhouette is not rounded (a sine wave pattern, CNC'ed). Left
shows a snapshot from the CNC step,
preparing the voids for the epoxy and the middle (Walnut) and
right (Ash) images two final plates.


Epoxy Spheres

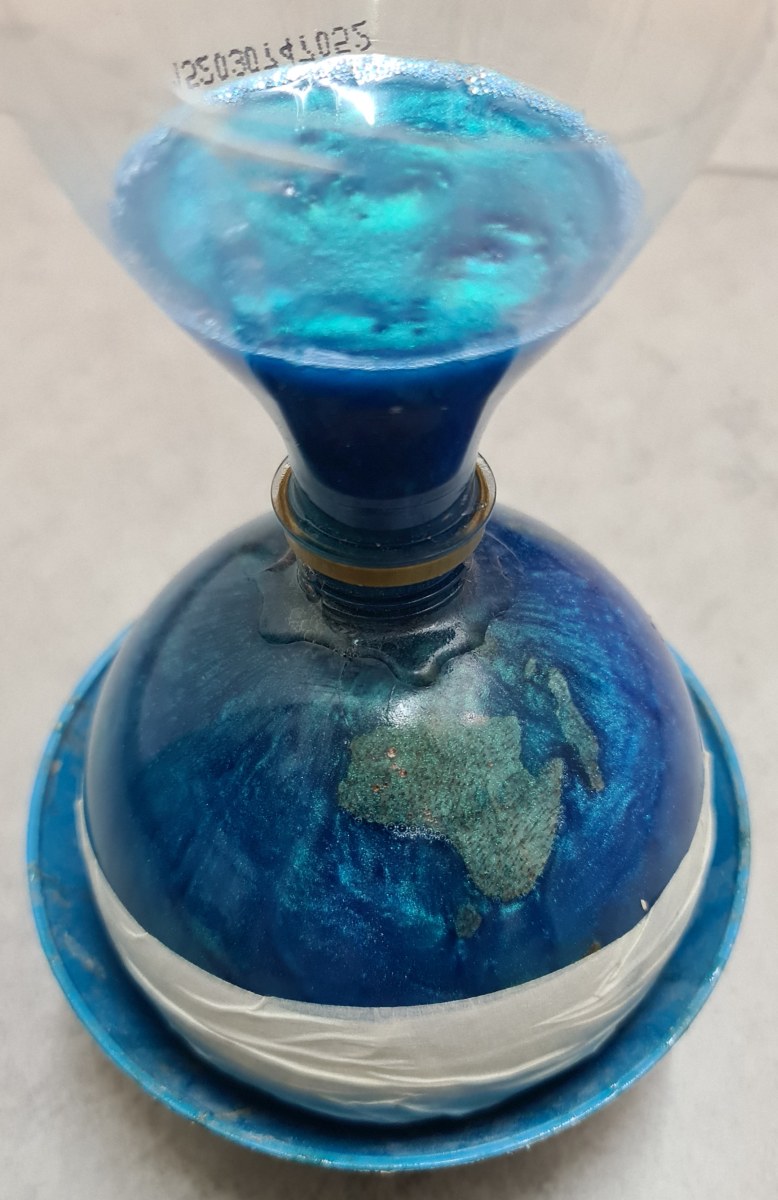
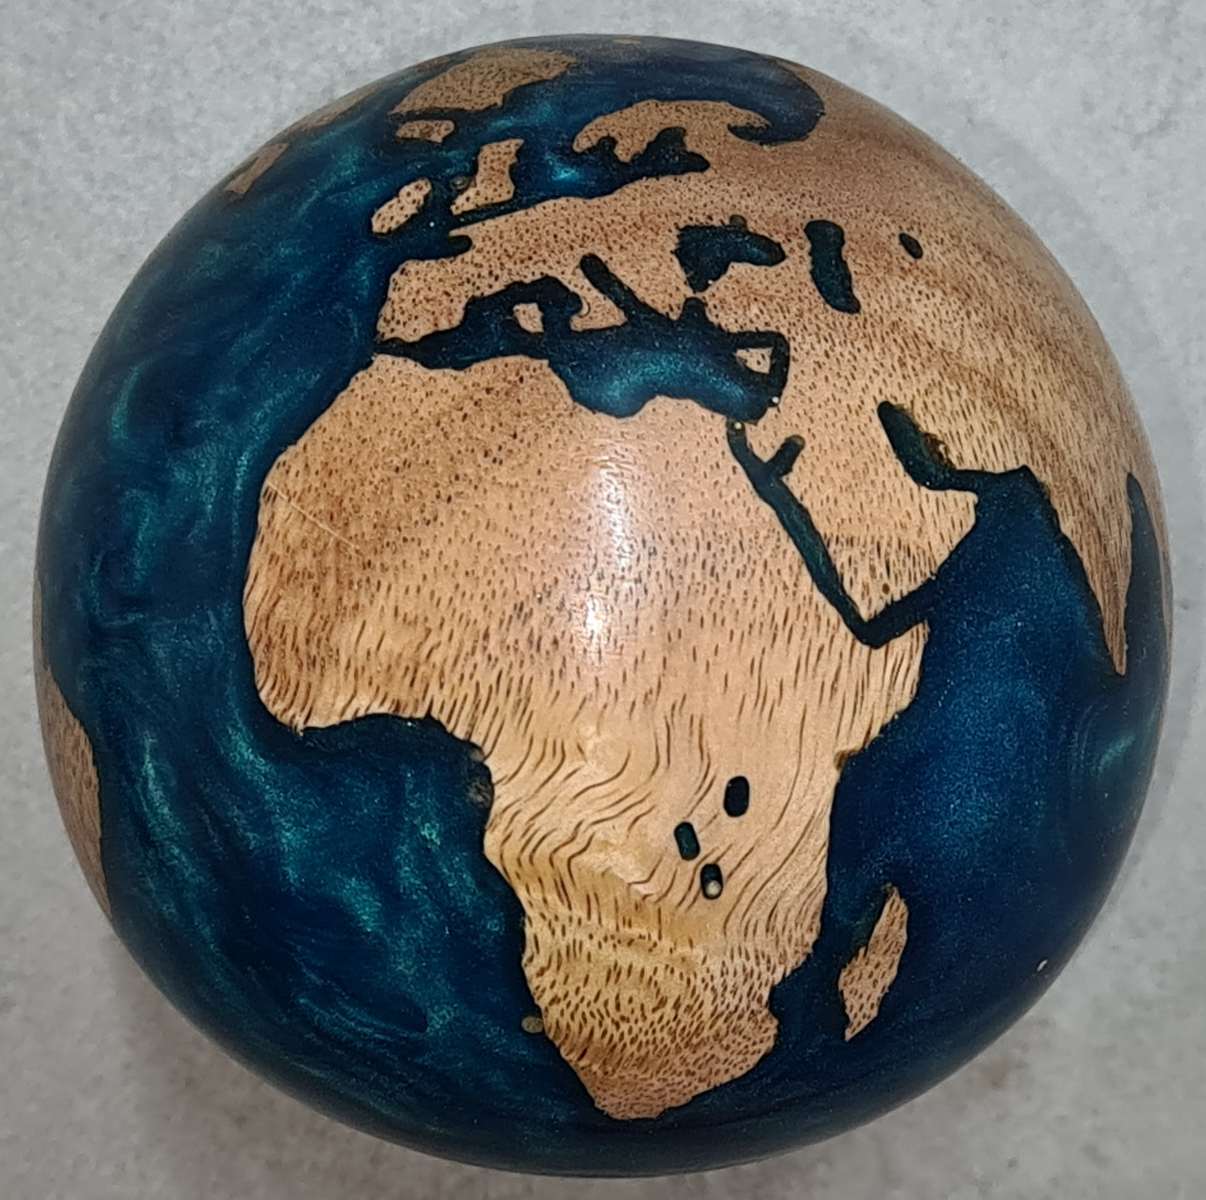
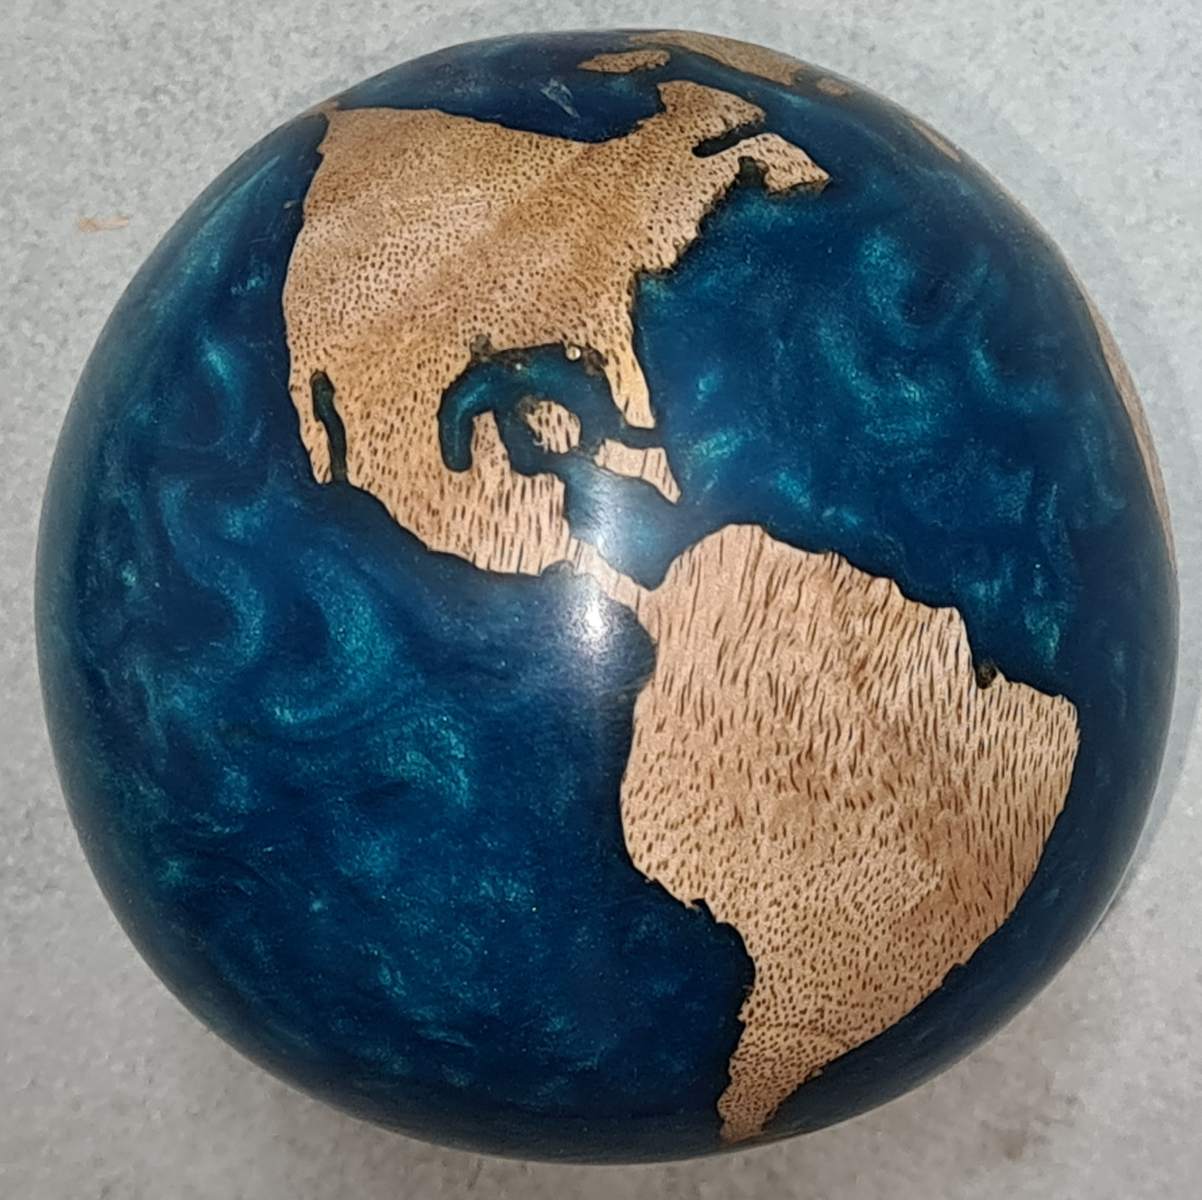 A ~12 cm sphere approximating the earth. Left shows the
carving (~8 mm deep into a turned sphere, in all oceans) and epoxy
stages, while the right shows two images of the final result.
A ~12 cm sphere approximating the earth. Left shows the
carving (~8 mm deep into a turned sphere, in all oceans) and epoxy
stages, while the right shows two images of the final result.
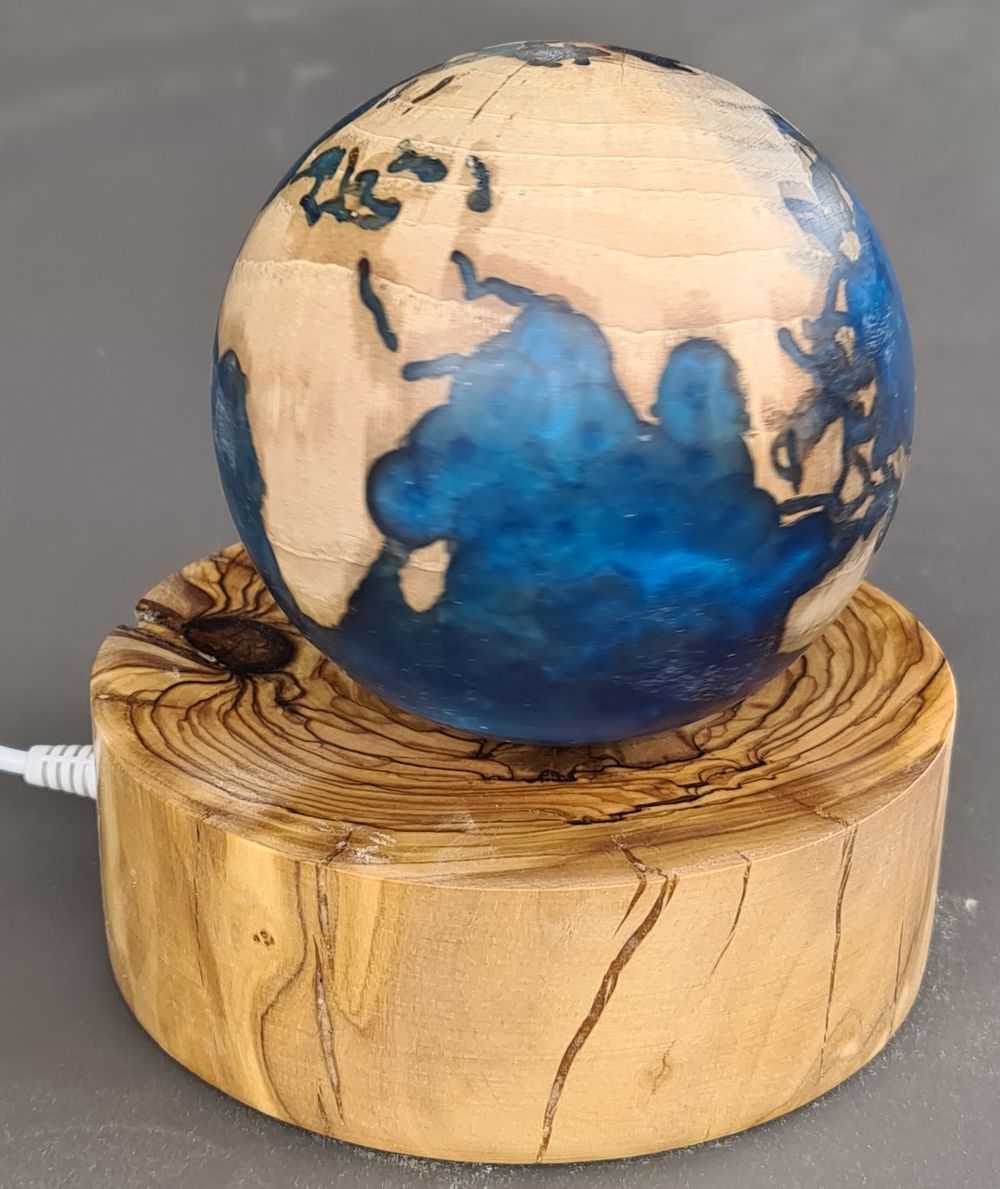
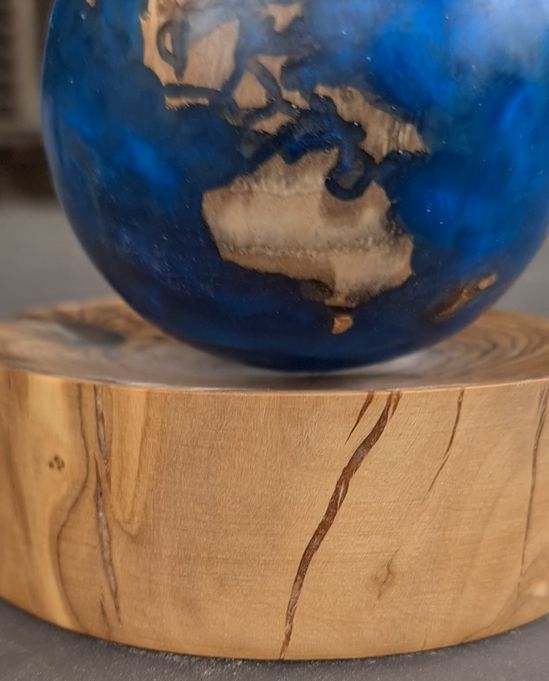
 A levitated version using a (electro-) magnetic levitation hardware.
I was exposed to this levitation ability from a very nice article
by Ken Conte, in the August 2022 issue of American Woodturner.
A levitated version using a (electro-) magnetic levitation hardware.
I was exposed to this levitation ability from a very nice article
by Ken Conte, in the August 2022 issue of American Woodturner.
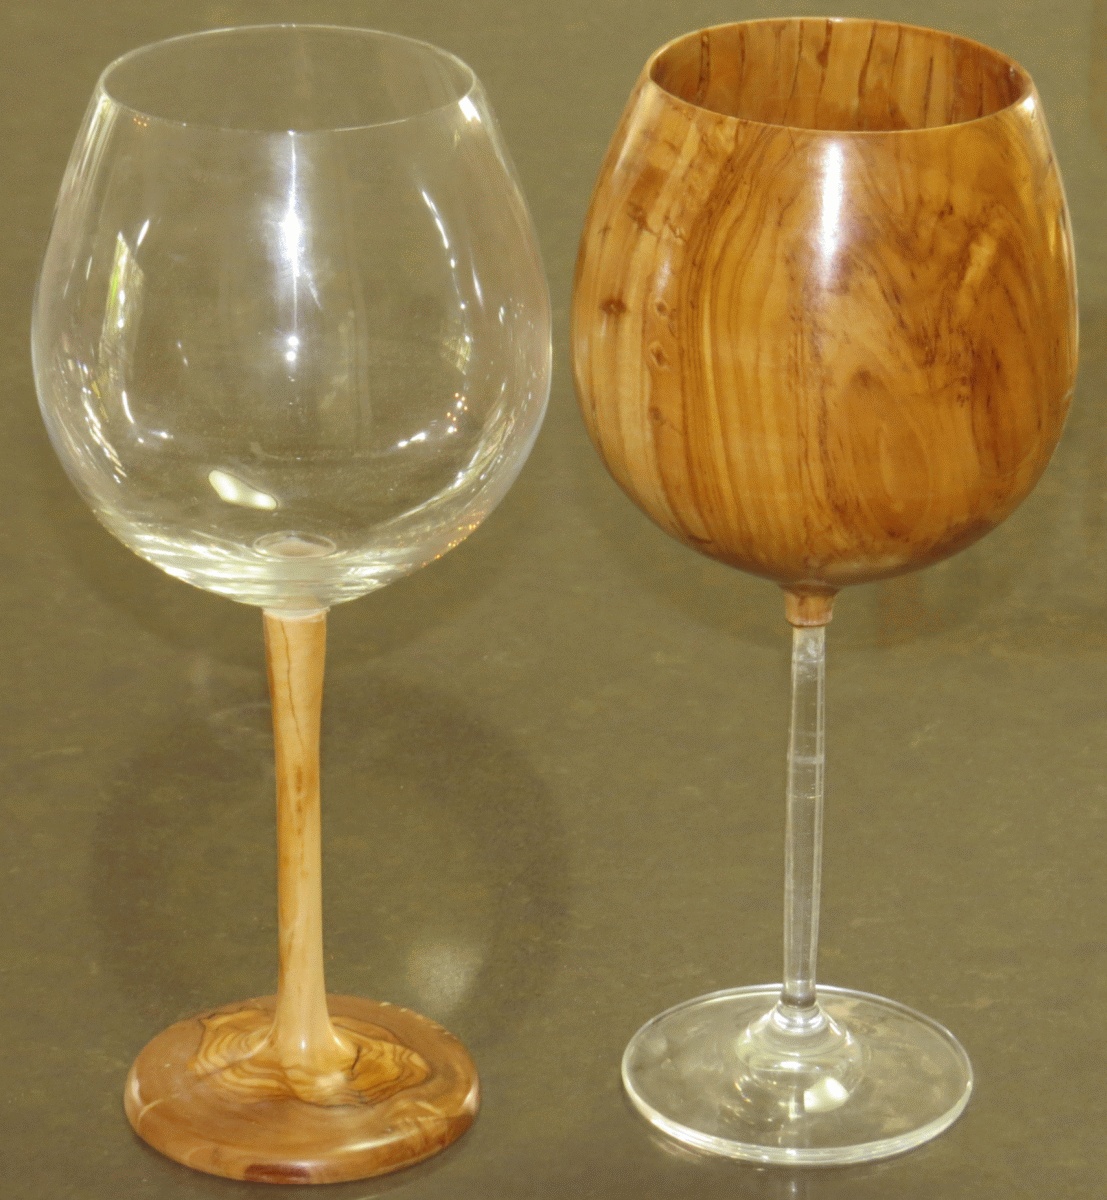
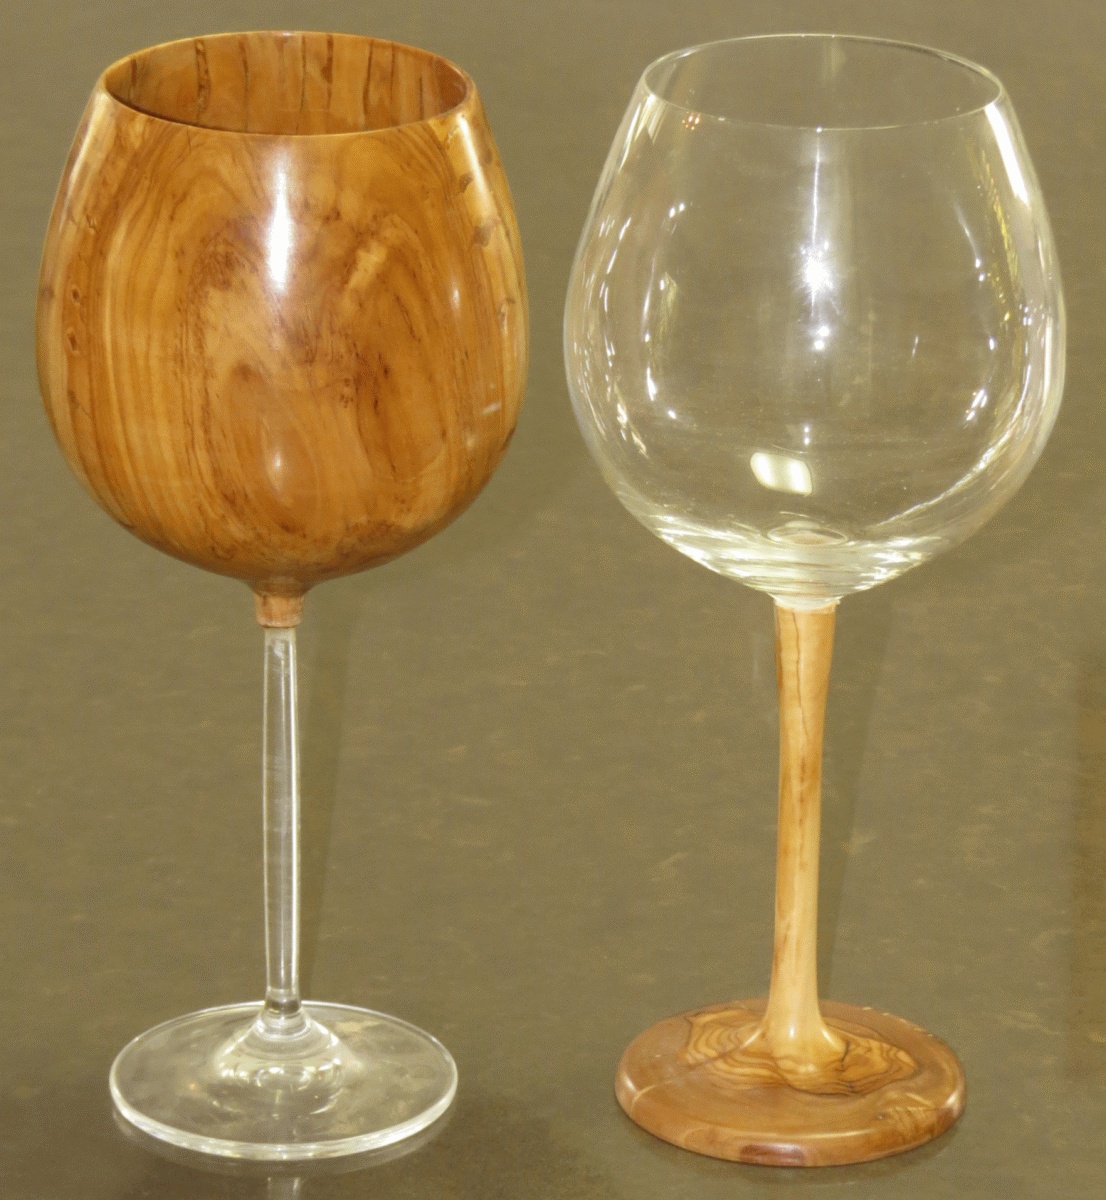
Epoxy Glasses
 I had some cracked Olive tree pieces, so I tried to use epoxy
as a filler. As a second stage a mold was made for the epoxy
ring (See image on the left). And if we are at it, any clue
how was the epoxy leg made on the right image?
I had some cracked Olive tree pieces, so I tried to use epoxy
as a filler. As a second stage a mold was made for the epoxy
ring (See image on the left). And if we are at it, any clue
how was the epoxy leg made on the right image?
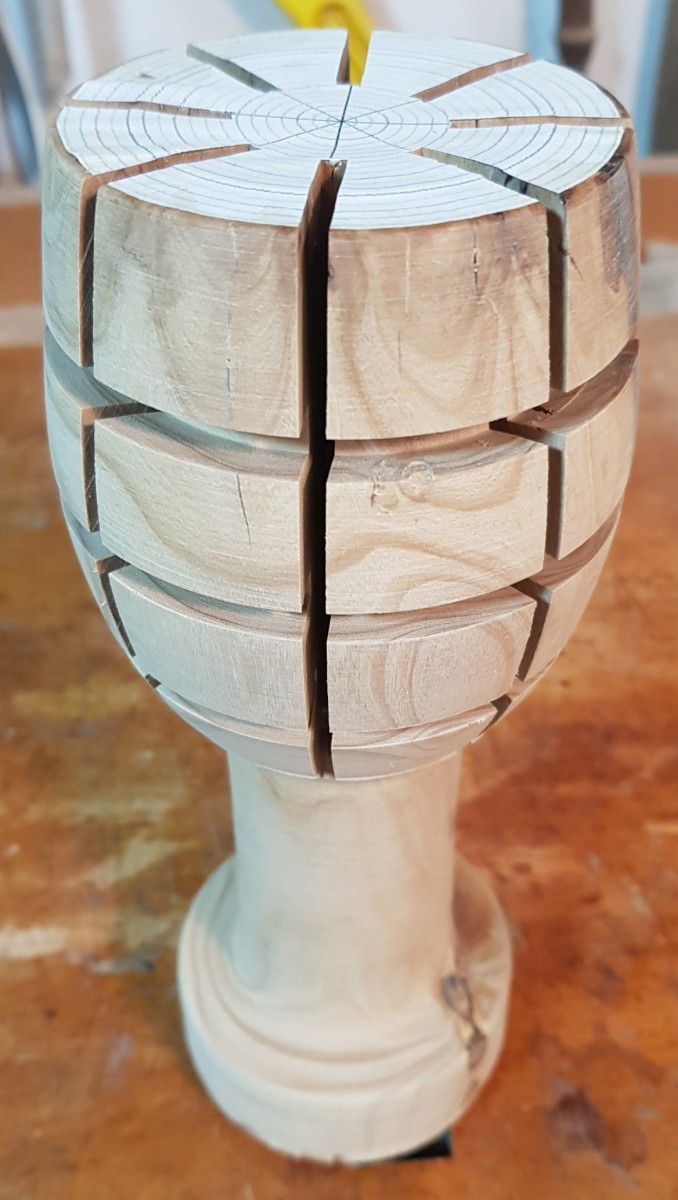
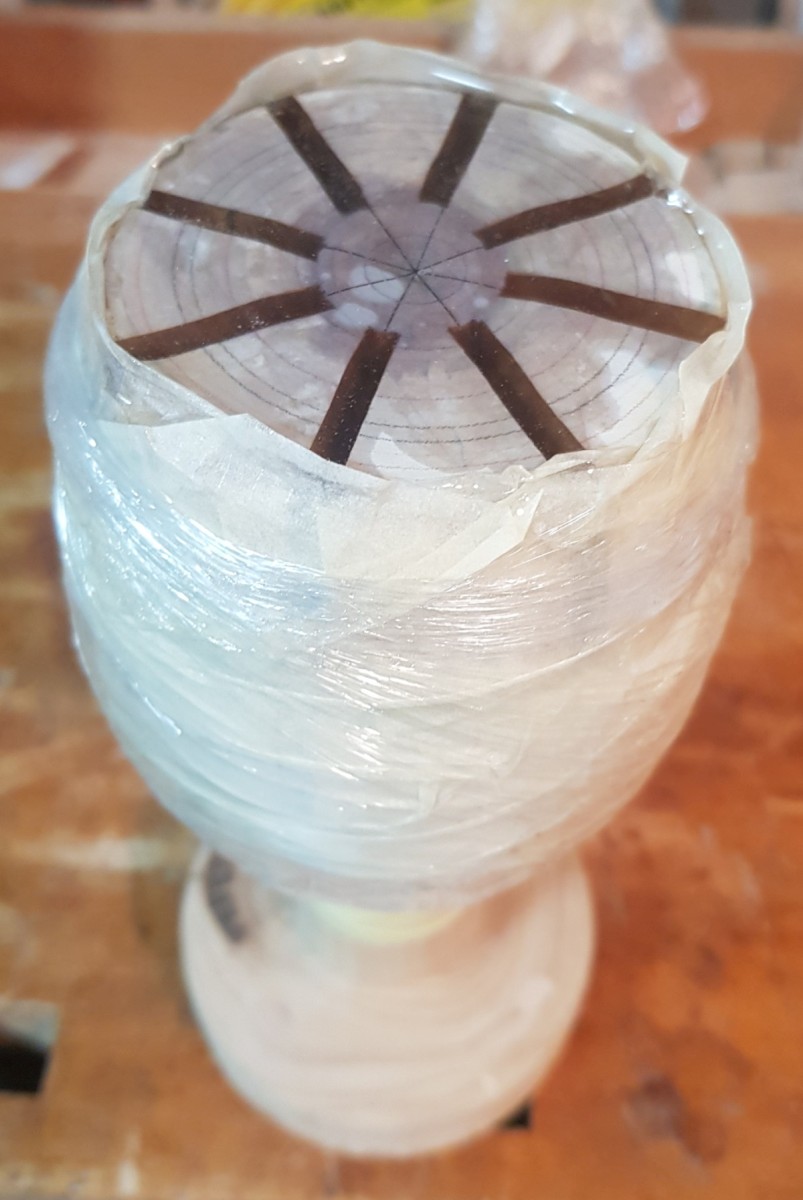
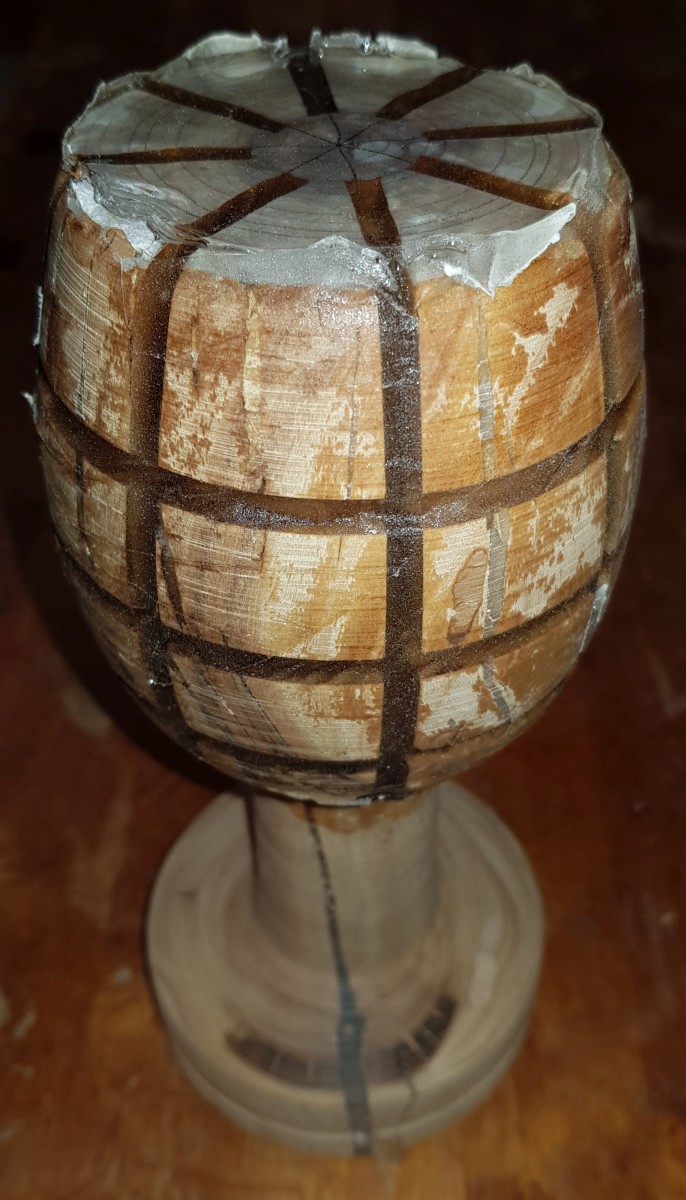
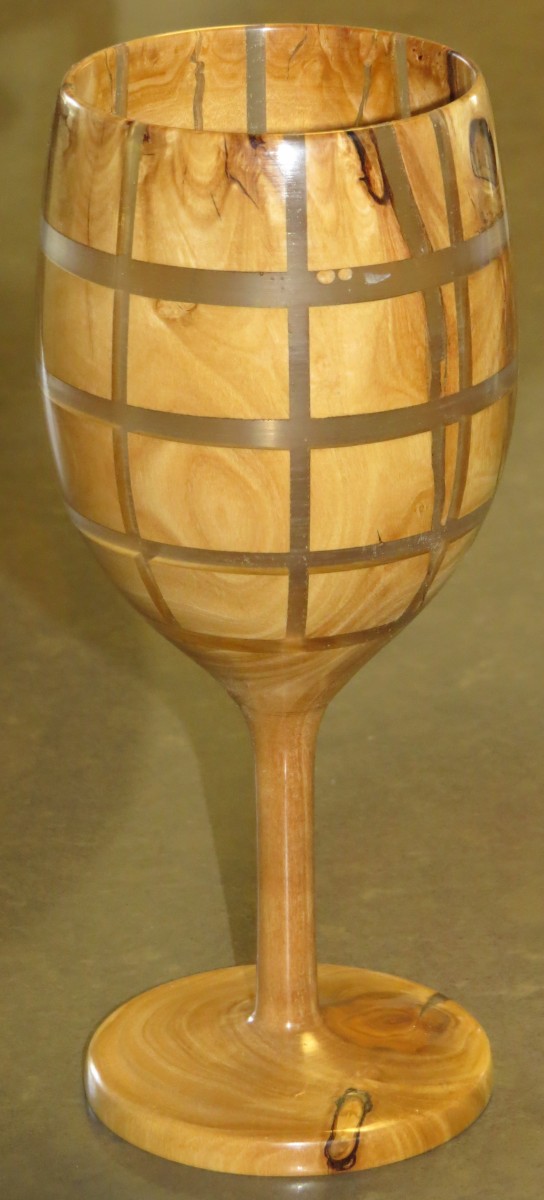
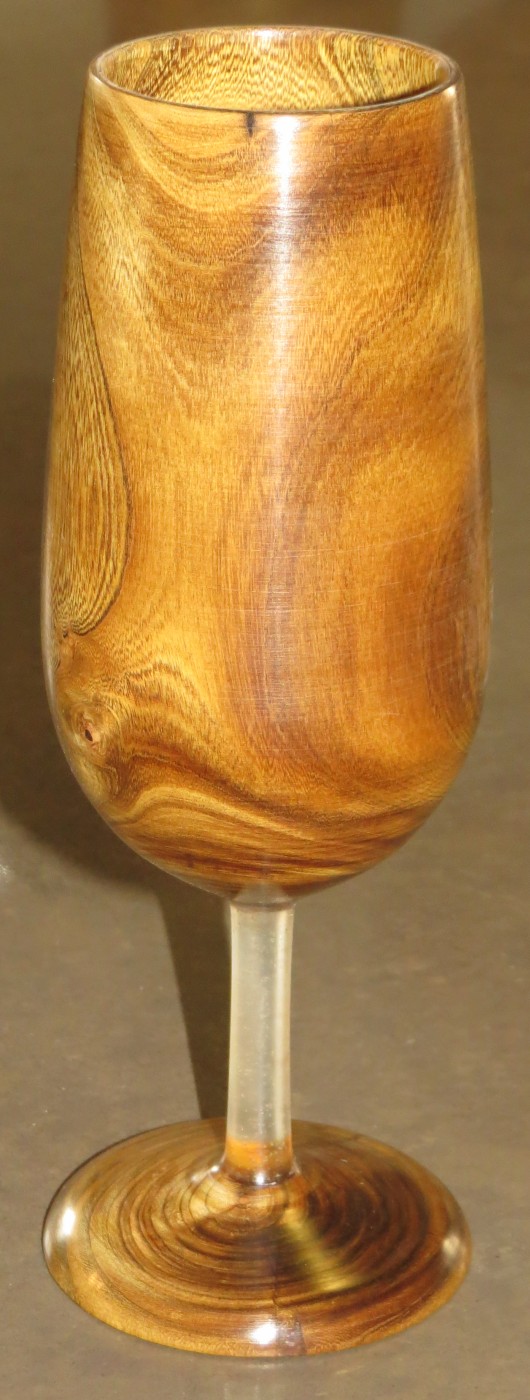
 Also cracked Olive tree pieces filled with Epoxy. Herein, however,
a checkerboard patterns ~10mm deep (or more) was made using
the lathe (the round latitude rings - see left image) and on a
table saw (the longitude lines along the glass). Then, the
glass was sealed and filled with Epoxy (middle images), only to
turn it to the final results on the right.
See also Epoxy vessels
Also cracked Olive tree pieces filled with Epoxy. Herein, however,
a checkerboard patterns ~10mm deep (or more) was made using
the lathe (the round latitude rings - see left image) and on a
table saw (the longitude lines along the glass). Then, the
glass was sealed and filled with Epoxy (middle images), only to
turn it to the final results on the right.
See also Epoxy vessels
Trapped Arrow
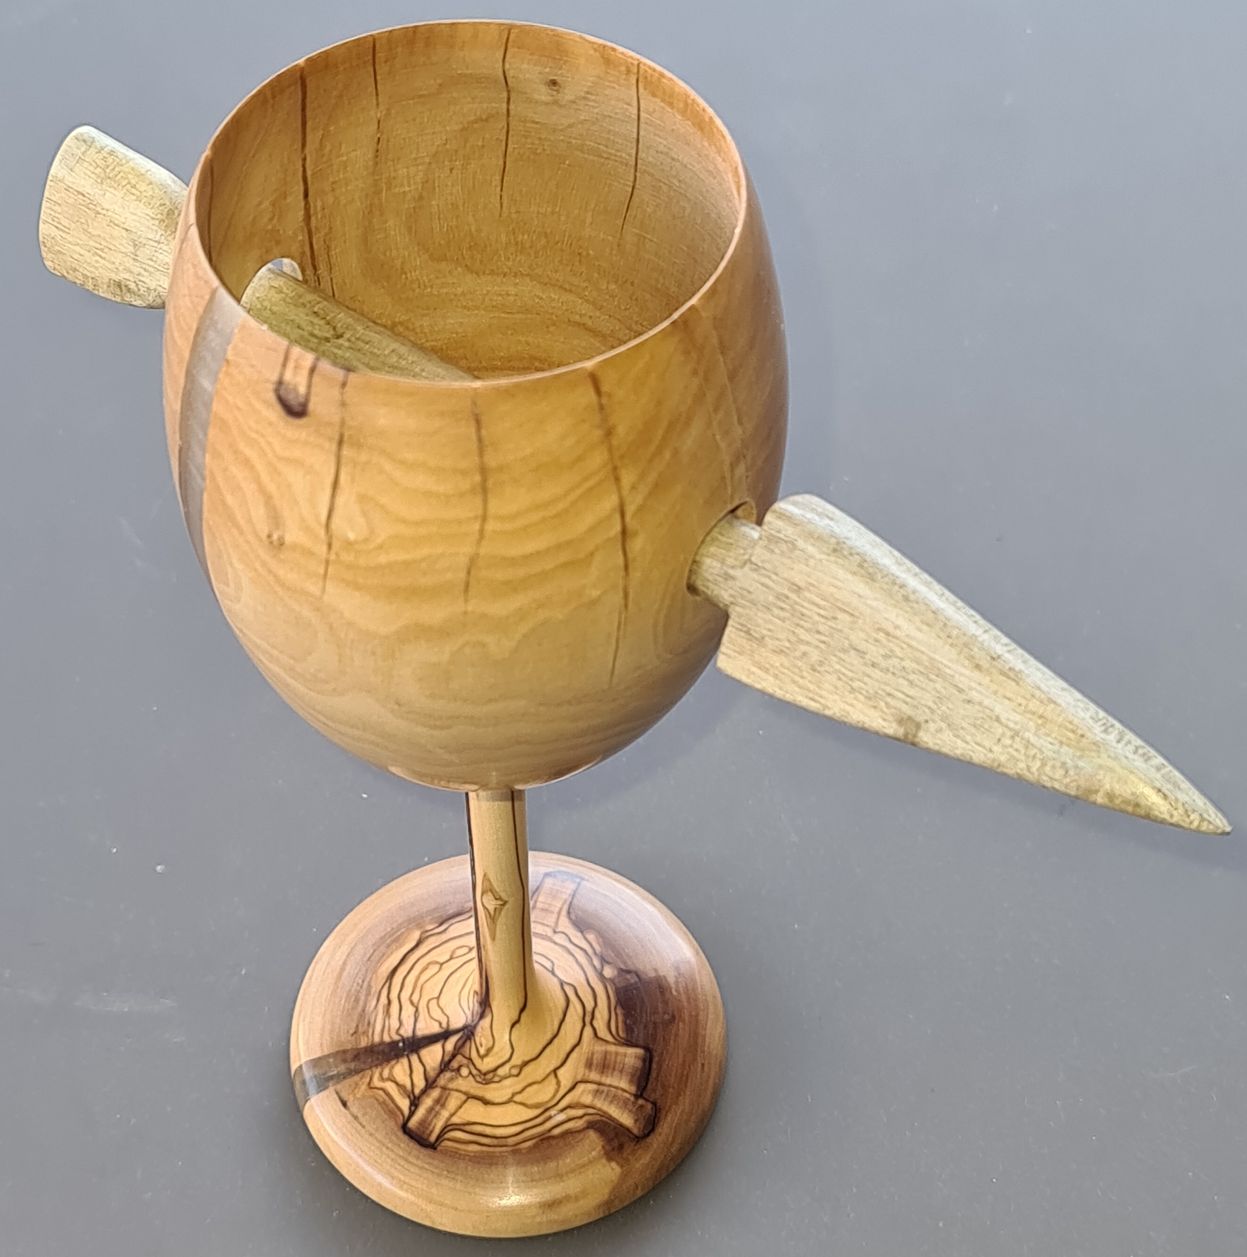

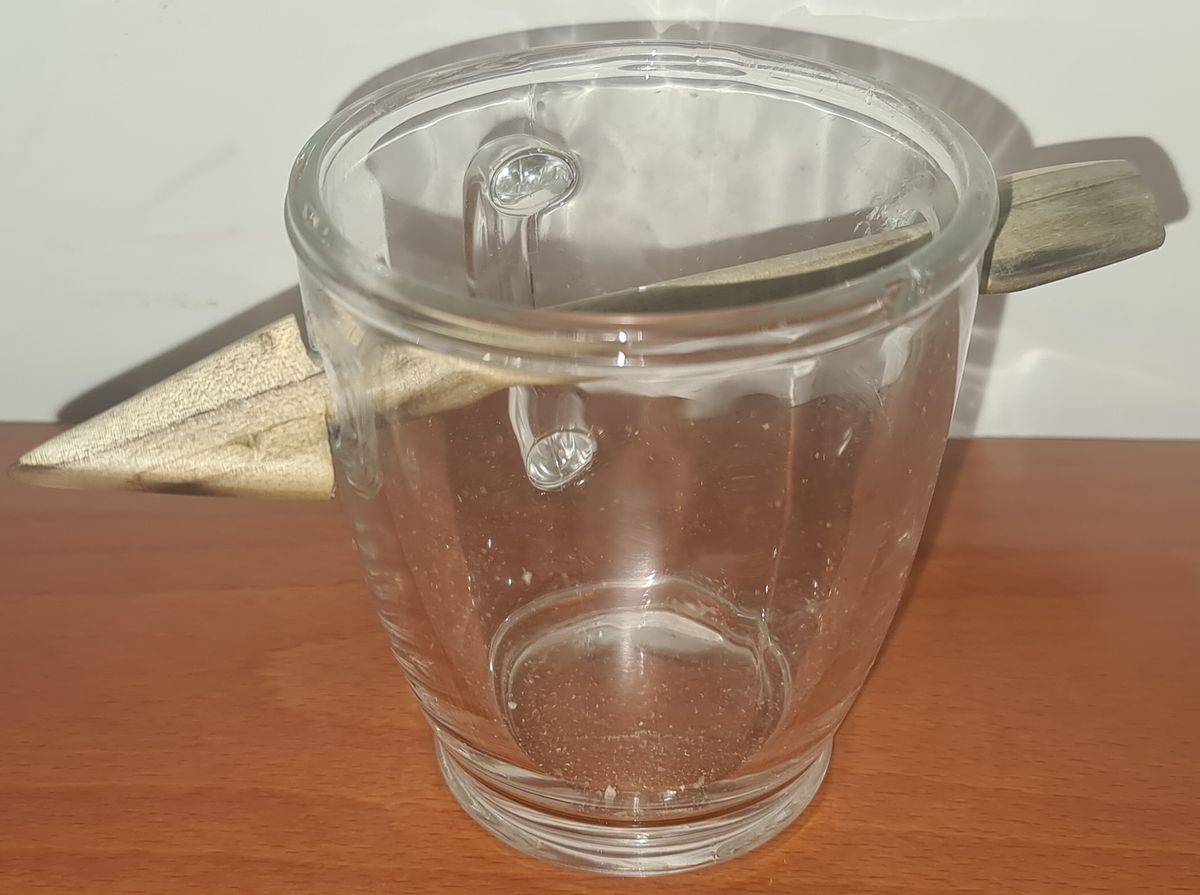 Yet another cracked Olive tree piece, but it also has a
trapped arrow in it, also from Olive tree. The arrow was
inserted through the small holes after boiling the back side
of the arrow in water for ~15 minutes and then pressing it
hard for several days to dry out, shrinking it to fit the
holes. Placing the back side of the arrow in hot water again,
let it expand back in minutes! Original idea from the
"Woodturning Wizardry" book by David Springett. The two right
images show variants with a wine battle and a cup.
Yet another cracked Olive tree piece, but it also has a
trapped arrow in it, also from Olive tree. The arrow was
inserted through the small holes after boiling the back side
of the arrow in water for ~15 minutes and then pressing it
hard for several days to dry out, shrinking it to fit the
holes. Placing the back side of the arrow in hot water again,
let it expand back in minutes! Original idea from the
"Woodturning Wizardry" book by David Springett. The two right
images show variants with a wine battle and a cup.
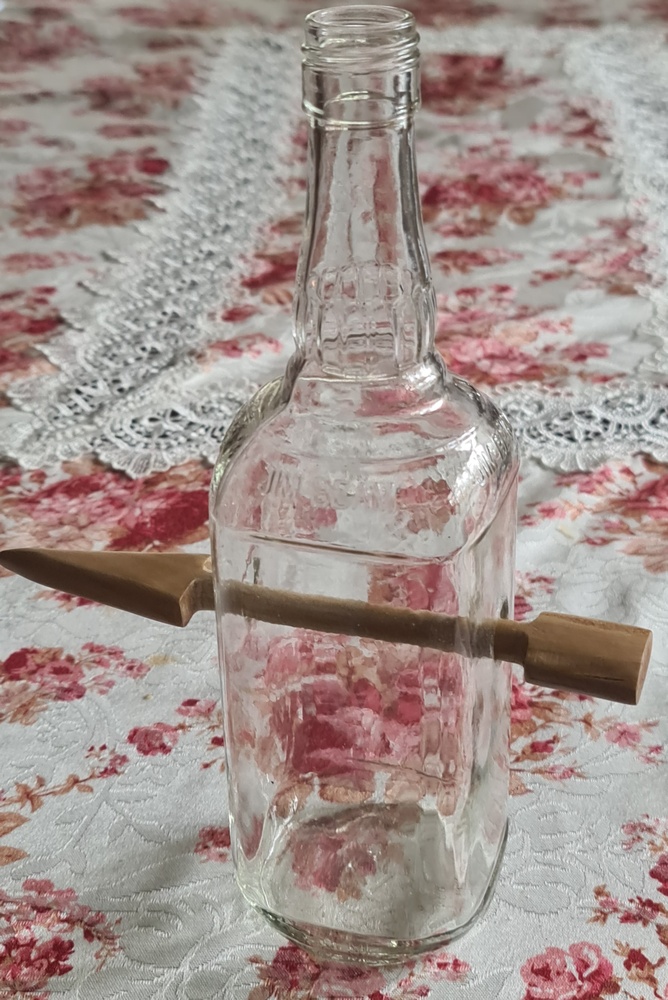
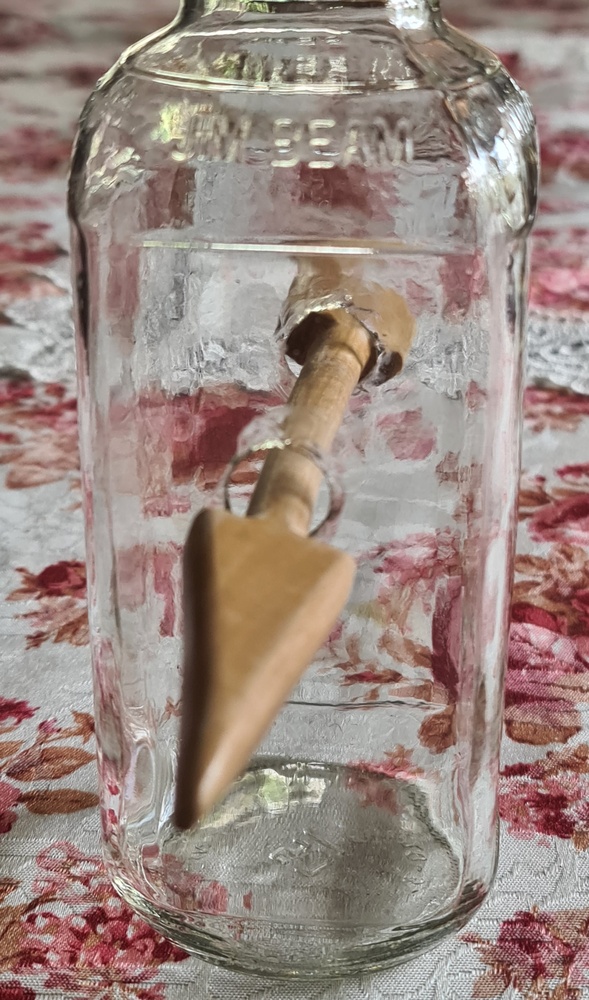
Bottle-opener Trapped in a Bottle
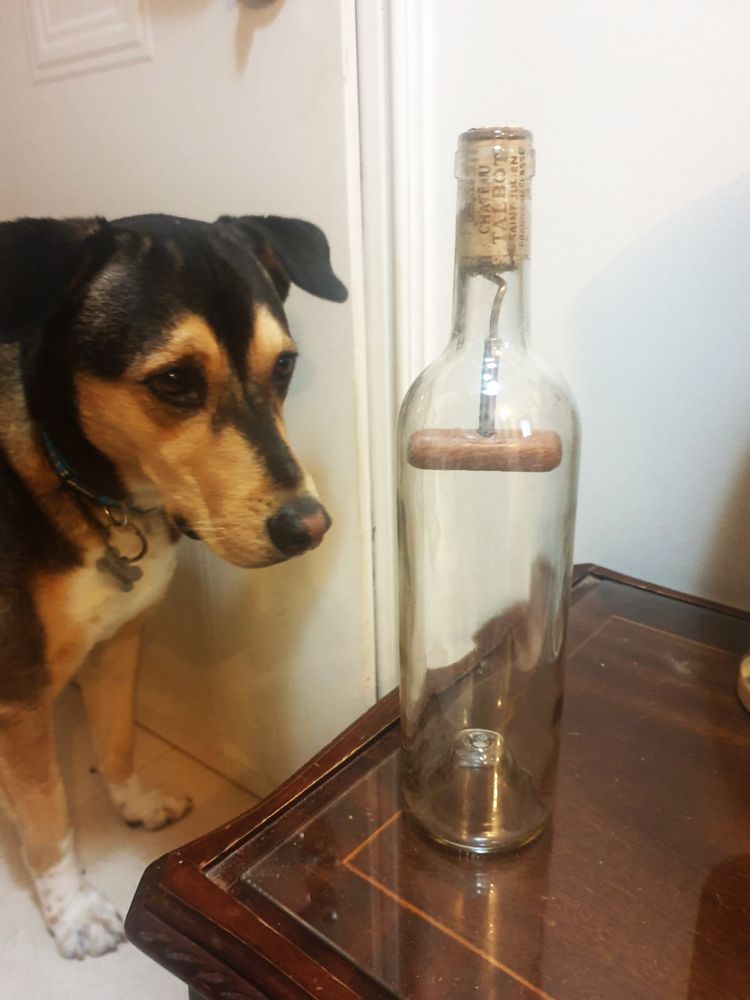
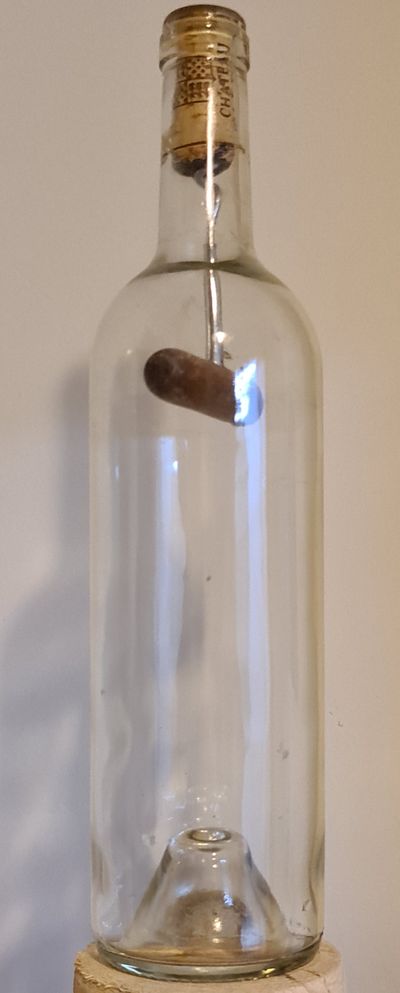
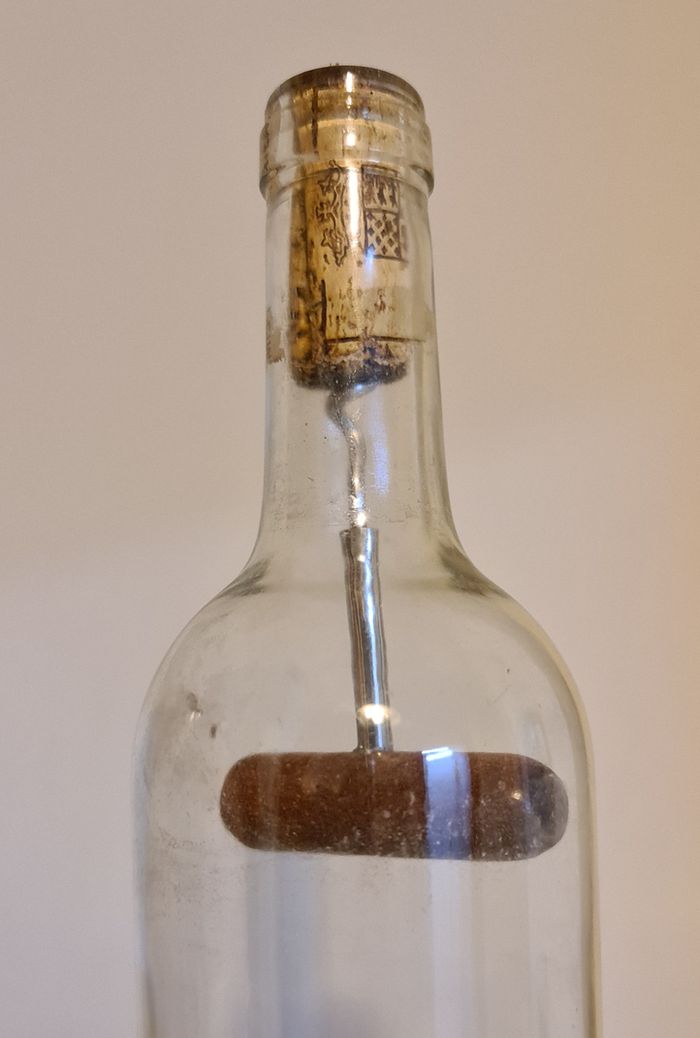 Can you imagine how this bottle-opener in a bottle was
created? Johnny did not figure it out... A hint: The bottle is
a regular wine bottle, and was not cut or drilled in any way.
And the bottle was not blown around the bottle opener... The
real hint can be found here.
Can you imagine how this bottle-opener in a bottle was
created? Johnny did not figure it out... A hint: The bottle is
a regular wine bottle, and was not cut or drilled in any way.
And the bottle was not blown around the bottle opener... The
real hint can be found here.
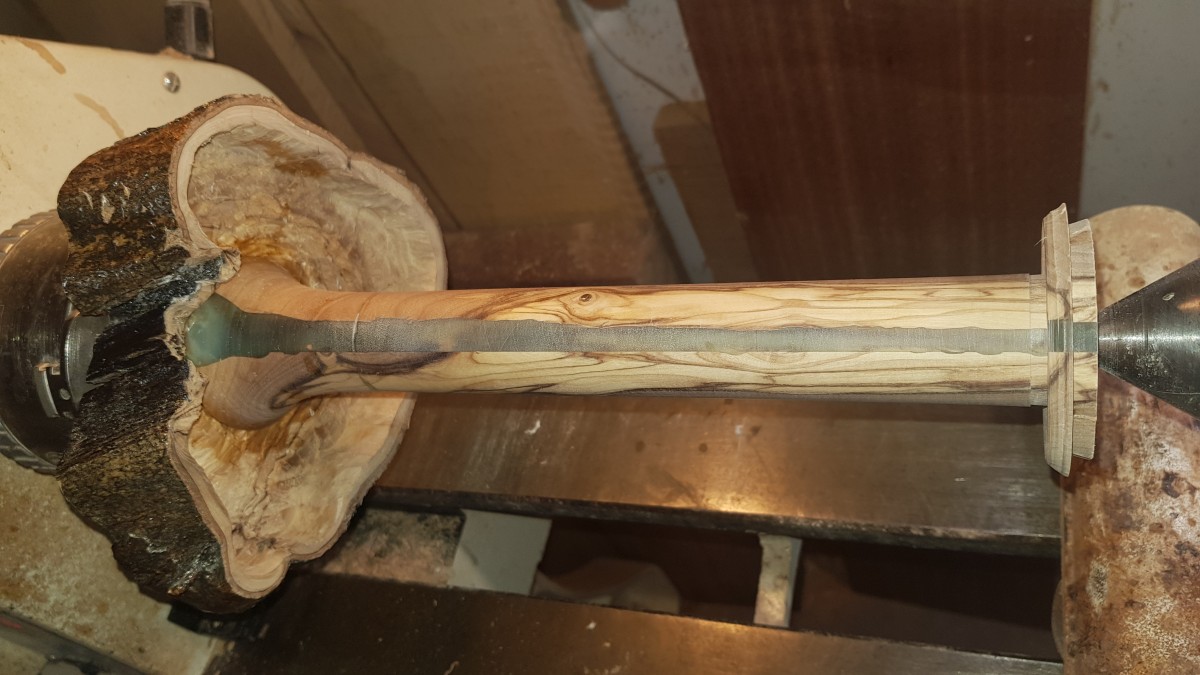
Epoxy Lamps
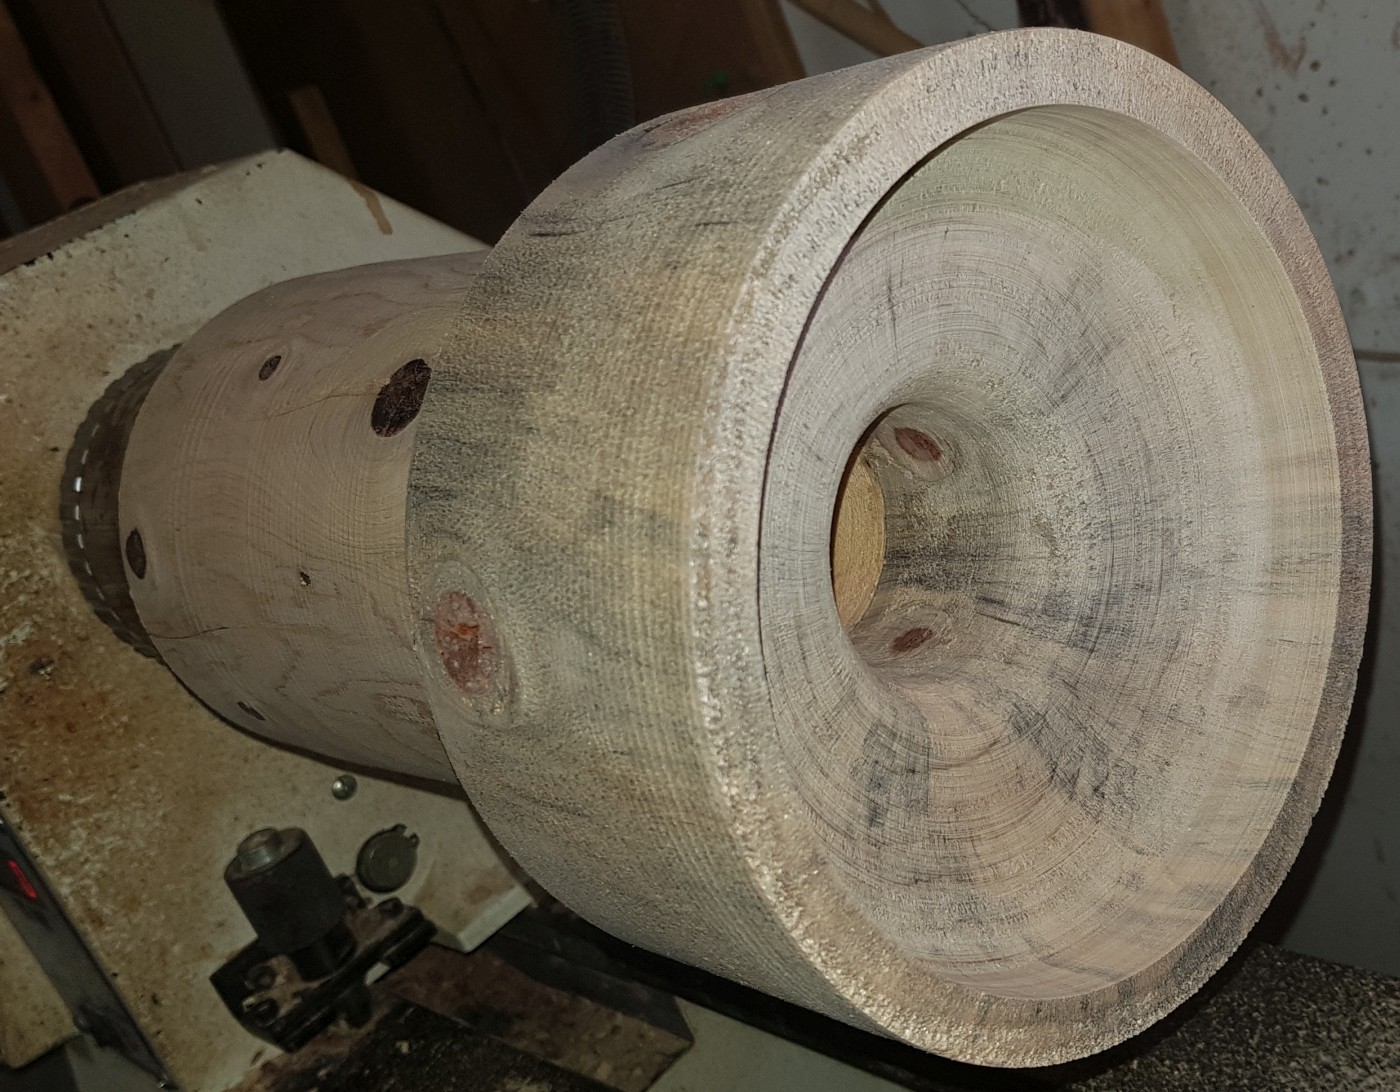
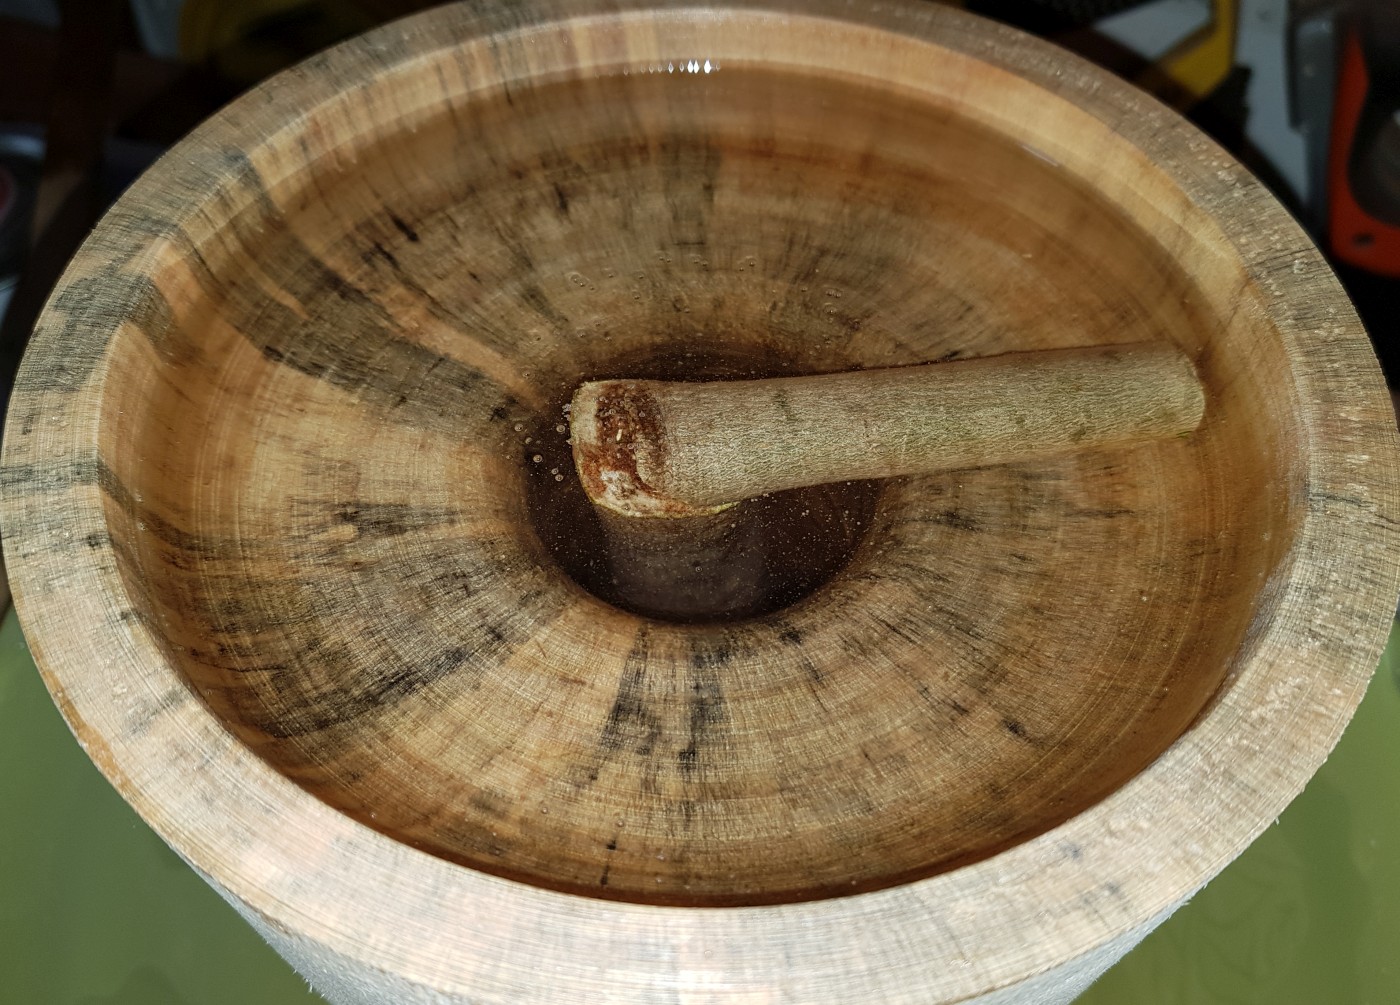
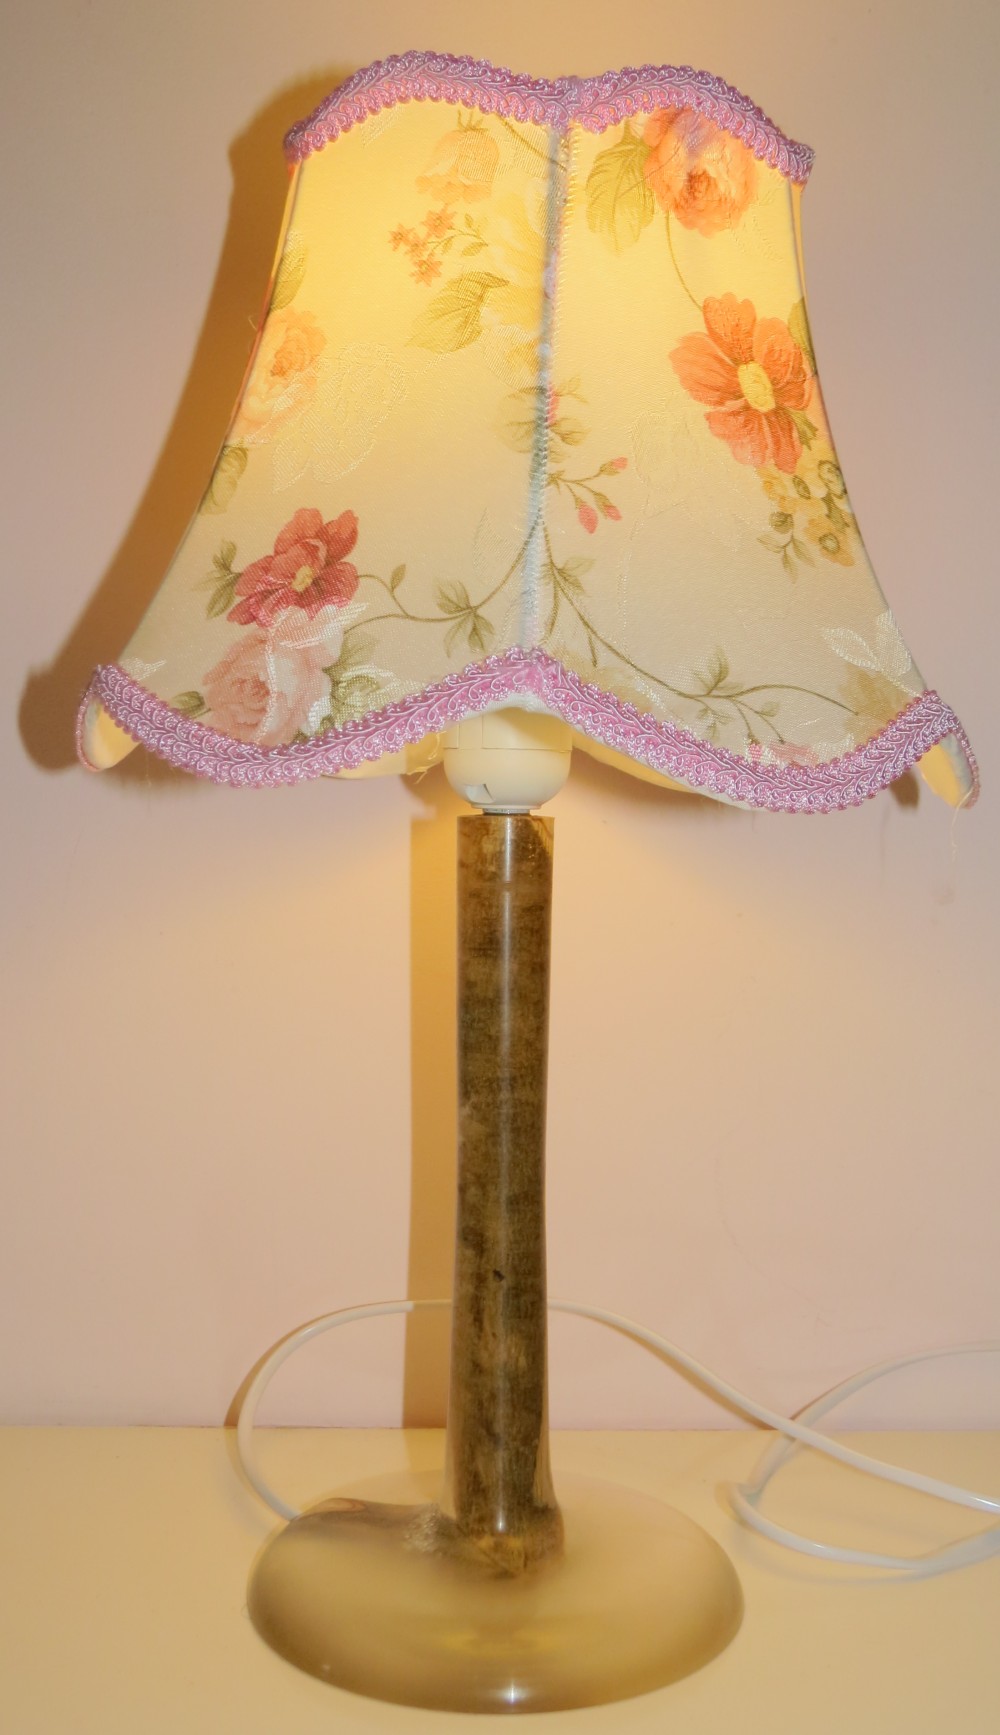
 An epoxy-based lamp. A mold from cheap wood (left) was turned
on a lathe, and two Olive tree branches were glued at 90
degrees, along the axis and orthogonal to it (second from the
left), only to pour the epoxy. The base of the epoxy lamp was
then wood-turned out of the mold... The two images on the
right show two results - the electric wires are hidden inside
holes made in the Olive branches.
An epoxy-based lamp. A mold from cheap wood (left) was turned
on a lathe, and two Olive tree branches were glued at 90
degrees, along the axis and orthogonal to it (second from the
left), only to pour the epoxy. The base of the epoxy lamp was
then wood-turned out of the mold... The two images on the
right show two results - the electric wires are hidden inside
holes made in the Olive branches.

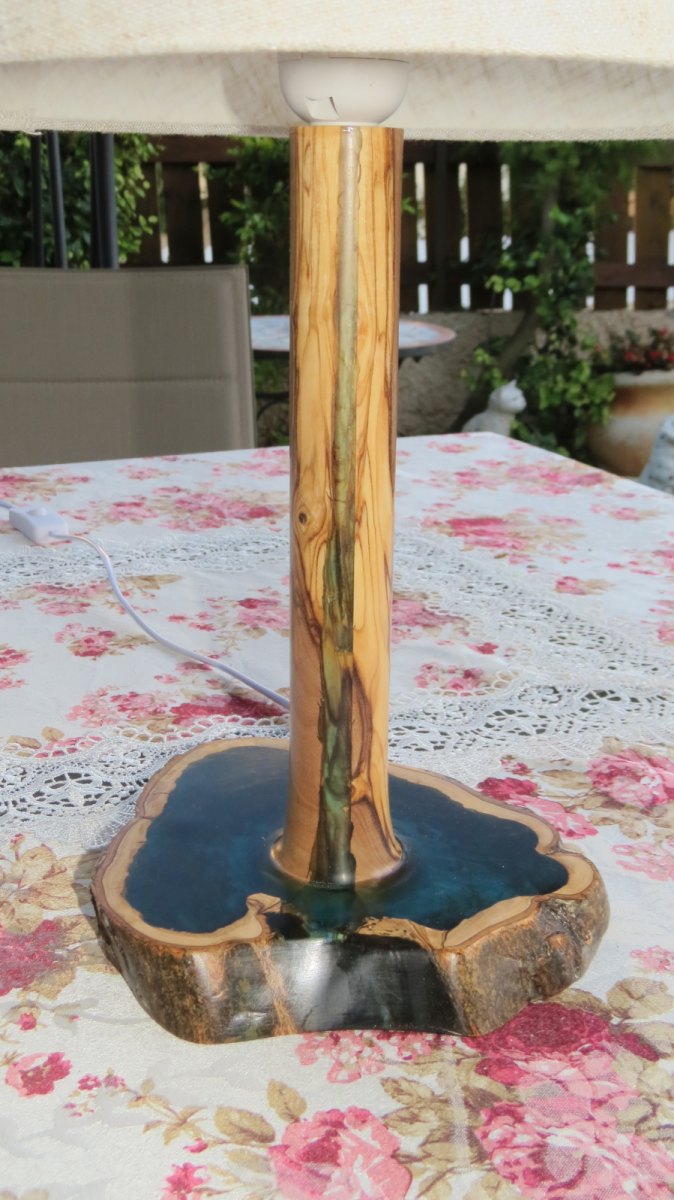 An epoxy-based lamp, like a waterfall. The vertical pillar was
cracked first, epoxy was filled in it and it was turn. Then, the
base was carved as can see in the left image, and epoxy was poured
in. Olive tree.
An epoxy-based lamp, like a waterfall. The vertical pillar was
cracked first, epoxy was filled in it and it was turn. Then, the
base was carved as can see in the left image, and epoxy was poured
in. Olive tree.
Laser Etching I


 Some experiments with laser-etching. A 2-axis laser system (with
a manual Z axis) I purchased some years ago, was upgraded by Uri
Benchetrit to have a 3rd Z axis and a 4th rotation axes.
With my IRIT solid
modeling environment, G-code generation code to place text
over the turned geometry was developed and used for these two
examples. Left shows the laser etching in action, middle
after the etching and the right shows the final result.
Some experiments with laser-etching. A 2-axis laser system (with
a manual Z axis) I purchased some years ago, was upgraded by Uri
Benchetrit to have a 3rd Z axis and a 4th rotation axes.
With my IRIT solid
modeling environment, G-code generation code to place text
over the turned geometry was developed and used for these two
examples. Left shows the laser etching in action, middle
after the etching and the right shows the final result.


Auxiliary Staff I
 Some trials in locked geometry inside a cube...
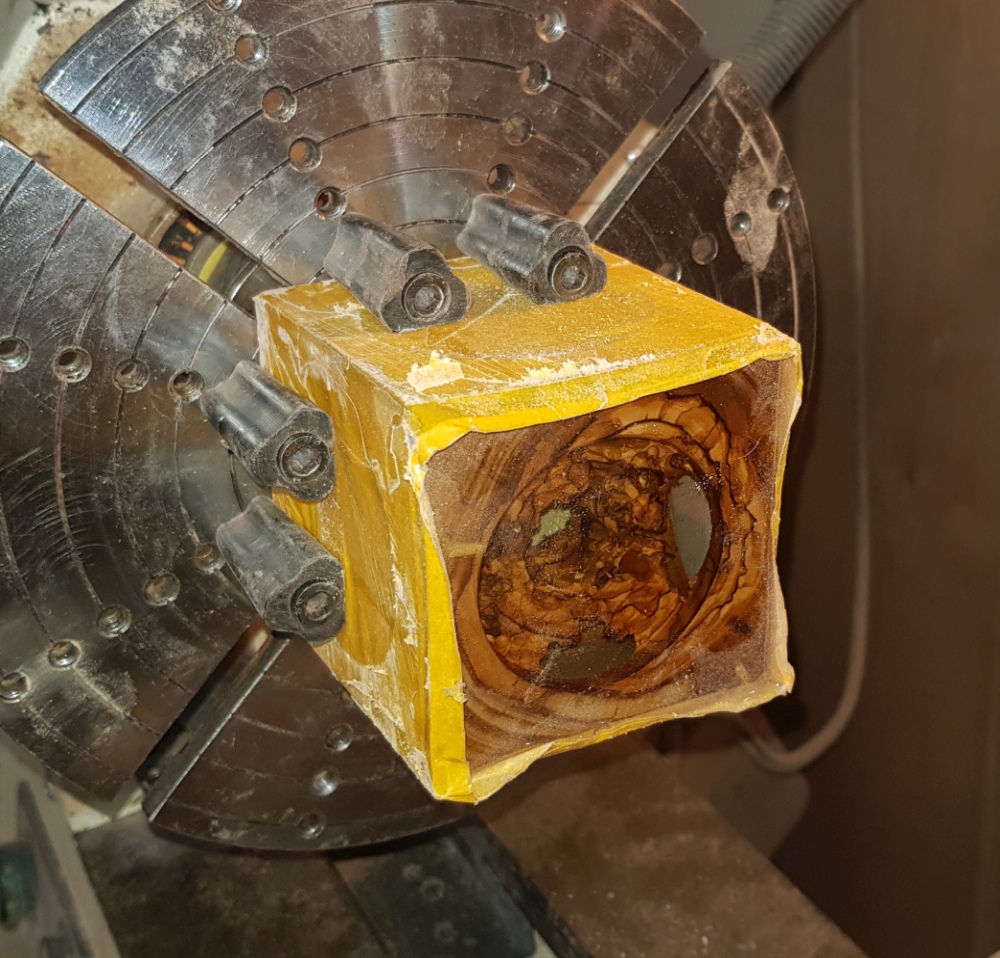

 In this version, an epoxy pour made the locked sphere. The
cube was lightly drill from its six faces and its core was
randomly carved through the six holes, only to pour
translucent epoxy.
In this version, an epoxy pour made the locked sphere. The
cube was lightly drill from its six faces and its core was
randomly carved through the six holes, only to pour
translucent epoxy.
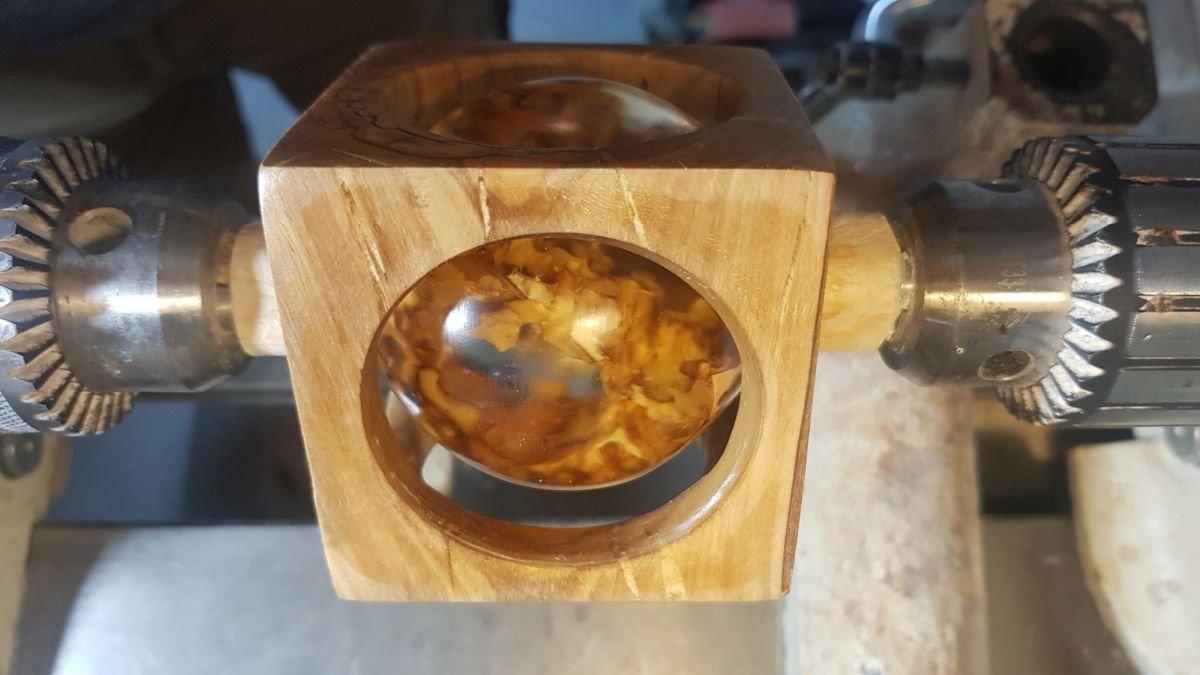
 A challenge I was exposed to by Yaacov Strichman.
The different steps are conveyed in the images left to right,
top to bottom. First step (top left) shows the chuck that were
used on the (almost) final result. In the bottom left, the simple
gouge made and used to verify the sphericity is presented. Beech wood.
A challenge I was exposed to by Yaacov Strichman.
The different steps are conveyed in the images left to right,
top to bottom. First step (top left) shows the chuck that were
used on the (almost) final result. In the bottom left, the simple
gouge made and used to verify the sphericity is presented. Beech wood.
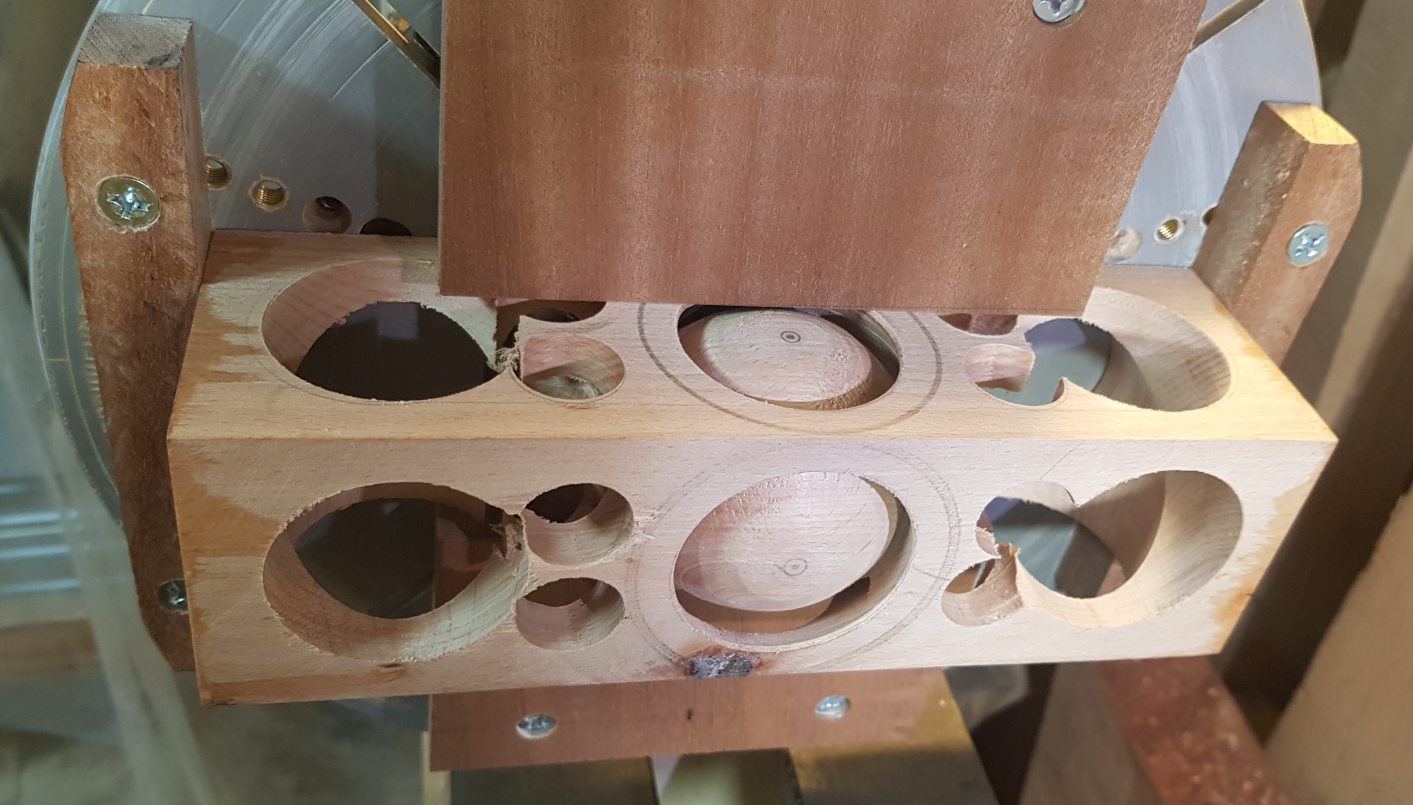
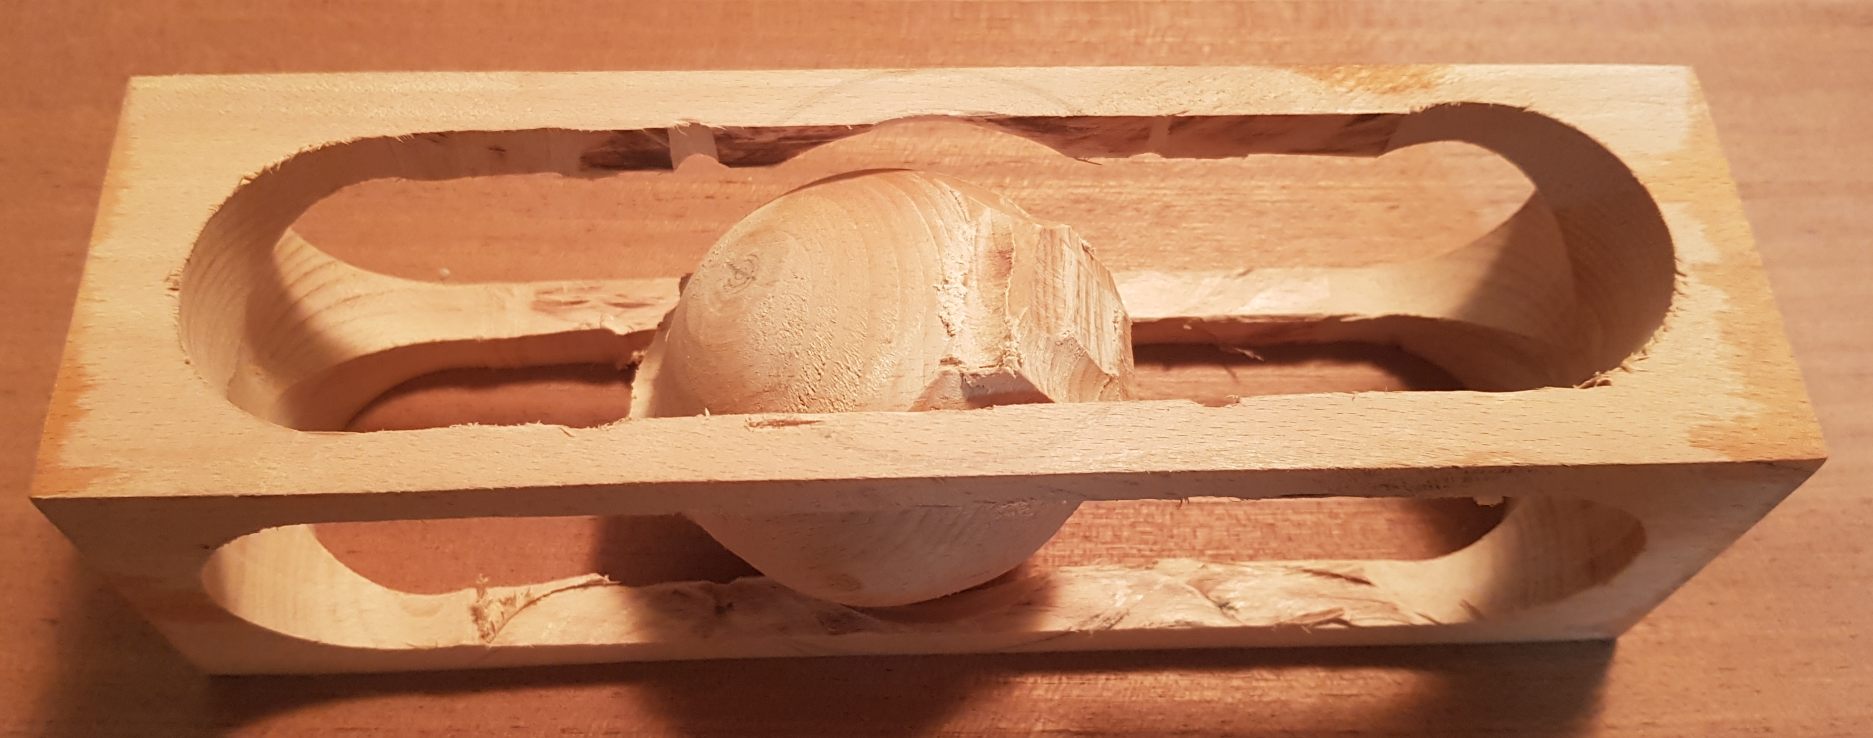

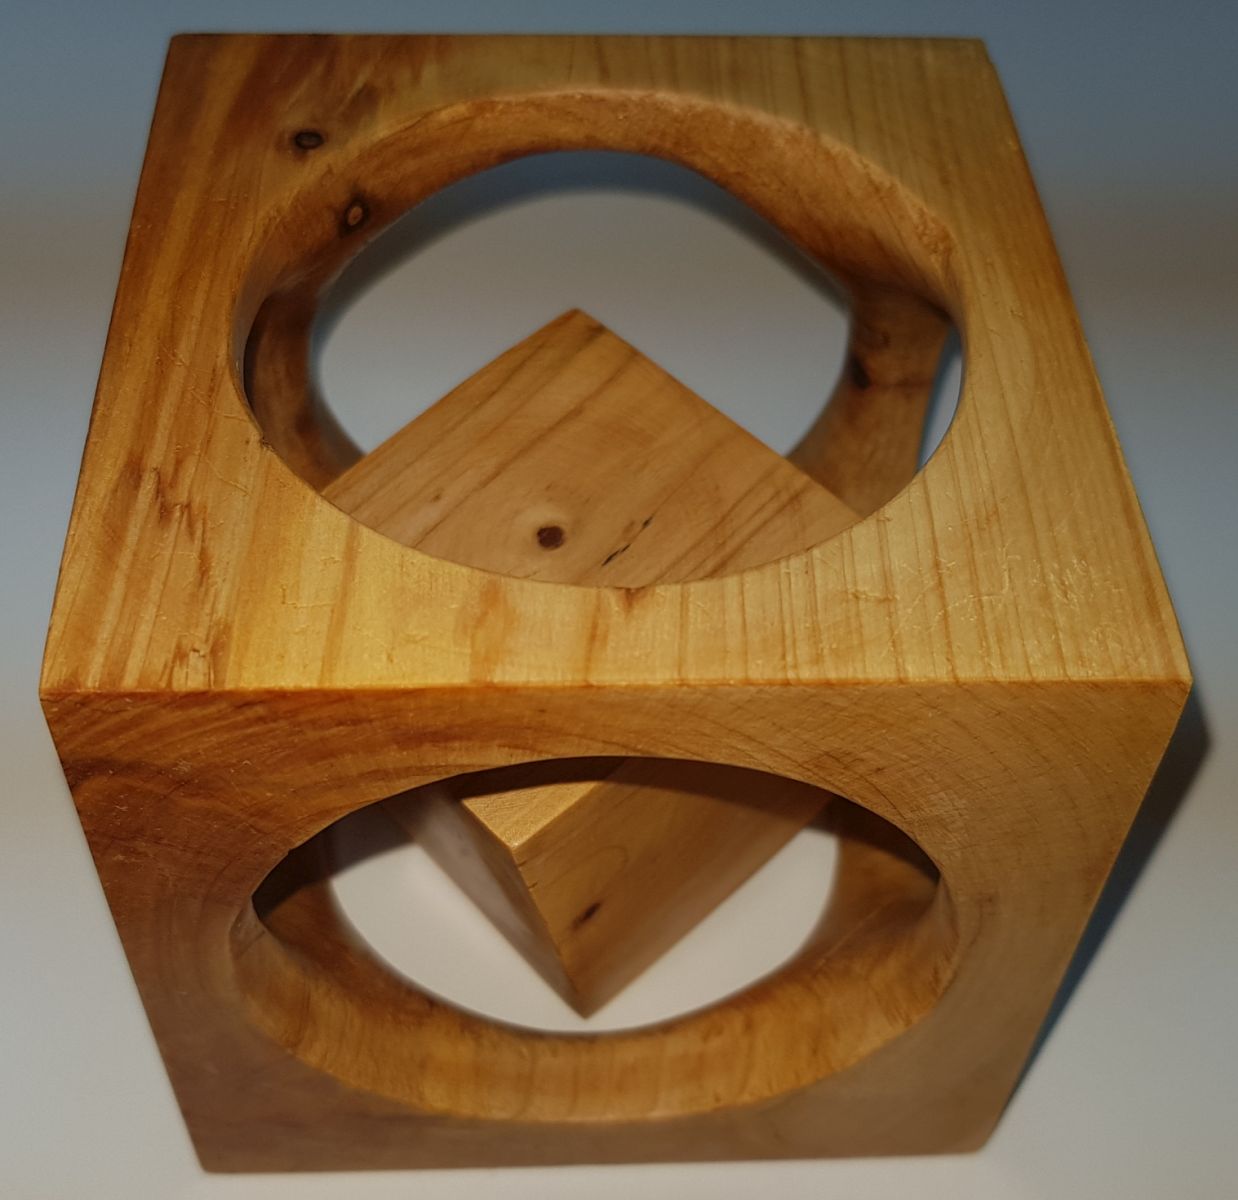
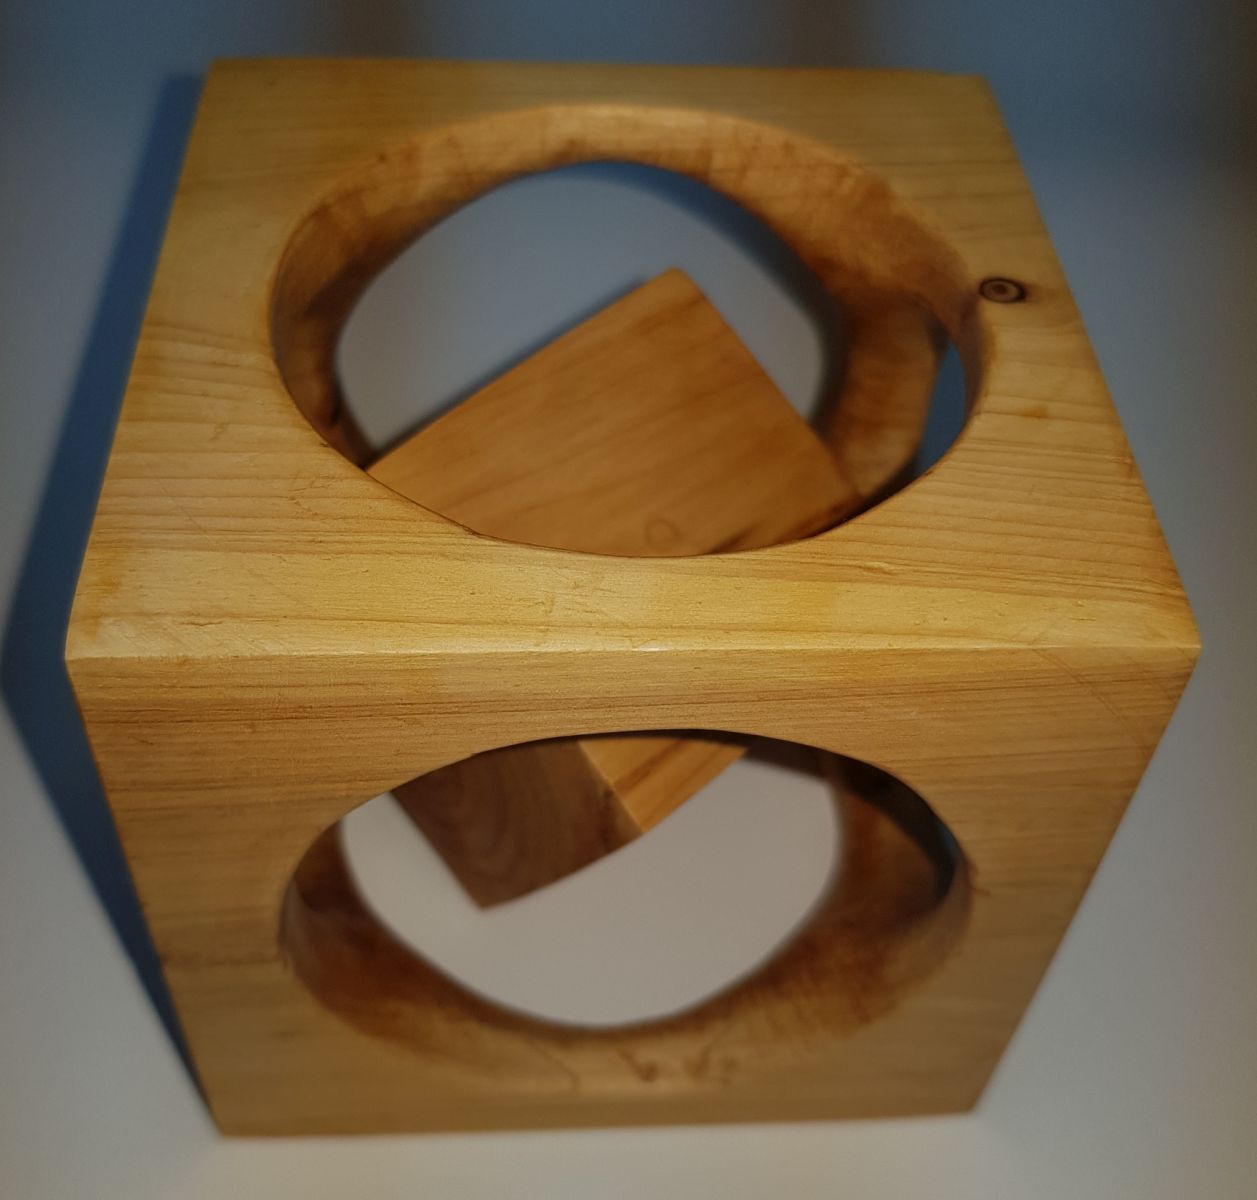
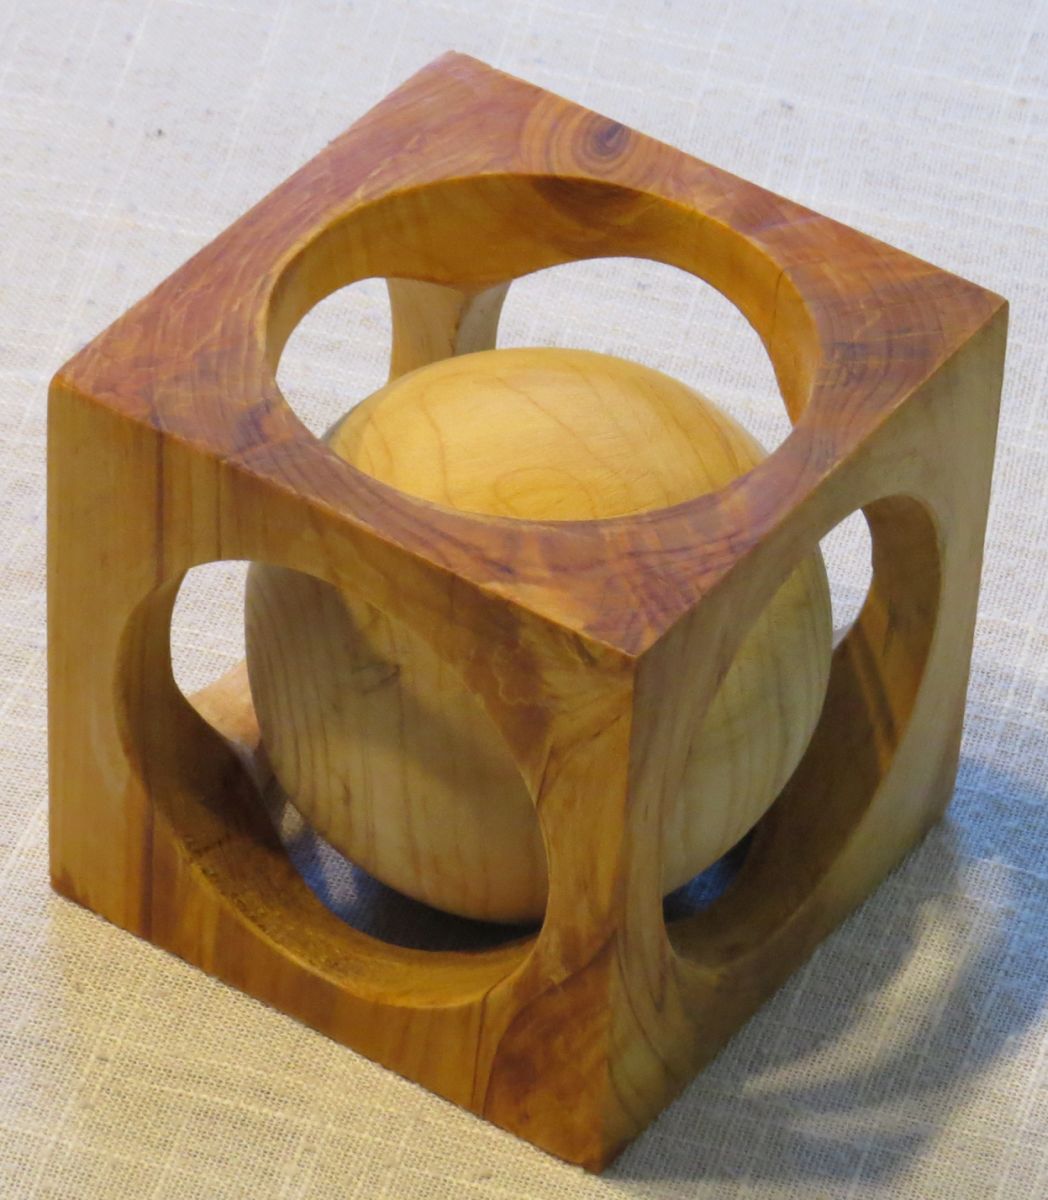
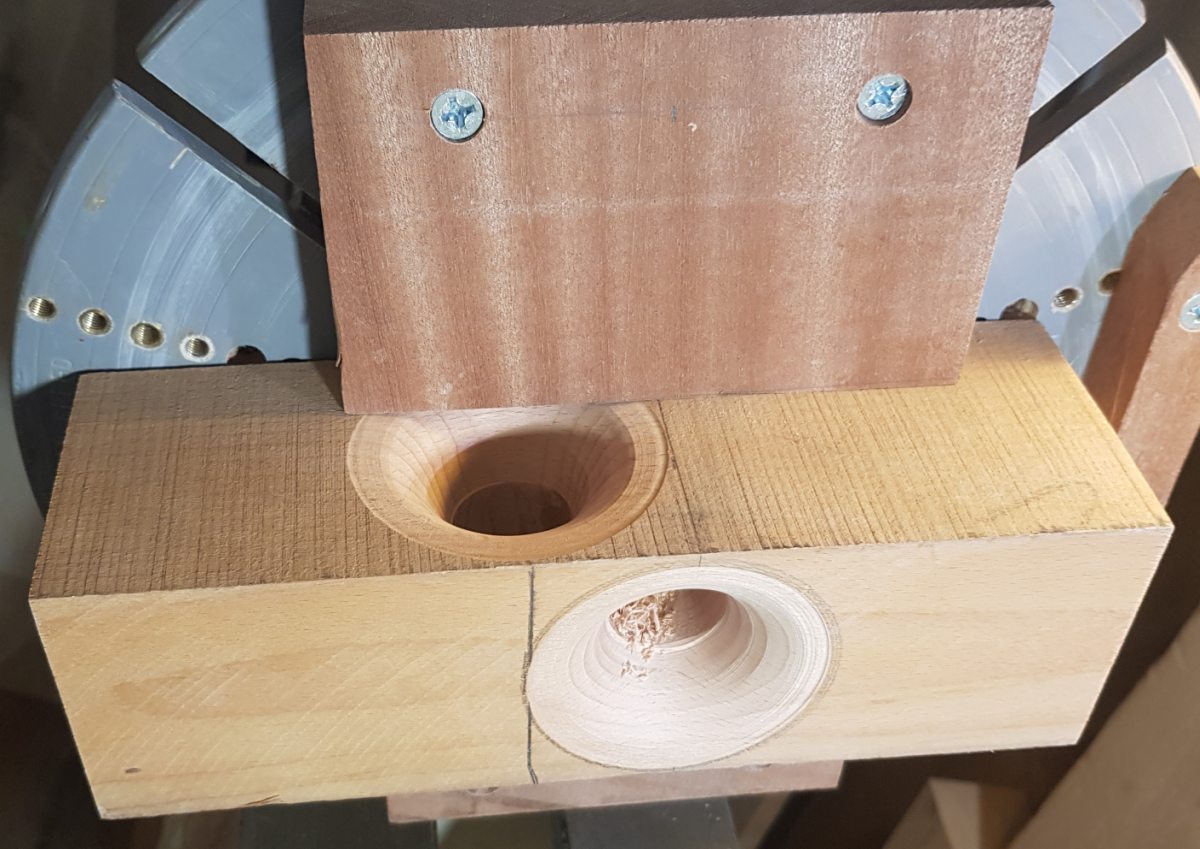
Auxiliary Staff II

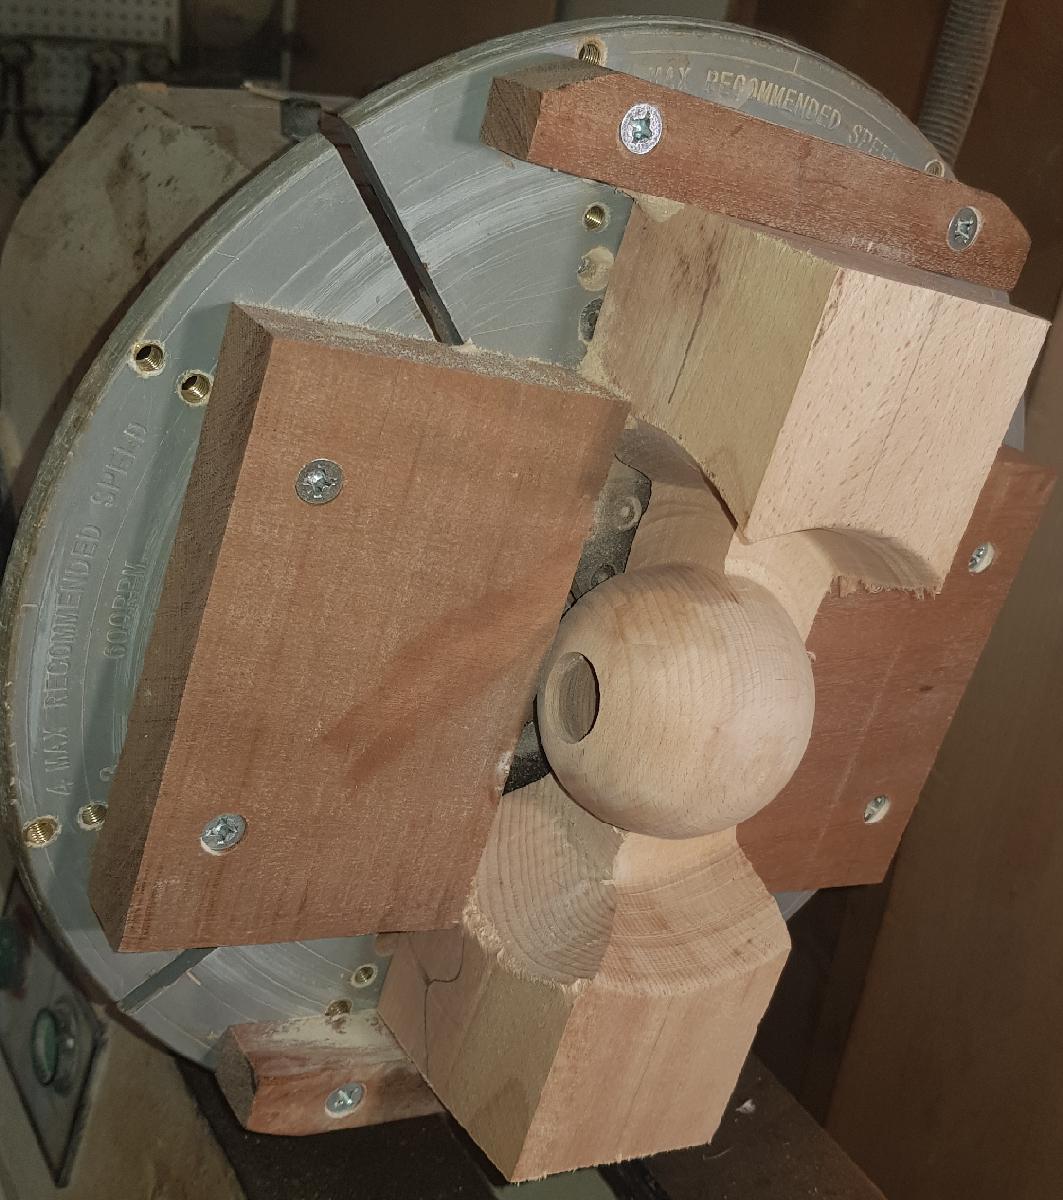

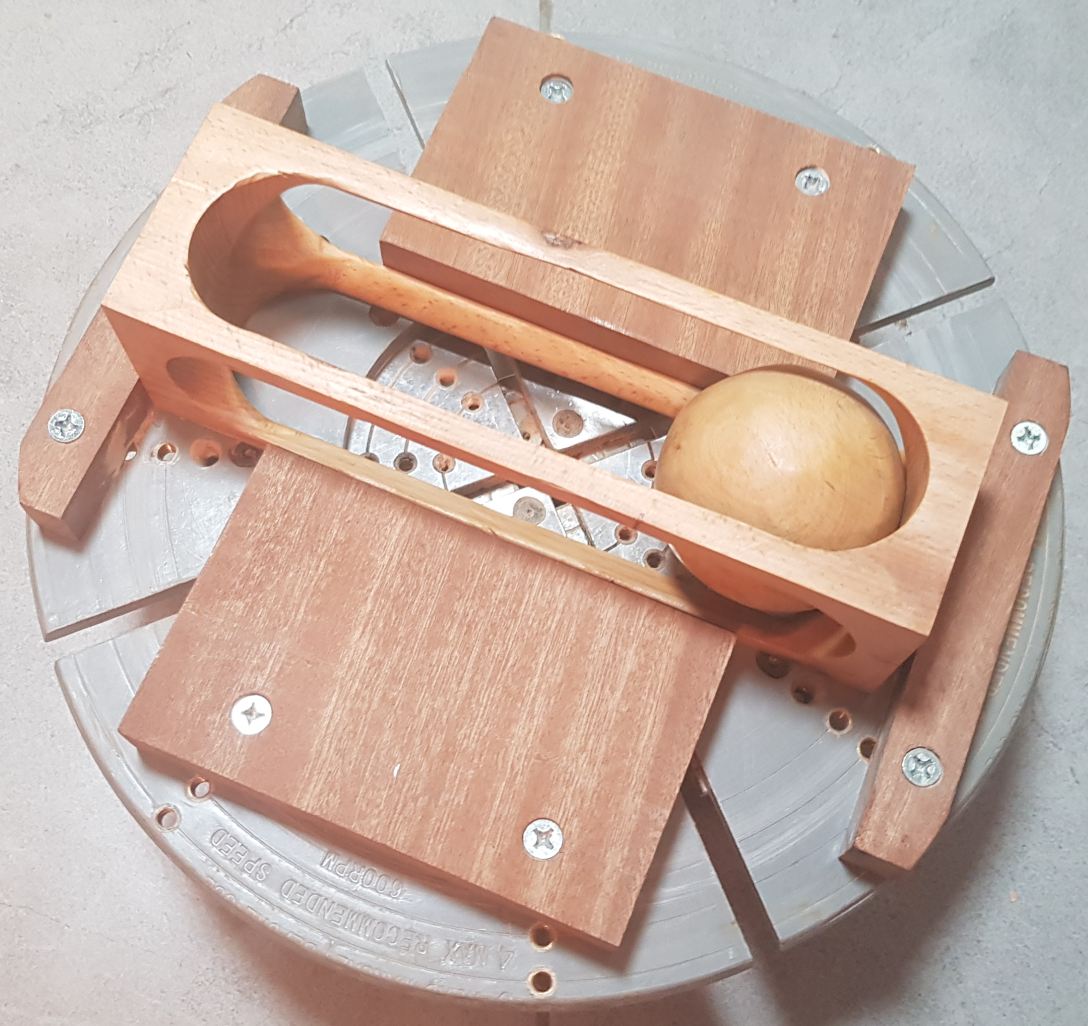
 Some interesting turning challenge (a sphere partially out of a box).
The different steps of the process are shown left to right,
where the last shown step was sawing the leftovers on a table
saw. Beech wood.
Some interesting turning challenge (a sphere partially out of a box).
The different steps of the process are shown left to right,
where the last shown step was sawing the leftovers on a table
saw. Beech wood.
Auxiliary Staff III

 Another interesting turning challenge (by Yaacov Strichman, that
required turning from three axis).
The different steps of the process are shown on the two left images,
whereas the right image shows the final result. Beech wood.
Another interesting turning challenge (by Yaacov Strichman, that
required turning from three axis).
The different steps of the process are shown on the two left images,
whereas the right image shows the final result. Beech wood.
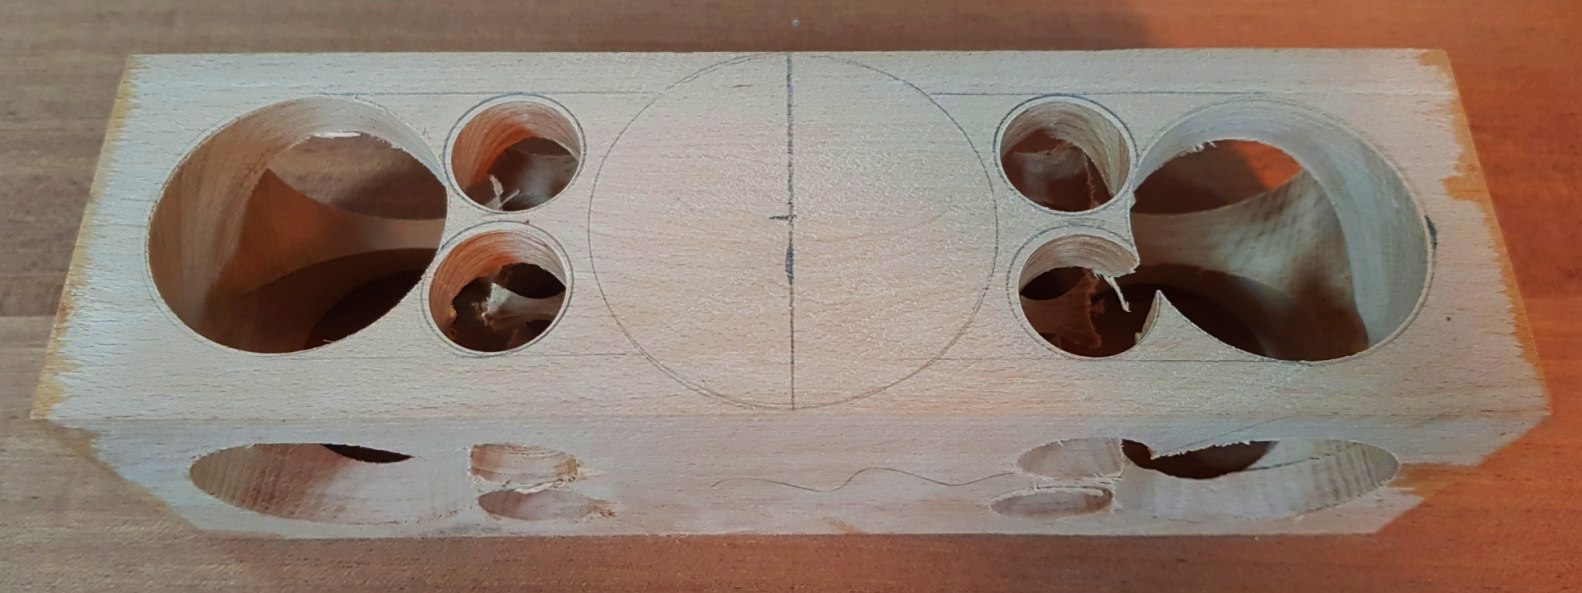
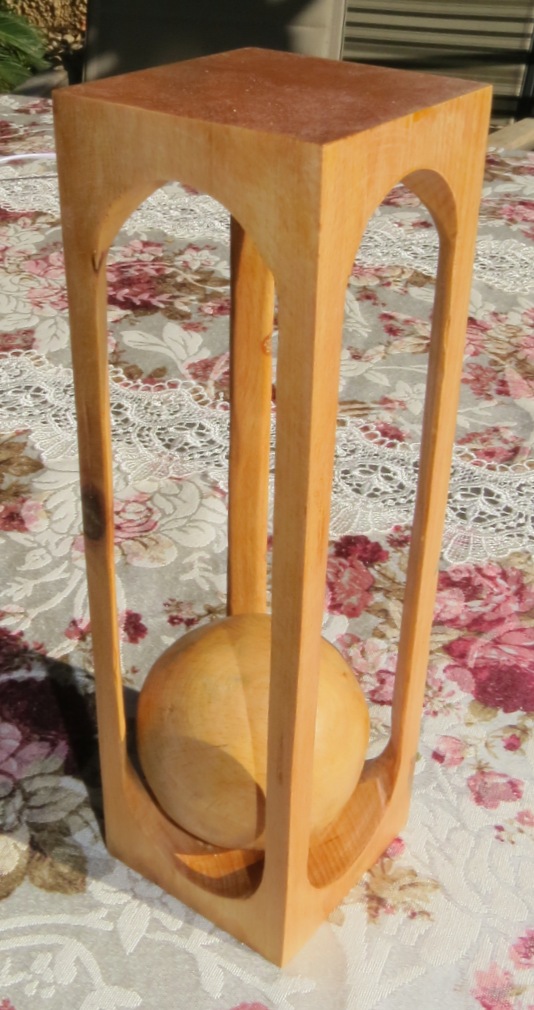
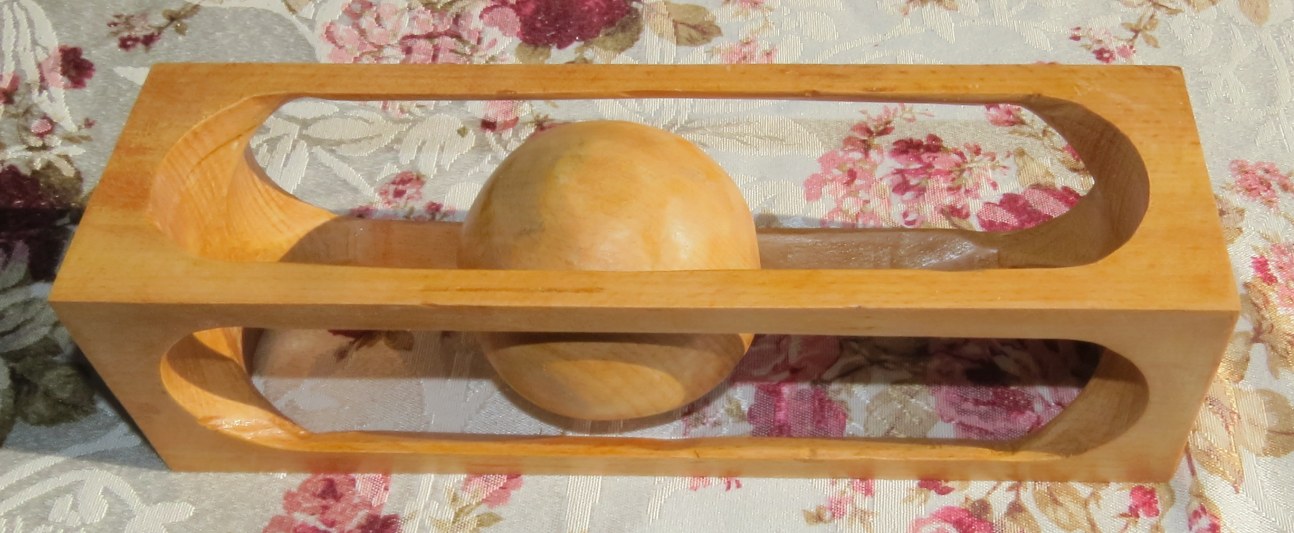
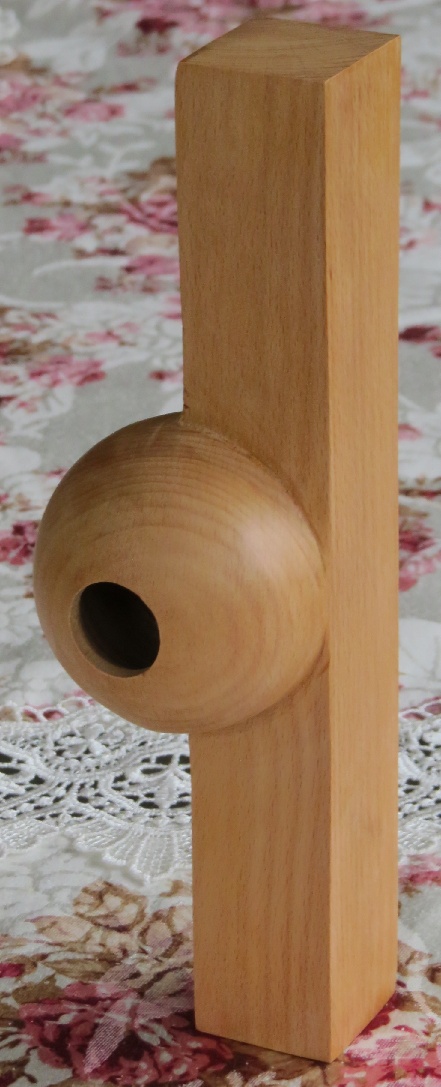
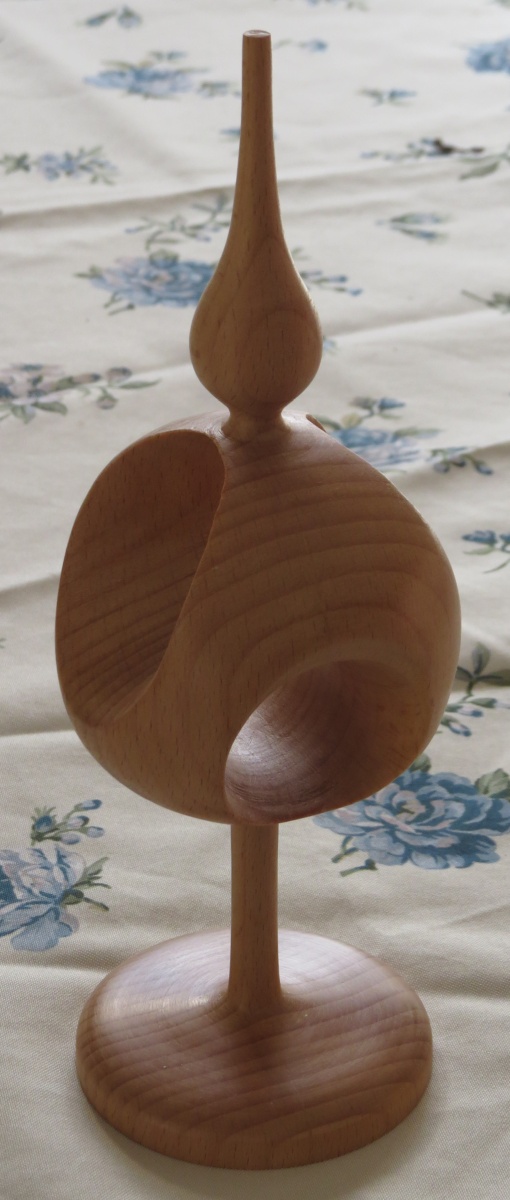
Auxiliary Staff IV
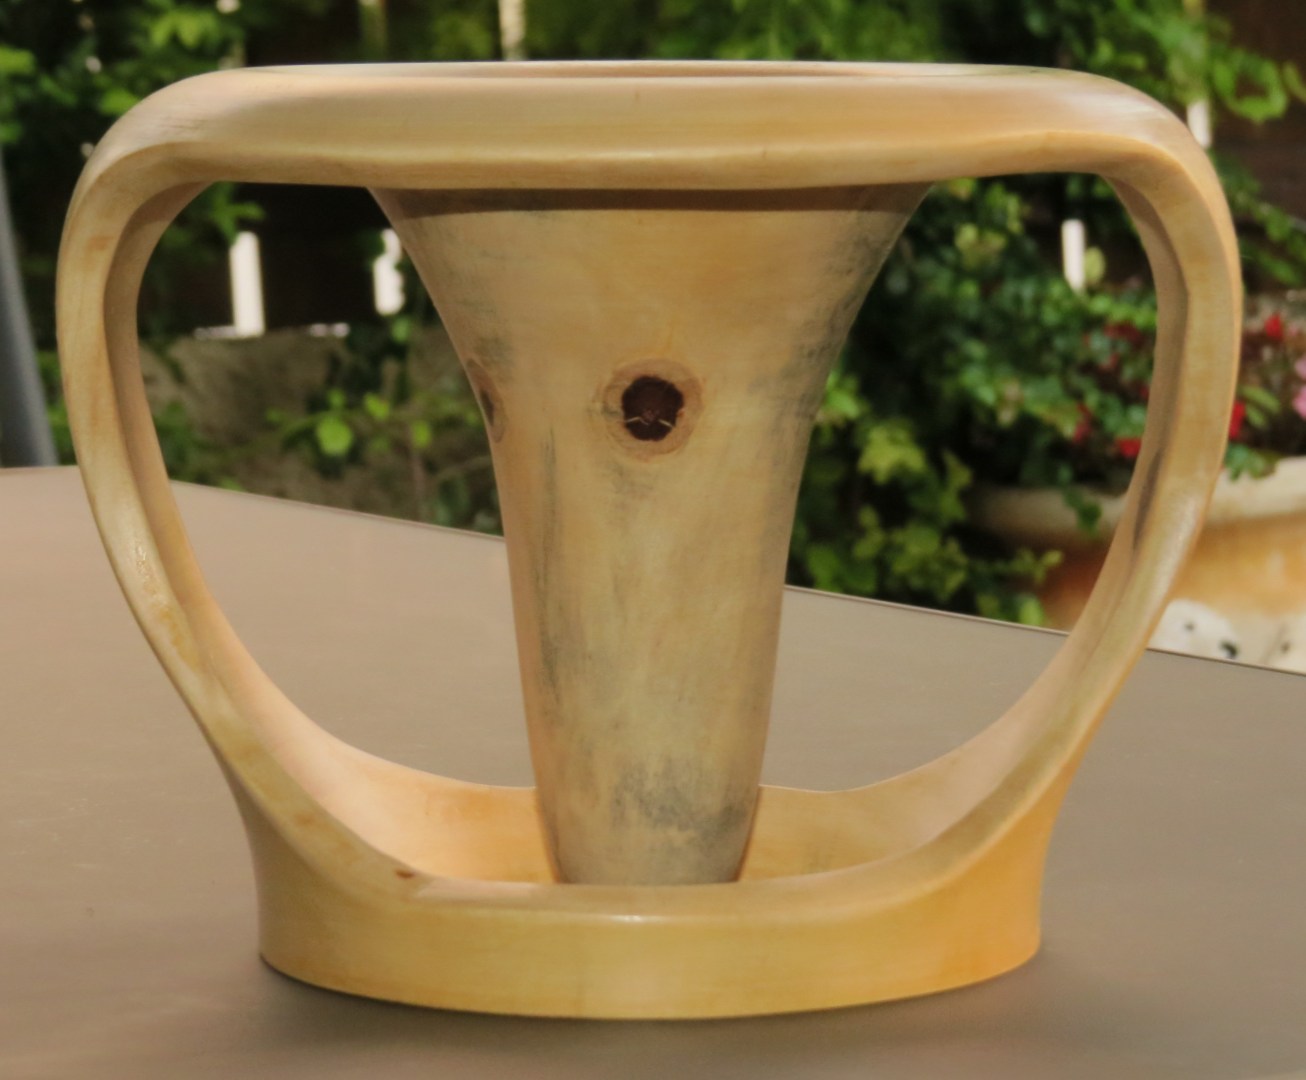
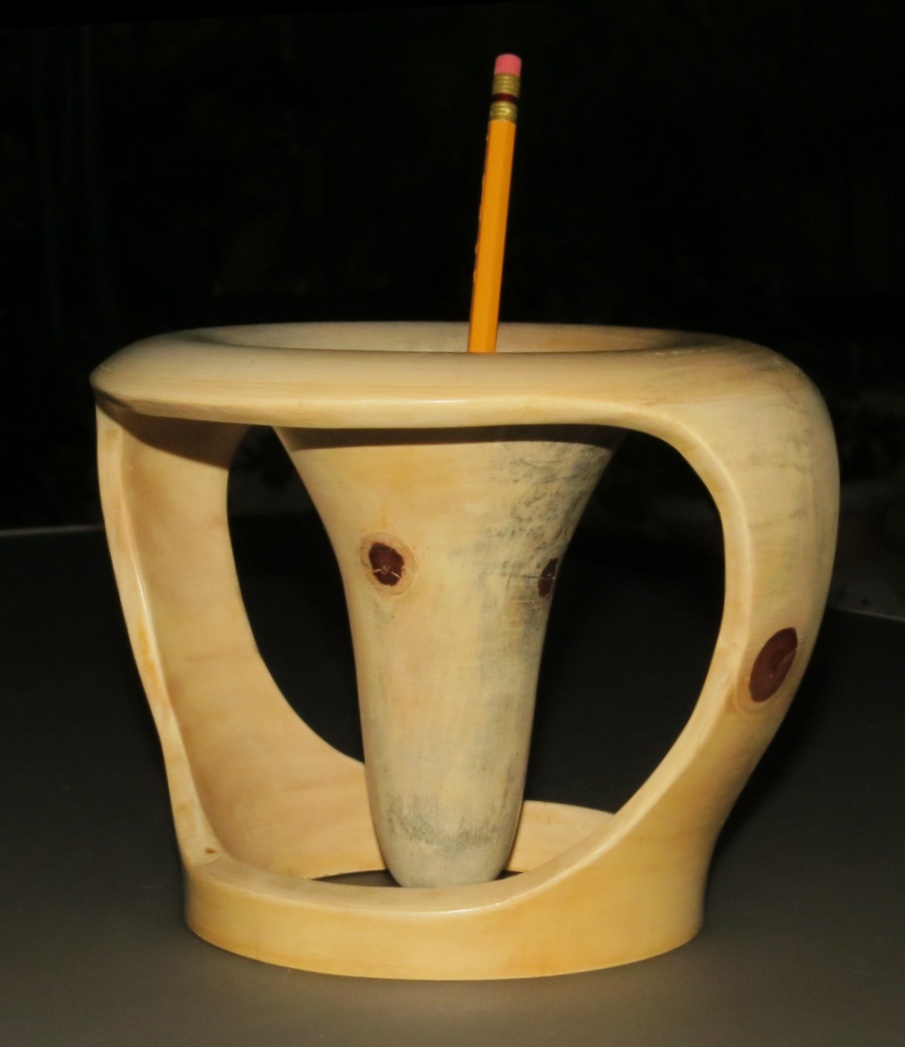 Some interesting geometry (a Pencil holder!?) I saw in a 2019
(I think) AAW magazine by Mark Jundanian, and had to try
it. Araucaria wood.
Some interesting geometry (a Pencil holder!?) I saw in a 2019
(I think) AAW magazine by Mark Jundanian, and had to try
it. Araucaria wood.

 Another Pencil holder... Unknown wood.
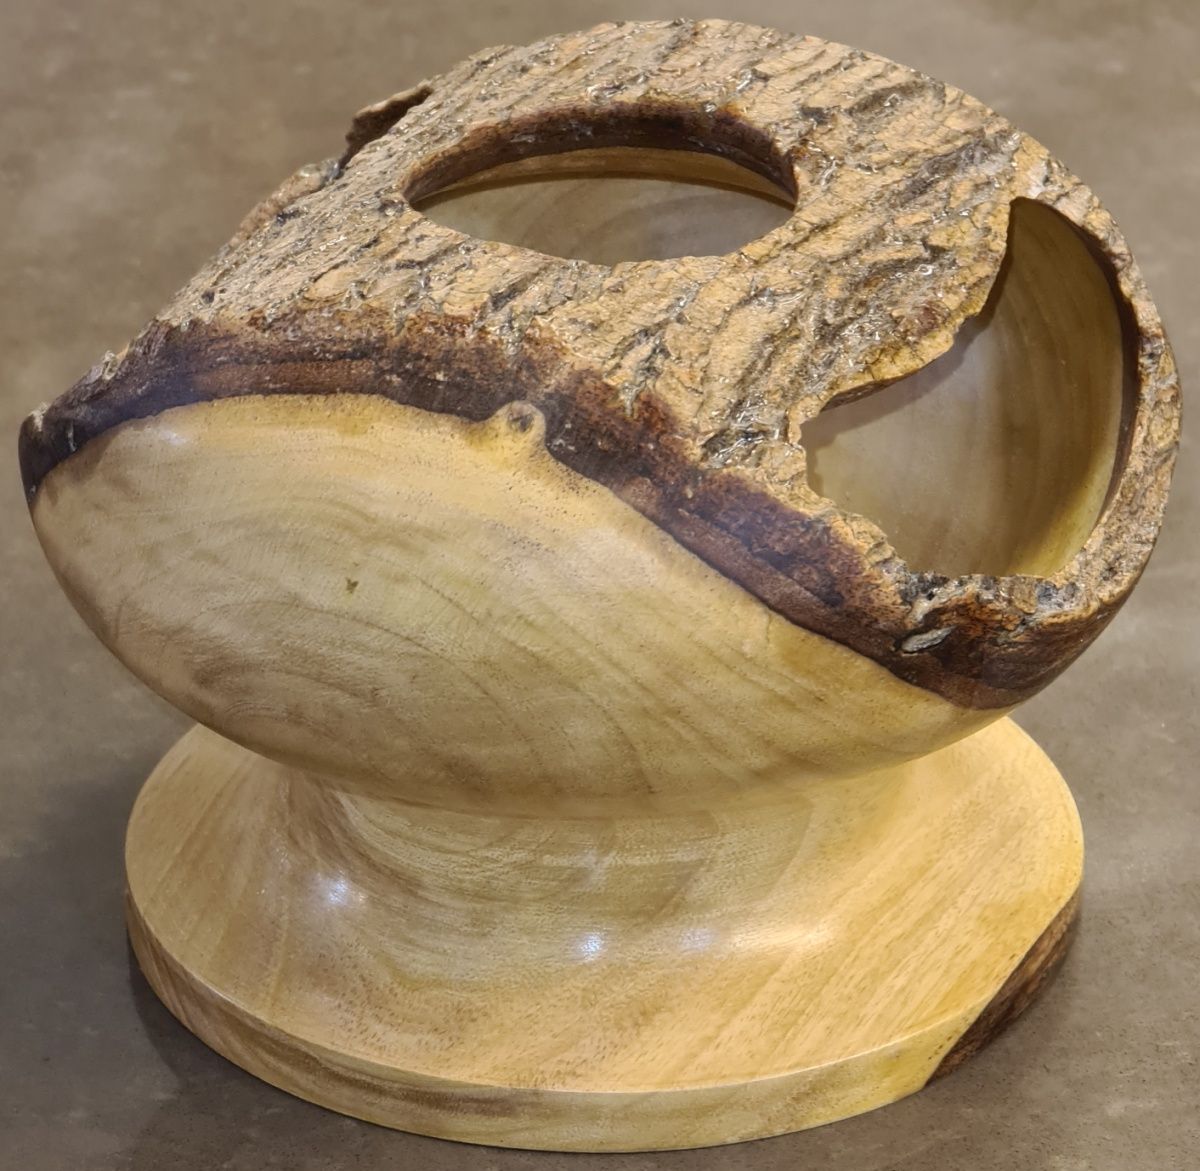
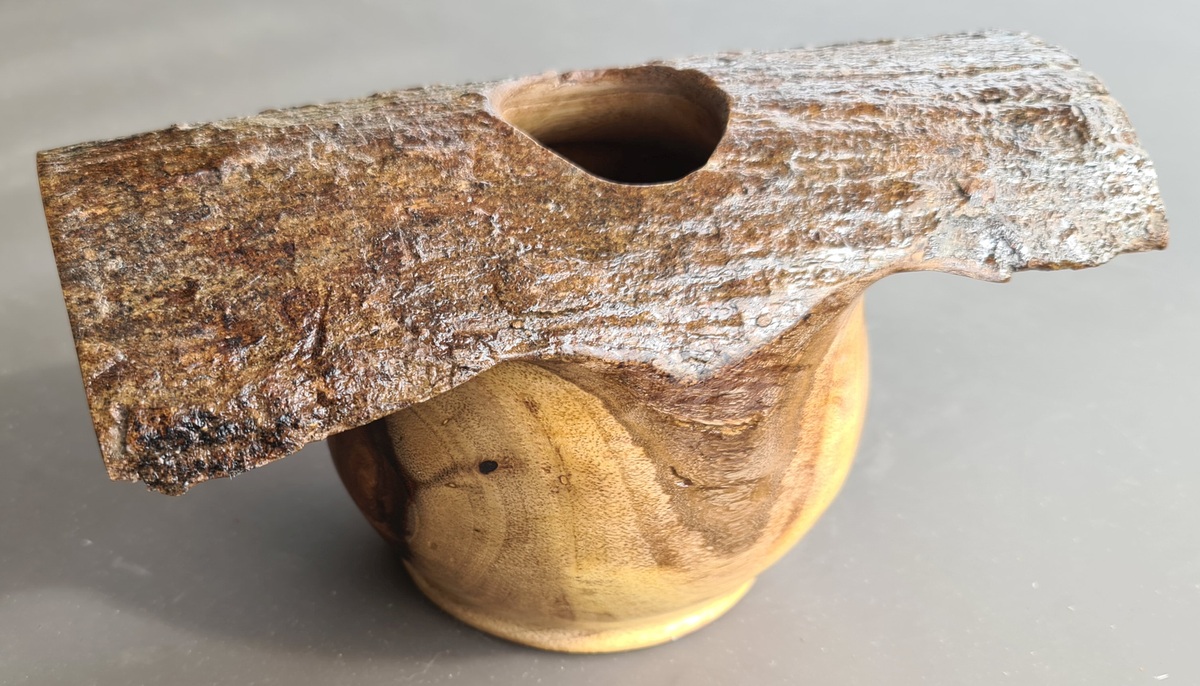
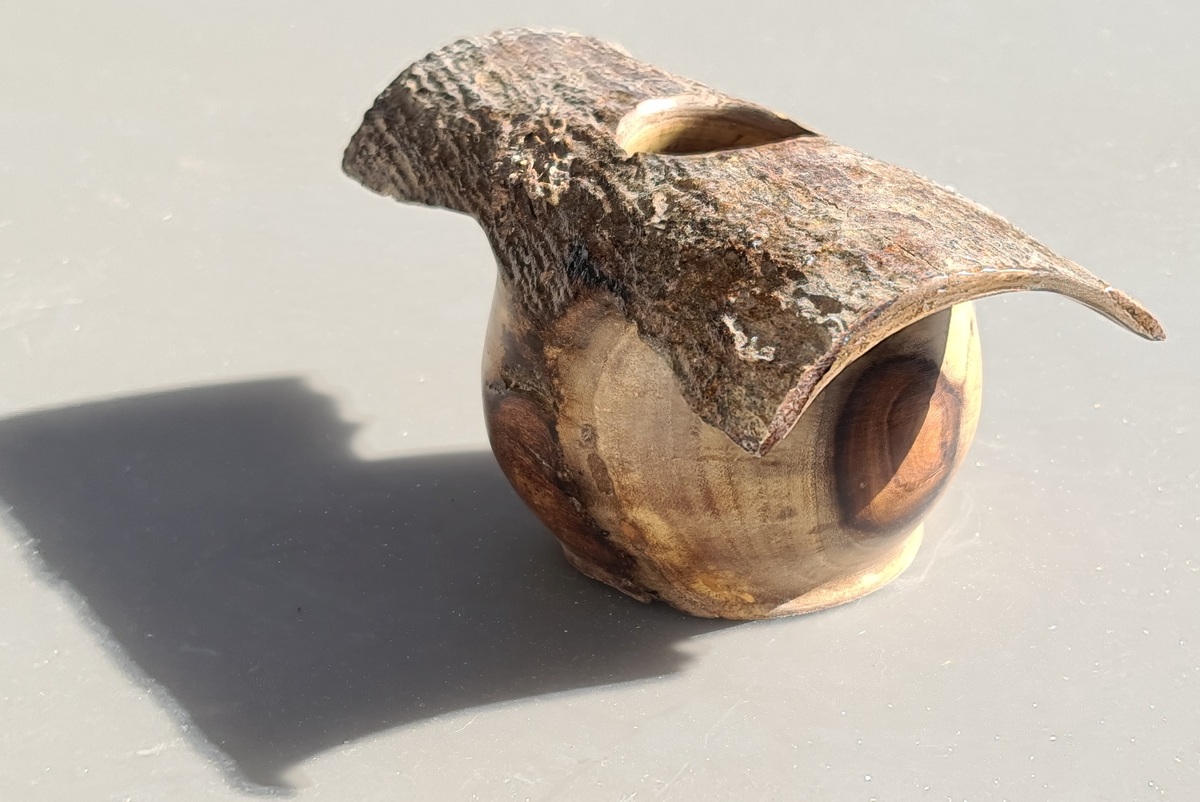
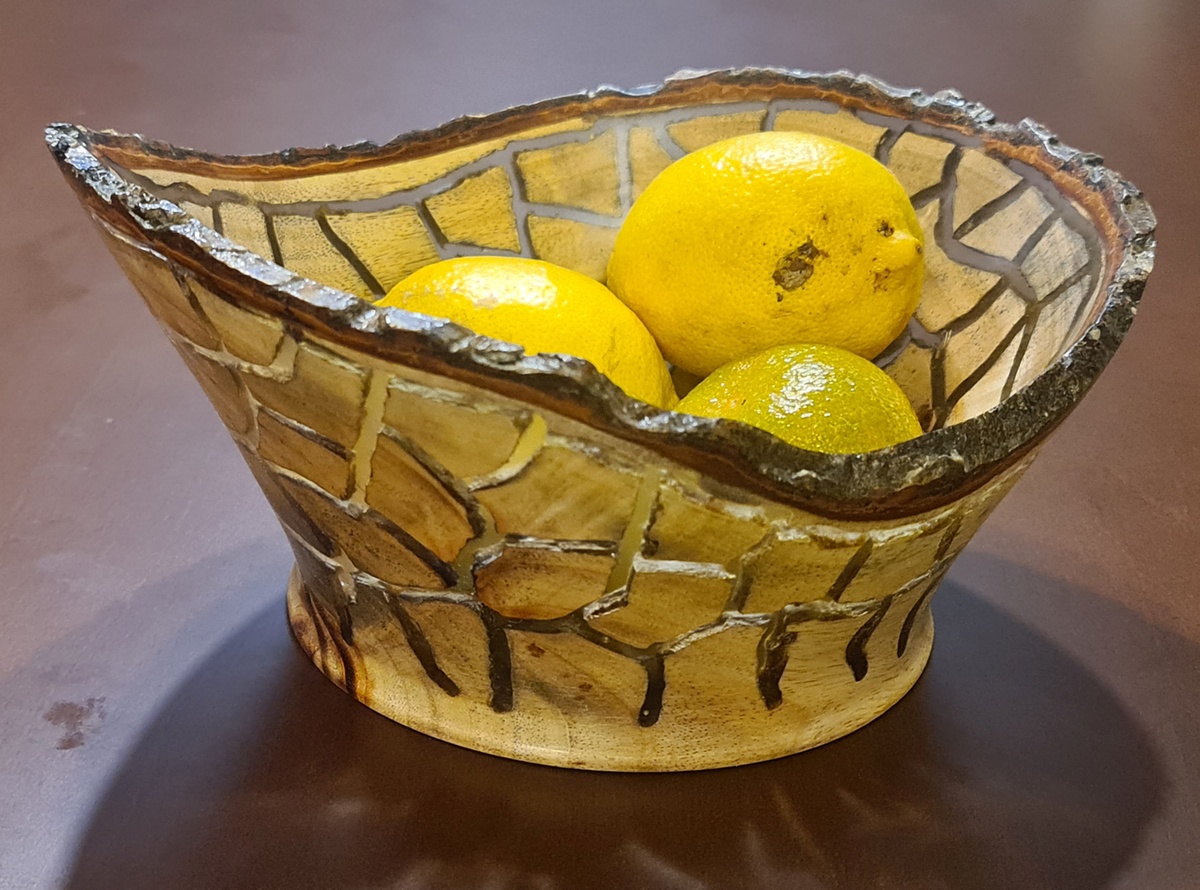
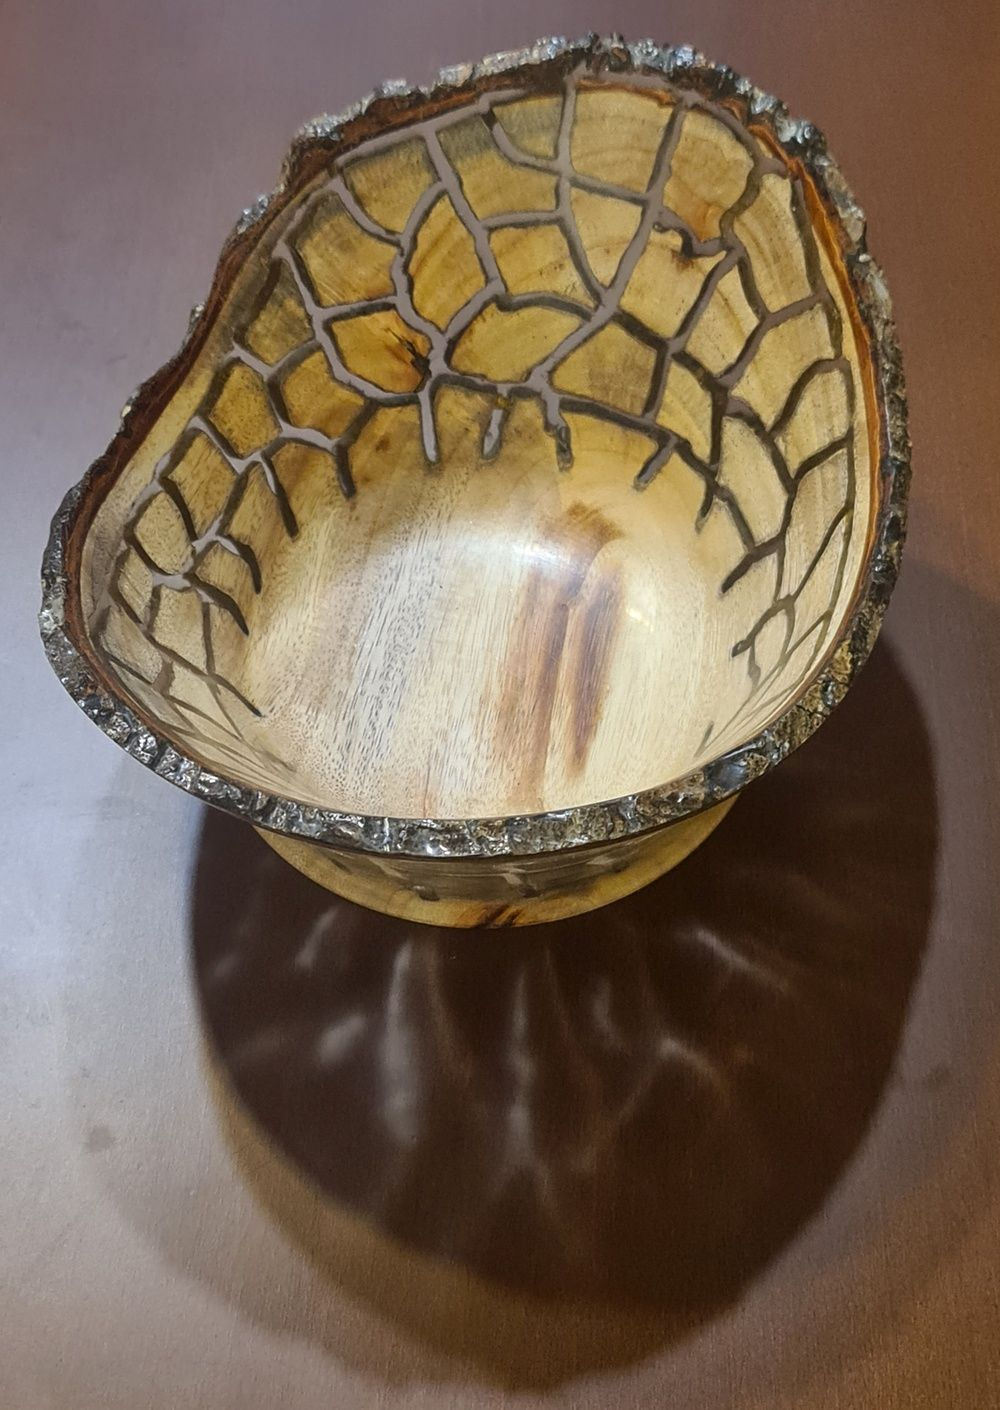
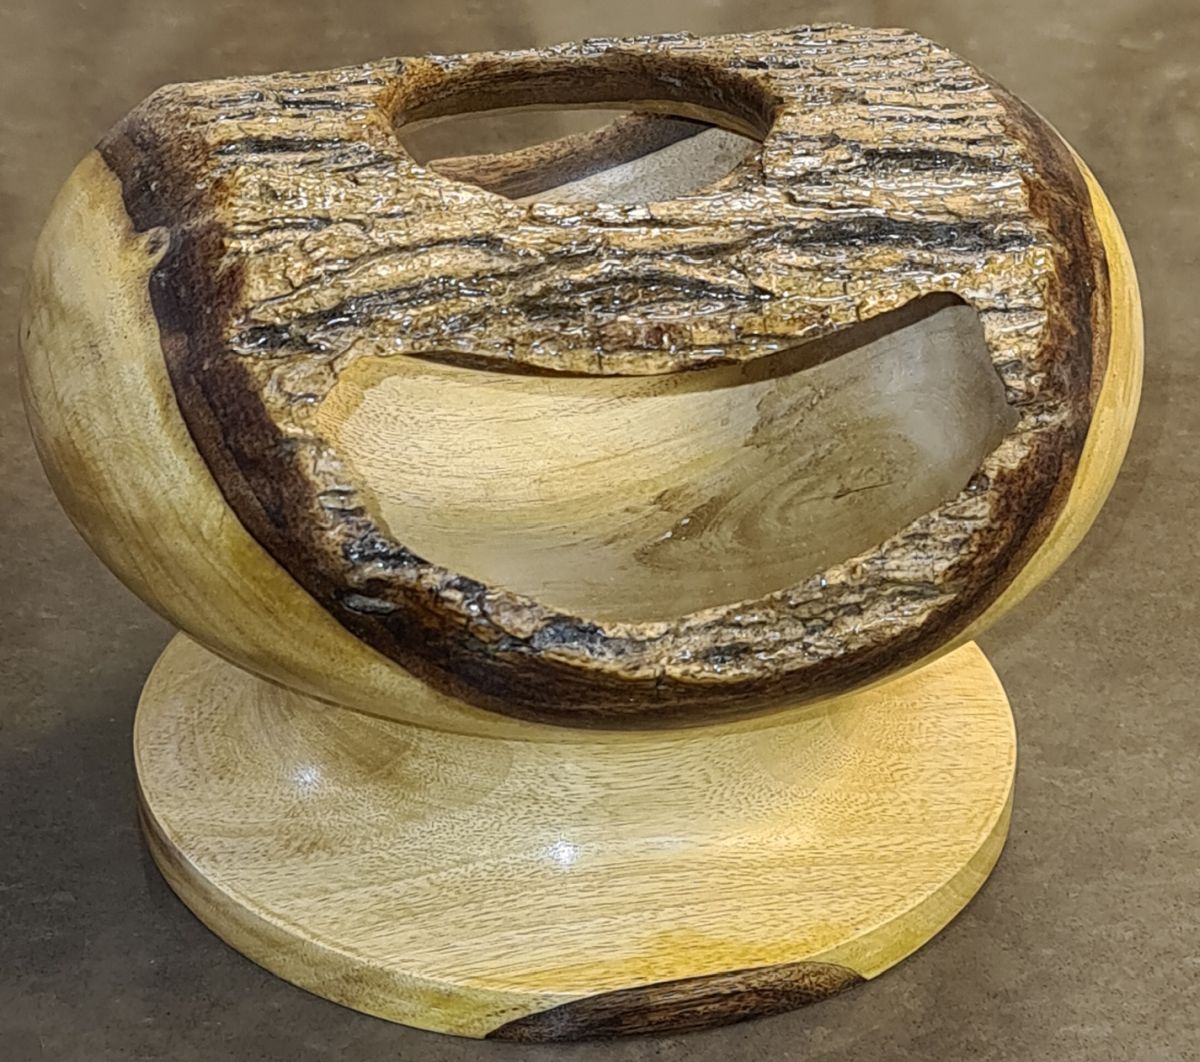 Another interesting geometry, made by turning off-center the
given tree trunk, making the holes, including in the bark,
shaped in a unique form. Unknown wood.
Another interesting geometry, made by turning off-center the
given tree trunk, making the holes, including in the bark,
shaped in a unique form. Unknown wood.
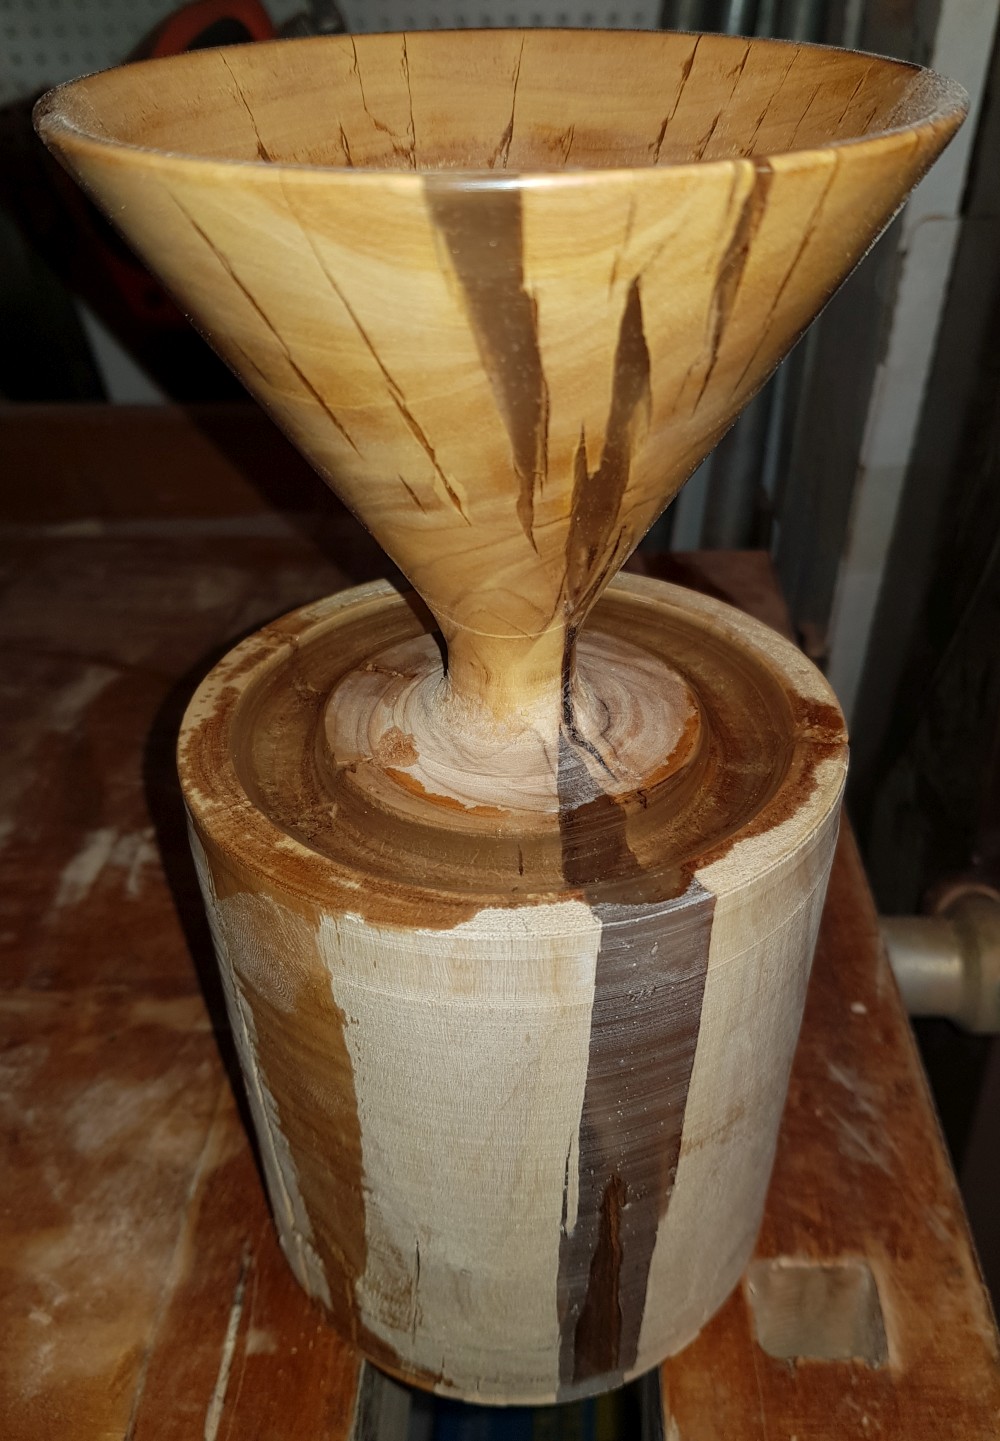
Auxiliary Staff V


 A red-wine glass above a martini-glass as one piece. Cracks
in the tree were first seals using transparent epoxy. Olive
tree. Left shows the piece during the making.
A red-wine glass above a martini-glass as one piece. Cracks
in the tree were first seals using transparent epoxy. Olive
tree. Left shows the piece during the making.


 A Champagne glass above a red-wine glass that is above a
martini-glass as one piece. Unknown wood. Left shows the
piece during the making.
A Champagne glass above a red-wine glass that is above a
martini-glass as one piece. Unknown wood. Left shows the
piece during the making.


 A very interesting challenge I saw in the original work of Radek
Teterycz. Was not successful in the first attempt. And
yes, the rubber bands are necessary as in the first attempt,
the small glass simply flew out when turning the larger glass,
due to the centrifugal forces... The different turning steps
are shown left to right, with two orthogonal turning
directions. Some carving was also necessary. Red heart wood.
A very interesting challenge I saw in the original work of Radek
Teterycz. Was not successful in the first attempt. And
yes, the rubber bands are necessary as in the first attempt,
the small glass simply flew out when turning the larger glass,
due to the centrifugal forces... The different turning steps
are shown left to right, with two orthogonal turning
directions. Some carving was also necessary. Red heart wood.


 The final result.